
There’s something truly magical about pizza cooked in a wood-fired oven. The intense heat creates a perfectly crispy crust with a slight char and a chewy center that’s hard to replicate in a regular oven. This traditional method brings out rich smoky flavors that elevate every topping and cheese blend.
We love how wood oven pizza combines simplicity and artistry. With just a few quality ingredients and a bit of patience, you can create an authentic pizzeria experience right at home. Whether you’re a seasoned pizza lover or just starting out, mastering this recipe will impress your family and friends every time.
Ingredients
To achieve that perfect wood oven pizza with a crispy crust and vibrant flavors, using the right ingredients is essential. Here is everything we need to craft an authentic pizza from scratch.
Dough Ingredients
Our wood oven pizza starts with a simple yet effective dough that can withstand the intense heat while delivering the perfect texture.
- 4 cups all-purpose flour (preferably unbleached)
- 1 ½ cups warm water (100°F to 110°F)
- 2 ¼ teaspoons active dry yeast (one packet)
- 2 tablespoons extra virgin olive oil
- 1 teaspoon salt
- 1 teaspoon sugar
Sauce Ingredients
The sauce brings depth and brightness to our pizza. We keep it fresh and bold to complement the high-heat cooking.
- 1 can (14 oz) whole peeled San Marzano tomatoes
- 2 cloves garlic, finely minced
- 1 tablespoon extra virgin olive oil
- 1 teaspoon dried oregano
- Salt to taste
- Freshly ground black pepper to taste
- Handful of fresh basil leaves (optional)
Toppings and Cheese
Choosing the right toppings and cheese adds layers of flavor without overpowering the natural taste achieved in a wood oven pizza.
| Ingredient | Quantity | Notes |
|---|---|---|
| Fresh mozzarella cheese | 8 oz | Sliced or torn into pieces |
| Pepperoni | ½ cup | Optional, thinly sliced |
| Fresh mushrooms | ½ cup | Sliced |
| Red onion | ¼ cup | Thinly sliced |
| Fresh basil leaves | Handful | Added after baking |
| Extra virgin olive oil | For drizzling | Enhances flavor and finish |
Using quality ingredients ensures our pizza reflects the traditional flavors and textures that set wood oven-cooked pizzas apart. Each component supports the intense heat and rapid cooking time of the wood oven, creating an irresistible balance of crunch, chewiness, and fresh taste.
Equipment Needed
To master the art of making wood oven pizza, having the right equipment is crucial. This ensures we replicate the authentic textures and flavors unique to this cooking method.
Wood-Fired Oven
A wood-fired oven is the heart of our pizza-making process. It reaches intense temperatures between 700°F to 900°F (370°C to 480°C), creating the signature crispy crust and smoky aroma that define wood oven pizza. When choosing a wood-fired oven, consider:
| Feature | Importance |
|---|---|
| Temperature Range | Must reach at least 700°F |
| Size | Large enough to fit your pizza size |
| Heat Retention | Retains heat evenly for consistent cooking |
| Fuel Type | Use dry hardwoods like oak or maple for best flavor |
We ignite the fire well in advance, allowing the oven floor to heat thoroughly—this ensures an evenly cooked base with that characteristic char and chew.
Pizza Peel and Stone
Using a pizza peel is essential for safely transferring pizza to and from the hot oven. We recommend a wooden peel for assembling and a metal peel for sliding pizzas in and out quickly.
The pizza stone serves as a durable, heat-retentive surface replicating the oven floor if you’re using a more conventional oven. It helps achieve a crisp bottom crust by absorbing moisture.
| Tool | Purpose |
|---|---|
| Wooden Peel | Assemble and slide pizza into oven |
| Metal Peel | Efficient removal from high heat |
| Pizza Stone | Retains heat and crisps the crust |
Other Essential Tools
Besides the oven and peels, several other tools enhance our wood oven pizza experience:
- Infrared Thermometer: Checks the oven floor temperature accurately before baking.
- Pizza Cutter or Rocker Blade: For cleanly slicing our pizzas into perfect portions.
- Dough Scraper: Helps handle and portion dough efficiently.
- Heat-Resistant Gloves: Protect hands while working close to the blazing oven.
- Wooden Brush or Broom: Clears ashes and debris from the oven surface before baking.
Each tool plays a vital role in creating a seamless pizza-making process and achieving that perfect rustic finish.
Dough Preparation
Mastering the dough preparation is the foundation of an authentic wood oven pizza. We focus on combining the right ingredients with precise techniques to create a perfect balance of elasticity and flavor.
Mixing the Dough
Start by gathering our ingredients:
- 4 cups all-purpose flour
- 1 ½ cups warm water (105°F to 110°F)
- 2 ¼ tsp active dry yeast (1 packet)
- 2 tbsp olive oil
- 2 tsp salt
- 1 tsp sugar
Steps:
- In a small bowl, dissolve the active dry yeast and sugar in warm water. Let it sit for 5-10 minutes until it becomes frothy. This indicates the yeast is active and ready.
- In a large mixing bowl, combine flour and salt. Create a well in the center.
- Pour the yeast mixture and olive oil into the well.
- Use a wooden spoon or your hands to gradually mix the flour into the liquids until a rough dough forms.
“Activating the yeast properly is critical for a light and airy crust that is characteristic of wood oven pizzas.”
Kneading and Resting
Now that the dough is roughly mixed, we move on to kneading.
- Transfer the dough to a clean, lightly floured surface.
- Knead by pressing the dough with the heels of our hands, folding it, and turning it. Repeat this process for 8-10 minutes until the dough becomes smooth, elastic, and slightly tacky but not sticky.
- Shape the dough into a ball.
- Place it in a lightly oiled bowl and cover it with a damp cloth or plastic wrap.
Kneading tips:
| Step | Action | Duration | Purpose |
|---|---|---|---|
| Initial Pressing | Heel of hands pressing | 8-10 minutes | Develop gluten structure |
| Folding & Turning | Stretch and fold dough | Continuous | Increase elasticity |
- Let the dough rest for 10 minutes before the first proofing. Resting relaxes gluten and makes stretching easier.
First Proofing
Proofing allows the dough to ferment and rise, contributing to flavor and texture.
- After resting, cover the bowl tightly with plastic wrap or a damp cloth for a warm environment.
- Place the bowl in a draft-free area, ideally around 75°F – 80°F.
- Let the dough proof for 1 to 1 ½ hours or until it doubles in size.
“The dough should be airy and soft to the touch, showing visible bubbles—this signals a well-fermented base ready for shaping.”
- Once proofed, punch down the dough gently to release excess gas.
- Divide into portions depending on desired pizza size and prepare for shaping.
| Proofing Conditions | Temperature Range | Time Duration | Expected Outcome |
|---|---|---|---|
| Ideal Temperature | 75°F – 80°F | 1 to 1 ½ hours | Dough doubles in size |
| Dough Texture | Soft and airy | – | Visible bubbles, light gluten |
With these precise dough preparation steps we ensure a crust that crisps quickly in the wood oven while remaining tender and flavorful inside.
Sauce Preparation
The sauce is the heart of our wood oven pizza, providing a fresh, tangy base that complements the crispy crust and rich toppings. Let’s craft a simple yet flavorful tomato sauce that perfectly balances acidity and herbs for an authentic taste.
Making the Tomato Sauce
We start with high-quality San Marzano tomatoes because their natural sweetness and low acidity create an ideal sauce foundation.
- Crush 1 can (28 oz) of whole peeled San Marzano tomatoes by hand or with a food mill for a rustic texture.
- Mince 2 cloves of fresh garlic finely to release a robust aroma.
- Heat 2 tablespoons of extra virgin olive oil in a saucepan over medium heat until shimmering.
- Add the minced garlic and gently sauté for 30 seconds — avoid browning to prevent bitterness.
- Pour in the crushed tomatoes and gently stir.
- Let the sauce simmer on low heat for 15 minutes to thicken slightly and concentrate flavors. Stir occasionally.
- Add 1 teaspoon of dried oregano and stir it in.
- Season with 1 teaspoon salt and ½ teaspoon freshly ground black pepper.
- Remove from heat and gently fold in a handful of fresh basil leaves (optional) for a bright herbal finish.
Our sauce should be vibrant, slightly chunky, and bursting with fresh tomato flavor—perfect for spreading onto our pizza dough.
Seasoning Tips
Balancing the sauce seasoning is crucial. Here’s our guide to creating a harmonious flavor profile:
| Ingredient | Purpose | Recommended Amount |
|---|---|---|
| Salt | Enhances tomato sweetness and depth | 1 tsp (adjust to taste) |
| Black Pepper | Adds gentle heat and complexity | ½ tsp |
| Dried Oregano | Traditional herb for earthiness | 1 tsp |
| Fresh Basil | Adds freshness and fragrance | A handful (optional) |
| Olive Oil | Adds richness and smooth mouthfeel | 2 tbsp |
| Garlic | Provides pungent zest | 2 cloves (minced) |
Pro Tip: Taste the sauce after simmering and adjust salt or herbs before using it on the pizza dough. The sauce should be slightly tangy with a delicate herbaceous balance, complementing but never overpowering the crust and toppings.
By mastering this Sauce Preparation step, we layer in the essential flavors that will make our wood oven pizza truly unforgettable.
Pizza Assembly
As we move into the pizza assembly, we will shape our perfectly proofed dough, apply the rich tomato sauce, and layer fresh toppings carefully. This step transforms all prior preparations into the canvas that carries the heart of our wood oven pizza experience.
Shaping the Dough
To shape the dough for our wood oven pizza, we begin by lightly flouring our work surface. Gently press down the risen dough ball with your fingertips, gradually stretching it outward from the center. Resist using a rolling pin, as this can deflate the air pockets we developed during proofing. Instead, use your hands to maintain the dough’s airy texture and elasticity. Rotate the dough frequently as you stretch it to achieve an even 12-inch circle with a slightly thicker edge for the crust. If the dough resists stretching, let it rest for 5 minutes and try again. This careful handling ensures a crispy yet chewy crust once baked in the high-heat wood oven.
Adding Sauce and Toppings
Once the dough is shaped, we move to layering the flavors. Start by spooning approximately 1/3 cup of the prepared San Marzano tomato sauce onto the center, spreading it gently with the back of the spoon in a circular motion. Leave about a 1-inch border free of sauce to allow the crust to brown beautifully. Next, add 6 ounces of fresh mozzarella, torn into small chunks for even melting.
Toppings should be balanced—not too heavy—to allow for quick baking and to preserve the natural flavors. A recommended combination includes:
- Thin slices of pepperoni
- Sliced mushrooms
- Thinly sliced red onions
- Fresh basil leaves added after baking
Here’s a quick overview in table format for optimal topping quantities per 12-inch pizza:
| Ingredient | Amount | Notes |
|---|---|---|
| Tomato Sauce | 1/3 cup | Spread evenly leaving border |
| Fresh Mozzarella | 6 oz | Tear into chunks |
| Pepperoni | 12-15 slices | Thinly sliced |
| Mushrooms | 1/4 cup sliced | Use fresh |
| Red Onions | 2 tbsp thin slices | Adds mild sweetness |
| Fresh Basil | 5-6 leaves | Add after baking for freshness |
Final Assembly Tips
To finalize our wood oven pizza assembly, we must ensure efficiency and precision. Dust the pizza peel generously with semolina or flour to prevent sticking during transfer. Before moving the pizza, double-check that the toppings are evenly distributed and not overloading the dough’s center to avoid sogginess.
Remember, the wood oven’s extreme heat demands a pizza that is balanced and not too heavy—this is key to achieving the signature crispy edges with a soft and flavorful crumb inside. If desired, brush the exposed crust lightly with olive oil for a golden finish.
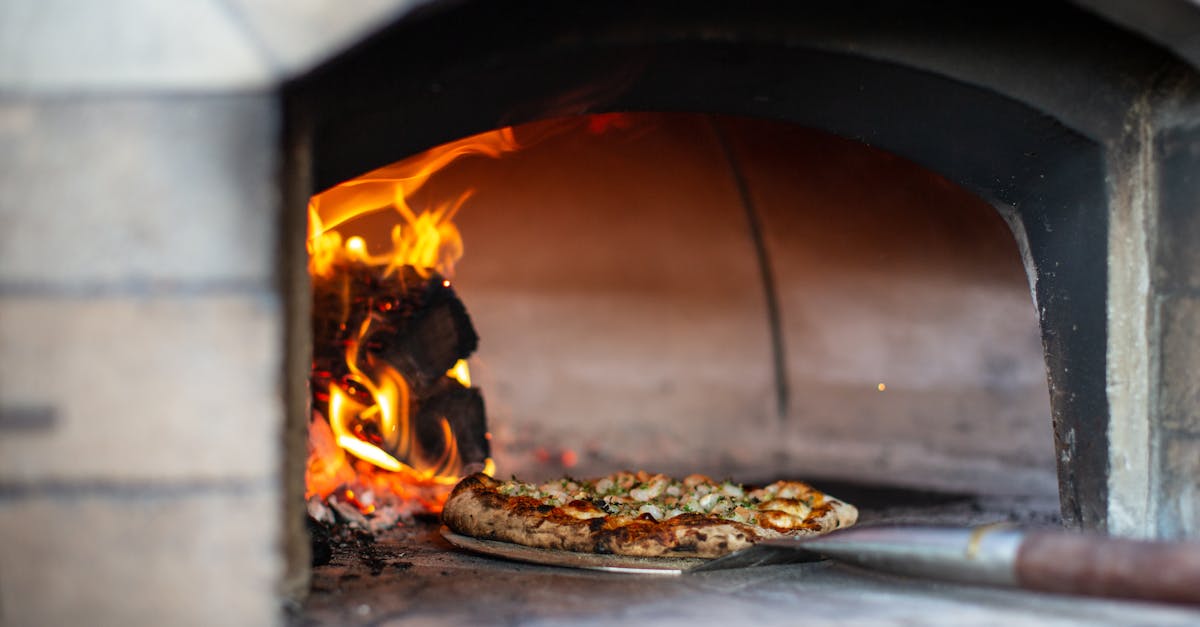
Cooking the Pizza
Cooking wood oven pizza demands precision and attention to detail. Mastering each step ensures we achieve that signature crispy crust and smoky aroma that defines this classic dish.
Preheating the Wood Oven
First, we must preheat the wood oven to its optimal temperature. For authentic results, aim for a temperature between 700°F and 900°F. This intense heat is what creates the perfect crust—crispy on the outside, tender inside.
- Start by lighting the wood fire well in advance—at least 60 minutes before cooking.
- Use dry, seasoned hardwood like oak or maple for consistent heat and subtle smokiness.
- Allow the dome and floor of the oven to absorb the heat evenly.
- We recommend checking the temperature with an infrared thermometer to ensure accuracy.
“The secret to a great wood oven pizza lies in a properly heated oven—the hotter the better within safe limits.”
Placing and Rotating the Pizza
Once the oven is heated, it’s time to slide our pizza inside with a pizza peel dusted lightly with flour or cornmeal.
- Place the pizza directly on the oven floor or stone for an ultra-crisp base.
- Position the pizza near the fire for quick cooking but not so close it burns.
- To cook evenly, rotate the pizza every 20-30 seconds. Use the pizza peel or heat-resistant gloves to do this safely.
- Keep an eye on the crust and toppings, turning the pie so it browns uniformly without burning.
Cooking Time and Temperature
At these high temperatures, cooking time is remarkably short, usually about 90 seconds to 2 minutes.
| Cooking Aspect | Detail |
|---|---|
| Oven Temperature | 700°F – 900°F |
| Cooking Time | 1.5 to 2 minutes |
| Rotation Frequency | Every 20 to 30 seconds |
| Optimum Placement | Near but not directly in fire |
- Watch for the crust to puff and char lightly.
- The cheese should bubble and brown slightly.
- Remove the pizza once the bottom is crisp and the toppings are perfectly cooked.
Mastering wood oven pizza cooking means embracing this quick fast-paced process while being attentive to every detail. This attention results in the sensational crust and flavor profile that make wood oven pizza irresistible.
Serving Suggestions
Enjoying our wood oven pizza to its fullest means serving it just right and pairing it with the perfect sides and drinks. Here’s how we recommend presenting and savoring this rustic masterpiece.
Cutting and Serving Tips
To preserve the crisp crust and melty toppings of wood oven pizza, use a sharp pizza cutter or large chef’s knife. Cut the pizza into 6 to 8 evenly sized slices depending on its diameter, ideally right after removing it from the oven while still hot. This helps keep the cheese from hardening and toppings intact.
We suggest serving pizza on a warm wooden board or stone plate to maintain the crust’s crispiness longer. Use a pizza spatula or peel to transfer slices without disturbing the toppings.
For family-style meals, stack slices on large serving platters. For individual servings, place each slice on pre-warmed plates. Adding a sprinkle of fresh basil or drizzle of extra virgin olive oil right before serving enhances aroma and flavor, creating an authentic pizzeria experience.
Complementary Sides and Drinks
Pairing is key to elevating the wood oven pizza experience. Consider these:
| Side Dish | Description | Taste Profile |
|---|---|---|
| Arugula Salad | Fresh arugula tossed with lemon vinaigrette | Peppery, bright |
| Roasted Garlic Knots | Soft dough knots brushed with herb butter | Buttery, savory |
| Caprese Salad | Slices of fresh mozzarella, tomato, basil | Creamy, refreshing |
| Marinated Olives | Mixed olives with herbs and citrus zest | Tangy, briny |
For drinks, choose beverages that cut through the richness and refresh the palate:
- Classic Italian red wine such as Chianti or Sangiovese, offering medium tannins and cherry notes.
- Craft beers like pale ales or pilsners with crisp, hoppy profiles.
- Sparkling water with lemon or lime to cleanse the palate between bites.
- Homemade lemonade with fresh herbs for a non-alcoholic refreshing contrast.
By pairing our wood oven pizza with these sides and drinks, we create a balanced and highly enjoyable meal that honors tradition and delights every sense.
Make-Ahead Tips
Planning ahead helps us enjoy the authentic flavors of our wood oven pizza without stress. With proper preparation, we can save time and develop deeper flavors that enhance every bite.
Preparing Dough in Advance
Making the dough ahead of time ensures a more developed gluten structure and richer taste. Here’s how we do it:
- Mix and knead the dough according to the recipe.
- First proofing: Let it rise at room temperature for 1 to 1.5 hours until doubled.
- Cold ferment: Transfer the dough to an airtight container or cover tightly with plastic wrap.
- Refrigerate for 24 to 72 hours. This slow fermentation improves flavor complexity and texture.
| Step | Description | Timing |
|---|---|---|
| Mix & Knead | Follow recipe instructions | 15-20 minutes |
| First Proofing | Let rise until doubled in size | 1 – 1.5 hours |
| Cold Fermentation | Refrigerate in sealed container or wrap | 24-72 hours (optimal 48h) |
| Bring to Room Temp | Remove from fridge before shaping | 1-2 hours before baking |
Tip: Always bring dough to room temperature before shaping. Cold dough resists stretching and can tear easily during assembly.
Storing Sauce and Toppings
Preparing the sauce and slicing toppings in advance keeps assembly efficient while locking in freshness.
- Tomato sauce: Store in an airtight container in the refrigerator for up to 5 days. For longer storage, freeze in portioned containers.
- Cheese: Keep fresh mozzarella wrapped in plastic or submerged in water inside the fridge to maintain moisture.
- Vegetables and meats: Slice and store separately in sealed containers to prevent sogginess. Keep items like mushrooms and onions dry on paper towels before refrigerating.
| Ingredient | Storage Method | Refrigerator Life | Freeze Friendly |
|---|---|---|---|
| Tomato Sauce | Airtight container | Up to 5 days | Yes |
| Fresh Mozzarella | Wrapped in plastic or submerged | Up to 3 days | No |
| Sliced Veggies | Sealed container with paper towel | 2-3 days | Some (e.g., peppers yes, mushrooms no) |
| Meats | Sealed container or vacuum seal | 3-4 days | Yes |
By prepping dough, sauce, and toppings in advance, we streamline the pizza-making process, allowing us to focus on crafting the perfect wood oven pizza with vibrant flavors and a beautifully crisp crust.
Troubleshooting and Tips
Mastering the wood oven pizza recipe often involves troubleshooting common challenges and applying expert tips to elevate flavor and texture. Here, we address frequent issues and share strategies to perfect every pie.
Common Issues and Fixes
| Issue | Cause | Fix |
|---|---|---|
| Dough too sticky | Too much water or under-kneaded | Add flour gradually during kneading; knead 8–10 minutes for gluten development |
| Dough too tough | Over-kneaded or too much flour | Reduce kneading time slightly; allow proper proofing for dough relaxation |
| Crust burns quickly | Oven too hot or pizza too close to fire | Adjust pizza position; maintain oven temp between 700°F – 900°F; rotate frequently |
| Soggy crust after baking | Excess sauce or toppings moisture | Use sparing sauce; pat wet toppings dry; preheat pizza stone thoroughly |
| Uneven cooking | Inconsistent oven temperature or poor rotation | Use infrared thermometer for hot spots; rotate pizza every 20–30 seconds |
| Cheese doesn’t melt properly | Oven temperature too low or cheese quality | Ensure oven is fully preheated; use high-quality, fresh mozzarella |
Tip: Keep a steady flow of seasoned hardwood to maintain consistent heat, and always use a well-floured pizza peel to avoid sticking.
Enhancing Flavor and Texture
- Use High-Quality Ingredients: Choose San Marzano tomatoes for sauce and fresh mozzarella for rich creaminess, which contribute significantly to authentic wood-fired pizza flavor.
- Cold Ferment Dough: Refrigerating dough for 24–72 hours deepens flavor complexity and improves crust texture, making it crispier yet tender.
- Master the Proofing Time: Allow dough to become airy and softly elastic before shaping to ensure the signature lightness of the crust.
- Optimize Toppings Balance: Keep toppings light and evenly distributed to allow quick cooking and avoid sogginess or heavy crust texture.
- Rotate Pizza Frequently: Turning the pizza every 20–30 seconds exposes it evenly to wood oven heat, creating a uniform char and perfect melt on cheese.
- Season After Baking: Sprinkle fresh basil, cracked black pepper, or a drizzle of extra virgin olive oil right after baking to enhance aroma and taste without overpowering.
Conclusion
Mastering wood oven pizza is a rewarding journey that combines skill, quality ingredients, and the right tools. With patience and practice, we can bring the authentic flavors of a pizzeria right into our own kitchens. The unique heat and smoky aroma of a wood-fired oven truly elevate every bite, making each pizza a memorable experience.
By embracing the process—from dough preparation to perfecting cooking techniques—we unlock endless possibilities to customize and impress. Whether sharing with family or entertaining friends, wood oven pizza offers a delicious way to connect and celebrate great food together. Let’s keep experimenting and savoring every crispy, flavorful slice.
Frequently Asked Questions
What makes wood-fired oven pizza different from regular pizza?
Wood-fired oven pizza cooks at extremely high temperatures (700°F to 900°F), creating a unique crispy crust with a smoky aroma and enhanced flavors that standard ovens can’t replicate.
What ingredients are essential for making authentic wood-fired pizza dough?
The basic dough ingredients include all-purpose flour, warm water, active dry yeast, olive oil, salt, and sugar. Quality ingredients and proper kneading are key for texture and flavor.
Why is San Marzano tomato sauce recommended for wood-fired pizza?
San Marzano tomatoes have a rich, sweet flavor and low acidity, making them perfect for a balanced, fresh tomato sauce that complements the high heat and toppings.
What tools do I need to cook pizza in a wood-fired oven?
Essential tools include a wood-fired oven, pizza peel, pizza stone, infrared thermometer, pizza cutter, dough scraper, heat-resistant gloves, and a wooden brush for oven maintenance.
How long should I preheat my wood-fired oven?
Preheat the oven for at least 1 hour or until it reaches 700°F to 900°F to ensure consistent heat for a perfect crust and quick cooking.
What is the ideal cooking time for a pizza in a wood-fired oven?
Cooking typically takes 90 seconds to 2 minutes, with the pizza rotated every 20-30 seconds for even cooking and to prevent burning.
How can I ensure my pizza dough rises properly?
Activate yeast with warm water and sugar, knead well to develop gluten, then allow the dough to rest and proof in a warm, draft-free place until it doubles in size.
Can I prepare dough and sauce ahead of time?
Yes, cold ferment the dough in the refrigerator for 24 to 72 hours to improve flavor and texture. Store sauce and toppings in airtight containers to keep them fresh.
How do I avoid soggy pizza toppings?
Use a light hand with sauce and toppings, distribute them evenly, and avoid overloading so the pizza cooks quickly, maintaining a crispy crust and fresh toppings.
What are good side dishes to serve with wood-fired pizza?
Complement your pizza with sides like arugula salad, roasted garlic knots, caprese salad, marinated olives, and beverages such as Chianti, craft beer, or sparkling water.