
Whatchamacallit bars have a special place in the world of candy lovers. Known for their irresistible combination of crunchy peanut-flavored crisp, gooey caramel, and rich chocolate, these bars deliver a perfect mix of textures and flavors in every bite. They’re a nostalgic treat that’s easy to enjoy anytime.
Making Whatchamacallit bars at home lets us customize the sweetness and control the ingredients while capturing that classic taste. Whether we’re craving a quick snack or want to impress friends with a homemade twist, this recipe is simple and rewarding. Let’s dive into creating these delicious bars that bring a sweet crunch to our day.
Ingredients
To recreate the legendary Whatchamacallit Bars, we rely on three essential components: a crispy base, a creamy peanut butter layer, and a luscious chocolate topping. Each section below lists the precise ingredients needed to achieve that perfect balance of textures and flavors.
For the Base Layer
The base is the foundation of the bars and provides that crunchy peanut-flavored crisp we love.
- 3 cups crisp rice cereal
- 1 cup creamy peanut butter
- 1/2 cup unsalted butter
- 1 cup granulated sugar
- 1/4 cup light corn syrup
For the Peanut Butter Mixture
This layer adds the gooey, slightly salty peanut butter flavor that is the heart of the treat.
- 3/4 cup creamy peanut butter
- 1 cup powdered sugar, sifted
- 1 tsp vanilla extract
For the Chocolate Topping
The final touch is a smooth, rich chocolate layer that seals the bar with a luxurious finish.
- 2 cups semisweet chocolate chips
- 2 tbsp unsalted butter
| Ingredient | Quantity | Purpose |
|---|---|---|
| Crisp rice cereal | 3 cups | Crunchy base |
| Creamy peanut butter | 1 cup + 3/4 cup | Base flavor and filling |
| Unsalted butter | 1/2 cup + 2 tbsp | Texture and richness |
| Granulated sugar | 1 cup | Sweetness and binding |
| Light corn syrup | 1/4 cup | Helps set the base |
| Powdered sugar | 1 cup | Smooth, sweet filling |
| Vanilla extract | 1 tsp | Enhances peanut butter mix |
| Semisweet chocolate chips | 2 cups | Chocolate topping |
Together, these ingredients combine to capture the distinctive Whatchamacallit bar experience: crunchy, creamy, and irresistibly chocolaty.
Equipment Needed
To craft the perfect Whatchamacallit Bars at home, having the right equipment is essential. Each tool plays a critical role in achieving that ideal texture and rich flavor combination. Here’s what we recommend gathering before we begin:
- 9×13-inch Baking Pan
This size is perfect for layering the crispy base and shaping the bars evenly.
- Mixing Bowls
Use one large bowl for combining the crispy base ingredients and a smaller bowl for the peanut butter layer.
- Saucepan
Required to melt butter, sugar, and corn syrup for the gooey caramel layer with precision.
- Spatula (preferably silicone)
Ideal for stirring mixtures smoothly and spreading layers evenly without scratching your pan.
- Measuring Cups and Spoons
Accuracy is key. Use these for all ingredients including granulated sugar, powdered sugar, and flavor extracts.
- Microwave-Safe Bowl or Double Boiler
For melting the semisweet chocolate chips gently without burning.
- Parchment Paper or Nonstick Spray
To line the baking pan, this ensures easy removal of the bars once set.
| Equipment | Purpose |
|---|---|
| 9×13-inch Baking Pan | Shapes and holds the layered bars |
| Mixing Bowls | Mix base and peanut butter layers |
| Saucepan | Melt butter, sugar, and syrup accurately |
| Silicone Spatula | Stir and spread layers evenly |
| Measuring Cups & Spoons | Measure ingredients precisely |
| Microwave-Safe Bowl / Double Boiler | Melt chocolate gently |
| Parchment Paper/Nonstick Spray | Prevent sticking and ease clean-up |
Instructions
Follow these step-by-step instructions to create our Whatchamacallit Bars with perfect layers and irresistible flavor. With careful prep and precise layering, we’ll achieve the classic crunch, creamy peanut butter, and rich chocolate all in one bite.
Prep Work
- Line a 9×13-inch baking pan with parchment paper or lightly spray it with nonstick spray for easy removal.
- Measure out all ingredients precisely and have them within reach.
- Set up separate mixing bowls for each layer.
- Prepare tools: silicone spatula, saucepan, microwave-safe bowl or double boiler, measuring cups and spoons.
Making the Base Layer
- In a large mixing bowl, combine 6 cups of crisp rice cereal with 1/4 teaspoon salt.
- In a medium saucepan, melt 1/3 cup unsalted butter over medium heat.
- Stir in 1 cup granulated sugar and 1/4 cup light corn syrup.
- Cook the mixture, stirring constantly, until it reaches a gentle boil.
- Remove from heat and quickly pour the hot syrup over the rice cereal.
- Stir immediately to coat all cereal evenly.
- Press this crispy mixture firmly into the bottom of the prepared pan using the back of a spatula or your hands lined with parchment.
Preparing the Peanut Butter Mixture
- In a clean saucepan over low heat, melt 1 cup creamy peanut butter with 1/2 cup unsalted butter.
- Once melted and smooth, remove from heat and whisk in 2 cups powdered sugar and 1 teaspoon vanilla extract.
- Stir until fully combined into a thick, creamy mixture.
Assembling the Bars
- Spread the peanut butter mixture evenly over the pressed base layer.
- Use a spatula to smooth the top for an even layer.
- Press lightly to ensure it adheres well to the base.
Adding the Chocolate Topping
- In a microwave-safe bowl or over a double boiler, melt 2 cups semisweet chocolate chips until smooth.
- Pour the melted chocolate over the peanut butter layer.
- Spread quickly and evenly using an offset spatula or the back of a spoon.
Chilling and Setting
- Place the layered pan in the refrigerator for at least 2 hours to allow the chocolate topping to set firmly.
- Once set, lift the bars out by the parchment paper edges.
- Use a sharp knife to cut into 12 to 16 bars depending on your preferred size.
| Step | Ingredient(s) | Quantity | Notes |
|---|---|---|---|
| Base Layer | Crisp rice cereal | 6 cups | Salted for balance |
| Unsalted butter | 1/3 cup | Melted with sugar and syrup | |
| Granulated sugar | 1 cup | Creates crispy coating | |
| Light corn syrup | 1/4 cup | Adds chewiness and shine | |
| Peanut Butter Layer | Creamy peanut butter | 1 cup | Melted with butter |
| Unsalted butter | 1/2 cup | Ensures creamy texture | |
| Powdered sugar | 2 cups | Sweetens and thickens | |
| Vanilla extract | 1 teaspoon | Enhances flavor | |
| Chocolate Topping | Semisweet chocolate chips | 2 cups | Melted to glossy finish |
Tips and Variations
To perfect our Whatchamacallit Bars, here are vital tips and creative variations that enhance flavor, texture, and presentation.
Essential Tips for the Best Bars
- Press the Crunchy Base Firmly
We use a spatula or clean hands to press the crispy rice cereal mixture firmly into the pan. This ensures a sturdy base that holds together well when cutting.
- Melt Ingredients Gently
When melting butter, chocolate, or peanut butter, use low heat or microwave in short bursts. Overheating can cause grainy or burnt textures.
- Chill Thoroughly
After layering, chill the bars for at least 2 hours. This step allows the chocolate and peanut butter layers to set perfectly for clean slicing.
- Line the Pan with Parchment Paper
This simple tip helps us lift the entire block out easily for cutting and serving without damaging the bars.
- Use Fresh Ingredients
Fresh peanut butter and high-quality chocolate chips maximize flavor and texture authenticity, mirroring the iconic Whatchamacallit taste.
Flavor Variations to Customize Your Bars
We can easily adapt the Whatchamacallit Bars recipe to satisfy different cravings or dietary preferences. Here’s how:
| Variation | Description | Suggested Ingredient Swap or Addition |
|---|---|---|
| Nut-Free Version | Ideal for nut allergies, keeping the crunch and sweetness. | Replace peanut butter with sunButter or soy nut butter. |
| Salted Caramel Twist | Add a touch of saltiness to balance the sweetness perfectly. | Sprinkle flaky sea salt on top of the melted chocolate layer. |
| Dark Chocolate Upgrade | Intensify the chocolate flavor and richness. | Substitute semisweet chocolate chips with 70-85% dark chocolate. |
| Extra Crunch Boost | Add more texture for peanut butter lovers who want added snap. | Mix in chopped peanuts or crushed pretzels into the base layer. |
| Mini Bar Bites | Perfect for parties or portion control. | Use a mini muffin pan or brownie bites pan to create smaller bars. |
Pro Tips for Layering and Assembly
- Spread Layers Evenly
We spread each layer evenly using a silicone spatula. This guarantees equal distribution of taste and texture in every bite.
- Work Quickly When Layering
Chocolate can start to harden fast. We pour and spread it promptly to get a smooth glossy finish.
- Temperature Matters
Let the peanut butter mixture cool slightly before layering. If it’s too warm it may mix with the base layer compromising firmness.
How to Store and Serve
Storage tips keep our bars fresh and delightful:
- Store in an airtight container at room temperature for up to 4 days.
- For longer freshness chill them; bring to room temperature before serving for best texture.
- Freeze individually wrapped bars for up to 3 months; thaw overnight in the fridge.
By applying these tips and exploring these variations, our Whatchamacallit Bars will impress every time with their signature crunchy, gooey, and chocolaty appeal.
Serving Suggestions
To maximize the indulgence of our Whatchamacallit Bars let’s explore several serving ideas that showcase their signature crunchy peanut-flavored crisp, gooey caramel, and rich chocolate.
Classic Presentation
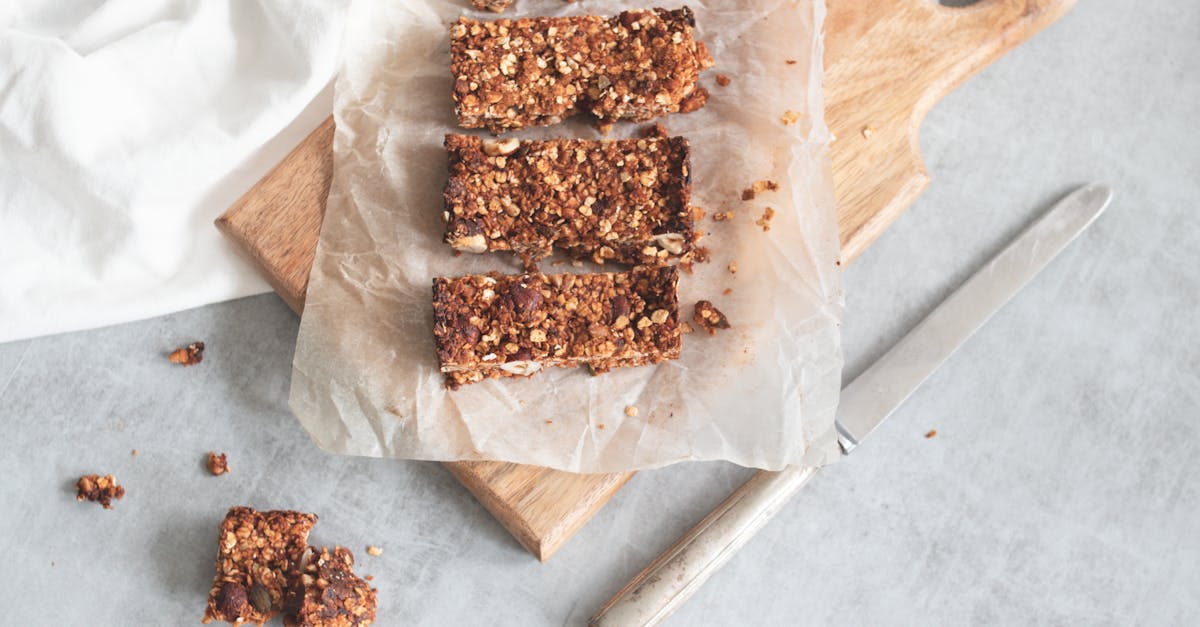
Serve the bars chilled and sliced into uniform squares about 2 inches wide for easy handling. Arrange on a decorative plate or parchment-lined platter. This presentation emphasizes the distinct layers visible in each bar.
Pairing Ideas
Our bars pair perfectly with beverage options that complement their sweetness:
| Beverage | Why It Works |
|---|---|
| Cold milk | Softens the richness, classic combo |
| Black coffee | Balances sweetness with bitterness |
| Hot chocolate | Amplifies the chocolate experience |
| Iced tea | Refreshes palate between bites |
Serving Temperature
- For best texture and flavor, serve the bars chilled (straight from the fridge). This keeps the peanut butter layer firm and chocolate topping crisp.
- For a melt-in-your-mouth twist, allow bars to sit at room temperature for 5 minutes before serving.
Garnishing Ideas
Add a creative flair with these quick garnishes:
- Sprinkle coarse sea salt over the chocolate layer for a salted caramel vibe.
- Add a light drizzle of melted white or dark chocolate for contrast.
- Top with chopped roasted peanuts or toasted coconut flakes to enhance crunch.
- Dust with powdered sugar for a festive look.
Serving for Parties & Gifting
- Cut bars into smaller bite-sized pieces for party platters or dessert buffets.
- Place individual bars in small decorative boxes or bags lined with wax paper for thoughtful homemade gifts.
- For portion control, try our mini bar bites version by cutting with a small cookie cutter or into pebble sizes.
Pro tip: Use a sharp knife warmed under hot water and wiped dry before slicing to achieve clean, smooth edges without cracking the layers.
By integrating these serving suggestions with our Whatchamacallit Bars Recipe, we create an enjoyable experience that highlights the bars’ nostalgic appeal while elevating their presentation and flavor to impressive levels.
Storage Instructions
To keep our Whatchamacallit Bars fresh and delicious, proper storage is essential. Follow these guidelines to maintain their perfect texture and flavor:
- Store at Room Temperature: Place the bars in an airtight container. This prevents moisture from softening the crispy base and keeps the chocolate topping firm. Our bars will stay fresh for up to 5 days this way.
- Use Parchment Paper: When stacking bars in the container, layer parchment paper between them. This avoids sticking and preserves the integrity of each piece.
- Refrigeration: If you live in a warm or humid climate, refrigerate the bars to prevent melting. Wrap them tightly in plastic wrap or use an airtight container to avoid absorption of odors. Refrigerated bars keep for up to 7 days but may lose some of their crunch.
- Freezing for Longer Storage: For extended freshness, freeze the bars. Wrap them individually or place them in a single layer inside a freezer-safe container, separated by parchment paper. When frozen, they last up to 3 months. Thaw the bars at room temperature for 15-20 minutes before serving.
Storage Duration and Conditions
| Storage Method | Container Type | Duration | Tips |
|---|---|---|---|
| Room Temperature | Airtight container | Up to 5 days | Use parchment paper between layers |
| Refrigeration | Airtight container | Up to 7 days | Wrap tightly, avoid fridge odors |
| Freezing | Freezer-safe wrap or container | Up to 3 months | Thaw before serving, wrap individually or layer with parchment paper |
“Proper storage is the secret to maintaining the crisp and creamy layers of our Whatchamacallit Bars, ensuring every bite stays irresistible.”
By following these steps, we guarantee that our homemade Whatchamacallit Bars deliver the same nostalgic crunch and rich flavors each time we enjoy them.
Conclusion
Making Whatchamacallit Bars at home lets us enjoy a classic treat with a personal touch. The process is straightforward and rewarding, giving us control over every layer’s flavor and texture. Whether we stick to the original recipe or try creative variations, these bars never fail to impress.
With the right tools, ingredients, and a bit of patience, we can create a batch that rivals store-bought versions. Perfect for sharing or savoring solo, these bars bring a nostalgic delight straight from our kitchen. Let’s keep experimenting and enjoying every crunchy, gooey, chocolaty bite together.
Frequently Asked Questions
What makes Whatchamacallit bars so appealing?
Whatchamacallit bars combine a crunchy peanut-flavored crisp base, gooey caramel, and rich chocolate, creating a nostalgic treat with a unique texture and flavor blend.
Can I make Whatchamacallit bars at home?
Yes, you can make them at home using a simple recipe that includes a crispy base, creamy peanut butter layer, and chocolate topping, allowing for customization and fresh ingredients.
What ingredients are needed to make homemade Whatchamacallit bars?
You need crisp rice cereal, creamy peanut butter, unsalted butter, granulated sugar, light corn syrup, powdered sugar, vanilla extract, and semisweet chocolate chips.
What equipment do I need for making these bars?
You’ll need a 9×13-inch baking pan, mixing bowls, a saucepan, silicone spatula, measuring cups and spoons, a microwave-safe bowl or double boiler, and parchment paper or nonstick spray.
How do I ensure the perfect texture and flavor?
Press the base firmly, melt ingredients gently, chill thoroughly, use parchment paper for easy removal, and choose fresh, quality ingredients.
Are there any variations to the traditional Whatchamacallit bars?
Yes, you can try a nut-free version, salted caramel twist, dark chocolate upgrade, extra crunch, or make mini bar bites for portion control.
How should I serve Whatchamacallit bars?
Serve them chilled and sliced into squares, paired with cold milk, coffee, hot chocolate, or iced tea. Garnish with sea salt, drizzled chocolate, chopped peanuts, or coconut flakes for extra flair.
What is the best way to store Whatchamacallit bars?
Store bars in an airtight container at room temperature for up to 5 days, refrigerate for up to 7 days in warm climates, or freeze for up to 3 months to maintain freshness and texture.