
Turkey carnitas offer a delicious twist on the classic Mexican favorite by using lean, flavorful turkey instead of pork. This recipe delivers tender, juicy meat with crispy edges that make every bite irresistible. It’s a healthier option without sacrificing any of the bold, savory flavors we love in traditional carnitas.
We love how easy it is to prepare this dish, whether you’re using a slow cooker or an oven. With simple ingredients and straightforward steps, turkey carnitas come together quickly, making them perfect for weeknight dinners or casual gatherings. Plus, they’re incredibly versatile—great in tacos, burritos, salads, or even on their own.
Let’s dive into this flavorful recipe that brings a fresh and wholesome take on carnitas. Once you try it, turkey carnitas will become a staple in our meal rotation.
Ingredients
To create the perfect Turkey Carnitas, we need the right combination of fresh, flavorful, and aromatic ingredients. Below are the essential components, categorized for easy preparation.
Meat and Marinade Ingredients
We start with lean protein and a citrus-infused marinade to ensure our turkey carnitas stay juicy and tender.
- 3 pounds boneless, skinless turkey thighs (trimmed of excess fat)
- Juice of 2 oranges (freshly squeezed for natural sweetness and acidity)
- Juice of 1 lime (adds brightness and tenderizes the meat)
- 4 cloves garlic (minced for aromatic depth)
- 1/4 cup olive oil (helps blend flavors and aids in cooking)
- 1/2 cup chicken broth (to keep the meat moist during cooking)
Spice Mix Ingredients
Our custom spice blend packs a punch with smoky, warm, and earthy tones — key for authentic carnitas flavor.
| Spice | Amount | Purpose |
|---|---|---|
| Ground cumin | 1 tablespoon | Earthy warmth |
| Smoked paprika | 2 teaspoons | Smoky depth |
| Dried oregano | 1 teaspoon | Herbaceous undertone |
| Ground coriander | 1 teaspoon | Citrus hints complementing marinade |
| Chili powder | 2 teaspoons | Mild heat with smoky notes |
| Salt | 1 teaspoon | Enhances overall flavors |
| Black pepper | 1/2 teaspoon | Mild spiciness and balance |
Additional Toppings and Sides
To complete our turkey carnitas experience, fresh, crunchy, and zesty toppings make all the difference. These transform the dish into a well-rounded meal whether in tacos, burritos, or bowls.
- Fresh cilantro (chopped)
- Diced white onion
- Sliced radishes (for crunch)
- Avocado slices or guacamole
- Lime wedges (for an extra citrus kick)
- Crumbled queso fresco or shredded Monterey Jack cheese
- Warm corn or flour tortillas
- Pickled jalapeños (optional for heat)
- Pico de gallo or fresh salsa
Together these ingredients bring life and authentic character to our turkey carnitas recipe ensuring every bite is packed with balanced flavor and texture.
Equipment Needed
To achieve perfectly tender and crispy Turkey Carnitas, having the right equipment is essential. Below is a list of everything we recommend using to make this recipe straightforward and enjoyable.
Essential Cookware and Tools
- Slow Cooker or Dutch Oven: We prefer a slow cooker for its convenience and ability to gently cook the turkey until it is juicy and pull-apart tender. Alternatively, a heavy-bottomed Dutch oven works perfectly if you want to bake the carnitas in the oven or simmer on the stovetop.
- Large Skillet or Cast Iron Pan: For crisping up the shredded turkey at the end, use a cast iron skillet or any heavy-bottomed skillet. This step gives the carnitas the irresistible texture contrast between tender meat and crispy edges.
- Cutting Board and Sharp Knife: You’ll need a sturdy cutting board and a sharp knife for trimming the turkey thighs and chopping any fresh toppings.
- Measuring Cups and Spoons: Accurate measurements of liquids and spices are crucial. We recommend using standard measuring cups and spoons for consistent flavor.
- Mixing Bowl: For combining the citrus marinade and the spice blend before applying it to the turkey, use a medium-sized mixing bowl.
- Tongs or Forks: Use tongs or two forks to shred the cooked turkey once it’s tender.
- Aluminum Foil or Lid: If using the oven method, you’ll need aluminum foil or a Dutch oven lid to cover the turkey during slow roasting.
Summary of Equipment
| Equipment | Purpose |
|---|---|
| Slow Cooker | Slow cooking turkey until tender |
| Dutch Oven | Oven or stovetop cooking alternative |
| Cast Iron Skillet | Crisping shredded turkey |
| Cutting Board | Preparing and trimming turkey |
| Sharp Knife | Cutting turkey and vegetables |
| Measuring Cups & Spoons | Measuring liquids and spices |
| Mixing Bowl | Mixing marinade and spice blend |
| Tongs or Forks | Shredding cooked turkey |
| Aluminum Foil or Lid | Covering turkey during oven cooking |
Prep Work
Before we start cooking our Turkey Carnitas, careful preparation is key to bringing out the rich flavors and achieving that perfect tender and crispy texture. Let’s break down the essential steps to get everything ready.
Preparing the Turkey
- Choose boneless, skinless turkey thighs for the best balance of lean meat and natural fat, ensuring juicy carnitas.
- Pat the turkey thighs dry with paper towels to help the marinade adhere better and improve browning later.
- Cut the thighs into large chunks, about 2-inch pieces. This size allows for even cooking and easy shredding once cooked.
- Set the turkey aside in a large mixing bowl to marinate.
Making the Marinade
We combine citrus, spices, and broth to infuse our turkey with vibrant flavor and tenderness.
| Ingredient | Quantity | Notes |
|---|---|---|
| Fresh orange juice | 1 cup | Adds sweetness and acidity |
| Fresh lime juice | 1/4 cup | Provides tangy brightness |
| Garlic cloves | 4, minced | Builds savory depth |
| Olive oil | 2 tablespoons | Helps with moisture and flavor |
| Chicken broth | 1/2 cup | Keeps the meat juicy |
| Ground cumin | 2 teaspoons | Earthy and warm spice |
| Smoked paprika | 1 teaspoon | Adds smoky undertones |
| Dried oregano | 1 teaspoon | Classic Mexican flavor |
| Ground coriander | 1/2 teaspoon | Citrus and floral notes |
| Chili powder | 1 teaspoon | Mild heat and complexity |
| Salt | 1 teaspoon | Balances flavors |
| Black pepper | 1/2 teaspoon | Adds a subtle kick |
- In a medium bowl, whisk together all the citrus, olive oil, and chicken broth.
- Add the dry spices and minced garlic then mix until fully combined.
- Pour this marinade over the turkey chunks, ensuring every piece is well coated.
- Cover the bowl with plastic wrap and refrigerate for at least 1 hour, preferably up to 4 hours, to maximize flavor infusion.
Preparing Vegetables and Toppings
Fresh toppings take our Turkey Carnitas to the next level, delivering crisp contrast and extra flavor brightness.
- Dice white or red onions finely for that sharp bite.
- Chop a handful of fresh cilantro, leaving some leaves whole for garnish.
- Slice crisp radishes thinly to add peppery crunch.
- Cut ripe avocado into cubes or slices for creamy richness.
- Prepare lime wedges for squeezing fresh juice just before serving.
- Optional: Rinse and slice pickled jalapeños for those who want a spicy kick.
Organizing these fresh ingredients before cooking ensures quick assembly and a vibrant plate once the carnitas are ready.
Cooking Instructions
Follow these detailed steps to prepare turkey carnitas that are juicy, flavorful, and perfectly crispy. We will guide you through cooking, shredding, and crisping the turkey for the best results.
Cooking the Turkey Carnitas
- Preheat your slow cooker to low or your oven to 300°F (150°C).
- Place the marinated turkey chunks into the slow cooker or Dutch oven. Make sure the pieces are evenly spread.
- Pour any remaining marinade over the turkey to keep it moist during cooking.
- Cover with the lid or aluminum foil.
- Cook:
- Slow cooker: Cook on low for 6 to 8 hours until the turkey is tender and shreds easily.
- Oven: Place the Dutch oven on the middle rack and cook for 2.5 to 3 hours.
- Check turkey tenderness by inserting a fork. It should slide in and out smoothly.
| Cooking Method | Temperature/Setting | Time | Indicator of Doneness |
|---|---|---|---|
| Slow Cooker | Low | 6 to 8 hours | Meat shreds easily with fork |
| Oven | 300°F (150°C) | 2.5 to 3 hours | Meat is tender and juicy |
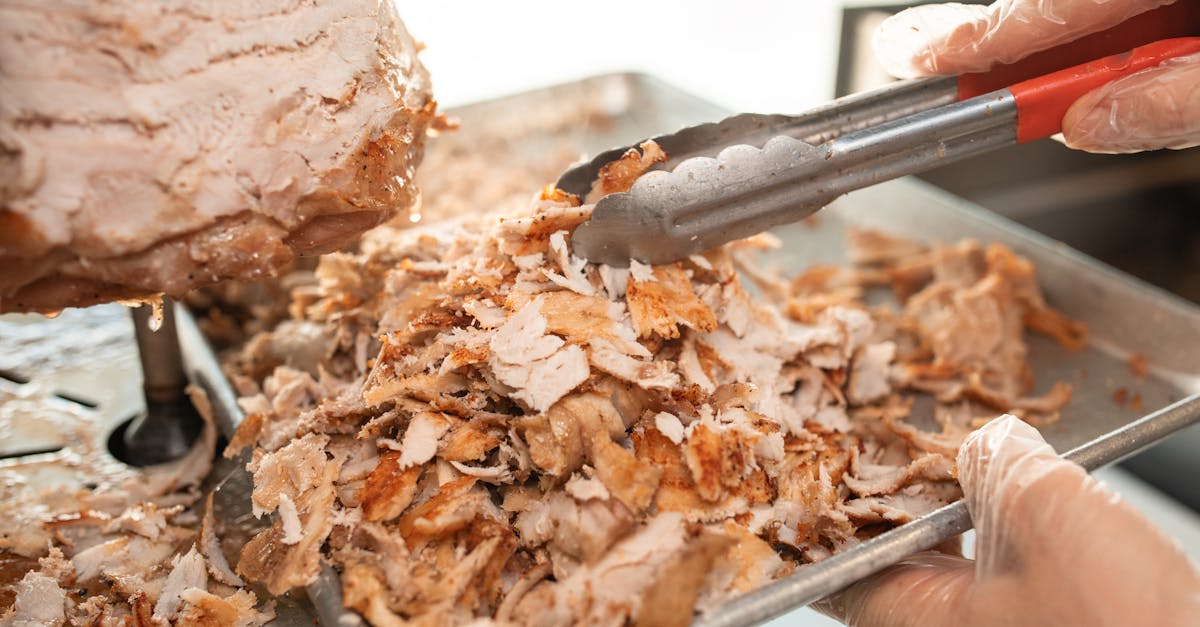
Shredding the Meat
- Remove the cooked turkey pieces from the cooker or Dutch oven, reserving the cooking liquid.
- Use two forks or meat claws to shred the turkey into bite-sized pieces.
- Transfer the shredded meat back to the cooking vessel.
- Pour ¼ to ½ cup of reserved cooking liquid over the shredded turkey to keep it moist.
- Toss gently to evenly mix the liquid through the meat.
Pro Tip: Keep some cooking liquid aside to prevent the turkey from drying out during crisping.
Crisping the Carnitas
- Preheat a large skillet or cast iron pan over medium-high heat. Add 1 tablespoon of olive oil.
- Once the oil shimmers, add the shredded turkey in a single layer, pressing down lightly.
- Let the meat cook undisturbed for about 3 to 5 minutes until the bottom edges turn golden brown and crispy.
- Flip sections of the turkey and crisp the other side for another 2 to 4 minutes.
- Continue to toss and press the meat, creating crispy edges throughout.
- Remove from heat and serve immediately with your favorite toppings and tortillas.
“Crispy edges provide the authentic texture and contrast that make turkey carnitas irresistible.”
By following these steps we ensure your turkey carnitas deliver juicy tenderness inside and delectable crispiness outside every time.
Assembling the Carnitas
Once our turkey carnitas are perfectly cooked and crisped, it’s time to assemble them into delicious meals. Whether we’re making tacos or bowls, layering flavors and textures carefully will elevate every bite.
Building Tacos or Bowls
To create the ideal base for our turkey carnitas, start by warming fresh tortillas or preparing a bed of fluffy rice or greens for a bowl. Then, spoon a generous amount of the juicy, crispy turkey on top.
Here’s how to assemble each option:
| Assembly Step | Tacos | Bowls |
|---|---|---|
| Base | Warm corn or flour tortillas | Cooked cilantro-lime rice or mixed greens |
| Protein | Shredded turkey carnitas | Shredded turkey carnitas |
| Fresh vegetables | Diced onions, cilantro, radishes | Diced onions, cilantro, radishes |
| Creamy element | Avocado slices or guacamole | Sliced avocado or creamy dressing |
| Tangy touch | Lime wedges for squeezing | Lime wedges or a splash of salsa |
| Optional crunch | Pickled jalapeños or crisp lettuce | Pickled jalapeños or crunchy tortilla strips |
We recommend folding tacos gently to hold the fillings securely. For bowls, layering ingredients starting with greens or rice ensures that each forkful has balanced flavor.
Suggested Garnishes and Toppings
Toppings make all the difference in enhancing the turkey carnitas experience. Here are our favorite garnish choices to create vibrant and mouth-watering plates:
- Fresh cilantro: Adds bright herbaceous notes.
- Diced white onion: Offers sharp contrast and crunch.
- Thinly sliced radishes: Provide peppery crispness.
- Creamy avocado or guacamole: Balances spice with smoothness.
- Lime wedges: Add zesty citrus brightness to every bite.
- Crumbled queso fresco or shredded cheese: Introduces salty richness.
- Pickled jalapeños: Bring a spicy, tangy kick.
- Sour cream or Mexican crema: Gives a cooling effect.
By combining these toppings thoughtfully, we ensure every bite of our turkey carnitas is packed with layers of flavor and texture that delight the palate.
Serving Suggestions
Our Turkey Carnitas shine brightest when paired with fresh, vibrant accompaniments that complement their juicy tenderness and crispy edges. Here are some of our favorite ways to serve this versatile dish:
Tacos and Burritos
- Warm corn or flour tortillas provide the perfect base for the carnitas.
- Layer the shredded turkey with diced onions, fresh cilantro, and sliced radishes for crunch and brightness.
- Add creamy avocado slices or a dollop of guacamole to introduce richness.
- Finish with a squeeze of fresh lime juice and sprinkle of crumbled queso fresco or shredded cheese.
- Optionally, include pickled jalapeños for a tangy spicy kick.
Bowls and Salads
- Serve the turkey over a bed of cilantro-lime rice or mixed greens to create a satisfying bowl.
- Add black beans, corn, and diced tomatoes for added texture and flavor.
- Top with a drizzle of chipotle crema or salsa verde.
- Garnish generously with fresh herbs and crunchy toppings like toasted pepitas.
Side Pairings
- Crispy carnitas pair wonderfully with classic Mexican sides such as Mexican street corn (elote) or pico de gallo.
- For a lighter option, serve alongside a fresh jicama slaw.
- Don’t forget the warm tortillas or crispy tortilla chips for scooping up every bit.
Flavor and Texture Table for Serving Combinations
| Serving Style | Complementary Ingredients | Key Flavor Profile | Texture Contrast |
|---|---|---|---|
| Tacos/Burritos | Tortillas, onions, cilantro, avocado, lime, cheese | Citrusy, fresh, creamy, and tangy | Crunchy veggies, smooth avocado |
| Bowls/Salads | Rice or greens, beans, corn, chipotle crema | Smoky, earthy, zesty | Soft meat, crunchy seeds, fresh greens |
| Sides | Elote, pico de gallo, jicama slaw, tortilla chips | Sweet, spicy, tangy | Creamy, crispy, juicy |
Pro Tips for Serving
- Always warm tortillas before assembling to enhance flavor and pliability.
- Use fresh lime wedges on the side for a customizable zesty finish.
- Incorporate pickled vegetables to add acidity and balance richness.
- Offer varied salsas to let everyone tailor the heat and flavor to their preference.
By thoughtfully pairing our flavorful Turkey Carnitas with these fresh toppings and sides we create a meal that is vibrant, balanced, and absolutely irresistible.
Make-Ahead and Storage Tips
To get the most out of our Turkey Carnitas recipe, preparing ahead and storing properly are key steps that save time and preserve flavor and texture.
Make-Ahead Preparation
- Marinate in advance: We recommend marinating the turkey thighs for at least 4 hours or overnight in the citrus and spice blend. This deepens the flavor and tenderizes the meat.
- Cook ahead: Cooking the turkey carnitas a day before serving allows the flavors to meld beautifully. After shredding and crisping the meat, let it cool completely before refrigeration.
- Prep toppings in advance: Chop cilantro, dice onions, slice radishes, and prepare avocado slices a few hours before serving. Store toppings separately in airtight containers to maintain freshness.
Storage Guidelines
Proper storage keeps the turkey carnitas delicious and safe to eat for several days.
| Storage Method | Duration | Storage Tips |
|---|---|---|
| Refrigeration | 3 to 4 days | Store in an airtight container; keep shredded carnitas separate from crispy bits to retain texture. |
| Freezing | Up to 3 months | Place cooled carnitas in freezer-safe bags; remove excess air. Label with date. |
| Toppings | 1 to 2 days | Store fresh toppings in sealed containers; add avocado slices just before serving. |
Reheating for Best Texture
Reheating correctly ensures the tender yet crispy balance of turkey carnitas remains intact:
- Skillet method: Reheat shredded carnitas in a skillet over medium heat. Add a sprinkle of reserved cooking liquid to keep it moist, crisping edges evenly.
- Oven method: Spread carnitas on a baking sheet. Warm at 350°F (175°C) for 10-15 minutes until heated through and crispy on the edges.
- Microwave caution: Use microwave only for quick reheats. Cover loosely and heat in 30-second increments, stirring in between to avoid drying.
Additional Tips
“Separating shredded turkey from crispy bits before storing preserves the signature texture contrast of carnitas.”
- Freeze leftovers in portion sizes for quick meals.
- For best flavor, avoid freezing toppings; prepare fresh when ready to serve.
- When assembling tacos or bowls after storage, add fresh lime juice and toppings to brighten the dish.
By following these Make-Ahead and Storage Tips, we keep our turkey carnitas flavorful, juicy, and ready for any occasion.
Conclusion
Turkey carnitas bring a fresh and flavorful twist to any meal, combining juicy tenderness with irresistible crispiness. Whether you’re cooking for a quick weeknight dinner or hosting friends, this recipe fits seamlessly into your routine. With simple ingredients and versatile serving options, it’s easy to customize and enjoy.
By mastering the preparation and cooking techniques, we ensure every bite delivers bold, authentic flavors. Plus, thoughtful storage and reheating tips keep your carnitas tasting just as good the next day. Let’s make turkey carnitas a delicious staple in our kitchens that everyone will love.
Frequently Asked Questions
What are turkey carnitas?
Turkey carnitas are a healthier alternative to traditional pork carnitas, made with tender, juicy turkey thighs cooked slowly and then crisped for a flavorful, slightly crispy texture.
How do you make turkey carnitas tender and crispy?
Cook turkey thighs low and slow in a marinade, shred the meat, then crisp it in a hot skillet to achieve moist tenderness inside and crispy edges outside.
Can turkey carnitas be made in a slow cooker?
Yes, turkey carnitas cook perfectly in a slow cooker, making it an easy, hands-off method ideal for weeknight meals.
What spices are used in turkey carnitas?
A custom blend including ground cumin, smoked paprika, dried oregano, ground coriander, chili powder, salt, and black pepper adds authentic flavor depth.
What toppings go well with turkey carnitas?
Fresh toppings like diced onion, cilantro, sliced radishes, avocado, lime wedges, cheese, and pickled jalapeños complement turkey carnitas wonderfully.
What are popular ways to serve turkey carnitas?
Serve turkey carnitas in tacos, burritos, salads, or bowls, often with warm tortillas, rice or greens, plus fresh toppings and sides like elote or pico de gallo.
How should turkey carnitas be stored?
Store cooked turkey carnitas in an airtight container in the fridge for 3–4 days or freeze for up to 3 months to maintain freshness.
Can I prepare turkey carnitas in advance?
Yes, marinate turkey thighs for 4+ hours or overnight and cook a day ahead. Prep toppings early to save time on mealtime.
What’s the best way to reheat turkey carnitas?
Reheat turkey carnitas in a skillet or oven to keep the meat moist and crispy; avoid microwaving to prevent sogginess.