
Tassajara Bread has earned its place as a beloved classic among artisan bread lovers. Originating from the Tassajara Zen Mountain Center in California, this bread combines simplicity with a rich, tangy flavor that comes from a naturally fermented starter. It’s the perfect blend of crusty exterior and soft, chewy interior that makes every bite unforgettable.
We love Tassajara Bread because it’s approachable for home bakers yet delivers bakery-quality results. Whether you’re new to sourdough or a seasoned pro, this recipe guides you through making a loaf that’s full of character and depth. Let’s dive into creating a bread that’s both wholesome and satisfying, perfect for sandwiches, toasts, or just enjoying with butter.
Ingredients
To create the authentic Tassajara Bread we love, precise ingredients are essential. Below is the list of components with clear preparation notes to ensure success in every loaf.
- Active sourdough starter: 1 cup (approx. 200g), ripe and bubbly
- Warm water: 1 cup (240 ml), around 75°F (24°C) for optimal fermentation
- Bread flour: 3 ½ cups (420g), preferably unbleached for a strong gluten structure
- Whole wheat flour: 1 cup (120g), adds a nutty flavor and hearty texture
- Salt: 2 teaspoons (12g), enhances flavor and strengthens dough
- Honey: 2 tablespoons (30 ml), to subtly feed the starter and balance tanginess
- Olive oil: 1 tablespoon (15 ml), contributes to softness and crust coloration
Ingredient Breakdown Table
| Ingredient | Quantity | Purpose | Notes |
|---|---|---|---|
| Active sourdough starter | 1 cup (200g) | Natural leavening agent | Must be bubbly and mature |
| Warm water | 1 cup (240 ml) | Hydrates and activates yeast | Ideal temp 75°F (24°C) |
| Bread flour | 3 ½ cups (420g) | Structure and chewiness | Unbleached preferred |
| Whole wheat flour | 1 cup (120g) | Flavor and texture richness | Adds rustic nutty undertones |
| Salt | 2 tsp (12g) | Flavor enhancer, strengthens gluten | Accurate measurement critical |
| Honey | 2 tbsp (30 ml) | Mild sweetness and fermentation aid | Balances sour tang |
| Olive oil | 1 tbsp (15 ml) | Softens crumb, browns crust | Extra virgin for best taste |
Tip: Use a digital scale for flour and water for precision — consistency is key in artisan bread making.
This combination gives us the essential balance of flavors and textures characteristic of the timeless Tassajara Bread. We recommend sourcing organic or high-quality ingredients whenever possible to elevate the final loaf.
Equipment Needed
To achieve the perfect Tassajara Bread loaf, having the right equipment on hand is crucial. Each tool helps us handle the dough precisely and ensures the artisan texture and crust we aim for. Below is a detailed list of essential equipment along with their specific uses in the bread-making process.
| Equipment | Purpose | Tips |
|---|---|---|
| Mixing Bowl | For combining starter, flours, water, and other ingredients. | Choose a large, non-reactive bowl for easy mixing. |
| Digital Kitchen Scale | To measure ingredients accurately, ensuring consistent results. | Measure flour and water by weight for precision. |
| Bench Scraper | To divide and shape dough during kneading and folding. | Helps keep the workspace clean and dough manageable. |
| Dough Proofing Basket (Banneton) | Provides structure and aids in the final rise. | Line with a lightly floured cloth to prevent sticking. |
| Clean Kitchen Towel | Covers dough to retain moisture during fermentation. | Use a damp towel to prevent drying out. |
| Dutch Oven or Baking Stone | Creates a steamy environment for crusty, golden bread. | Preheat thoroughly for best crust development. |
| Oven Mitts | Safe handling of hot cookware. | Heavy-duty mitts recommended for Dutch oven lids. |
| Cooling Rack | Allows bread to cool evenly after baking. | Prevents soggy bottoms by letting air circulate. |
Additional Helpful Tools
- Wooden Spoon or Dough Whisk: Ideal for initially mixing the dough without overworking it.
- Thermometer: To check water temperature and finished bread internal temperature (~200°F or 93°C).
- Spray Bottle: For misting water into the oven to boost steam during baking.
Make-Ahead Instructions
To ensure a seamless Tassajara Bread baking experience, preparing parts of the recipe ahead of time is essential. This section guides us through the make-ahead steps that deepen flavor development and save valuable time on baking day.
1. Prepare the Sourdough Starter in Advance
Our active sourdough starter needs to be fed and bubbly before mixing the dough for the best rise and tangy flavor. Plan to:
- Feed the starter at least 6 to 12 hours before starting the dough, ideally when it has doubled in size.
- Keep it at room temperature (70-75°F) for optimal fermentation.
- If refrigerated, allow it to come back to room temperature with a feeding for at least 2–4 hours prior.
“A lively starter is the heart of Tassajara Bread’s signature crust and crumb.”
2. Mix and Autolyse the Dough the Night Before
We can mix our flour and water, then let it rest (autolyse) overnight in the refrigerator. This step strengthens gluten and enhances hydration for a superior crumb.
- Combine the bread flour, whole wheat flour, and warm water.
- Mix gently, making sure no dry flour remains.
- Cover the bowl tightly with plastic wrap or a damp towel.
- Refrigerate for 12 to 24 hours.
3. Bulk Fermentation Convenience
After autolyse, add starter, salt, honey, and olive oil. We can allow the bulk fermentation at a cool temperature for an extended period, such as overnight, to deepen flavor complexity without extra attention.
| Bulk Fermentation Options | Time | Temperature | Result |
|---|---|---|---|
| Room temperature (70-75°F) | 3 to 4 hours | Warm | Faster fermentation |
| Cold fermentation in refrigerator | 12 to 24 hours | Cool (38-42°F) | Enhanced flavor, slower rise |
4. Shaping and Proofing Ahead
We can shape the dough the night before and store it in the refrigerator to proof slowly.
- After shaping the dough into a round or oval, place it in a floured proofing basket or bowl.
- Cover with plastic wrap or a cloth.
- Refrigerate for 8 to 12 hours.
- Remove the dough 1 to 2 hours before baking to come to room temperature and complete proofing.
Summary Table: Make-Ahead Timeline for Tassajara Bread
| Step | Action | Time Required | Notes |
|---|---|---|---|
| Starter Preparation | Feed and activate starter | 6-12 hours | Ensure bubbly and doubled in size |
| Autolyse Dough | Mix flour and water | 12-24 hours (cold) | Refrigerate covered restroom |
| Bulk Fermentation | Add remaining ingredients | 3-4 hours (warm) or 12-24 hours (cold) | Varies with temperature and timing |
| Shaping and Proofing | Shape dough and proof | 8-12 hours (cold) | Bring to room temp 1-2 hrs before baking |
Implementing these Make-Ahead Instructions lets us enjoy the rich, tangy flavor and perfect crust of Tassajara Bread while making bread-making fit comfortably into our schedule.
Preparing the Dough
Before baking our Tassajara Bread, we focus on carefully preparing the dough. This step ensures the right texture, flavor, and structure that define this beloved artisan bread.
Mixing the Ingredients
We begin by combining the active sourdough starter with warm water in our mixing bowl. This activates the natural fermentation that gives Tassajara Bread its distinct tangy flavor. Next, we add the bread flour and whole wheat flour. Mixing these dry ingredients with the wet helps develop gluten—the backbone of our bread’s chewy crumb.
Finally, we incorporate salt, honey, and olive oil. Salt enhances flavor and tightens gluten, honey adds a subtle sweetness, and olive oil brings tenderness.
| Ingredient | Quantity | Purpose |
|---|---|---|
| Active sourdough starter | 200g | Fermentation and flavor |
| Warm water | 350g | Hydrates and activates the starter |
| Bread flour | 450g | Provides structure and chew |
| Whole wheat flour | 50g | Adds flavor and nutrition |
| Salt | 10g | Enhances flavor and strengthens dough |
| Honey | 15g | Adds sweetness and aids fermentation |
| Olive oil | 20g | Contributes moisture and softness |
We mix these ingredients until just combined, forming a rough shaggy dough. This approach promotes gluten development without overworking the dough at this stage.
Kneading the Dough
Kneading develops gluten strands that give Tassajara Bread its chewy texture and open crumb. We turn the dough onto a lightly floured surface and use the stretch and fold method rather than vigorous kneading. This gentle technique strengthens the dough while preserving its extensibility.
We proceed as follows:
- Stretch the dough outward.
- Fold it back over itself.
- Rotate the dough 90 degrees.
- Repeat this process for about 10 minutes until it becomes smooth and elastic.
Alternatively, a stand mixer fitted with a dough hook can knead the dough on medium speed for 6 to 8 minutes.
First Rise
After kneading, we place the dough in a lightly oiled mixing bowl, covering it with a clean kitchen towel or plastic wrap. The dough undergoes its bulk fermentation where wild yeast and bacteria multiply, creating flavor and structure.
We leave the dough to rise at room temperature (70°F to 75°F) for 3 to 4 hours or until it roughly doubles in size. During this period, we perform two sets of “stretch and folds” spaced 30 minutes apart to improve dough strength and gas retention.
| Step | Timeframe | Purpose |
|---|---|---|
| Bulk fermentation | 3–4 hours at 70°F–75°F | Develops flavor and dough strength |
| Stretch and folds | Twice, every 30 mins | Enhances gluten structure and gas retention |
When the dough passes the “poke test” — gently pressing the dough leaves a slow-springing indentation — it is ready for shaping and the next stage in our Tassajara Bread journey.
Shaping the Bread
Once the dough has successfully completed its bulk fermentation and passes the poke test, it’s time to focus on shaping the Tassajara Bread. Proper shaping is essential to achieving that classic rounded loaf with an even crumb and beautiful crust.
Step 1: Preparing the Work Surface
- Lightly flour a clean work surface to prevent sticking.
- Gently turn the dough out onto the floured surface, handling it carefully to preserve the trapped gas bubbles.
Step 2: Pre-shaping the Dough
- Using a bench scraper or your hands, gently fold the edges of the dough towards the center, creating surface tension on the top.
- Let the dough rest for 15–20 minutes. This bench rest allows the gluten to relax, making final shaping easier.
Step 3: Final Shaping Technique
- After resting, shape the dough into a tight round boule or oval bâtard, depending on your preferred loaf shape:
- For a boule (round loaf), cup your hands around the dough and rotate it while pulling it gently toward you to create surface tension.
- For a bâtard (oval loaf), flatten the dough slightly, fold the bottom third towards the center, then fold the top third over it, sealing the seam with your fingers.
- Make sure to create a taut skin on the surface. This tension helps the bread hold its shape during the final proof and baking.
Step 4: Placing in the Proofing Basket
- Dust the proofing basket (banneton) with rice flour or a flour mix to prevent sticking.
- Place the shaped dough seam-side up in the basket if you want a rustic pattern or seam-side down for a smooth top crust.
- Cover the basket with a clean kitchen towel or plastic wrap.
Step 5: Final Proofing
- Allow the dough to proof until it becomes slightly puffy but doesn’t overproof. This typically takes 1–2 hours at room temperature or 8–12 hours if proofing in the refrigerator.
- Optimal proofing ensures the crust will have a beautiful oven spring and the crumb will be open and light.
| Step | Key Action | Purpose | Time Frame |
|---|---|---|---|
| Pre-shaping | Fold edges to center | Develop surface tension | 15–20 minutes rest |
| Final shaping | Shape into boule or bâtard | Create strong skin on dough | Immediate |
| Proofing | Place in banneton, cover | Support dough during final rise | 1–2 hrs room temp or 8–12 hrs fridge |
“Achieving the right tension during shaping is crucial for that signature Tassajara Bread crust and crumb structure. Handle the dough gently but firmly.”
By following these shaping steps, we set the stage for a loaf that rises beautifully in the oven and delivers the rich texture and tangy flavor Tassajara Bread is famous for.
Second Rise
Once we have shaped the dough and completed the initial proofing, it’s time for the second rise, also known as the final proof. This stage is critical for developing the loaf’s volume, texture, and the signature airy crumb of our Tassajara Bread.
Steps for the Second Rise
- Transfer to Proofing Basket or Container
Place the shaped dough gently into a lightly floured proofing basket or a bowl lined with a clean kitchen towel dusted with flour. This prevents sticking and supports the dough as it expands.
- Cover and Maintain Temperature
Cover the dough loosely with a damp cloth or plastic wrap to retain humidity and avoid drying out the surface. We recommend keeping the dough at a warm, steady temperature between 75°F to 80°F (24°C to 27°C) for optimal yeast activity.
- Timing the Rise
The final proof generally takes 1 to 2 hours depending on ambient temperature and dough strength. The dough is ready when it nearly doubles in size and gently springs back when poked lightly without completely deflating.
- Check Readiness with the “Finger Dent Test”
Use a clean finger to press the dough. If the indentation springs back slowly and remains slightly visible, it indicates proper fermentation and expansion, signaling it’s time to bake.
Environmental Conditions for the Second Rise
| Condition | Ideal Range | Reason |
|---|---|---|
| Temperature | 75°F – 80°F (24-27°C) | Activates yeast efficiently without risking over-proofing |
| Humidity | 75% – 85% | Prevents dough surface drying which can impede expansion |
| Duration | 1 – 2 hours | Allows gluten relaxation and gas retention to develop crustiness |
Pro Tips for Success
- Avoid placing the dough in drafty or excessively warm areas to prevent uneven rising or over-proofing.
- For longer second rises, we can refrigerate the shaped dough for a slow cold proof, which improves flavor complexity and crust texture. If cold-proofing, allow the dough to rest at room temperature for 30-45 minutes before baking.
- Handle the dough gently when transferring between containers and before scoring to preserve the trapped gases.
By mastering the second rise, we set a foundation for the bread’s iconic crusty exterior and soft, tangy crumb, hallmark traits that make Tassajara Bread beloved by artisan bakers around the world.
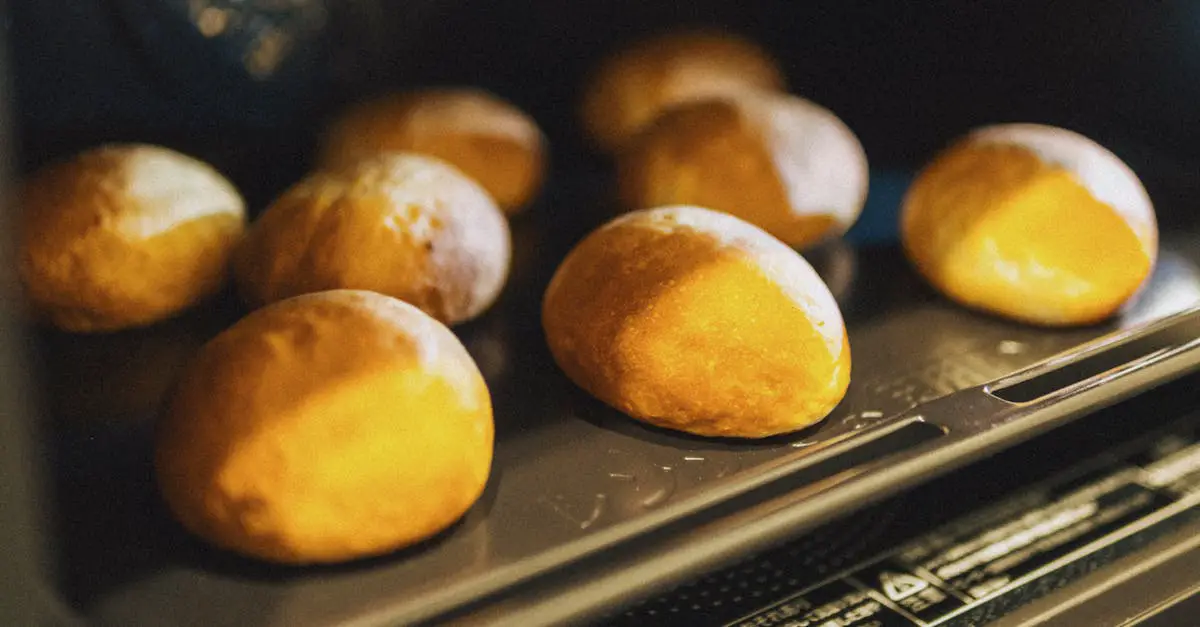
Baking the Bread
Baking the Tassajara Bread is where the magic happens, transforming our perfectly proofed dough into a crusty, aromatic masterpiece. We must carefully control our oven settings and timing to capture the signature crust and texture.
Oven Preparation
Before placing our dough inside, preparing the oven correctly is crucial for that classic artisan crust and crumb. Here’s how we do it:
- Preheat the oven to 450°F (232°C) at least 45 minutes before baking. This ensures consistent, even heat.
- Place a Dutch oven or heavy baking stone in the oven while it preheats. The Dutch oven traps steam, essential for a blistered crust.
- If we don’t use a Dutch oven, we can add steam by:
- Placing a metal tray on the oven floor during preheating and adding hot water right after putting in the dough.
- Spraying water inside the oven walls quickly using a spray bottle at the start of baking.
- Score the dough using a sharp razor or bread lame just before placing it in the oven to control expansion and create the signature look.
By setting up our oven correctly, we guarantee a golden, crackling crust with a tender, open crumb inside.
Baking Time and Temperature
Baking times and temperatures deeply influence the Tassajara Bread crust color and crumb texture. Follow this guide for optimal results:
| Step | Temperature (°F) | Duration | Notes |
|---|---|---|---|
| Initial Bake | 450 | 20 minutes | Bake covered if using Dutch oven to trap steam |
| Finish Bake | 425 | 20–25 minutes | Remove cover and continue baking to develop crust color |
- Start by baking at 450°F covered (Dutch oven lid on) to create steam that keeps the crust moist and allows the bread to rise fully.
- After 20 minutes, remove the cover to reveal the bread and continue baking at 425°F for another 20 to 25 minutes. This step browns the crust beautifully and adds crunch.
- Look for a deep amber color and tap the bottom of the loaf. A hollow sound means it’s perfectly baked.
“Baking is both science and art. Timing, temperature, and steam management bring our Tassajara bread to life.”
Once baked, we transfer the loaf to a cooling rack and wait at least 1 hour before slicing. This resting period finishes the crumb development and enhances flavor.
Our careful attention to oven preparation and baking time and temperature unlocks the coveted crust and chewy interior that make Tassajara Bread a standout artisan loaf.
Cooling and Serving
Once the Tassajara Bread exits the oven, the cooling phase begins, which is essential for developing the bread’s full flavor and ideal texture. We transfer the loaf to a wire cooling rack immediately. This allows air to circulate around the bread, preventing the crust from becoming soggy and helping the interior crumb set perfectly.
Cooling Time and Benefits
We recommend letting the bread cool for at least 1 hour before slicing. Cutting too early can result in a gummy texture as the crumb is still finishing its baking process internally.
| Cooling Step | Details |
|---|---|
| Transfer to Rack | Remove bread from Dutch oven or stone carefully |
| Allow Air Circulation | Place loaf on wire rack |
| Cooling Duration | At least 60 minutes |
| Avoid Wrapping | Do not wrap bread while cooling |
“Patience during cooling rewards us with a loaf where the crust maintains its crunch and the crumb has an open, chewy structure full of flavor.”
Serving Suggestions
Once cooled, our Tassajara Bread is ready to enjoy. Its crusty exterior pairs beautifully with a soft buttery spread or high-quality olive oil. For an enhanced experience, consider these serving ideas:
- Use as the base for gourmet sandwiches with fresh cheeses, roasted vegetables, or smoked meats.
- Toast slices lightly to bring out a nutty aroma and crunch.
- Serve alongside soups or stews, letting the bread soak up rich broths.
- Pair with jams or honey for a sweet contrast to the tangy sourdough flavor.
Storage Tips
To maintain freshness, store the bread at room temperature in a linen bag or wrapped loosely in a cloth. Avoid plastic bags as these trap moisture and soften the crust quickly.
| Storage Method | Recommended Duration | Notes |
|---|---|---|
| Linen Bag or Cloth | Up to 3 days | Maintains crust texture |
| Freezing | Up to 3 months | Slice before freezing for convenience |
| Avoid Refrigeration | N/A | Causes bread to stale faster |
Reheat frozen slices directly in a toaster or oven to revive the delightful crust and chewy inside.
By following these steps, we preserve the delightful qualities that make Tassajara Bread a cherished artisan staple in every home kitchen.
Storage Tips
To keep our Tassajara Bread fresh and flavorful, following proper storage techniques is essential. Here’s how we can preserve the crusty exterior and soft, tangy crumb for as long as possible:
Short-Term Storage (Up to 2 Days)
- Store the bread at room temperature in a clean linen bag or wrapped loosely in a kitchen towel.
- This method allows the bread to breathe, preventing moisture buildup that leads to sogginess while maintaining crust crispness.
- Avoid plastic bags at this stage as they trap moisture and soften the crust.
Medium-Term Storage (Up to 1 Week)
- For storage longer than two days, place the bread inside a bread box or wrap it in a linen cloth and then loosely in plastic wrap to maintain some moisture without suffocating the bread.
- Keep the bread in a cool, dry location away from direct sunlight or heat sources to preserve texture and flavor.
Long-Term Storage (Freezing)
- To enjoy our homemade bread beyond a week, freezing is the best option:
- Slice the bread before freezing to allow easy access to portions.
- Wrap slices or whole loaves tightly in plastic wrap followed by a layer of aluminum foil or place them in an airtight freezer bag.
- Label with the date to monitor freshness (recommended use within 3 months).
- Thaw frozen bread at room temperature wrapped in a kitchen towel to absorb any condensation or gently toast for immediate use.
What to Avoid
- Refrigeration is not recommended, as it accelerates the staling process by drying out the bread, resulting in a tough crumb and less enjoyable texture.
Quick Reference Storage Guide
| Storage Duration | Method | Key Notes |
|---|---|---|
| Up to 2 Days | Linen bag or loose kitchen towel | Maintains crust, breathability essential |
| Up to 1 Week | Bread box or linen + loose plastic wrap | Keeps moisture balanced, avoid heat |
| Up to 3 Months | Freeze wrapped in plastic wrap + aluminum foil | Best for long-term freshness, slice first |
| Avoid | Refrigerator | Speeds up staling, dries out bread |
“Proper storage preserves the artisan qualities of our Tassajara Bread, keeping each bite as rewarding as the moment it came out of the oven.”
By integrating these Storage Tips, we ensure our bread delivers the authentic, tangy flavor and crust that make the Tassajara Bread recipe a cherished staple for every baker.
Conclusion
Mastering the Tassajara Bread recipe brings a rewarding blend of tradition and artisan skill right into our kitchens. With patience and attention to detail, we can create loaves that boast a perfect crust and a flavorful, tender crumb. This bread not only elevates everyday meals but also connects us to a rich baking heritage.
By following the steps and tips shared, we ensure consistent results that impress every time. Whether enjoyed fresh or stored for later, Tassajara Bread remains a versatile and satisfying staple worth baking again and again. Let’s keep exploring and sharing the joy of artisan bread making together.
Frequently Asked Questions
What is Tassajara Bread?
Tassajara Bread is an artisan sourdough bread originating from the Tassajara Zen Mountain Center in California. It is known for its crusty exterior, soft chewy interior, and rich tangy flavor from a natural sourdough starter.
What ingredients are needed to make Tassajara Bread?
Key ingredients include an active sourdough starter, warm water, bread flour, whole wheat flour, salt, honey, and olive oil. Using high-quality or organic ingredients is recommended for the best flavor.
What equipment is essential for baking Tassajara Bread?
Essentials include a mixing bowl, digital kitchen scale, bench scraper, proofing basket, clean towel, Dutch oven or baking stone, oven mitts, and cooling rack. Optional tools are a dough whisk, thermometer, and spray bottle.
Can Tassajara Bread be made ahead of time?
Yes. You can prepare the sourdough starter in advance, autolyse the dough overnight, and refrigerate during bulk fermentation. Shaping and final proofing can also be done ahead to fit your schedule.
How do I know when the dough is ready for shaping?
The dough passes the “poke test” when lightly pressed and it springs back slowly but leaves a slight indentation. This indicates proper fermentation and gluten development.
What is the best method to shape Tassajara Bread?
Shape the dough by creating surface tension through pre-shaping and final shaping, forming either a boule (round) or bâtard (oval) loaf. A taut surface ensures a beautiful crust and even crumb.
How long should the final proof (second rise) last?
Typically, the second rise takes 1 to 2 hours at ideal temperature and humidity. The “finger dent test”—a gentle press that slowly springs back—can help assess readiness.
At what temperature should I bake Tassajara Bread?
Preheat your oven to 450°F (232°C) and bake the bread for 20 minutes, then lower the temperature to 425°F for an additional 20–25 minutes to achieve a crusty, golden loaf.
Why should I let Tassajara Bread cool before slicing?
Cooling on a wire rack for at least one hour allows the crumb structure and flavor to develop fully, preventing a gummy or doughy texture inside the loaf.
How should I store Tassajara Bread?
For short-term freshness, store in a linen bag or loosely wrapped in cloth at room temperature. Avoid refrigeration. For longer storage, slice and freeze bread wrapped tightly in plastic to preserve freshness.