
Tahini bread is a delightful twist on traditional bread that brings the rich, nutty flavor of tahini right into every bite. Originating from Middle Eastern cuisine tahini adds a creamy texture and a subtle depth that makes this bread truly unique. Whether you’re enjoying it fresh out of the oven or toasted with a drizzle of honey this bread is a versatile treat.
We love how simple ingredients come together to create something so flavorful and satisfying. This tahini bread recipe is perfect for breakfast sandwiches hearty snacks or as a side to your favorite dips. Let’s dive in and bake a loaf that’s both comforting and packed with wholesome goodness.
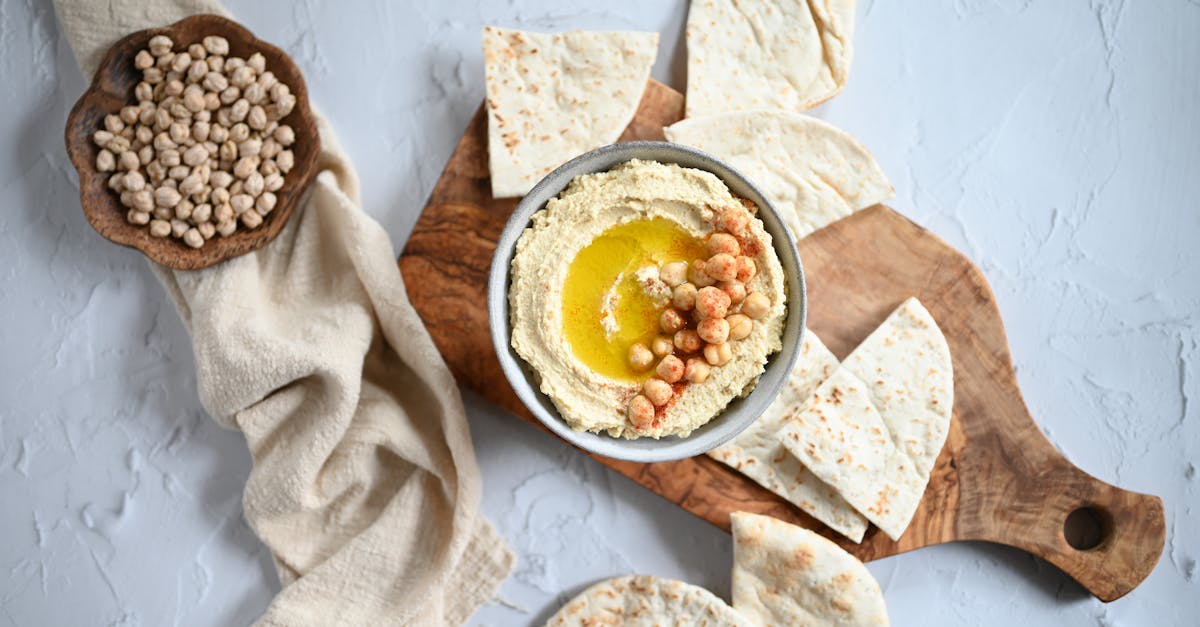
Ingredients
To create the perfect Tahini Bread, we carefully combine simple yet flavorful ingredients. Below, we break down everything you need into clear categories to streamline your baking process.
Dry Ingredients
These ingredients form the base of our dough, providing structure and flavor:
- 2 ½ cups (320g) all-purpose flour — the foundation for a soft and airy crumb
- 2 tablespoons granulated sugar — for mild sweetness and yeast activation
- 1 teaspoon salt — enhances overall flavor balance
- 2 teaspoons instant yeast — the leavening agent that helps the bread rise
Wet Ingredients
Wet components infuse moisture and richness into our Tahini Bread:
- ¾ cup (180ml) warm water (about 110°F/43°C) — activates the yeast and hydrates the flour
- ⅓ cup (90g) tahini — the star ingredient, adding nutty depth and creaminess
- 2 tablespoons olive oil — for tenderness and subtle richness
Optional Add-Ins and Toppings
Customize your loaf with these flavorful extras for texture and visual appeal:
| Add-Ins | Purpose | Quantity |
|---|---|---|
| 1 tablespoon za’atar | Earthy seasoning twist | Optional |
| 2 tablespoons sesame seeds | Adds crunch and nuttiness | Optional |
| 1 tablespoon honey | Sweetens and enhances flavor | Optional |
“Feel free to experiment with these add-ins to tailor your tahini bread to your taste buds!”
By gathering these ingredients, we set the stage to bake a loaf that is flavorful, aromatic, and deeply satisfying.
Equipment Needed
To bake our rich and nutty Tahini Bread, having the right equipment simplifies the process and ensures consistent results. Here is a detailed list of essential tools we will use:
- Mixing Bowls: One large bowl for combining the dry ingredients and another for mixing the wet ingredients thoroughly.
- Measuring Cups and Spoons: Accurate measurement of flour, tahini, sugar, and yeast is critical for perfect bread texture.
- Wooden Spoon or Dough Hook: For initial mixing, a sturdy wooden spoon works well. An electric mixer with a dough hook attachment speeds up mixing and kneading.
- Kitchen Scale (optional but recommended): Ensures the precision necessary for baking, especially for flour and tahini.
- Bench Scraper: Useful for handling sticky dough and cleaning the work surface.
- Clean Kitchen Towel or Plastic Wrap: For covering the dough during its rising phases to retain moisture.
- Loaf Pan: A standard 9×5-inch loaf pan shapes the bread and promotes even baking.
- Cooling Rack: Allows the bread to cool evenly, preventing soggy bottoms.
- Oven Thermometer (optional): Validates oven temperature for consistent baking results.
| Equipment | Purpose |
|---|---|
| Mixing Bowls | Combine dry and wet ingredients separately |
| Measuring Tools | Ensure precise ingredient quantities |
| Wooden Spoon/Dough Hook | Mix and knead dough |
| Kitchen Scale | Accurately weigh ingredients (optional) |
| Bench Scraper | Handle dough and clean work surface |
| Kitchen Towel/Plastic Wrap | Cover dough for proofing |
| Loaf Pan | Shape bread for baking |
| Cooling Rack | Cool bread evenly without sogginess |
| Oven Thermometer | Verify accurate oven temperature (optional) |
Tip: When mixing, using an electric mixer with a dough hook can reduce the physical effort and help achieve a smooth elastic dough quicker. However, hand mixing and kneading give great control and ensure we connect directly with our dough for the best tahini bread experience.
With these tools at the ready, we can move confidently into the baking steps, fully prepared to create our moist and flavorful Tahini Bread.
Preparation
In this section, we focus on the crucial steps to create the perfect tahini bread dough. Careful attention to each stage ensures a flavorful and tender loaf.
Preparing the Dough
To begin, we activate the yeast and prepare the environment for our dough.
- Warm water (about 110°F/43°C) is essential to wake the yeast without killing it.
- Measure instant yeast precisely and combine it with a pinch of sugar from the dry ingredients to help fermentation.
| Ingredient          | Temperature/Condition      |
| ------------------- | ------------------------- |
| Warm water          | 110°F (43°C), not hot     |
| Instant yeast       | Room temperature          |
| Sugar (for yeast)   | Small pinch (about 1 tsp) |
“Warm water activates yeast more efficiently, resulting in superior dough rise.” We gently stir the yeast and water mixture and set it aside for 5-10 minutes until frothy bubbles appear. This signals active yeast, ready for mixing.
Mixing the Ingredients
Once yeast is activated, we combine the dry and wet ingredients to form the dough.
- Add the all-purpose flour, salt, and remaining sugar into a large mixing bowl or stand mixer bowl.
- Incorporate the wet ingredients: the activated yeast mixture, tahini, and olive oil.
We mix the ingredients thoroughly until a shaggy dough starts to form. This step evenly distributes the tahini’s nutty flavor and ensures the salt and sugar dissolve properly.
Tip: If adding optional ingredients like za’atar or sesame seeds, fold them in during this phase for balanced flavor infusion.
Kneading the Dough
Kneading strengthens the dough’s gluten network giving the tahini bread its chewy texture and structure.
- Turn the shaggy dough onto a lightly floured surface.
- Using the heels of our hands, we push the dough away, fold it back, and rotate it.
- Repeat this motion for about 8-10 minutes or until the dough becomes smooth, elastic, and slightly tacky.
If using a stand mixer with a dough hook, knead on medium speed for 6-8 minutes.
“The dough should spring back when poked gently” signaling enough gluten development. Avoid over-flouring the surface to keep the bread moist and tender.
This step-by-step preparation ensures our tahini bread dough will rise beautifully and bake into a moist, flavorful masterpiece.
First Rise
After kneading, we transfer the dough into a large greased bowl to allow it to rise. This step is essential for developing the texture and flavor unique to our tahini bread.
Steps for the First Rise
- Grease the bowl lightly with olive oil to prevent sticking.
- Place the dough ball in the bowl and turn it once to coat all sides with oil.
- Cover the bowl tightly with plastic wrap or a clean, damp kitchen towel to maintain moisture.
- Set the bowl in a warm, draft-free spot. The ideal temperature for the first rise is between 75°F to 85°F (24°C to 29°C).
- Allow the dough to rise until it doubles in size, typically taking 1 to 1.5 hours.
“Patience during this first rise transforms the tahini bread dough into a light, airy base ready to become our comforting loaf.”
| Aspect | Details |
|---|---|
| Temperature Range | 75°F to 85°F (24°C to 29°C) |
| Duration | 1 to 1.5 hours |
| Desired Outcome | Dough doubles in size |
We can gently press the dough with a fingertip to check readiness. If the indentation remains and springs back slowly it is ready for the next step.
By focusing on this First Rise we ensure a well-fermented dough full of flavor and the perfect crumb for our tahini bread recipe.
Shaping the Dough
Once our tahini bread dough has completed the first rise and is doubled in size, we move forward to the shaping stage. This step is crucial to create the loaf’s structure and texture.
Follow these steps to shape the dough properly:
- Prepare your work surface by lightly flouring it to prevent sticking.
- Gently punch down the dough to release any large gas bubbles. This helps redistribute yeast and sugars evenly for a balanced crumb.
- Transfer the dough onto the floured surface and use your hands or a bench scraper to flatten it into a rough rectangle approximately 10 by 15 inches.
- Starting from one of the longer edges, roll the dough tightly into a log shape. This rolling traps air and creates an even crumb texture.
- Pinch the seams and ends firmly to seal the roll, preventing it from expanding uncontrollably during the second rise.
- Place the shaped dough seam-side down into a greased or parchment-lined loaf pan. This stabilizes the dough as it rises and helps achieve a uniform shape.
- Cover the pan loosely with a clean kitchen towel or plastic wrap.
Key tips for shaping:
| Tip | Purpose |
|---|---|
| Lightly flour surface | Prevents dough from sticking |
| Punch dough gently | Maintains air pockets |
| Roll tightly | Supports good loaf structure |
| Pinch seams securely | Prevents dough from opening |
| Place seam side down | Ensures loaf maintains shape |
At this stage, the dough is ready for the second rise. Shaping properly supports the unique tahini flavor and moist texture in every slice. As we shape with intention, our bread will develop its signature look and crumb.
“Shaping is where the dough transforms into the loaf we love. A little care here makes a world of difference in the final bread.“
Next, we allow the dough to proof until it nearly doubles in size again, creating the perfect spring and softness for our tahini bread recipe.
Second Rise
After shaping our tahini bread dough and placing it seam-side down in the prepared loaf pan, the second rise—also known as proofing—is essential for achieving that soft, airy crumb and perfect spring.
Steps for the Second Rise:
- Cover the Dough
Lightly cover the loaf pan with a clean kitchen towel or plastic wrap. This creates a warm, humid environment that prevents the dough surface from drying out.
- Choose a Warm, Draft-Free Spot
Place the dough somewhere warm, ideally between 75°F to 85°F (24°C to 29°C). A slightly warmer spot helps the yeastproofing process speed up without compromising texture.
- Timing the Proof
Allow the dough to rise until it nearly doubles in size again. This usually takes 30 to 45 minutes, but can vary depending on room temperature.
- Testing for Readiness
Gently press the top of the dough with a floured fingertip:
- If the indentation springs back slowly but remains slightly, the dough is ready to bake.
- If it springs back immediately, it needs more time.
- If it doesn’t spring back at all, it may be over-proofed.
“The second rise is the moment where the dough transforms from formed to fully alive, giving our tahini bread its signature tender crumb and light texture.”
Temperature and Timing Guide for Second Rise
| Condition | Temperature (°F) | Time (Minutes) | Notes |
|---|---|---|---|
| Ideal Proofing Environment | 75–85 | 30–45 | Dough nearly doubles in size |
| Cooler Environment (<75°F) | Below 75 | 60+ | Slower rise, monitor closely |
| Warmer Environment (>85°F) | Above 85 | 20–30 | Watch carefully; avoid overproofing |
By managing the Second Rise carefully, we ensure our tahini bread develops a beautiful, tender crumb with just the right chew and depth of flavor. This step solidifies the dough’s structure and prepares it for the final golden bake.
Baking Directions
We are ready to transform our well-proofed dough into a delicious loaf of tahini bread. Follow these precise baking directions to achieve the ideal crust, crumb, and flavor balance.
Preheating the Oven
Preheat your oven to 375°F (190°C) at least 20 minutes before baking. This ensures consistent, even heat — essential for a perfectly baked tahini bread. Position the oven rack in the center to promote optimal air circulation and an even bake.
Tip: Use an oven thermometer to verify the temperature. Ovens often fluctuate and this prevents under or over-baking.
Baking Time and Temperature
Bake the tahini bread for 30 to 35 minutes at 375°F (190°C). The initial radiant heat helps develop a nicely browned crust while the steady temperature inside bakes the crumb evenly.
| Time (Minutes) | Temperature (°F) | Temperature (°C) | Purpose |
|---|---|---|---|
| 30 – 35 | 375 | 190 | Bake until golden crust and fully cooked crumb |
During baking:
- The tahini-infused dough develops an enticing nutty aroma.
- The crust will turn a rich golden brown.
- The interior crumb will set with a tender yet chewy texture.
Checking for Doneness
To verify tahini bread doneness:
- The crust should be firm and have a deep golden color.
- Tap the bottom of the loaf. It should sound hollow, signaling a fully baked interior.
- For accuracy, use an instant-read thermometer inserted into the bread’s center. The internal temperature should reach about 200°F (93°C).
Remember: Removing the bread too early results in a doughy crumb; baking it longer ensures full texture and flavor development.
By carefully following these baking directions we ensure a stunning loaf with the signature richness and subtle nuttiness from tahini.
Cooling and Serving
Once our tahini bread is out of the oven with its golden crust and rich aroma, we move promptly to the cooling process. This step is crucial for the bread to set properly and enhance its signature moist and chewy texture.
Cooling Steps
- Remove the loaf carefully from the pan and place it directly on a wire cooling rack. This allows air to circulate freely around the bread, preventing sogginess.
- Let the bread cool at room temperature for at least 1 hour. Cutting into the bread too soon can cause the crumb to become gummy as steam escapes.
- We recommend avoiding wrapping the bread until it has fully cooled to preserve the crust’s crispness.
Serving Tips
Our tahini bread shines when served fresh but also holds up beautifully the next day. Here are a few ways we love to enjoy it:
- Slice it thick for sandwiches; tahini’s subtle nutty flavor complements savory fillings like hummus, roasted vegetables, or grilled chicken.
- Toast slices lightly to awaken the aroma and add crunch, perfect for breakfast spreads with honey or za’atar.
- Use leftover slices for croutons or breadcrumbs to add a unique tahini essence to salads or dishes.
Storage Guidelines
To help our readers keep their tahini bread fresh longer, here’s a simple storage chart:
| Storage Method | Duration | Notes |
|---|---|---|
| Room temperature | Up to 2 days | Store in a paper bag or bread box to keep crust crisp. |
| Refrigerated | Up to 1 week | Wrap in plastic wrap to retain moisture but may soften crust. |
| Frozen | Up to 3 months | Slice before freezing; thaw at room temp or toast directly. |
Pro Tip: For best flavor, reheat slices in a toaster oven or skillet rather than a microwave.
By following these Cooling and Serving techniques, our tahini bread retains its ideal texture and flavor, ensuring every bite is a delightful balance of softness and richness.
Storage Tips
Proper storage is essential to maintain the freshness and flavor of our tahini bread. Follow these tips to extend the shelf life and enjoy the bread at its best.
Room Temperature Storage
- Wrap the cooled tahini bread in a clean cotton towel or place it in a paper bag. This preserves the crust’s crispness while preventing it from drying out.
- Store at room temperature in a cool, dry place away from direct sunlight.
- Consume within 2 to 3 days for optimal flavor and texture.
Refrigeration
Refrigerating is generally not recommended as it can dry out the bread. However, if the climate is very warm or humid:
- Wrap the bread tightly in plastic wrap or place it in an airtight container.
- Refrigerate for up to 1 week.
- To restore softness, reheat the bread briefly in a preheated oven at 350°F (175°C) for 5 to 7 minutes.
Freezing for Longer Storage
Freezing is the best method for longer-term storage while preserving flavor and texture.
- Slice the bread before freezing to allow easy thawing.
- Wrap slices tightly in plastic wrap then place them inside a zipper-lock freezer bag or airtight container.
- Label with the freezing date.
| Storage Method | Wrap Type | Duration | Temperature | Reheating Tip |
|---|---|---|---|---|
| Room Temperature | Cotton towel / paper bag | 2 to 3 days | 68°F to 72°F (20°C to 22°C) | No reheating necessary |
| Refrigeration | Plastic wrap / airtight container | Up to 1 week | 35°F to 40°F (2°C to 4°C) | 350°F for 5-7 mins to refresh |
| Freezing | Plastic wrap + freezer bag | Up to 3 months | 0°F (-18°C) | Thaw at room temp or oven reheat |
Pro Tip: For the best eating experience, thaw frozen slices at room temperature or toast directly from frozen to enjoy the crisp edges and tender crumb that define our tahini bread.
By following these storage techniques, we can extend the enjoyment of our homemade tahini bread without sacrificing the delicate nutty flavor and moist texture characteristic of the recipe.
Conclusion
Baking tahini bread is a rewarding experience that brings a unique Middle Eastern twist to your kitchen. With simple ingredients and clear steps, we can create a loaf that’s both flavorful and versatile. Whether enjoyed fresh or toasted, this bread adds a rich, nutty depth to any meal.
By paying attention to each stage—from mixing and rising to baking and cooling—we ensure a perfect texture and taste every time. Storing it properly keeps that freshness intact, so we can savor our homemade tahini bread whenever we like. Let’s keep experimenting and enjoying the comforting goodness this recipe offers.
Frequently Asked Questions
What is tahini bread?
Tahini bread is a Middle Eastern-inspired bread that incorporates tahini, a sesame seed paste, into the dough. It has a unique nutty flavor and a moist, chewy texture, making it versatile for meals or snacks.
What ingredients do I need to make tahini bread?
You need all-purpose flour, sugar, salt, instant yeast, warm water, tahini, and olive oil. Optional add-ins include za’atar, sesame seeds, and honey for extra flavor.
What equipment is necessary for baking tahini bread?
Essential tools include mixing bowls, measuring cups and spoons, a wooden spoon or dough hook, a kitchen scale, bench scraper, loaf pan, cooling rack, and optionally an oven thermometer.
How do I activate yeast for tahini bread?
Activate yeast by mixing it with warm water at about 110°F (43°C) and a pinch of sugar. Let it sit until frothy, which indicates it is ready for baking.
Why is kneading important in making tahini bread?
Kneading develops gluten in the dough, which gives tahini bread its characteristic chewy texture and helps the bread rise evenly.
How long should the first rise take and at what temperature?
The first rise should take 1 to 1.5 hours in a warm, draft-free spot between 75°F to 85°F (24°C to 29°C), allowing the dough to double in size and develop flavor.
What is the shaping process for tahini bread?
After the first rise, punch down the dough, flatten it into a rectangle, roll it tightly into a log, seal the seams, and place it seam-side down in a greased loaf pan for the second rise.
How long is the second rise and why is it important?
The second rise lasts 30 to 45 minutes. It helps the dough develop a soft, airy crumb and proper spring before baking.
At what temperature and for how long should I bake tahini bread?
Preheat your oven to 375°F (190°C) and bake the bread for 30 to 35 minutes until it has a golden crust and sounds hollow when tapped.
How should I cool and serve tahini bread?
Cool the bread on a wire rack for at least an hour to maintain crust crispness and avoid gumminess. Serve sliced for sandwiches, toasted, or as croutons.
What’s the best way to store tahini bread?
Store at room temperature up to 3 days, refrigerate only in hot climates, or freeze for long-term storage. Wrap well and thaw frozen bread before eating for best texture.