
Who can resist the warm, golden glow of freshly baked sun buns? These soft, pillowy treats get their name from their sunny appearance and the way they brighten up any table. Perfect for breakfast, brunch, or an afternoon snack, they’re a delightful mix of light sweetness and buttery goodness that feels like a hug in every bite.
Sun buns have a rich history rooted in European baking traditions, where soft, enriched doughs are a staple. We’ve taken inspiration from those classic recipes and added our own twist to make them approachable and foolproof for any home baker. Whether you’re an experienced baker or just starting out, these buns are a joy to make and even better to eat.
Sun Buns Recipe
Creating sun buns at home is a delightful journey that fills our kitchen with the enticing aroma of freshly baked golden treats. Let’s dive into the step-by-step guide to crafting these soft, fluffy pastries that are full of buttery and sweet flavors.
Ingredients
Here’s what we’ll need to get started:
- 2 ½ cups all-purpose flour (sifted for a lighter texture)
- 3 tbsp sugar (for a touch of sweetness)
- 1 tsp salt
- 2 tsp instant yeast (or dry active yeast, activated beforehand)
- ¾ cup warm milk (around 110°F)
- 1 large egg (lightly beaten)
- 3 tbsp unsalted butter (softened)
- 1 tbsp vegetable oil (for greasing the bowl)
- 1 egg yolk (mixed with 1 tbsp water, for egg wash)
- 1 tbsp honey or maple syrup (optional for glazing)
Step-by-Step Instructions
- Prepare the Dough:
- In a large mixing bowl, combine the flour, sugar, salt, and yeast.
- Gradually pour in the warm milk while stirring, then add the beaten egg and mix until combined.
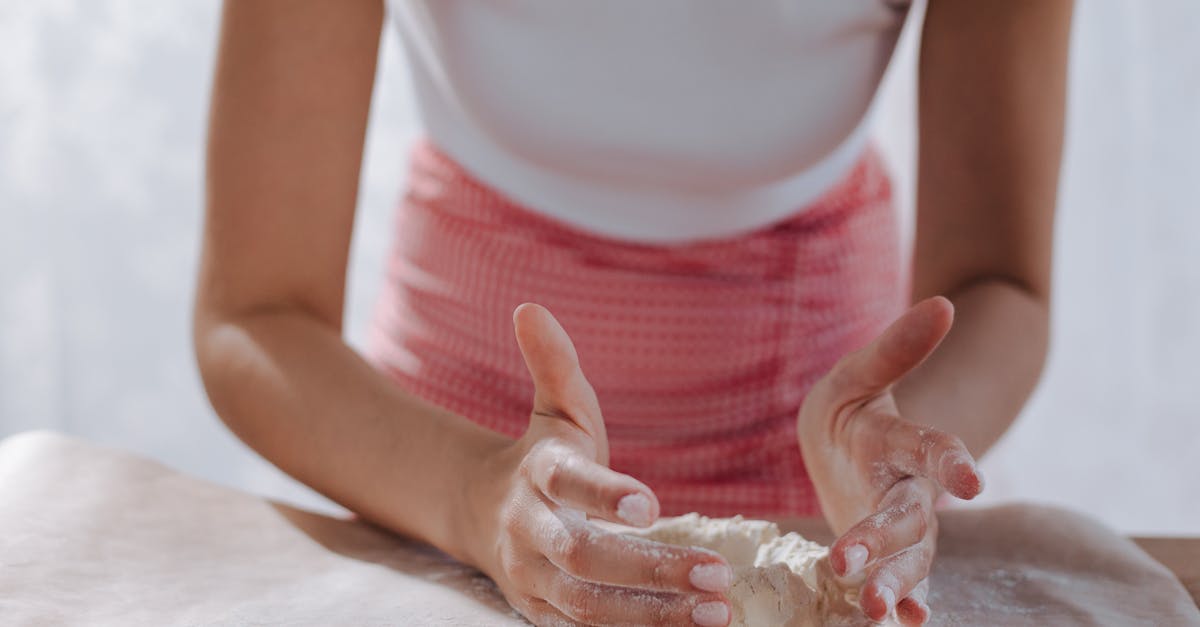
- Add the softened butter and knead the dough on a lightly floured surface for 8–10 minutes until it’s smooth and elastic.
- First Rise:
- Coat a large bowl with vegetable oil. Place the dough inside, turning it once so the surface is lightly greased.
- Cover the bowl with a damp towel or plastic wrap and let it rise in a warm place for 1–2 hours, or until the dough has doubled in size.
- Shape the Buns:
- Punch down the risen dough and divide it into equal portions (approximately 8–10 pieces). Roll each piece into a smooth ball.
- Arrange the shaped buns on a parchment-lined baking sheet, leaving space between each one to allow for expansion.
| Portion Size | Number of Buns |
|---|---|
| Small | 10 |
| Medium | 8 |
- Second Rise:
- Cover the buns with a towel and let them rise again for about 30–40 minutes, until they look plump and airy.
- Egg Wash and Bake:
- Preheat the oven to 375°F (190°C).
- Brush the tops of the buns with the egg yolk and water mixture using a pastry brush.
- Bake the buns in the preheated oven for 12–15 minutes, or until the tops are golden brown.
- Optional Glaze:
- For an extra touch of sweetness and shine, lightly brush the warm buns with honey or maple syrup as soon as they come out of the oven.
- Cool and Serve:
- Allow the buns to cool on a wire rack for 5–10 minutes before serving.
- Enjoy these sun buns on their own or with a generous spread of butter or jam.
Ingredients
To create the perfect soft and golden sun buns, we’ll need a combination of high-quality ingredients that ensure both texture and flavor. Here’s everything you’ll need to get started:
For the Dough:
- 3 ½ cups (420g) all-purpose flour, sifted for smooth dough
- 1 packet (2 ¼ teaspoons) active dry yeast or instant yeast
- ¼ cup (50g) granulated sugar for a mild touch of sweetness
- ½ teaspoon salt to enhance flavors
- ¾ cup (180ml) whole milk, warmed to 110°F
- ¼ cup (60g) unsalted butter, melted and slightly cooled
- 1 large egg, room temperature
- 1 teaspoon vanilla extract for subtle aromatic notes
For the Glaze (Optional but Recommended):
- 2 tablespoons (30ml) heavy cream or whole milk
- 2 tablespoons (30g) unsalted butter, melted
- 2 teaspoons powdered sugar, sifted for smoothness
Each ingredient plays a vital role in creating the iconic softness and buttery richness that defines sun buns. Using high-quality flour and fresh yeast makes a big difference in achieving perfect results.
Ingredient Preparation Tips:
- Warm the milk to 110°F, ensuring it is warm but not hot to activate the yeast without killing it.
- For best results, use room temperature eggs and butter to help the dough mix evenly for a velvety consistency.
- Always sift the powdered sugar for a smooth glaze if applying the optional finish.
Tools And Equipment
To prepare sun buns, having the right tools and equipment on hand ensures a smooth baking process and optimal results. Below is a breakdown of the essential items to keep ready:
Baking Tools and Essentials
- Mixing bowls: Use one large bowl for mixing the dough and smaller ones for any additional preparation, such as whisking eggs or proofing yeast. Opt for glass or stainless-steel bowls for durability.
- Digital kitchen scale: Precision is key in baking. A kitchen scale allows us to measure ingredients accurately for consistent results.
- Measuring cups and spoons: Essential for measuring liquids and dry ingredients like sugar, salt, and flour.
- Whisk and silicone spatula: Use a whisk for combining dry ingredients or beating eggs. A silicone spatula works well for scraping down the sides of bowls.
Specialized Equipment
- Stand mixer with dough hook attachment: While the dough can be kneaded by hand, a stand mixer significantly reduces effort and ensures even mixing for a smooth dough consistency.
- Instant-read thermometer: Monitoring the temperature of the warmed milk helps activate the yeast without overheating or underwarming it. Aim for 110°F (43°C).
- Pastry brush: Perfect for applying the optional glaze or brushing melted butter across the buns for added flavor.
Baking & Shaping Tools
- Rolling pin (optional): If shaping the buns requires rolling out the dough, a sturdy rolling pin will be helpful.
- Sharp knife or bench scraper: Use these for dividing the dough into even pieces for uniform buns.
- Round cookie cutter (optional): While not mandatory, it can help achieve perfectly round buns if consistency in shape is desired.
Ovenware and Baking Accessories
- Baking sheet: A non-stick or lined baking sheet is crucial for even baking. Line it with parchment paper or a silicone baking mat for easy cleanup.
- Clean tea towel: Use a damp tea towel to cover the dough during the proofing stage. It retains moisture and provides the ideal environment for rising.
- Wire rack: This allows the buns to cool evenly after baking, preventing condensation from making the bottoms soggy.
Table for Reference
| Tool/Equipment | Purpose in Making Sun Buns |
|---|---|
| Mixing bowls | Mixing dough and preparing other ingredients |
| Stand mixer | Kneading dough for smooth and elastic texture |
| Instant-read thermometer | Ensuring milk is at the correct temperature for yeast activation |
| Baking sheet | Baking sun buns evenly; prevents sticking |
| Wire rack | Cooling buns while maintaining their texture |
| Pastry brush | Applying glaze or butter evenly for enhanced flavor |
Directions
Let’s dive into the step-by-step process to make these delightful sun buns. Follow these instructions carefully to create soft, golden pastries with a melt-in-your-mouth texture.
Prep
- Activate the yeast: In a small bowl, combine 1/4 cup of warm milk (around 110°F) with 1 tablespoon of sugar. Sprinkle in 2 1/4 teaspoons (1 packet) of active dry yeast. Let the mixture sit for 5-10 minutes until it becomes frothy. This shows the yeast is active.
- Mix the dry ingredients: In a large mixing bowl, whisk together 3 1/2 cups of all-purpose flour, 1/4 cup of sugar, and 1 teaspoon of salt. Make sure all the dry ingredients are evenly incorporated.
- Prepare the wet mixture: In another bowl, whisk together the remaining 3/4 cup of warm milk, 1 room temperature egg, and 1 teaspoon of vanilla extract.
- Combine wet and dry ingredients: Add the yeast mixture, wet mixture, and 5 tablespoons of softened unsalted butter to the dry ingredients. Stir to form a shaggy dough.
| Step | Action | Key Notes |
|---|---|---|
| 1 | Activate yeast | Milk temperature: ~110°F |
| 2 | Mix dry ingredients | Use a large mixing bowl |
| 3 | Prepare wet mixture | Ensure egg is room temperature |
| 4 | Combine wet, dry, and yeast mixtures | Stir gently to avoid over-mixing |
- Knead the dough: Turn the dough onto a floured surface or use a stand mixer with a dough hook. Knead for 8-10 minutes until you achieve a smooth, elastic dough that springs back when touched. Add small amounts of flour if too sticky.
- First rise: Place the dough in a lightly greased bowl, cover it with a clean tea towel, and let it proof in a warm place for 1-2 hours or until doubled in size.
Assemble
- Divide the dough: Once proofed, punch down the dough gently to release air. Turn it onto a floured surface and divide it into 12 equal portions using a kitchen scale for accuracy.
- Shape the buns: Roll each portion into a ball. To achieve smooth tops, fold the edges underneath, pinching seams at the bottom.
- Arrange on a baking sheet: Line a baking sheet with parchment paper and place the shaped buns 2 inches apart.
- Second rise: Cover the buns lightly with a tea towel and allow them to proof for another 30-45 minutes. At this stage, the buns should puff up beautifully.
- Brush with egg wash: Whisk together 1 egg yolk and 1 tablespoon of milk. Brush this over the buns for that iconic golden, glossy finish.
Cook
- Preheat the oven: While the buns are rising, preheat your oven to 375°F (190°C).
- Bake: Place the baking sheet in the center of the preheated oven. Bake for 18-20 minutes until the buns are golden brown and sound hollow when tapped on the bottom.
- Cool: Transfer the baked buns to a wire rack. Let them cool slightly for 10 minutes, though they taste heavenly while still warm.
Baking Time Overview
| Step | Duration | Temperature |
|---|---|---|
| Second Proofing | 30-45 minutes | Room temperature |
| Baking | 18-20 minutes | 375°F (190°C) |
| Cooling | ~10 minutes | N/A |
Serving Suggestions
When it comes to enjoying sun buns, their versatility makes them a delight for a variety of palates and occasions. Whether you’re serving these soft, buttery pastries fresh out of the oven or getting creative with accompaniments, here are some serving ideas to elevate your experience:
- Breakfast Bliss: Serve sun buns warm with a generous smear of salted butter or a side of fruit preserves like raspberry, apricot, or strawberry. The subtle sweetness of the buns pairs perfectly with bold, tangy jams.
- Morning Coffee Partner: Pair these golden treats with a hot cup of coffee, cappuccino, or even a spiced masala chai. The rich, aromatic flavors of your morning beverage will enhance the softness and lightly sweet flavor of the buns.
- Brunch Star: Arrange the buns on a plate with other baked goods like croissants and muffins. Add fresh fruit, honey, and yogurt to create a winsome brunch spread.
- Sweet Indulgence: For a luxurious dessert, drizzle a homemade glaze or melted white chocolate across the tops of the buns. Sprinkle with powdered sugar or crushed nuts like almonds or pistachios for an added crunch.
- Holiday Treat: Use the buns as a base for special holiday spreads. Top them with whipped cream and a sprinkle of cinnamon in the winter months or fresh berries and mint during summer gatherings for extra flair.
Quick Pairing Ideas:
| Occasion | Suggested Pairing |
|---|---|
| Morning Coffee | Latte, cappuccino, or chai |
| Breakfast | Butter, fruit preserves, or honey |
| Brunch | Fresh fruit, yogurt, and assorted cheeses |
| Sweet Dessert | Glaze, powdered sugar, or nuts |
| Festive Celebration | Whipped cream, berries, or cinnamon dusting |
- Kid-Friendly Option: For younger ones, serve sun buns with a dollop of Nutella, peanut butter, or cream cheese. These spreads make the buns both fun and finger-licking good for kids.
- On-the-Go: Wrap them tightly in parchment paper for a quick snack or breakfast. They’re perfect for busy mornings or packed lunches.
Let your imagination guide you as you explore these serving ideas. Sun buns’ adaptable nature allows them to shine on any table, whether as a comforting breakfast dish or the centerpiece of an indulgent dessert creation.
Make-Ahead Tips
When it comes to preparing sun buns, planning ahead ensures ease and efficiency, especially for those busy mornings or special occasions. Here are our step-by-step make-ahead tips to save time while preserving the freshly baked flavor and texture of these golden treats.
1. Preparing the Dough in Advance
To streamline the process:
- Refrigerate the Dough: After kneading the dough and completing the first rise, place it in a lightly greased, airtight container or wrap it tightly in plastic wrap. Refrigerate it for up to 24 hours. This slows down the fermentation process while maintaining the dough’s flavor and flexibility.
- Bring to Room Temperature: Let the chilled dough rest on the counter for about 30–45 minutes before shaping the buns. This ensures it’s pliable and ready for the next steps.
2. Freezing Unbaked Sun Buns
For ultimate convenience, you can freeze the buns before baking:
- Shape the Buns: Divide and shape the dough into individual buns as per the recipe instructions.
- Initial Proof & Freeze: Allow the buns to undergo their second rise until puffy but not fully doubled. Arrange them on a baking sheet lined with parchment paper, then freeze the tray until the buns are solid.
- Store Properly: Transfer the frozen buns into a freezer-safe bag or container, labeling with the date. They can be frozen for up to 3 months.
When ready to bake:
- Arrange the frozen buns on a baking sheet and let them thaw and rise at room temperature for approximately 2–3 hours.
- Once risen, continue with the egg wash and bake as indicated.
Freezing Baked Sun Buns
For those who prefer to bake ahead entirely:
- Cool Completely: Once the buns are baked and cooled on a wire rack, ensure they are at room temperature to prevent sogginess.
- Wrap Securely: Wrap each bun individually in plastic wrap or aluminum foil, and place them in a freezer-safe bag.
- Label & Store: Note the date and store them in the freezer for up to 2 months.
To reheat:
- Unwrap and warm them in a 350°F (175°C) oven for about 8–10 minutes or until heated through. For a softer texture, wrap the buns in foil during reheating.
3. Pre-Making the Glaze or Toppings
If you’re using glaze or toppings:
- Prepare Ahead: Mix the glaze or toppings a day in advance. Store the glaze in an airtight container in the refrigerator.
- Reheat Gently: When ready to use, warm the glaze over low heat or at room temperature. Stir well for a smooth consistency before drizzling over the buns.
Step-by-Step At-a-Glance Guide
| Make-Ahead Method | Storage Duration | Reheating or Prep |
|---|---|---|
| Refrigerated Dough | Up to 24 hours | Rest at room temp 30–45 minutes |
| Frozen Unbaked Buns | Up to 3 months | Thaw, rise for 2–3 hours, then bake |
| Frozen Baked Sun Buns | Up to 2 months | Reheat at 350°F for 8–10 minutes |
| Pre-Made Glaze/Toppings | 1 day (refrigerated) | Reheat gently or bring to room temp |
Storage And Reheating Instructions
Proper storage and reheating are crucial to preserving the soft, buttery texture and fresh-baked flavor of our sun buns. Whether you’re saving leftovers or prepping in advance, follow these tips to keep your sun buns as delectable as the moment they came out of the oven.
Storage Tips
For Room Temperature Storage:
- Allow the baked buns to cool completely on a wire rack. Warm buns may create condensation, causing them to turn soggy.
- Store the buns in an airtight container or tightly wrapped in plastic wrap.
- Keep in a cool, dry place for up to 2 days.
Refrigeration:
- If storing longer than 2 days, transfer the buns to the refrigerator. Use a resealable freezer bag or an airtight container to maintain freshness.
- Refrigerated buns will stay fresh for up to 5 days but might lose some softness.
Freezing:
- To freeze, first cool the buns entirely. Either individually wrap each bun in plastic wrap or place them in a single layer inside a freezer-safe bag.
- Label the bag with the date to track storage time. Sun buns can be frozen for up to 3 months.
- For best results, freeze unglazed buns and prepare toppings fresh when ready to serve.
Reheating Instructions
Freshly reheated sun buns will regain their soft, fluffy texture and warm buttery taste. Here’s how to bring them back to life:
Room Temperature Buns:
- Wrap the buns lightly in aluminum foil and warm them in a preheated oven at 350°F (175°C) for 5-10 minutes.
- Alternatively, microwave individual buns for 15-20 seconds, wrapping each in a damp paper towel to prevent drying.
Refrigerated Buns:
- Preheat the oven to 325°F (160°C). Place the buns on a baking sheet and cover loosely with foil to retain moisture. Warm them for 10-12 minutes until heated through.
- For a quicker option, microwave for 20-25 seconds with a damp paper towel as mentioned above.
Frozen Buns:
- Remove the buns from the freezer and let them thaw at room temperature for 1-2 hours.
- Reheat thawed buns following the steps for room-temperature buns or bake them directly from frozen:
- Preheat the oven to 350°F (175°C).
- Place frozen buns on a baking sheet and cover with foil. Heat for 15-20 minutes, checking halfway through.
Quick Tips for Maintaining Perfect Texture
- Avoid over-reheating, as it can make the buns dry or hard.
- For a bakery-fresh finish, brush a small amount of melted butter on the buns after reheating.
- To restore any glaze, warm it gently and drizzle over buns just before serving.
Storage and Reheating Summary
| Storage Method | Timeframe | Reheating Instructions |
|---|---|---|
| Room Temperature | Up to 2 days | 350°F for 5-10 minutes or 15-20 seconds in the microwave. |
| Refrigerator | Up to 5 days | 325°F for 10-12 minutes or 20-25 seconds in the microwave. |
| Freezer (Unbaked/Baked) | Up to 3 months | Thaw, then reheat at 350°F for 15-20 minutes. Directly bake frozen buns if unbaked. |
These storage and reheating instructions ensure every bite of our sun buns remains irresistible and fresh, whether enjoyed immediately or saved for later.
Conclusion
Sun buns are more than just a treat—they’re a delightful experience that brings warmth and joy to any moment. Whether you’re savoring them fresh from the oven or sharing them with loved ones, these golden pastries never fail to impress. With a little preparation and the right tools, creating your own batch of sun buns is both rewarding and delicious. Let’s embrace the simple pleasure of baking and enjoy every buttery, sweet bite!
Frequently Asked Questions
What are sun buns?
Sun buns are soft, golden pastries with a sweet, buttery flavor. They are versatile treats, perfect for breakfast, snacks, or desserts, and are inspired by European baking traditions.
Are sun buns difficult to make?
No, sun buns are beginner-friendly and include a step-by-step recipe in the article. With basic baking tools and clear instructions, even novice bakers can easily make them.
What ingredients are needed for sun buns?
The main ingredients are all-purpose flour, dry yeast, sugar, salt, milk, butter, eggs, and vanilla extract. For an optional glaze, you’ll need powdered sugar, milk, and vanilla.
Do I need any special equipment to bake sun buns?
Basic tools like mixing bowls, a whisk, and a baking sheet will work. However, a stand mixer, thermometer, and pastry brush can make the process easier and more precise.
How long do sun buns take to make?
From start to finish, it takes about 3–4 hours, including proofing and baking time. Much of this is inactive time while the dough rises.
Can I make sun buns ahead of time?
Yes, the dough can be refrigerated or buns frozen before baking. You can also store baked buns and reheat them later to maintain their fresh flavor.
How should I store leftover sun buns?
Store them in an airtight container at room temperature for up to 2 days or in the freezer for longer storage. Reheat them to restore freshness.
What are some topping or glaze options for sun buns?
A glaze made of powdered sugar, milk, and vanilla is a classic choice. You can also add melted chocolate, fruit preserves, or whipped cream for variety.
Can I serve sun buns for different occasions?
Absolutely! Enjoy them warm with coffee for breakfast, include them in a brunch spread, or serve them with toppings like berries and cream for dessert.
Are there tips to ensure my sun buns turn out soft and golden?
Use room-temperature ingredients, allow enough time for proofing, and brush the buns with an egg wash before baking for a glossy, golden finish.