
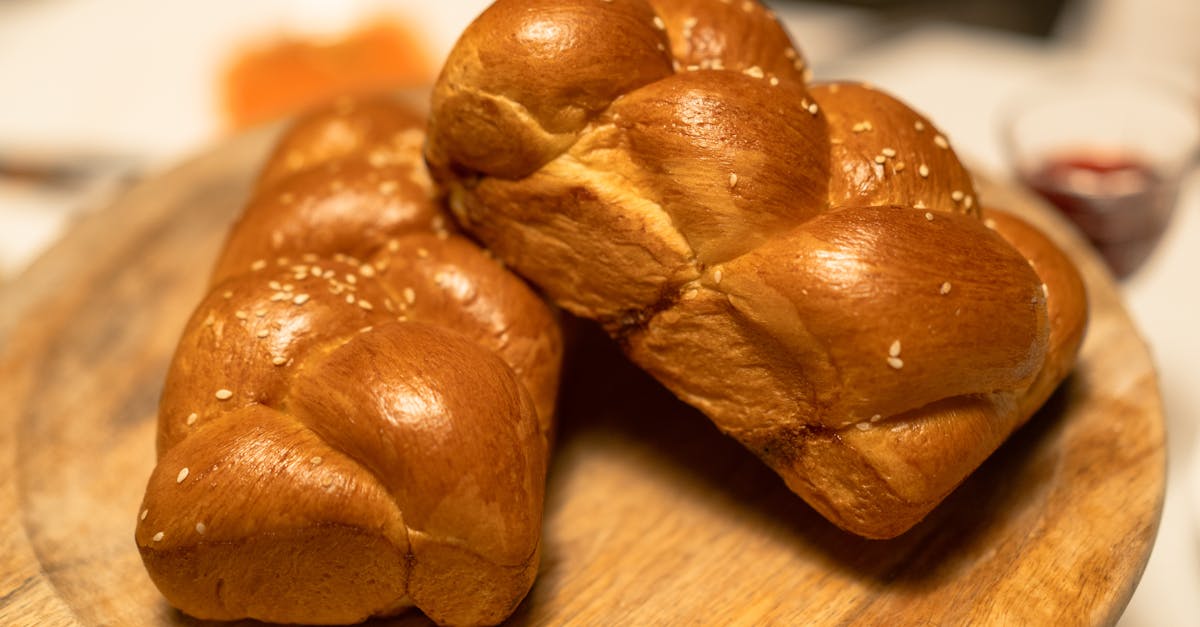
Challah holds a special place in our hearts, with its golden crust and soft, braided beauty gracing tables for generations. This spelt version offers a wholesome twist on the classic, bringing a nutty flavor and tender texture that’s perfect for those seeking a more nutritious option without sacrificing tradition.
Spelt flour has been cherished for centuries, known for its mild sweetness and easier digestibility compared to regular wheat. It’s a natural fit for challah, creating a loaf that’s light yet hearty. Whether you’re celebrating a special occasion or simply want to elevate your bread game, this spelt challah is as versatile as it is delicious.
Spelt Challah Recipe
Mastering our Spelt Challah Recipe is a delightful journey into the world of bread making. This wholesome and slightly nutty take on the classic challah is as beautiful as it is delicious. Follow the detailed steps below to achieve a braided loaf that’s perfect for gatherings or mealtime indulgence.
Ingredients
Here’s what we need to bring this recipe to life. Each ingredient adds depth of flavor and the distinct texture unique to spelt flour:
- 4 cups spelt flour (plus extra for dusting)
- 1/4 cup granulated sugar
- 1 teaspoon salt
- 2 1/4 teaspoons active dry yeast (or 1 packet)
- 1/3 cup neutral oil (like grapeseed or vegetable oil)
- 2 large eggs (room temperature)
- 1/2 cup warm water (approximately 100°F or lukewarm to the touch)
- 1 egg yolk (for egg wash)
- 1 tablespoon water (for egg wash)
- Optional: Sesame or poppy seeds for topping
Step-by-Step Instructions
We’ll guide you through each phase of the process to ensure your spelt challah comes out perfectly:
Step 1: Activate the Yeast
- In a small bowl, combine warm water, sugar, and yeast.
- Stir gently and let it sit for 5–7 minutes until bubbles form and the mixture foams up. This “proofing” step ensures the yeast is alive.
Step 2: Mix the Dough
- In a large mixing bowl, whisk together the spelt flour and salt.
- Make a well in the center of the flour mixture. Add the activated yeast, one egg, and the oil.
- Gradually mix the wet ingredients into the dry using a wooden spoon or your hands until a sticky dough forms.
Step 3: Knead the Dough
- Transfer the dough to a lightly floured surface. Knead it for 8–10 minutes. Spelt dough will feel softer and slightly stickier than regular wheat dough; avoid overworking it.
- Add small amounts of flour, if necessary, but keep the dough moist and pliable.
Step 4: First Rise
- Place the dough in a greased bowl, cover it with a damp kitchen towel or plastic wrap.
- Let it rise in a warm, draft-free spot for 1–1.5 hours, or until it doubles in size.
Step 5: Braid the Challah
- Gently punch down the dough to release any excess air.
- Divide it into 3 equal portions (or more for intricate braiding). Roll each portion into long, even ropes.
- Braid the ropes together, pinching the ends to seal, and tuck them neatly underneath.
Step 6: Second Rise
- Place the braided loaf on a parchment-lined baking sheet.
- Cover again and let it rise for 30–40 minutes, or until it puffs up slightly.
Step 7: Egg Wash and Topping
- Preheat your oven to 350°F (175°C).
- Combine egg yolk and water in a small bowl. Brush the mixture generously over the challah.
- If desired, sprinkle with sesame or poppy seeds for added flavor and texture.
Step 8: Bake
- Bake the challah in the preheated oven for 25–30 minutes, or until the loaf is golden brown and emits a hollow sound when tapped on the bottom.
- Allow the loaf to cool completely on a wire rack before slicing.
Baking Tips & Notes
| Tip | Details |
|---|---|
| Measure precisely | Spelt flour absorbs liquid differently; avoid over or under-measuring for best results. |
| Do not substitute 1:1 | Spelt behaves differently than all-purpose flour; this exact ratio is calibrated for success. |
| Check water temperature | Yeast thrives at 100°F – 110°F; too hot, and you’ll kill the yeast. |
| Keep dough moist | Slight stickiness is part of spelt’s unique texture; refrain from adding excess flour. |
This Spelt Challah Recipe delivers a loaf that’s airy yet hearty, slightly sweet from natural spelt’s nutty notes. Each slice carries tradition and healthfulness to your table.
Ingredients
Creating a perfectly tender and flavorful spelt challah starts with carefully selected ingredients. Below, we’ve broken the components into two sections for clarity: the dough and the egg wash. Gather these essentials to begin your bread-making journey.
For The Dough
- 4 cups spelt flour (plus extra for dusting)
- 1/4 cup sugar or honey (adjust based on sweetness preference)
- 1 tablespoon active dry yeast
- 1 teaspoon salt
- 1/4 cup olive oil (extra virgin recommended for richness)
- 2 large eggs (room temperature)
- 3/4 cup warm water (around 110°F – warm to touch but not hot)
For The Egg Wash
- 1 large egg (beaten)
- 1 tablespoon water
- Optional: sesame or poppy seeds for garnish (for added texture and flair)
Tools And Equipment
To produce the perfect spelt challah, having the right Tools And Equipment is essential. Proper tools not only ensure ease during the process but also contribute to achieving professional-quality results. Here are the main items we’ll need:
Essential Tools List
- Mixing Bowls: At least two large bowls for combining and letting the dough rise. Opt for glass or stainless steel for stability.
- Measuring Cups and Spoons: Accurate measurements ensure the right balance of ingredients, especially with spelt flour’s unique properties.
- Wooden Spoon or Spatula: For mixing the dough without overworking it.
- Dough Scraper or Bench Scraper: Perfect for handling the soft spelt dough while shaping and cleaning surfaces effectively.
- Kitchen Scale (optional): Helps you measure ingredients more precisely, especially if you’re dividing dough for even braiding.
- Whisk: For beating the egg wash to a smooth consistency.
- Clean Kitchen Towel or Plastic Wrap: To cover the dough while proofing, keeping it moist.
- Baking Sheet: Use a sturdy, flat baking sheet for even heat distribution.
- Parchment Paper: Ensures the challah doesn’t stick and makes cleanup a breeze.
- Pastry Brush: Essential for applying the egg wash evenly across the braided loaf.
Optional Equipment
These extras can enhance your baking experience:
- Stand Mixer with Dough Hook: Though spelt dough is soft and requires less kneading, a stand mixer can save time and effort.
- Proofing Basket or Bowl: Useful to maintain the dough’s shape while proofing.
- Thermometer: Ensures that the water temperature is just right when activating the yeast (around 105°F to 110°F).
- Cooling Rack: Allows the baked challah to cool evenly without becoming soggy on the bottom.
Equipment Care and Tips
- Prepare all tools in advance. This minimizes interruptions during the process and improves flow.
- Always use clean and dry tools when measuring and mixing, as moisture or residue can affect ingredient ratios.
- Use parchment paper or lightly oil your baking sheet for the best non-stick surface.
Investing in these essential tools and equipment will make baking spelt challah both enjoyable and seamless. Reliable tools ensure accuracy and help bring out the soft, airy texture and subtle nutty-sweet flavor we all love in this traditional bread.
Directions
Let’s dive into creating this delicious spelt challah step by step. Follow these instructions for a soft, airy bread with its signature nutty sweetness.
Prep The Ingredients
- Measure out all the ingredients accurately:
- 4 cups spelt flour
- 1/4 cup sugar or honey
- 2 1/4 teaspoons active dry yeast (1 packet)
- 1 teaspoon salt
- 1/4 cup olive oil
- 2 large eggs (room temperature)
- 3/4 cup warm water (110°F)
- Optional toppings: sesame seeds or poppy seeds
- Crack the eggs into a bowl before mixing to ensure no shells sneak in.
- Prepare your mixing bowls, wooden spoon, baking sheet, and any preferred tools like a stand mixer or dough scraper.
Make The Dough
- Activate the yeast by combining the warm water (110°F), sugar, and yeast in a bowl. Let it sit for 5–10 minutes until it becomes frothy and bubbly.
- In a large mixing bowl, combine the spelt flour and salt. Push this to the sides to create a well in the middle.
- Add the yeast mixture, olive oil, and 2 eggs to the center of the well. Slowly mix until everything forms a shaggy dough.
Knead The Dough
- Transfer the dough onto a lightly floured surface (use spelt flour) for kneading.
- Knead the dough for about 8–10 minutes until it becomes smooth and elastic. If using a stand mixer with a dough hook, knead on medium-low speed for about 5–7 minutes.
- The dough may be slightly sticky due to the low gluten content of spelt flour, but it should hold its form. Avoid over-kneading to prevent toughness.
First Rise
- Transfer the dough to a lightly oiled bowl, turning it to coat in oil. Cover the bowl with a damp kitchen towel or plastic wrap.
- Place the bowl in a warm spot and allow the dough to rise until it doubles in size, about 1–1.5 hours.
- To check if the dough has risen enough, press the surface gently with your finger—if it leaves an indentation that doesn’t spring back, it’s ready.
Shape The Challah
- Turn the risen dough onto a clean surface and divide it into 3 equal parts (or more, depending on your preferred braiding style).
- Roll each portion into strands, ensuring they’re even in thickness and about 12–16 inches long.
- Braid the strands into a traditional 3-strand braid or experiment with more intricate patterns. Pinch the ends together to seal the braid.
Second Rise
- Transfer the braided dough to a parchment-lined baking sheet and cover it loosely with plastic wrap or a damp kitchen towel.
- Allow the challah to rise for another 30–45 minutes. This second rise helps achieve a fluffy texture. During this time, preheat the oven to 350°F (175°C).
- Once the dough has risen, lightly brush it with the egg wash (beat 1 egg with a splash of water). Sprinkle with sesame or poppy seeds if desired.
Baking Instructions
To bake the perfect spelt challah with its subtle nutty sweetness and light, airy texture, we need to follow these steps carefully:
Preheating the Oven
- Preheat the oven to 350°F (175°C). Ensuring the oven reaches the correct temperature is critical for achieving even baking.
- Place the oven rack in the center position to allow the challah to bake uniformly.
Preparing the Braided Dough for Baking
- Gently transfer the braided dough onto a parchment-lined baking sheet. Ensure the parchment is smooth to prevent sticking or uneven browning.
- Using a pastry brush, apply the prepared egg wash generously over the entire surface of the dough. This step will give the challah its signature golden-brown shine.
- Optional: Sprinkle sesame seeds, poppy seeds, or coarse sea salt over the egg-washed dough for added flavor and texture.
Baking the Challah
- Place the baking sheet with the braided challah into the preheated oven.
- Bake for 25-30 minutes, or until the challah develops a deep, golden-brown crust. Use a timer for accuracy.
- To ensure it is fully baked, tap the bottom of the loaf gently. It should produce a hollow sound, indicating it is done.
Cooling the Challah
- Remove the challah from the oven and let it cool on the baking sheet for 5 minutes.
- Carefully transfer the challah to a wire rack to cool completely. Cooling on a rack prevents the bottom from becoming soggy and ensures the bread’s texture remains light and airy.
| Step | Details | Time |
|---|---|---|
| Preheating Oven | Set to 350°F | 10-15 Minutes |
| Baking the Challah | Golden-brown crust, hollow sound | 25-30 Minutes |
| Cooling the Challah | Cool on pan, then wire rack for airy texture | 30 Minutes Total |
Pro Tip: Avoid slicing the challah while it’s warm. Allow it to cool completely for the flavors to fully develop and to make slicing easier.
By following these precise baking instructions, we ensure our spelt challah emerges from the oven as a stunning golden masterpiece, perfect for sharing at the table.
Tips For Perfect Spelt Challah
Creating an exceptional spelt challah requires not only precise measurements but also an understanding of best practices for handling spelt flour and optimizing texture, flavor, and presentation. Below, we’ve outlined crucial tips to guarantee bakery-worthy results every time you bake.
1. Handle Spelt Flour with Care
Spelt flour has a unique gluten structure that’s more delicate than regular wheat flour. To avoid overworking the dough:
- Knead gently for about 7-8 minutes, just until smooth and elastic.
- Avoid over-kneading, which can lead to a dense, tough loaf.
- If the dough feels sticky, lightly oil your hands instead of adding more flour.
2. Adjust Hydration Carefully
Spelt flour absorbs liquids differently. The dough may appear wetter than expected, but resist the urge to overcorrect:
- Add water or flour in very small increments—1 tablespoon at a time.
- Aim for a dough that’s soft and slightly tacky, but not overly sticky.
3. Monitor Rise Times
Spelt dough tends to rise more quickly due to its weaker gluten structure. To prevent collapse:
- Keep an eye on it during both rises and avoid overproofing.
- Allow the first rise to double in size; this typically takes 45-60 minutes, depending on room temperature.
- For the second rise, let the braided loaf rise until slightly puffed, about 20-30 minutes.
4. Use the Right Egg Wash
Achieving a deeply golden crust is all about the egg wash. For best results:
- Mix one beaten egg with 1 tablespoon of water for a glossy finish.
- Brush evenly over the braids, ensuring every nook is coated.
- For added flavor and texture, sprinkle with sesame seeds, poppy seeds, or flaky sea salt.
5. Ensure Proper Braiding
Braiding the challah not only enhances its visual appeal but also affects how evenly it bakes. Follow these tips:
- Divide the dough into equal portions by weight for symmetrical braids.
- Roll each portion into even ropes that are smooth and uniform.
- Work gently to avoid deflating the dough during shaping.
6. Temperature Control is Key
Both proofing and baking temperatures are critical to perfecting spelt challah:
- Ensure your proofing area is warm (around 75°F-80°F). Too chilly, and the dough may not rise properly.
- Preheat your oven to exactly 350°F (175°C) and allow it to reach full heat before baking.
7. Test for Doneness
To confirm your spelt challah is fully baked:
- Look for a deep golden-brown color across the loaf.
- Tap the bottom of the bread. A hollow sound indicates it’s ready.
- Use an instant-read thermometer if desired; the internal temperature should reach 190°F.
8. Cooling and Storage
Proper cooling preserves both texture and flavor:
- Cool the loaf on a wire rack immediately after baking to prevent sogginess.
- Allow it to cool completely before slicing to maintain its airy structure.
- Store leftover challah in an airtight bag at room temperature for up to 3 days or freeze for longer storage.
Quick Reference Table
| Process | Key Tip |
|---|---|
| Kneading | Gentle knead for 7-8 minutes; avoid overworking |
| Hydration | Adjust with small increments for proper texture |
| First Rise | 45-60 minutes; ensure the dough doubles in size |
| Second Rise | 20-30 minutes or until slightly puffed |
| Egg Wash | Use a beaten egg with water; coat evenly |
| Oven Temperature | Preheat to 350°F (175°C) for even baking |
| Doneness | Look for golden color and hollow sound |
| Cooling | Cool completely on a wire rack before slicing |
By adhering to these proven techniques, we can elevate our spelt challah into a show-stopping masterpiece with the perfect balance of soft texture, light sweetness, and nutty richness.
Make-Ahead Instructions And Storage
Storing and preparing spelt challah ahead of time is a game-changer for busy schedules and ensures the bread retains its fresh, wholesome texture and nutty sweetness. Whether you’re making it for a festive occasion or planning for weekly meals, follow these tips to maintain its quality and flavor.
Make-Ahead Options
- Refrigerating the Dough: After shaping the dough into a braid, place it on a parchment-lined baking sheet and cover it loosely with plastic wrap. Refrigerate it for up to 24 hours. Before baking, allow it to come to room temperature and rise slightly (approximately 1-2 hours).
- Freezing the Dough: Once the loaf is braided and unbaked, wrap it tightly in plastic wrap followed by a layer of aluminum foil. Store it in the freezer for up to 1 month. When ready to bake, thaw it overnight in the refrigerator, then let it come to room temperature and rise before brushing with egg wash and baking.
- Baking in Advance: Fully baked spelt challah freezes beautifully. After cooling completely on a wire rack, tightly wrap the loaf in plastic wrap and then in aluminum foil to prevent freezer burn. This method keeps the loaf fresh for up to 2 months. Thaw at room temperature and rewarm in a preheated oven at 300°F (150°C) for about 10 minutes to regain its softness.
Storage Tips for Fresh Challah
- Room Temperature: Store leftover challah in an airtight plastic bag or a bread box at room temperature for up to 3 days. This preserves its soft texture and prevents it from staling too quickly. Avoid refrigeration, as it can dry out the bread.
- Freezer Storage: Sliced challah can be frozen for easier portioning. Place slices in a resealable freezer bag, ensuring all air is pressed out before sealing. Label the bag with the date for reference.
| Storage Method | Duration | Preparation Notes |
|---|---|---|
| Refrigerating Dough | Up to 24 hours | Let rise at room temperature before baking. |
| Freezing Dough | Up to 1 month | Thaw overnight, bring to room temperature, then bake. |
| Freezing Fully Baked Loaf | Up to 2 months | Rewarm at 300°F (150°C) for 10 minutes after thawing. |
| Room Temperature Loaf | Up to 3 days | Airtight storage is crucial to maintain softness. |
Pro Tip: Maximizing Freshness
For the best results, consider brushing a light layer of olive oil on the crust before storing. This adds a subtle sheen while keeping the bread moist and flavorful. Also, ensure all plastic or wrapping materials are tightly sealed to avoid air exposure, which can accelerate staling.
By following these steps, our spelt challah will remain fresh and delicious, making it ideal for meal prep or enjoying over holidays and celebrations.
Conclusion
Baking spelt challah is more than just creating a loaf of bread—it’s an opportunity to blend tradition with health-conscious choices. With its nutty sweetness and tender texture, this recipe offers a delightful experience for both novice and seasoned bakers.
Whether you’re preparing it for a special occasion or simply elevating your everyday meals, spelt challah brings warmth and flavor to any table. By following the steps and tips we’ve shared, you’ll enjoy a beautiful, golden loaf that’s as satisfying to make as it is to eat.
Let’s embrace the joy of baking and savor the wholesome goodness of spelt challah together!
Frequently Asked Questions
What is spelt challah, and how is it different from regular challah?
Spelt challah is a variation of traditional challah bread made with spelt flour instead of regular wheat flour. Spelt flour has a mild sweetness and is easier to digest due to its delicate gluten structure, making it a healthier alternative while maintaining a light, airy texture.
What are the benefits of using spelt flour?
Spelt flour is known for its nutty flavor, mild sweetness, and better digestibility compared to regular wheat. It contains essential nutrients, like fiber and protein, and works well for creating softer, lighter baked goods.
What ingredients are needed for spelt challah?
The primary ingredients include spelt flour, sugar or honey, active dry yeast, salt, olive oil, eggs, and warm water for the dough. For the egg wash, a beaten egg and water are used, with optional toppings like sesame or poppy seeds.
Can I make spelt challah without a stand mixer?
Yes, spelt challah can be made without a stand mixer. You can knead the dough by hand using a wooden spoon and a dough scraper. A stand mixer is optional but can make the process faster and easier.
How do I ensure my spelt challah is soft and airy?
Handle spelt flour gently to preserve its delicate gluten structure, avoid over-kneading to prevent density, and monitor rise times carefully to prevent overproofing. Proper proofing, braiding, and cooling after baking all contribute to the bread’s soft texture.
What temperature should I bake spelt challah at?
Bake spelt challah at 350°F (175°C) for 25–30 minutes. The crust should be golden brown, and the loaf will sound hollow when tapped, indicating it is fully baked.
How do I store spelt challah to keep it fresh?
Store spelt challah in an airtight container at room temperature for up to three days. For longer storage, freeze the loaf and thaw it before use. Brushing olive oil on the crust before storing helps retain moisture.
Can I make spelt challah dough ahead of time?
Yes, you can refrigerate or freeze spelt challah dough. Refrigerate the dough for up to 24 hours or freeze it for longer. Allow the dough to come to room temperature before shaping and baking it.
What tools are essential for making spelt challah?
Basic tools include mixing bowls, measuring cups, a wooden spoon, a dough scraper, and a baking sheet. Optional tools like a stand mixer and proofing basket can improve convenience and results.
Why is it important to let challah cool before slicing?
Allowing challah to cool prevents it from becoming soggy and helps the flavors develop fully. Cooling also ensures the bread maintains its airy texture and optimal flavor.