
Sourdough hoagie rolls bring a delightful twist to your favorite sandwiches. With their tangy flavor and chewy texture, these rolls elevate any hoagie or sub to a whole new level. Making them from scratch lets us enjoy fresh, flavorful bread that’s perfect for piling high with meats, cheeses, and veggies.
This recipe combines the classic sourdough tang with the soft yet sturdy structure needed for a hoagie roll. Whether you’re craving an Italian sub or a classic Philly cheesesteak, these rolls hold up beautifully without falling apart. Plus, baking our own sourdough rolls means we control the ingredients and get that unbeatable homemade taste every time.
Ingredients
To craft the perfect Sourdough Hoagie Rolls, we rely on a precise balance of dry and wet ingredients that create the iconic tangy flavor and chewy texture. Here’s everything we’ll need to get started.
Dry Ingredients
- 3 ½ cups (420g) all-purpose flour – for structure and chewiness
- 1 ½ teaspoons salt – enhances flavor and controls yeast activity
- 1 tablespoon sugar – feeds the starter and lightly sweetens the dough
- 1 cup (240g) active sourdough starter – ensures the authentic tang and natural leavening
- 1 tablespoon vital wheat gluten (optional) – improves elasticity and rise, important for the perfect hoagie texture
Wet Ingredients
- 1 cup (240ml) warm water (around 80°F/27°C) – hydrates the flour and activates the starter
- 2 tablespoons olive oil – adds richness and tender crumb
| Ingredient | Amount | Purpose |
|---|---|---|
| All-purpose flour | 3 ½ cups (420g) | Structure and chewiness |
| Salt | 1 ½ teaspoons | Flavor enhancement, yeast control |
| Sugar | 1 tablespoon | Feeds sourdough starter |
| Active sourdough starter | 1 cup (240g) | Natural leavening and tangy flavor |
| Vital wheat gluten | 1 tablespoon (optional) | Elasticity, better rise |
| Warm water | 1 cup (240ml) | Hydration and activation |
| Olive oil | 2 tablespoons | Adds richness and tenderness |
With these ingredients, we set the foundation for our homemade sourdough hoagie rolls that perfectly complement any sandwich filling.
Equipment Needed
To bake perfect sourdough hoagie rolls, having the right equipment is essential for consistent results and ease in handling the dough. Below is a list of all the necessary tools we recommend using throughout the process.
Essential Tools for Mixing and Kneading
- Large mixing bowl: Preferably glass or stainless steel for combining ingredients.
- Dough scraper: Helps in cleanly lifting and folding sticky dough.
- Kitchen scale: For precise measuring of flour and water for accuracy.
- Measuring spoons: To measure salt, sugar, and oil precisely.
- Stand mixer with dough hook (optional): Speeds up kneading but hand kneading works fine.
Tools for Proofing and Shaping
- Clean kitchen towel or plastic wrap: To cover the dough for proper fermentation and proofing.
- Proofing basket or bowl: Allows the dough to rise without sticking.
- Baking sheet or hoagie roll pan: Provides the right surface to shape and bake the rolls.
- Parchment paper or silicone baking mat: Prevents sticking and eases transfer.
Baking and Finishing Equipment
- Oven thermometer: Ensures your oven reaches and maintains the right baking temperature.
- Cooling rack: Allows rolls to cool evenly post baking.
- Pastry brush: For applying egg wash or water before baking to achieve golden crust.
Equipment Overview Table
| Equipment | Purpose | Optional |
|---|---|---|
| Large mixing bowl | Mixing ingredients | No |
| Dough scraper | Handling sticky dough | No |
| Kitchen scale | Accurate measuring | No |
| Measuring spoons | Measuring small ingredients | No |
| Stand mixer with dough hook | Kneading dough faster | Yes |
| Kitchen towel/plastic wrap | Covering dough during proofing | No |
| Proofing basket/bowl | Controlled dough rising | No |
| Baking sheet/hoagie roll pan | Baking shaped rolls | No |
| Parchment paper/silicone mat | Prevents sticking during baking | No |
| Oven thermometer | Accurate oven temperature | Yes |
| Cooling rack | Cooling rolls evenly | Yes |
| Pastry brush | Applying egg wash or water | Yes |
By assembling these key tools before starting, we will streamline the sourdough hoagie rolls process and ensure every step flows smoothly. Let’s get ready to create rolls with perfect structure, texture, and that signature tangy flavor.
Prep Work
Before we dive into mixing and kneading, precise preparation sets the stage for perfect sourdough hoagie rolls. Let’s ensure every ingredient and starter is ready to deliver that signature tang and ideal structure.
Measuring Ingredients
Accurate measurements are crucial when baking sourdough hoagie rolls because the balance of ingredients impacts flavor, texture, and rise. Use a kitchen scale for the best results. Here’s a clear breakdown of what to measure and how:
| Ingredient | Measurement | Preparation Notes |
|---|---|---|
| All-purpose flour | 450 grams | Spoon into the scale gently, no packing |
| Warm water | 300 milliliters | Around 75-80°F (24-27°C), lukewarm |
| Active sourdough starter | 150 grams | Fed and bubbly, see next section |
| Olive oil | 30 milliliters | Room temperature |
| Salt | 10 grams | Fine sea salt preferred |
| Sugar | 10 grams | Granulated |
| Vital wheat gluten (optional) | 15 grams | Enhances structure, optional |
Tip: Weighing ingredients eliminates guesswork and ensures consistent dough quality every time.
Preparing the Starter (if applicable)
Our active sourdough starter is the heart of flavor and leavening. Proper preparation guarantees the tangy complexity and perfect rise:
- Feed the starter 4-6 hours before baking with equal parts flour and water by weight (e.g. 50g flour + 50g water).
- Keep it at room temperature to activate yeast and bacteria growth.
- Your starter should be bubbly, airy, and at its peak volume before using — this indicates strong yeast activity.
- If it has separated liquid (hooch), gently stir it back in or pour off for a milder taste.
- Measure out the precise amount of active starter (150 grams) straight before combining with other ingredients.
“A lively, well-fed starter guarantees our hoagie rolls develop their characteristic sourdough tang and excellent crumb.”
With the ingredients precisely measured and the starter fully active, we’re ready to move forward and create dough that’s flavorful and resilient—ideal for holding your favorite sandwich fillings.
Making the Dough
To create the perfect sourdough hoagie rolls, the dough must be carefully mixed and kneaded to develop the ideal texture and structure. This section guides us through the essential steps of mixing and kneading to unleash the dough’s full potential.
Mixing the Dough
We begin by combining our measured ingredients in a large mixing bowl. Start with the all-purpose flour, then add the active sourdough starter, warm water, olive oil, salt, and sugar. If using, include the vital wheat gluten to enhance the dough’s elasticity.
We use a sturdy spoon or a dough whisk to blend everything thoroughly. At this stage, our goal is to hydrate the flour evenly, creating a shaggy but cohesive dough. Avoid over-mixing here as the gluten will fully develop during kneading.
| Ingredient | Amount | Note |
|---|---|---|
| All-purpose flour | 400g | Measure with a kitchen scale |
| Active sourdough starter | 100g | Well-fed and bubbly |
| Warm water | 260g | Around 85°F (29°C) |
| Olive oil | 20g | Adds tenderness |
| Salt | 8g | Enhances flavor |
| Sugar | 10g | Feeds the yeast |
| Vital wheat gluten | 5g (optional) | Improves chewiness |
Once combined, cover the bowl with a damp cloth and let the dough rest during an autolyse phase for 30 minutes. This rest improves gluten formation and dough extensibility for better crumb and rise.
Kneading Techniques
After autolyse, we move into kneading to build gluten strength essential for our sourdough hoagie rolls’ chewy texture and sturdy structure. We recommend using the stretch and fold method for about 5-7 minutes.
- Lightly oil your hands to prevent sticking.
- Pull one side of the dough up and fold it over the center.
- Rotate the bowl 90 degrees and repeat the stretch and fold.
- Continue this motion, turning the dough until it feels smooth and elastic.
If preferred, a stand mixer fitted with a dough hook can perform this task on medium-low speed for 5 minutes. Be careful not to over-knead; the dough should be stretchy but still slightly tacky.
A well-kneaded dough will pass the windowpane test: stretch a small piece thin enough to see light through it without tearing. This indicates sufficient gluten development, ready for the first rise.
First Rise
The first rise is a crucial step where our sourdough hoagie rolls develop their signature tangy flavor and elastic texture. This fermentation phase allows the dough to expand and strengthen as the wild yeast and bacteria work their magic.
Ideal Temperature and Time
For an optimal First Rise, maintaining the right conditions is essential. We want to create an environment that encourages active fermentation without overheating the dough.
| Factor | Ideal Condition | Notes |
|---|---|---|
| Temperature | 75°F to 80°F (24°C to 27°C) | Promotes consistent fermentation and dough activity |
| Time | 3 to 4 hours | Dough should nearly double in size; may vary slightly based on starter activity |
| Dough Volume Change | Increase by 80% to 100% | Indicates sufficient fermentation and readiness for shaping |
Our goal is to keep the dough covered loosely with a damp towel or plastic wrap to prevent drying while allowing some airflow. If your kitchen is cooler, consider placing the dough inside a slightly warmed oven (turned off) or near a warm spot like a stove.
“Patience during this phase develops the sourdough’s depth of flavor and perfect chew.”
By monitoring the dough’s rise and its appearance—looking for noticeable puffiness and airy texture under gentle touch—we ensure the rolls will have excellent structure and that signature tang.
Shaping the Hoagie Rolls
Shaping is a crucial step in crafting our sourdough hoagie rolls. This phase sets the foundation for the perfect structure and texture, ensuring each roll holds its shape while showcasing the classic sourdough tang.
Dividing the Dough
After the first rise, gently transfer the dough to a lightly floured surface. We want to handle the dough delicately to preserve the air bubbles that give our rolls their light crumb. Using a bench scraper or sharp knife, divide the dough into equal portions. For standard hoagie rolls, aim for pieces weighing approximately 120 to 140 grams each.
| Roll Size | Weight per Dough Piece | Approximate Diameter After Shaping |
|---|---|---|
| Small | 120 grams | 6 inches |
| Medium | 130 grams | 6.5 inches |
| Large | 140 grams | 7 inches |
Dividing the dough evenly guarantees consistent baking and uniform rise across all rolls.
Forming the Rolls
To form each sourdough hoagie roll, start by gently flattening a dough piece into a rough rectangle.
- Fold the longer sides inward toward the center, overlapping slightly.
- Beginning at one short edge, roll the dough tightly but gently into a cylindrical shape.
- Seal the seam by pinching the dough edges together firmly.
- Taper the ends slightly for that classic hoagie roll silhouette.
- Roll the shaped dough gently under your palm on the work surface to smooth it and create an even thickness.
“The goal is a tight firm roll without deflating the dough’s air pockets.”
Place each formed roll seam-side down on a parchment-lined baking sheet or in a well-floured proofing basket. Leave enough space between rolls for expansion during the final proof. Cover loosely with plastic wrap or a damp cloth to prevent drying.
This shaping technique creates the distinctive structure necessary for holding robust sandwich fillings without compromising the soft chewy crumb or tangy flavor.
Second Rise
The second rise is essential for developing the final volume, texture, and flavor balance of our sourdough hoagie rolls. During this phase, the shaped rolls will undergo their last fermentation before baking, allowing the dough to relax and expand, ensuring a light crumb with a perfect chew.
Proofing the Shaped Rolls
After shaping, we place the rolls on our prepared baking sheet or proofing baskets. Now, we must create an optimal environment for the second rise:
- Temperature: Maintain a consistent temperature between 75°F and 80°F. This encourages active yeast activity without overproofing.
- Humidity: Cover the rolls loosely with a damp kitchen towel or plastic wrap to prevent drying but allow slight airflow.
- Duration: Plan for about 1.5 to 2 hours, or until the rolls noticeably puff up and nearly double in size.
We can use the following proofing indicators to determine readiness:
| Indicator | Description |
|---|---|
| Visual rise | Rolls should look puffed and expanded. |
| Finger poke test | Gently press the dough; the indentation springs back slowly. |
As the legendary baker Chad Robertson says, “Proper proofing lets the flavor deepen and the crumb open, giving each roll its signature sourdough tang and texture.“
Tip: Avoid overproofing. If the dough doubles too much or collapses, the rolls may bake flat or lack chew.
By carefully monitoring this second rise, we set the foundation for our sourdough hoagie rolls to develop their unmistakable tang and perfect structure — essential for holding hearty sandwich fillings without becoming soggy or dense.
Baking Instructions
Baking our Sourdough Hoagie Rolls perfectly requires precise control of oven temperature and timing. These steps ensure the rolls develop their distinct tangy crust, soft crumb, and ideal chewiness that hold up to any filling.
Oven Temperature and Settings
Preheat the oven to 425°F (220°C) to create the ideal environment for baking sourdough hoagie rolls. This high temperature promotes oven spring, which gives the rolls their light yet chewy texture and beautifully caramelized crust.
Use the following oven settings for best results:
| Oven Setting | Description |
|---|---|
| Bake (Conventional) | Good for even crust and crumb development |
| Bake with Steam | Adds moisture for a crisp crust |
Tips for optimal baking:
- Place a shallow pan of hot water on the oven floor before baking to create steam, enhancing crust formation.
- If your oven does not have a steam setting, mist the oven walls with water just before placing the rolls inside.
- Use an oven thermometer to verify the precise temperature, ensuring consistent results.
Baking Time
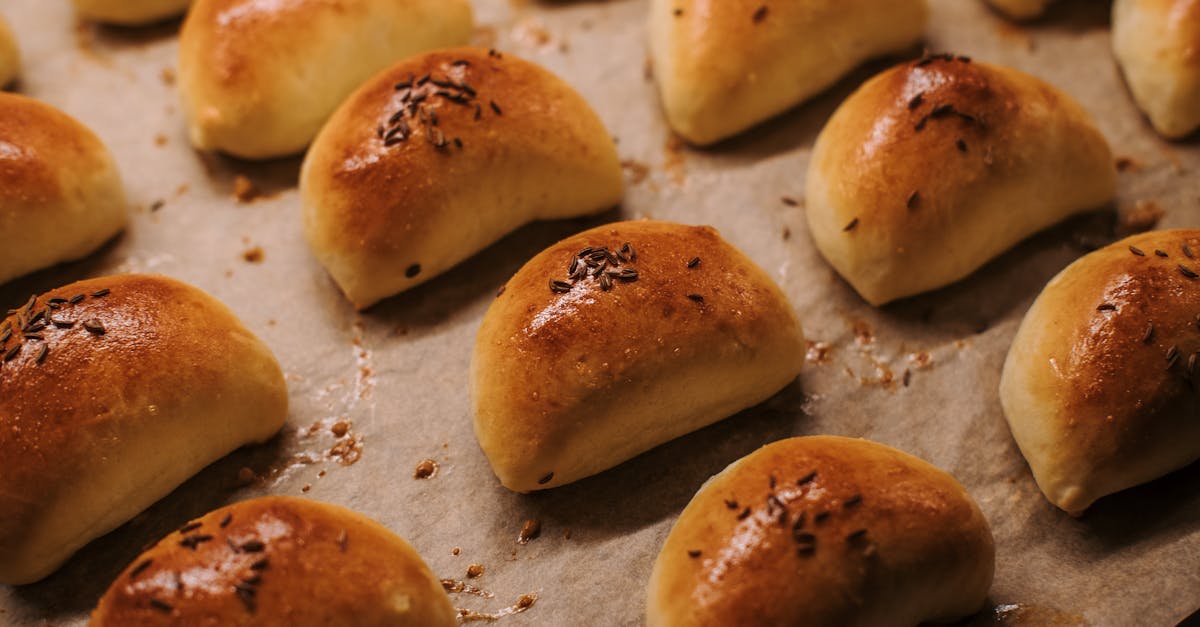
Bake the sourdough hoagie rolls for 18 to 22 minutes, rotating the baking sheet halfway through to ensure even browning. The rolls should develop a deep golden-brown crust signaling they are perfectly baked.
Baking indicators to look for:
- Rolls feel hollow when tapped on the bottom.
- Internal temperature reaches about 200°F (93°C) for a fully baked crumb.
| Baking Parameter | Details |
|---|---|
| Temperature | 425°F (220°C) |
| Time | 18-22 minutes |
| Internal Temp | ~200°F (93°C) |
| Crust Color | Deep golden brown |
After baking, transfer the rolls to a cooling rack and allow them to cool completely. This step finalizes the crumb structure and prevents sogginess, keeping our sourdough hoagie rolls firm yet tender and ready for your favorite sandwich fillings.
Cooling and Storage
After baking our sourdough hoagie rolls, proper cooling and storage are crucial to preserve their texture, flavor, and freshness. Let’s break down the steps to ensure our rolls stay delicious and ready for any sandwich.
Cooling
- Remove rolls from the oven carefully using oven mitts and transfer them immediately to a wire cooling rack.
- Allow the rolls to cool completely at room temperature for at least 1 to 2 hours. This step is essential because:
- It lets the crumb set firmly, avoiding a gummy texture.
- It allows steam to escape, ensuring the crust stays crisp.
- Avoid covering the rolls while cooling, as trapped moisture can make the crust soggy.
“Cooling on a wire rack is a game-changer to maintain that signature crisp and chew of our sourdough hoagie rolls.”
Storage
To retain the rolls’ quality over time, consider these recommended storage methods based on how soon you plan to consume them:
| Storage Method | Duration | Instructions | Tips |
|---|---|---|---|
| Room Temperature | 1 to 2 days | Store rolls in a paper bag or bread box at room temperature | Avoid plastic bags to keep crust crisp |
| Refrigeration | Up to 1 week | Wrap rolls in foil or airtight container | Can dry out bread; reheat before use |
| Freezing | Up to 3 months | Wrap tightly in plastic wrap then foil or place in freezer bag | Thaw at room temp; refresh in oven at 350°F (175°C) for 5–10 minutes |
Tips for Optimal Freshness
- If storing at room temperature, place a clean kitchen towel over the rolls to help absorb excess moisture while allowing some airflow.
- When freezing, individually wrap rolls to easily thaw single portions without compromising the rest.
- For reheating, avoid microwaving as it can make rolls chewy or tough; instead, warm in a preheated oven to revive their crust and texture.
By following these cooling and storage strategies, our sourdough hoagie rolls will keep their ideal tang, crust, and chew, making every sandwich satisfying and fresh.
Serving Suggestions
Our Sourdough Hoagie Rolls shine brightest when paired with hearty and flavorful fillings that complement their tangy crumb and chewy texture. Here are some of our top serving ideas to elevate your sandwich experience:
Classic Hoagie Fillings
We recommend layering these rolls with a variety of deli meats such as turkey, ham, roast beef, or salami. Adding sliced provolone or sharp cheddar enhances richness. Top with fresh lettuce, ripe tomatoes, crisp onions, and crunchy pickles for vibrant texture contrast. A drizzle of mustard or mayo balances the tang of the sourdough perfectly.
Vegetarian Delight
For a meatless option, load the rolls with grilled vegetables like zucchini, bell peppers, and eggplant. Spread a generous layer of hummus or pesto to add moisture and depth. Fresh arugula or baby spinach introduces peppery notes, while slices of avocado provide creamy richness.
Gourmet Twist
Create an upscale sandwich by combining thinly sliced roast beef, caramelized onions, blue cheese crumbles, and horseradish sauce. The robust flavors marry well with the chewy sourdough roll, offering an elegant bite.
Soup Companion
These rolls also serve wonderfully alongside soups and stews. Use them to dip into creamy tomato soup, hearty beef stew, or a rich French onion broth to soak up every flavorful drop.
Warm Toasted Sandwich
Try slicing the roll lengthwise, layering your favorite ingredients, then toasting under the broiler or in a panini press. The sourdough crust crisps beautifully while the interior stays soft, creating a delightful contrast.
Best Practices for Serving
- Serve rolls at room temperature or lightly toasted to highlight their texture and flavor.
- Cut sandwiches diagonally to showcase the filling and make them easier to handle.
- Pair with pickled side dishes or a fresh salad for balanced meals.
| Serving Idea | Suggested Ingredients | Serving Tip |
|---|---|---|
| Classic Hoagie | Turkey, ham, salami, provolone, lettuce, tomato | Add mustard or mayo generously |
| Vegetarian Delight | Grilled veggies, hummus, arugula, avocado | Toast lightly for added texture |
| Gourmet Twist | Roast beef, caramelized onions, blue cheese, horseradish sauce | Serve warm for enhanced flavor |
| Soup Companion | Any aromatic soup or stew | Use rolls for dipping |
| Warm Toasted Sandwich | Your favorite sandwich fillings | Use panini press or broiler |
By mixing and matching these serving ideas, our Sourdough Hoagie Rolls adapt wonderfully to any meal occasion, enhancing every bite with their signature tang and chew.
Conclusion
Mastering sourdough hoagie rolls opens up a world of delicious sandwich possibilities. With their perfect balance of tangy flavor and chewy texture, these rolls elevate any filling we choose. Baking them ourselves means we control every ingredient and step, ensuring freshness and quality.
By following the right techniques and paying attention to detail, we can consistently create rolls that hold up to hearty fillings without losing their structure. Whether for a casual lunch or a gourmet meal, these sourdough hoagie rolls bring both taste and satisfaction to the table.
Frequently Asked Questions
What makes sourdough hoagie rolls different from regular hoagie rolls?
Sourdough hoagie rolls have a tangy flavor and chewy texture due to the natural fermentation from the sourdough starter. This gives them a more complex taste and better structure than regular yeast rolls, making them perfect for hearty sandwich fillings.
What ingredients are needed to make sourdough hoagie rolls?
You need all-purpose flour, salt, sugar, active sourdough starter, warm water, olive oil, and optionally vital wheat gluten for better texture.
Why is the autolyse step important in making sourdough hoagie rolls?
Autolyse involves resting the dough for 30 minutes after mixing, which helps improve gluten formation and dough extensibility, resulting in better texture and rise.
How long should the first rise take, and at what temperature?
The first rise should take about 3 to 4 hours at 75°F to 80°F, allowing the dough to nearly double in size and develop its tangy flavor.
How do I shape sourdough hoagie rolls correctly?
Divide the dough into equal pieces, flatten, fold the sides inward, roll tightly, and taper the ends to create the classic hoagie shape. Place seam-side down for proofing.
What temperature and time are ideal for baking sourdough hoagie rolls?
Preheat your oven to 425°F (220°C) and bake the rolls for 18 to 22 minutes until they develop a deep golden crust and sound hollow when tapped.
How should I cool and store homemade sourdough hoagie rolls?
Cool on a wire rack for 1 to 2 hours to set the crumb. Store at room temperature for up to 2 days, refrigerate for up to a week, or freeze for longer preservation.
Can sourdough hoagie rolls be used for vegetarian sandwiches?
Yes, they pair well with vegetarian fillings like grilled vegetables, hummus, and cheeses, offering a flavorful base for various sandwich options.
What tools are essential for making sourdough hoagie rolls?
Key tools include a large mixing bowl, dough scraper, kitchen scale, proofing basket, baking sheet, oven thermometer, and optionally a stand mixer.
How can I tell if the dough is ready after kneading?
Perform the windowpane test by stretching a small dough piece. If it forms a thin, translucent membrane without tearing, the dough is ready for rising.