
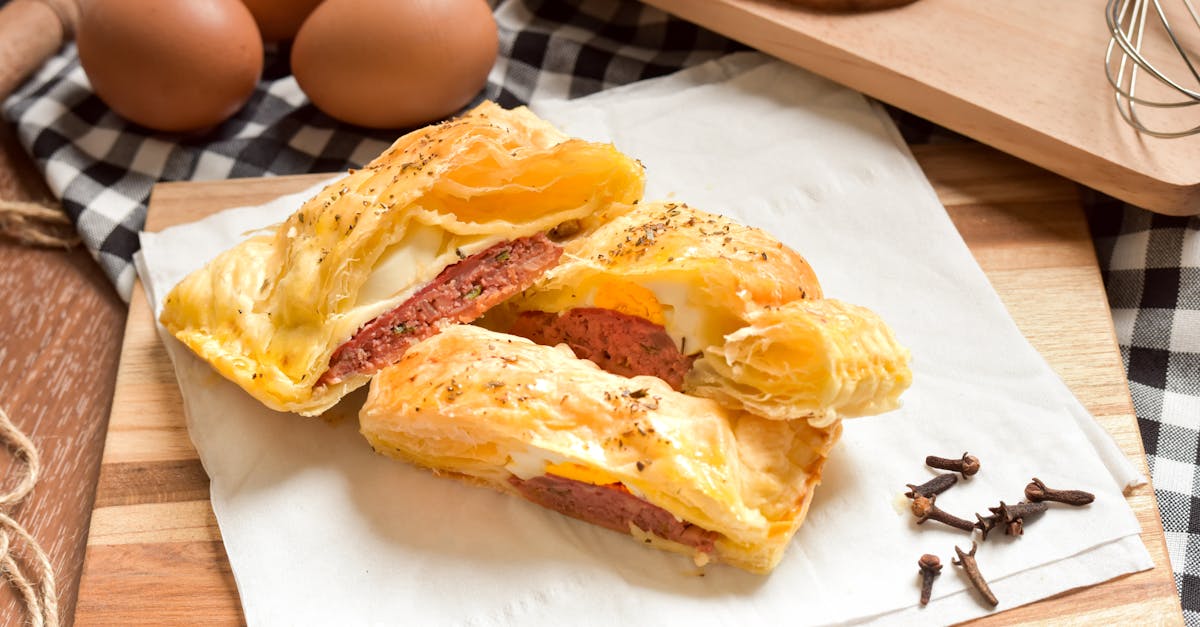
Solo pastries are a beloved treat known for their flaky crusts and rich, flavorful fillings. Originating from Southeast Asia, these hand-sized pastries offer a perfect balance of savory and sweet, making them a versatile snack or dessert. Whether enjoyed fresh from the oven or as a convenient on-the-go bite, solo pastries never fail to satisfy.
In this collection, we’ll explore a variety of solo pastry filling recipes that bring out the best in this classic pastry. From traditional chicken curry to creamy custard and spicy vegetable blends, our recipes are designed to inspire your baking adventures. Each filling is crafted to complement the delicate pastry shell, ensuring every bite is bursting with flavor.
Let’s dive into these delicious solo pastry fillings that are easy to make and perfect for sharing with family and friends. With our tips and tricks, you’ll master the art of creating irresistible pastries in no time.
Ingredients for Solo Pastry Filling Recipes
To create the perfect solo pastry fillings, we must focus on quality ingredients that bring out authentic flavors. Whether crafting sweet or savory fillings, precise measurements and fresh produce are key to achieving that signature taste and texture.
Sweet Fillings Ingredients
For our sweet solo pastry fillings, selecting ingredients with natural sweetness and creamy consistency ensures a rich, indulgent bite. Here are the staples we use:
- Granulated sugar – provides balanced sweetness
- Coconut milk – adds creaminess and subtle tropical flavor
- Egg yolks – build a smooth custard texture
- Cornstarch or all-purpose flour – thickens fillings without graininess
- Pandan leaves or vanilla extract – infuse aromatic notes
- Salt – enhances sweetness and flavor complexity
- Fresh fruit puree (e.g., mango, banana) – for a natural fruity filling option
| Ingredient | Purpose | Typical Quantity (per 1 cup filling) |
|---|---|---|
| Granulated sugar | Sweetener | 1/2 cup |
| Coconut milk | Creaminess | 1/2 cup |
| Egg yolks | Thickening agent | 3 large |
| Cornstarch | Thickening agent | 2 tablespoons |
| Vanilla extract | Flavor enhancer | 1 teaspoon |
| Salt | Flavor balance | Pinch |
| Fresh fruit puree | Flavor base | 1/2 cup |
Savory Fillings Ingredients
When it comes to savory solo pastry fillings, bold spices and fresh proteins are essential. We rely on traditional Southeast Asian seasonings combined with hearty ingredients to create a satisfying filling:
- Ground chicken or minced meat – the primary protein source
- Curry powder or paste – delivers warm, spicy complexity
- Onion and garlic – foundational aromatics
- Coconut cream – adds richness and smooth mouthfeel
- Potatoes – provide body and texture
- Chopped chili or chili flakes – optional heat element
- Salt and white pepper – balance and enhance the mixture
- Fresh cilantro or green onion – for fresh herbal notes
| Ingredient | Purpose | Typical Quantity (per 1 cup filling) |
|---|---|---|
| Ground chicken | Protein base | 1/2 cup |
| Curry powder or paste | Spice blend | 1-2 tablespoons |
| Onion | Aromatic | 1/4 cup, finely chopped |
| Garlic | Aromatic | 1 clove, minced |
| Coconut cream | Adds creaminess | 1/3 cup |
| Potatoes | Texture and bulk | 1/4 cup, cooked and diced |
| Chopped chili flakes | Heat | 1 teaspoon (optional) |
| Salt and white pepper | Seasoning | To taste |
| Fresh cilantro | Herbaceous freshness | 1 tablespoon, chopped |
Using these essential ingredients, we craft both sweet and savory solo pastry fillings with bold flavors and delightful textures. Each element plays a crucial role in achieving the perfect balance needed for these iconic pastries.
Equipment Needed for Solo Pastry Filling Recipes
To craft the perfect solo pastry fillings, having the right equipment is essential. Each tool plays a crucial role in preparing smooth sweet or savory fillings that complement the flaky pastry shell. Below we detail the key equipment items that help us achieve consistently delicious results.
Essential Tools for Mixing and Cooking Fillings
- Mixing Bowls
Use a set of medium to large bowls for combining ingredients thoroughly. Stainless steel or glass bowls work best for durability and easy cleanup.
- Spatula and Wooden Spoon
A flexible spatula lets us scrape down the sides of bowls ensuring no filling goes to waste. Wooden spoons are perfect for stirring thick savory fillings gently without scratching cookware.
- Measuring Cups and Spoons
Precision matters when balancing spices and sweetness. We recommend using standardized measuring tools to get consistent results.
- Saucepan
A medium-sized non-stick saucepan is ideal for cooking fillings such as curried chicken or custard gently on the stove. Non-stick surfaces prevent sticking and burning.
Cooking and Blending Equipment
- Blender or Food Processor
For smooth fillings like fruit purée or custard, a blender helps create a fine consistency free of lumps. A food processor is excellent for chopping and mixing savory vegetable blends evenly.
- Strainer or Sieve
Passing custards or purées through a fine mesh sieve removes any unwanted solids, producing silky fillings that elevate the pastry experience.
- Knife and Cutting Board
Sharp knives and clean boards are essential when prepping fresh herbs, vegetables, or proteins for savory fillings.
Baking and Handling Tools
- Pastry Brush
We use it to evenly apply egg wash or butter on the pastry for a golden crust that contrasts nicely with rich fillings.
- Baking Tray with Parchment Paper
Ensures pastries bake evenly without sticking while protecting the tray. Parchment paper also simplifies cleanup after baking.
Equipment Summary Table
| Equipment | Purpose | Recommended Features |
|---|---|---|
| Mixing Bowls | Combining filling ingredients | Stainless steel or glass, multiple sizes |
| Spatula & Wooden Spoon | Stirring & scraping | Flexible, heat-resistant |
| Measuring Tools | Accuracy in ingredients | Standardized, easy to clean |
| Saucepan | Cooking fillings on stove | Medium size, non-stick coating |
| Blender / Food Processor | Pureeing and chopping ingredients | High power, multiple speed settings |
| Strainer / Sieve | Removing solids for smooth texture | Fine mesh |
| Knife & Cutting Board | Prepping fresh ingredients | Sharp blade, sturdy board |
| Pastry Brush | Applying egg wash or butter | Soft bristles |
| Baking Tray & Parchment | Baking pastries without sticking | Heavy-duty tray, food-safe paper |
Pro Tip: Always prepare all your equipment before starting the filling process. Organization accelerates cooking time and ensures greater control over the final texture of your solo pastry fillings.
By using these essential tools, we set the foundation for delicious flaky solo pastries filled with perfectly balanced savory or sweet flavors.
Preparation for Solo Pastry Fillings
Preparing the solo pastry fillings correctly is crucial for achieving rich flavor and the perfect texture that complements our flaky pastry shells. Let us dive into the key steps for ingredient preparation and Mixing Techniques to ensure our fillings turn out irresistibly smooth and flavorful.
Prepping Ingredients
Properly preparing the ingredients sets the foundation for our solo pastry filling success. Here’s how we handle different components for optimal results:
- Measure precisely: Use measuring cups and spoons to ensure accuracy. Even small deviations can affect taste and consistency.
- Chop and puree: Vegetables or fruits should be chopped finely or pureed for a smooth texture that fills evenly. For example, chicken should be minced or finely ground to blend well with spices.
- Strain liquids: When using coconut milk or custards, strain them through a fine sieve to avoid lumps or curdles.
- Bring ingredients to room temperature: Eggs, butter, and dairy soften easily and incorporate better at room temperature, resulting in smooth fillings.
- Toast spices: For savory fillings, lightly toast curry powder or dried herbs to release their essential oils, intensifying aroma and flavor.
| Ingredient Type | Preparation Details | Purpose |
|---|---|---|
| Proteins | Mince or finely chop | Even mixing with spices and moisture |
| Fruits & Veggies | Chop finely or puree | Smooth texture and uniform flavor |
| Liquids | Strain before use | Remove solids for silkier consistency |
| Spices | Toast lightly before mixing | Boost aroma and flavor depth |
| Dairy & Eggs | Bring to room temperature | Improve emulsification and smoothness |
“Attention to ingredient prep is the first step toward crafting solo pastry fillings that burst with flavor in every bite.”
Mixing Techniques
The method we use to combine our ingredients profoundly impacts the texture and taste of the solo pastry filling. Follow these essential mixing techniques for best results:
- Combine dry ingredients first: For savory spice blends or sugar in sweet fillings, thoroughly mixing dry components avoids clumps and balances flavor.
- Incorporate liquids gradually: Slowly add liquids such as coconut milk or beaten eggs to dry mixtures while stirring to prevent separation.
- Use folding motion for delicate fillings: Fold ingredients gently using a spatula to retain airiness in custards or creamy fruit blends.
- Cook slowly with constant stirring: When heating the filling, stir continuously with a wooden spoon or spatula to avoid burning and ensure even thickening.
- Test consistency before filling: Aim for a thick creamy texture that holds shape but is still smooth enough to pipe or spoon easily.
Here is a quick guideline table outlining mixing methods for common solo pastry filling types:
| Filling Type | Mixing Method | Key Notes |
|---|---|---|
| Savory Curry | Stir dry spices, then add liquids gradually | Ensure spices bloom evenly |
| Creamy Custard | Fold egg yolks with milk, add sugar slowly | Avoid scrambling eggs by tempering |
| Fruit Puree | Puree then fold in sugar or cream | Maintain smooth texture, avoid overmixing |
| Ground Meat | Mix spices then protein gently | Evenly distributed seasoning |
“Mastering the mixing techniques ensures each spoonful of our solo pastry fillings delivers balanced, vivid flavors with flawless texture.”
By following these preparation steps for ingredients and mixing, we set ourselves up for creating solo pastry fillings that perfectly complement the tender, flaky crust and elevate every bite with rich, harmonious taste.
Instructions for Making Solo Pastry Fillings
Mastering the technique of crafting solo pastry fillings is essential for achieving that perfect balance of flavor and texture. Below, we break down the steps for creating both sweet and savory fillings to enhance your pastry experience.
Making Sweet Pastry Fillings
- Prep Ingredients: Measure all ingredients precisely. For creamy fillings, ensure coconut milk and egg yolks are at room temperature to blend smoothly.
- Combine Dry Ingredients: In a mixing bowl, sift sugar and any dry starches or flours together to prevent lumps.
- Mix Wet Ingredients: Gradually add the liquid elements like coconut milk, pureed fruits, or cream to the dry mix, stirring gently with a spatula.
- Cook Filling: Transfer the mixture to a non-stick saucepan. Cook over medium-low heat, stirring constantly with a wooden spoon to avoid curdling or burning.
- Cook Until Thickened: Continue stirring until the mixture thickens enough to coat the back of a spoon, typically 7–10 minutes.
- Strain and Cool: Pass the filling through a fine-mesh strainer to achieve a silky texture. Let it cool before filling pastries.
- Adjust Sweetness & Texture: Taste and adjust sweetness if needed. For extra richness, fold in butter or cream once cooled.
| Step | Key Focus | Estimated Time |
|---|---|---|
| Prep Ingredients | Precise measurement, room temperature mixing | 5 minutes |
| Combine Dry & Wet | Gradual mixing, avoid lumps | 3 minutes |
| Cook Filling | Constant stirring, medium-low heat | 7-10 minutes |
| Strain & Cool | Smooth texture, cooling before use | 10-15 minutes |
“Patience during cooking ensures a smooth sweet filling that won’t weep or split inside your solo pastries.“
Making Savory Pastry Fillings
- Prepare Proteins and Vegetables: Dice or mince proteins (e.g., ground chicken) uniformly. Chop vegetables finely to ensure even cooking.
- Heat Fat and Aromatics: In a heated non-stick pan, warm oil or coconut oil. Sauté aromatics such as garlic, onion, and spices until fragrant, about 2–3 minutes.
- Cook Proteins: Add ground chicken or other protein. Stir frequently and cook until no longer pink, approximately 5–7 minutes.
- Add Spices and Coconut Cream: Stir in curry powder, chili, or other spices. Pour in coconut cream, mixing well to combine flavors.
- Simmer and Thicken: Reduce heat to low and let the mixture simmer until thickened, about 8–10 minutes. Stir occasionally to avoid sticking.
- Cool Before Use: Remove from heat and let the filling cool completely to prevent pastry sogginess.
| Step | Key Focus | Estimated Time |
|---|---|---|
| Prep Ingredients | Uniform chopping for even cooking | 10 minutes |
| Sauté Aromatics | Build flavor base | 2-3 minutes |
| Cook Proteins | Thorough cooking without drying | 5-7 minutes |
| Add Spices & Cream | Flavor infusion | 1-2 minutes |
| Simmer & Thicken | Thick consistency with flavor meld | 8-10 minutes |
| Cool Before Filling | Prevent soggy pastry | 15 minutes |
“The key to a savory solo pastry filling is layering flavors through sautéing and careful simmering to yield a rich and aromatic result.“
By following these step-by-step instructions, we ensure our solo pastry fillings reach ideal texture and taste, ready to be encased in flaky, golden pastry shells.
Directions for Assembling Solo Pastry
Assembling solo pastries requires precision and care to ensure each bite delivers the perfect blend of flaky crust and flavorful filling. Let’s walk through the essential steps for filling, shaping, and sealing these delightful treats.
Filling the Pastry Shells
To achieve a perfectly balanced solo pastry, fill each pastry shell with the right amount of filling. Overfilling can cause leaking and underfilling can lead to a dry pastry. Follow these steps for consistent results:
- Use a small spoon or a piping bag for controlled filling placement.
- Fill each shell with about 2 tablespoons of filling.
- Leave a margin of about 1/2 inch from the edge to allow for seal formation.
- Ensure the filling is at room temperature to prevent premature dough softening.
- Avoid excess liquid in the filling; strain if necessary for smooth and firm texture.
| Step | Quantity/Detail | Tip |
|---|---|---|
| Filling per shell | 2 tablespoons | Use a measuring spoon for uniformity |
| Edge margin | 1/2 inch | Prevents filling leakage |
| Filling temperature | Room temperature | Keeps dough from becoming soggy |
| Filling texture | Thick, not runny | Strain fillings when needed |
“A well-filled pastry delivers a satisfying balance of textures and prevents soggy bottoms or burst edges.”
Shaping and Sealing Techniques
Proper shaping and sealing are vital to lock in flavors and maintain the structural integrity of our solo pastries. Here is the step-by-step process:
- Fold Carefully: Fold the pastry dough over the filling to create a half-moon or triangular shape depending on your preference.
- Press Edges Gently: Pinch the edges together with your fingers to initially secure the filling.
- Crimp the Edges: Use a fork or fingers to crimp the edges firmly, creating a decorative seal and preventing leakage.
- Check for Gaps: Inspect the seal carefully. If gaps or tears appear, wet the edges lightly with water and press together again.
- Chill if Needed: Place the assembled pastries in the refrigerator for 15 minutes before baking to help firm up the dough and improve texture.
| Shaping Step | Action Description | Purpose |
|---|---|---|
| Fold | Fold dough over filling | Encases filling |
| Press | Pinch edges gently | Initial secure seal |
| Crimp | Use fork or fingers for decorative seal | Prevents filling leaks |
| Inspect | Look for gaps or tears | Ensure airtight seal |
| Chill | Refrigerate 15 minutes if possible | Firms dough before baking |
Pro Tip: Chilling the sealed pastries prevents premature butter melting during baking ensuring a flaky and crisp crust.
By mastering these techniques, our solo pastries will bake evenly with no filling spills, showcasing a golden, crisp exterior and a well-contained flavorful center.
Baking or Cooking Solo Pastry
Mastering the Baking or Cooking Solo Pastry process is crucial for achieving that perfect flaky, golden crust with a flavorful filling. Whether we choose to bake or use alternative cooking methods, precision and attention to detail will ensure our solo pastries turn out exceptional every time.
Oven Baking Instructions
Baking is the traditional and most popular method for cooking solo pastries. Here’s a clear step-by-step guide to help us bake our pastries to perfection:
- Preheat the Oven
Set the oven to 350°F (175°C). Preheating ensures even baking and flaky crusts.
- Arrange Pastries on Baking Sheet
Line a baking tray with parchment paper to prevent sticking. Place each pastry 2 inches apart to allow room for expansion.
- Apply Egg Wash
Brush each pastry lightly with an egg wash (one beaten egg mixed with a tablespoon of water). This creates a shiny, golden finish.
- Bake
Place the tray in the middle rack and bake for 20 to 25 minutes or until the crust turns a rich golden brown.
- Cool Slightly
Remove the pastries and let them cool on a wire rack for 10 minutes before serving. This resting time lets the filling set and prevents sogginess.
| Step | Details |
|---|---|
| Oven Temperature | 350°F (175°C) |
| Baking Duration | 20 to 25 minutes |
| Pastry Spacing | 2 inches apart |
| Egg Wash | 1 beaten egg + 1 tbsp water |
| Cooling Time | 10 minutes |
Pro Tip: We always chill our assembled solo pastries for at least 30 minutes in the refrigerator before baking. This helps the dough maintain its structure and prevents shrinkage during baking.
Alternative Cooking Methods
While oven baking is ideal for achieving the classic flaky solo pastry, alternative methods can be used depending on available equipment or desired textures:
- Pan Frying
Heat 2 tablespoons of oil in a non-stick skillet over medium heat. Fry the solo pastries for 3-4 minutes on each side until golden and crispy. This method yields a slightly denser crust but with a deliciously crispy exterior.
- Steaming
Place solo pastries on parchment-lined steaming trays. Steam over boiling water for 10-12 minutes. Steamed pastries have a soft, tender crust and are a great option for those avoiding frying or baking.
- Air Frying
Preheat your air fryer to 320°F (160°C). Place solo pastries in a single layer and cook for 12-15 minutes, flipping halfway. This method offers a quick, oil-free alternative with a crisp texture.
| Method | Temperature/Heat | Time | Results |
|---|---|---|---|
| Pan Frying | Medium heat | 3-4 min per side | Crispy, denser crust |
| Steaming | Boiling water steam | 10-12 minutes | Soft, tender crust |
| Air Frying | 320°F (160°C) | 12-15 minutes | Oil-free, crispy crust |
“Choosing the right cooking method depends on our texture preference and available tools. Oven baking remains the gold standard, but these alternatives offer flexibility without compromising flavor.“
By following these baking and cooking techniques diligently, we ensure every bite of our solo pastries captures the perfect balance of crisp exterior and savory or sweet filling inside.
Tips and Tricks for Perfect Solo Pastry Fillings
Mastering solo pastry fillings requires attention to detail and a few essential tips to guarantee a delicious outcome every time. Let’s explore some key strategies to elevate our pastry filling game.
Use the Right Consistency for Filling
Maintaining the ideal filling consistency is crucial. A filling that is too watery will cause soggy pastry, while an overly thick one can feel dry and heavy.
- For sweet fillings aim for a smooth, custard-like texture that holds its shape but spreads easily.
- For savory fillings keep a moist but not runny texture, ensuring ingredients bind well without excess liquid.
| Filling Type | Ideal Texture | Common Indicators |
|---|---|---|
| Sweet | Smooth, thick but spreadable | Clings to spoon, no liquid pool |
| Savory | Moist, slightly chunky or smooth | Holds shape, no weeping liquids |
Measure Ingredients Precisely
Using exact measurements helps balance flavors and textures. We recommend using kitchen scales for solids and calibrated measuring spoons and cups for liquids. Remember:
“Precision in ingredient measurement is the foundation of consistent solo pastry success.”
Prepare Ingredients in Advance
Prepping ingredients beforehand makes the filling process seamless and helps maintain quality:
- Chop or puree fruits and vegetables uniformly for even cooking.
- Bring dairy and eggs to room temperature for better incorporation.
- Pre-toast spices to release aromas before mixing.
Combine Ingredients Properly
Follow these mixing best practices:
- Mix dry ingredients first to ensure even distribution.
- Gradually incorporate wet ingredients to avoid lumps.
- Use gentle folding motions for delicate fillings like custard to preserve lightness.
Control Heat During Cooking
Cooking temperature directly impacts filling consistency and flavor development:
- Cook on medium-low heat to prevent curdling and burning.
- Stir continuously to avoid sticking and ensure even thickening.
- For savory fillings, simmer gently to allow spices to fully infuse without overcooking proteins.
Strain Fillings for Smoothness
To achieve that silky, professional texture, strain sweet fillings through a fine mesh sieve to remove lumps or fiber from fruits. This simple step enhances mouthfeel and appearance.
Use Room Temperature Fillings for Assembly
Cold filling can break pastry dough or cause uneven sealing. Let fillings cool to room temperature before adding to pastry shells. This also prevents sogginess.
Avoid Overfilling Pastry Shells
Stick to the recommended 2 tablespoons per pastry shell, leaving at least a ½ inch margin for sealing. Overfilling can lead to leakage and uneven baking.
Chill Assembled Pastries Before Baking
Chilling the pastries for 15–20 minutes before baking helps to:
- Set the filling
- Firm up dough edges for better crimping
- Promote a flakier crust
Final Reminders in a Nutshell
| Tip | Reason |
|---|---|
| Precise ingredient measurement | Balanced flavor and texture |
| Preparation in advance | Smooth and efficient process |
| Cook on medium-low heat | Prevent burning, promote flavor |
| Strain sweet fillings | Silky texture |
| Use room temp filling | Prevent dough breakage and sogginess |
| Proper filling quantity | Avoid leakage, bake evenly |
| Chill before baking | Flaky crust and firm sealing |
By following these tips and tricks we ensure every batch of our solo pastry fillings turns out flavorful, with perfect texture and ready to be embraced by golden, flaky pastry.
Storage and Make-Ahead Instructions
Proper storage and make-ahead planning are essential for maintaining the freshness, flavor, and texture of our solo pastry fillings. By following these guidelines, we can save time and ensure every bite delivers a delicious experience.
Cooling and Storing Solo Pastry Fillings
- Cool Completely Before Storing
Always let the filling cool to room temperature. This prevents condensation, which can make the pastry soggy.
2. Use Airtight Containers
Transfer the cooled filling into clean, airtight containers to maintain moisture and prevent odors from other foods.
3. Label and Date
Clearly label each container with the type of filling and the date of preparation for easy tracking.
Make-Ahead Storage Duration
| Storage Method | Sweet Fillings Storage Time | Savory Fillings Storage Time |
|---|---|---|
| Refrigerator | Up to 3 days | Up to 2 days |
| Freezer | Up to 3 months | Up to 1 month |
- For sweet fillings, the higher sugar content allows for a longer refrigerator life.
- For savory fillings, which often contain proteins, refrigerate for no longer than two days for food safety.
Freezing Tips for Solo Pastry Fillings
- Portion filling into small batches before freezing to avoid repeated thawing.
- Use freezer-safe containers or resealable bags and remove excess air to prevent freezer burn.
- Label with the preparation date and type of filling.
- To thaw, transfer to the refrigerator overnight; avoid room temperature thawing to maintain safety and texture.
Reheating and Using Make-Ahead Fillings
- Reheat gently on low heat, stirring regularly until warm.
- Avoid overheating to maintain the filling’s smooth consistency and prevent separation.
- Use fillings at room temperature when assembling pastries to ensure proper sealing and avoid sogginess.
“Planning ahead with proper storage of solo pastry fillings not only saves time but preserves the essence of the flavors we crafted.”
By mastering these storage and make-ahead techniques, we keep our fillings at their best—ready to transform flaky pastry shells into irresistible treats anytime.
Conclusion
Mastering solo pastry fillings opens up a world of delicious possibilities, whether you prefer sweet or savory flavors. With the right ingredients, techniques, and a bit of patience, we can create fillings that perfectly complement flaky pastry shells every time.
By preparing fillings in advance and storing them properly, we make the process more convenient without sacrificing taste or texture. Let’s keep experimenting and perfecting our recipes to enjoy these delightful treats anytime.
Frequently Asked Questions
What are solo pastries?
Solo pastries are hand-sized Southeast Asian treats with flaky crusts and flavorful fillings, enjoyed as snacks or desserts.
What types of fillings can I use for solo pastries?
Fillings range from traditional chicken curry and spicy vegetables to creamy custard and sweet fruit purees.
What key ingredients are needed for sweet solo pastry fillings?
Common ingredients include granulated sugar, coconut milk, egg yolks, and fresh fruit puree.
What key ingredients are used in savory solo pastry fillings?
Savory fillings often use ground chicken, curry powder, spices, and coconut cream for rich flavors.
What equipment do I need to make solo pastry fillings?
You’ll need mixing bowls, spatulas, measuring tools, a non-stick saucepan, blender or food processor, strainers, and baking trays.
How do I prepare ingredients for solo pastry fillings?
Measure precisely, chop or puree fruits and veggies, strain liquids, and bring ingredients to room temperature before mixing.
What is the basic process for making sweet solo pastry fillings?
Combine dry and wet ingredients, cook until thickened, and strain for smooth texture, ensuring patience to avoid splitting or weeping.
How do I make savory solo pastry fillings?
Sauté aromatics, cook proteins, add spices and coconut cream, then simmer to develop rich flavors with the right texture.
How much filling should be added to each pastry shell?
About 2 tablespoons per shell, leaving a 1/2 inch margin for sealing to prevent leaks and sogginess.
What is the best way to seal solo pastries?
Fold the dough, pinch edges tightly, crimp decoratively, and inspect for gaps; chilling before baking improves flakiness.
How should solo pastries be baked?
Preheat the oven, place pastries on a tray, apply egg wash, and bake until golden brown; alternative methods include frying, steaming, and air frying.
What cooking method is best for solo pastries?
It depends on preference; oven baking yields a crisp crust, while frying or steaming offers different textures and flavors.
How can I ensure the perfect consistency for solo pastry fillings?
Measure ingredients precisely, control heat while cooking, strain the filling, use room temperature filling, and avoid overfilling pastry shells.
How should I store solo pastry fillings?
Cool completely, store in airtight containers, label with dates, refrigerate for up to 3 days (savory) or 1 week (sweet), or freeze for longer storage.
Can I prepare solo pastry fillings ahead of time?
Yes, fillings can be made in advance, stored properly, and reheated gently to maintain texture and flavor before assembly.