
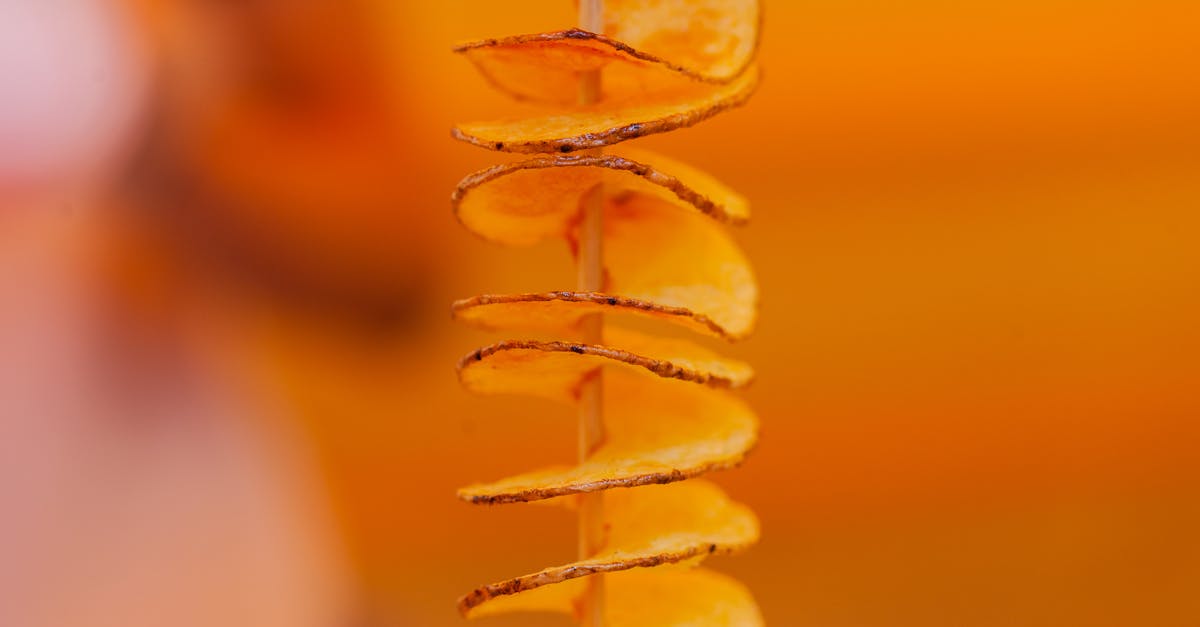
Venison snack sticks offer a delicious way to enjoy lean, flavorful game meat anytime. Perfect for hunters and food lovers alike, these portable treats combine the rich taste of venison with a blend of spices that keep every bite exciting. Making your own snack sticks lets us control the ingredients and customize the flavors to our liking.
This recipe is straightforward and rewarding whether you’re new to charcuterie or a seasoned pro. With just a few simple steps, we can create a protein-packed snack that’s perfect for hiking, road trips, or just a satisfying nibble at home. Let’s dive into crafting venison snack sticks that are as tasty as they are convenient.
Ingredients for Venison Snack Sticks
To create perfectly balanced venison snack sticks, we carefully select ingredients that enhance flavor, texture, and shelf life. Below is a breakdown of what you’ll need to craft these delicious, protein-rich treats.
Meat and Fat Ratio
The foundation of great venison snack sticks lies in the balance between lean meat and fat. Venison is naturally very lean, so we add fat to ensure juiciness and proper texture.
| Ingredient | Amount | Notes |
|---|---|---|
| Venison (ground) | 2 pounds | Freshly ground for best texture |
| Pork fat | 0.5 pounds | Preferably back fat, ground fine |
Tip: Aim for about a 80:20 ratio of venison to fat. This balance ensures the snack sticks stay moist and flavorful without being greasy.
Spices and Seasonings
We use a blend of spices to complement the gamey flavor of the venison and add depth to each bite. Each spice plays a role in balancing taste and aroma.
- Salt – 1.5 teaspoons (essential for flavor and preservation)
- Black pepper (freshly ground) – 1 teaspoon (adds mild heat and fragrance)
- Garlic powder – 1 teaspoon (enhances savory notes)
- Onion powder – 1 teaspoon (rounds out flavor profile)
- Crushed red pepper flakes – ½ teaspoon (optional, for a subtle spicy kick)
- Paprika – 1 teaspoon (adds smokiness and color)
- Dextrose or sugar – 1 teaspoon (balances curing and flavor)
Pro Tip: You can customize the spice mix to suit your taste, but maintain the salt and curing balance for safety.
Curing Agents
Using proper curing agents is critical for safety, flavor, and preservation when making venison snack sticks.
- Prague Powder #1 (pink curing salt) – 1 teaspoon (contains sodium nitrite for preventing bacterial growth)
- Ascorbic acid (Vitamin C powder) – ½ teaspoon (helps maintain color and boost curing efficiency)
Safety Note: Never skip the curing agents when making snack sticks. They protect against harmful bacteria and ensure a longer shelf life.
With these ingredients ready, we can proceed to mixing and stuffing our venison snack sticks, ensuring each bite offers the perfect balance of lean flavor and rich seasoning.
Equipment Needed
To craft perfect Snack Stick Recipe Venison, having the right equipment is essential. The following tools will help us maintain texture, flavor, and food safety while streamlining the process.
Meat Grinder
A meat grinder is crucial for achieving the ideal consistency in our venison snack sticks. We recommend using a grinder with adjustable plates to control the coarseness of the grind. A medium-coarse setting preserves the meat’s juiciness while allowing the seasoning to meld perfectly.
- Use a stainless steel grinder for durability and ease of cleaning.
- Keep all grinder parts chilled before use to prevent fat smearing and maintain texture.
- Ensure the grinder can handle pork fat and venison together to maintain the essential 80:20 meat-to-fat ratio.
| Feature | Recommended Spec | Purpose |
|---|---|---|
| Material | Stainless Steel | Durability and hygiene |
| Plate Size Options | 3/8 inch (medium-coarse) | Ideal texture for snack sticks |
| Motor Power | 500 watts or higher | Efficient grinding of lean venison mix |
Sausage Stuffer
To shape our snack sticks, a reliable sausage stuffer is indispensable. This tool ensures even filling of casings without air pockets or tearing.
- Choose a manual or electric stuffer based on your batch size.
- Use appropriately sized stuffing tubes (around 12 mm diameter) for standard snack sticks.
- Maintain steady, smooth pressure to avoid casing rupture and produce uniform sticks.
Curing Chamber or Refrigerator
Proper curing and drying require a controlled environment. A curing chamber is ideal but a well-regulated refrigerator can suffice for small batches.
- Maintain temperature between 50°F to 60°F (10°C to 15.5°C) for safe and effective curing.
- Control humidity at 70-80% to retain moisture while preventing spoilage.
- Use airflow fans inside the chamber or refrigerator to encourage even drying.
| Environment | Ideal Range | Function |
|---|---|---|
| Temperature | 50°F – 60°F (10-15.5°C) | Safe curing temperature |
| Humidity | 70%-80% | Prevents drying out or bacterial growth |
| Air Circulation | Continuous | Ensures uniform drying and texture |
Having the right equipment sets the foundation for successful crafting of flavorful and safe venison snack sticks. With these tools in hand, we proceed confidently to the mixing and stuffing stages of our snack stick recipe.
Preparation
To create the perfect Snack Stick Recipe Venison, precise preparation is essential. This section guides us through preparing the venison, grinding the meat and fat, and expertly mixing our spice and curing blend.
Preparing the Venison
Start by trimming the venison thoroughly. Remove all silverskin, connective tissue, and any excess sinew to ensure a tender final product. Cut the meat into 1-inch cubes to facilitate smooth grinding. Keep the meat chilled between 34°F and 40°F throughout preparation; this maintains freshness and helps retain texture.
For optimal flavor and safety, we should also prepare the pork fat using the same method — trim gently, cube, and keep refrigerated.
Grinding the Meat and Fat
Grinding is a critical step to achieving the ideal texture for our venison snack sticks. Use a stainless steel meat grinder fitted with a 3/8-inch (9.5 mm) plate for a balanced coarse grind. The recommended meat to fat ratio is 80:20, providing juiciness without compromising the leanness venison is known for.
We grind the meat and fat separately first, then combine them for a final mixed grind through the finer plate if desired. Keep all equipment and meats chilled to prevent smearing.
| Step | Details |
|---|---|
| Meat cut size | 1-inch cubes |
| Fat cut size | 1-inch cubes |
| Grinder plate size | 3/8-inch for initial grind |
| Final grind (optional) | Finer plate for smoother texture |
| Ratio (Venison:Pork Fat) | 80:20 |
| Temperature control | 34°F to 40°F during entire process |
Mixing Spices and Curing Ingredients
Next, we combine the freshly ground mixture with our spice blend and curing agents to enhance flavor and ensure safety. The spice mix typically includes salt, black pepper, garlic powder, onion powder, smoked paprika, and crushed red pepper flakes to create a bold, balanced profile.
Curing agents like Prague Powder #1 and ascorbic acid are essential. Prague Powder #1 acts as a preservative to prevent harmful bacterial growth while ascorbic acid helps maintain color and improves curing efficiency.
We recommend measuring spices precisely and mixing thoroughly with the meat and fat blend using gloved hands or a sturdy paddle mixer. This ensures even distribution and optimum curing.
| Ingredient | Purpose | Typical Amount (per 5 lbs meat) |
|---|---|---|
| Salt | Flavor, preservation | 2.5% of total meat weight |
| Black pepper | Flavor | 1 tsp |
| Garlic powder | Flavor | 1 tsp |
| Onion powder | Flavor | 1 tsp |
| Smoked paprika | Flavor, color | 1 tsp |
| Crushed red pepper | Heat | 0.5 tsp |
| Prague Powder #1 | Curing, safety | 0.25% of total meat weight |
| Ascorbic acid | Color retention, curing aid | 0.05% of total meat weight |
Making the Snack Sticks
In this phase, we transform our perfectly mixed venison snack stick blend into delicious sticks ready for curing. Attention to detail in stuffing and portioning ensures consistent texture and flavor.
Stuffing the Casings
First, we soak natural or collagen casings in warm water for about 30 minutes to soften them, making them easier to handle. After rinsing thoroughly inside and out, we load our sausage stuffer with the chilled venison mixture. Keeping the meat between 34°F and 40°F during this process maintains the ideal texture and prevents spoilage.
We gently feed the casing onto the sausage stuffer tube, ensuring no air pockets form as we stuff. It’s essential to maintain moderate pressure: too tight causes casing bursts, while too loose results in uneven sticks. As the mixture extrudes, we guide the casing off the tube smoothly, producing uniform diameter snack sticks roughly ¾ inch wide.
We pause frequently to check for air pockets. If found, we use a sterilized needle to gently prick and release trapped air, preventing spoilage and improving cure quality.
Tying and Portioning the Sticks
Once stuffed, we carefully twist the casings at regular intervals to form individual sticks, aiming for lengths between 4 to 6 inches, which balance curing efficiency and convenient snacking size.
We use butcher’s twine to tie off the ends firmly, preventing the stick from unraveling or drying unevenly. For a neat presentation and even curing, we knot the twine securely yet without over-tightening, preserving the casing’s integrity.
| Portion Detail | Measurement | Purpose |
|---|---|---|
| Stick Diameter | ~¾ inch (about 2 cm) | Uniform size for curing consistency |
| Stick Length | 4 to 6 inches (10-15 cm) | Optimal curing time and snack size |
| Meat Temperature Range | 34°F – 40°F (1-4°C) | Maintain freshness and texture |
After tying, we hang the sticks in a curing chamber or refrigerator set between 55°F and 60°F with 70% humidity to begin the curing and drying process — crucial for flavor development and safe preservation.
Curing and Drying Process
The Curing and Drying Process is critical in transforming our venison snack sticks into flavorful, safe, and shelf-stable treats. This phase develops the texture, deepens the flavor, and ensures proper preservation.
Hanging the Snack Sticks
Once the casings are stuffed and tied, we hang the venison snack sticks to promote even drying. Use a clean, well-ventilated space to suspend the sticks by the tied ends, ensuring they do not touch or overlap. This exposure to air helps form the desired outer pellicle — a tacky surface essential for drying and flavor absorption.
“Proper hanging keeps the stick shape consistent and enhances drying uniformity.”
We recommend using a curing chamber with hooks or rods designed to hold each stick securely. Avoid overcrowding since restricted airflow can cause uneven drying or spoilage.
Temperature and Humidity Control
Maintaining precise temperature and humidity levels is vital for safe curing and desirable texture development. The ideal environment settings are:
| Parameter | Recommended Range | Purpose |
|---|---|---|
| Temperature | 55°F to 60°F (13°C to 16°C) | Controls bacterial activity and drying rate |
| Humidity | 70% | Prevents case hardening or excessive moisture loss |
This environment preserves beneficial curing bacteria while reducing harmful pathogens. We monitor humidity with a hygrometer and adjust with humidifiers or ventilation as needed.
“Balanced moisture and temperature ensure our snack sticks cure evenly and safely, developing the classic dense texture and tangy flavor.”
Duration of Curing
The curing time depends on the snack sticks’ thickness and drying conditions but typically ranges between 3 to 6 weeks. During this period, the meat continues to ferment and dry, concentrating flavors and firming texture without becoming brittle.
| Thickness (diameter) | Curing Time | Notes |
|---|---|---|
| ~¾ inch | 3 to 4 weeks | Standard size for snacking |
| Larger sizes | 5 to 6 weeks | Requires longer drying |
We inspect the sticks weekly for firmness and appearance, looking for a dry surface with slight stickiness (pellicle) and no signs of mold or spoilage. White beneficial mold can develop, which is normal and can be wiped off with a vinegar solution before storage.
Careful patience during curing rewards us with perfectly textured and flavorful venison snack sticks ready for enjoyment.
Cooking the Snack Sticks
Once we’ve mastered the curing and drying phase, the next step is cooking the venison snack sticks. Cooking is crucial for enhancing the flavor, ensuring safety, and achieving the ideal texture. While traditional methods like smoking add a bold and savory character, there are alternative techniques to suit various preferences and equipment availability.
Smoking Instructions (Optional)
Smoking our venison snack sticks imparts a rich, smoky aroma and deepens their reddish-brown color. Follow these detailed steps for optimal results:
- Preheat the smoker to a consistent temperature of 160°F to 180°F.
- Select wood chips that complement venison’s natural flavor. Hickory, oak, or applewood are excellent choices.
- Place the cured snack sticks on smoker racks, ensuring they do not touch for even smoke exposure.
- Smoke the sticks for 2 to 4 hours depending on size and thickness. This gently cooks the sticks while infusing smoky notes.
- Use a meat thermometer to check the internal temperature. Ensure the sticks reach at least 150°F for safe consumption.
- After smoking, allow the sticks to cool at room temperature before storing them in airtight containers or vacuum-sealing for longer shelf life.
“Smoking is not mandatory but a fantastic way to unlock deeper layers of flavor in our venison snack sticks.“
| Step | Detail | Temperature/Time |
|---|---|---|
| Preheat Smoker | Set to smoking range | 160°F to 180°F |
| Wood Selection | Hickory, oak, or applewood | N/A |
| Smoking Duration | 2 to 4 hours | Until internal temp 150°F |
| Cooling | Room temperature | Until completely cooled |
Alternative Cooking Methods
When a smoker isn’t available, or if you prefer different cooking approaches, consider these reliable alternatives to cook the snack sticks while preserving their texture and flavor:
- Oven Cooking:
Preheat the oven to 200°F. Place snack sticks on a wire rack over a baking sheet. Cook for 2 to 3 hours or until the internal temperature hits 150°F. This method simulates slow smoking by gently cooking the sticks evenly.
- Grilling:
For a quick cook and slightly charred exterior, heat the grill to medium-low. Grill sticks for about 10 to 15 minutes, turning frequently to avoid burning and to ensure the inside reaches 150°F. Monitor carefully to maintain juiciness.
- Sous Vide:
Vacuum-seal the snack sticks, then cook in a water bath at 140°F for 2 to 3 hours. This method retains moisture and texture while pasteurizing the meat. After sous vide, finish the sticks with a brief sear on a hot pan or grill to add a smoky crust.
Each of these alternatives delivers a safe and delicious way to enjoy our homemade venison snack sticks, giving us flexibility based on kitchen tools and flavor preferences. Always verify internal temperature for safety and best quality.
Storage and Serving Tips
To maximize the flavor and shelf-life of our venison snack sticks, proper storage and smart serving choices are essential. Let’s explore how to keep these savory treats fresh and how to best enjoy them.
Proper Storage Techniques
Ensuring our venison snack sticks stay fresh and safe hinges on correct storage. We must control temperature, humidity, and packaging to maintain optimal quality.
- Refrigerated Storage: After smoking and curing, wrap the snack sticks tightly in butcher paper or vacuum seal them. Store in the refrigerator at 34°F to 40°F. This keeps them fresh for up to 4 weeks.
- Freezing for Long-Term: For extended storage, vacuum seal to prevent freezer burn. Freeze at 0°F or below. Properly frozen, the sticks retain quality for up to 6 months.
- Room Temperature Storage: Fully cured and dried sticks can be kept at room temperature if stored in a cool, dry place away from direct sunlight. Use breathable packaging like paper bags. Consume within 2 weeks.
- Avoid Moisture and Heat: Exposure to moisture or warm temperatures promotes mold and spoilage, jeopardizing safety and taste.
| Storage Method | Temperature | Packaging | Shelf Life |
|---|---|---|---|
| Refrigerated | 34°F – 40°F (1°C–4°C) | Butcher paper/vacuum seal | Up to 4 weeks |
| Frozen | 0°F (-18°C) or below | Vacuum seal | Up to 6 months |
| Room Temperature | Cool, dry (below 70°F) | Breathable paper bag | Up to 2 weeks |
“Vacuum sealing combined with refrigeration or freezing is the best method to preserve venison snack sticks’ freshness and flavor.”
Serving Suggestions
Our venison snack sticks deliver a protein-packed punch and vibrant flavor profile making them perfect for numerous occasions.
- On the Go Snack: Their convenient size and portability make them ideal for hiking, camping, or quick snacks during sports and outdoor activities.
- Charcuterie Boards: Slice thinly and pair with sharp cheeses, nuts, and dried fruits. Venison’s rich flavor complements robust flavors like smoked gouda and aged cheddar.
- Sandwich Add-In: Dice and mix into sandwiches, wraps, or salads for a smoky, savory boost.
- Accompaniment to Beverages: Serve alongside craft beers and robust red wines to enhance tasting experiences.
- Warm Serving: Lightly warm the sticks on a grill or skillet for a few minutes to amplify aroma and texture, perfect for winter gatherings.
“Venison snack sticks provide a gourmet touch to everyday meals and elevate special occasions effortlessly.”
We recommend experimenting with herbs, mustards, or dipping sauces like spicy aioli or honey mustard to customize your snack stick experience further.
Conclusion
Crafting venison snack sticks at home lets us enjoy a lean, flavorful protein snack tailored to our tastes. With the right balance of ingredients and careful curing, we create a product that’s both safe and delicious. Whether for outdoor adventures or casual snacking, these homemade sticks bring satisfaction beyond store-bought options. Embracing the process means mastering techniques that elevate our culinary skills and deepen our appreciation for quality venison.
Frequently Asked Questions
What makes venison snack sticks a healthy snack option?
Venison snack sticks are lean, high-protein snacks with lower fat content than many beef or pork alternatives. The 80:20 meat-to-fat ratio ensures juiciness without excess fat, making them ideal for health-conscious consumers and outdoor enthusiasts.
Why should I make my own venison snack sticks instead of buying them?
Making your own snack sticks allows complete control over ingredients, ensuring freshness and customization of flavor. It also avoids preservatives and additives commonly found in store-bought options, delivering a more natural, personalized product.
What is the ideal fat ratio for venison snack sticks?
An 80:20 ratio of venison to pork fat is optimal. This balance provides enough fat to keep the snack sticks juicy and tender without overpowering the lean venison flavor.
What equipment do I need to make venison snack sticks?
Essential tools include a stainless steel meat grinder, a reliable sausage stuffer, and a curing chamber or a refrigerator with temperature and humidity control for proper drying and curing.
How should I grind the meat for the snack sticks?
Use a 3/8-inch grinding plate for a balanced coarse grind to preserve texture. A finer second grind is optional but can help with mixing spices evenly and achieving the desired consistency.
What spices and curing agents are used in venison snack sticks?
Common spices include salt, black pepper, garlic powder, onion powder, smoked paprika, and crushed red pepper flakes. Curing agents like Prague Powder #1 and ascorbic acid are essential for preservation and safety.
How long do I cure and dry the venison snack sticks?
Curing and drying generally take 3 to 6 weeks at 55°F to 60°F with 70% humidity. This period allows the snack sticks to ferment, dry, develop flavor, and achieve the proper texture.
Can I cook venison snack sticks without smoking them?
Yes, you can cook snack sticks using oven baking, grilling, or sous vide methods. These alternatives still ensure safety and flavor while preserving texture if smoking isn’t an option.
How should I store venison snack sticks to keep them fresh?
Store in the refrigerator (34°F to 40°F) for up to 4 weeks, freeze at 0°F or below for up to 6 months, or keep fully cured sticks at room temperature for up to 2 weeks, avoiding heat and moisture.
What are some great ways to serve venison snack sticks?
Venison snack sticks are perfect for on-the-go snacks, charcuterie boards, sandwiches, or warm appetizers. Pair them with cheeses, nuts, sauces, or fresh bread to enhance flavor and variety.