
Santa Rosa plums bring a perfect balance of sweet and tart that’s hard to resist. Originating in California, these juicy fruits shine in a variety of dishes, from fresh salads to decadent desserts. Their vibrant color and rich flavor make them a favorite for both home cooks and professional chefs.
We love exploring creative ways to use Santa Rosa plums, whether in quick snacks or impressive meals. Their versatility means they can be grilled, baked, or enjoyed fresh, adding a burst of flavor to any recipe. Let’s dive into some of our favorite Santa Rosa plum recipes that highlight their unique taste and texture.
Ingredients for Santa Rosa Plum Recipes
To create delicious dishes highlighting the Santa Rosa plum, we rely on a combination of fresh fruit, complementary flavors, essential baking ingredients, and optional garnishes that elevate each recipe.
Fresh Santa Rosa Plums
Using ripe, juicy Santa Rosa plums is essential. Their sweet-tart balance forms the foundation of every dish we prepare. Choose plums that are firm yet yield slightly to gentle pressure for optimal flavor and texture.
- 4 to 6 fresh Santa Rosa plums, washed and pitted
- Cut into halves, quarters, or slices depending on recipe needs
Additional Fruits and Flavors
Pairing Santa Rosa plums with complementary fruits and flavorings enhances their natural taste.
- Apples (preferably tart varieties like Granny Smith)
- Peaches or nectarines for added sweetness
- Lemon zest and juice to brighten flavors
- Fresh ginger or cinnamon for warmth and spice
- Vanilla extract for a smooth aromatic layer
Baking and Cooking Essentials
We incorporate key baking ingredients to transform Santa Rosa plum recipes into satisfying desserts or savory dishes.
| Ingredient | Purpose | Typical Quantity per Recipe |
|---|---|---|
| Granulated sugar | Balances plum tartness | ½ to 1 cup |
| Brown sugar | Adds caramel notes | ¼ to ½ cup |
| All-purpose flour | Thickens fillings, aids baking | 1 to 2 cups |
| Butter | Adds richness and moisture | 4 to 8 tablespoons |
| Baking powder | Provides lift in baked goods | 1 to 2 teaspoons |
| Salt | Enhances overall flavor | ¼ to ½ teaspoon |
Optional Garnishes and Toppings
To finish our Santa Rosa plum recipes, we add garnishes that bring texture and visual appeal.
- Chopped toasted almonds or pecans for crunch
- Fresh mint leaves to add a bright herbal note
- Whipped cream or vanilla ice cream for creaminess
- Honey drizzle to amplify natural sweetness
- Powdered sugar dusting for a decorative touch
Together these ingredients form a versatile palette allowing us to craft delightful Santa Rosa plum creations from appetizers to desserts.
Tools and Equipment Needed
To craft delicious Santa Rosa plum recipes, having the right tools and equipment ensures precision and ease throughout the cooking process. Below, we detail the essential kitchen items that help us bring out the best in these vibrant plums.
Essential Cutting and Preparing Tools
- Paring knife: Perfect for peeling and trimming the Santa Rosa plums with control and accuracy.
- Chef’s knife: Ideal for slicing plums and chopping complementary fruits like peaches or apples.
- Cutting board: A sturdy surface to avoid slipping and ensure safe cutting.
Mixing and Measuring Tools
- Measuring cups and spoons: For exact measurement of dry and wet ingredients such as sugar, flour, and butter, ensuring balanced flavors and textures.
- Mixing bowls: Multiple sizes to combine ingredients efficiently, whether we’re making batter or tossing fruit salads.
Cooking and Baking Equipment
- Oven or stove: For baking our mouthwatering plum desserts or sautéing fruit compotes.
- Baking dishes or pans: Choose glass or metal pans depending on the dish—essential for crisps, cobblers, or plum tarts.
- Saucepan: Used for simmering plums into sauces or jams.
Specialty Tools to Elevate Plum Recipes
- Fruit pitter: Removes pits quickly without wasting fruit flesh, ideal for Santa Rosa plums with large seeds.
- Pastry brush: Helps us apply glazes or melted butter to brighten crusts and add richness.
- Cooling rack: Allows baked goods to cool evenly, preserving texture and preventing sogginess.
| Tool Type | Purpose | Notes |
|---|---|---|
| Paring knife | Peeling and trimming plums | Sharp blade for precision |
| Chef’s knife | Slicing plums and chopping fruits | Versatile and essential |
| Measuring cups/spoons | Measuring ingredients | Accurate measurements critical |
| Baking dishes/pans | Baking plum desserts | Glass or metal recommended |
| Fruit pitter | Removing plum seeds | Saves time and fruit integrity |
| Pastry brush | Applying glazes | For a golden, glossy finish |
Using these tools and equipment streamlines our preparation, enhancing the natural sweetness and tartness of the Santa Rosa plum. Proper equipment lets us focus on creating recipes with vibrant flavor profiles and stunning presentation each time.
Preparing Santa Rosa Plums
To unlock the vibrant flavor and perfect texture of Santa Rosa plums, proper preparation is essential. Following these steps ensures our dishes showcase their sweet and tart balance to the fullest.
Washing and Pitting
First, we always wash the Santa Rosa plums thoroughly under cool running water to remove any residues or impurities. Using a gentle brush helps clean the skin without damaging its delicate surface.
Next, we remove the pits to prepare the plums for cooking or fresh use. Here’s how we efficiently pit Santa Rosa plums:
| Step | Action |
|---|---|
| 1. | Using a sharp paring knife, cut around the plum lengthwise, circling the pit. |
| 2. | Gently twist the two halves in opposite directions to separate. |
| 3. | Use your fingers or the tip of a spoon to pop out the pit from the flesh. |
| 4. | Discard the pit and inspect the halves for any remaining pit fragments. |
Pro tip: Employing a fruit pitter tool streamlines this process for larger batches, reducing prep time while preserving the plum’s integrity.
Slicing and Chopping Techniques
How we slice or chop Santa Rosa plums depends on the recipe’s needs. To maximize the plums’ juicy texture and vibrant color, here are precise techniques:
| Style | Description | Usage |
|---|---|---|
| Thin Slices | Cut the plum halves into thin, uniform slices. | Ideal for salads, tarts, or garnishes. |
| Wedges | Slice the plum into 6 to 8 wedges per half. | Great for grilling or roasting recipes. |
| Diced | Chop slices or wedges into small cubes (¼ inch). | Perfect for jams, sauces, or baking. |
Always use a sharp chef’s knife to minimize juice loss and ensure clean cuts. We find that slicing just before using keeps the plums fresh and prevents browning.
Santa Rosa Plum Recipe Ideas
Exploring Santa Rosa plum recipes unlocks a world of vibrant flavors, from sweet jams to savory pairings. Let’s dive into some standout ideas that showcase the unique balance of sweetness and tartness these plums deliver so beautifully.
Santa Rosa Plum Jam
Making Santa Rosa Plum Jam is a fantastic way to preserve the fruit’s natural flavor and enjoy it year-round. The bright, juicy plums transform into a luscious spread perfect for toast, desserts, or even savory dishes.
Ingredients
- 4 cups Santa Rosa plums, pitted and chopped
- 2 cups granulated sugar
- 2 tablespoons fresh lemon juice
- 1 teaspoon grated lemon zest
- 1/2 teaspoon ground cinnamon (optional)
Instructions
- Prepare the plums: Wash and pit the Santa Rosa plums carefully to retain their juice. Chop into small pieces for even cooking.
- Combine ingredients: In a large saucepan, add plums, sugar, lemon juice, and lemon zest. Stir well to combine.
- Cook the mixture: Heat over medium heat, stirring frequently. Allow the sugar to dissolve fully and the plums to break down, about 15–20 minutes.
- Test for set: The jam is ready when it thickens and coats the back of a spoon. For a firmer set, cook an additional 5 minutes, stirring constantly.
- Optional spice: Add ground cinnamon in the last 5 minutes for a subtle warm flavor.
- Jar the jam: Pour into sterilized jars while hot. Seal and allow to cool before refrigerating or processing in a water bath for longer storage.
| Ingredient | Quantity | Notes |
|---|---|---|
| Santa Rosa plums | 4 cups (chopped) | Pitted and chopped |
| Granulated sugar | 2 cups | Adjust based on sweetness |
| Fresh lemon juice | 2 tablespoons | Enhances tartness and preserves |
| Lemon zest | 1 teaspoon | Adds bright citrus aroma |
| Ground cinnamon (opt.) | 1/2 teaspoon | Optional for spiced flavor |
“The key to perfect Santa Rosa plum jam lies in balancing sweetness with the fruit’s natural tartness to achieve a rich, silky texture.”
Enjoy this homemade jam spread on warm bread or incorporated into yogurt parfaits to elevate your breakfast or snack time.
Santa Rosa Plum Crisp
A Santa Rosa Plum Crisp combines the luscious tangy sweetness of our Santa Rosa plums with a warm, golden, buttery topping. This dessert is a perfect way to enjoy the vibrant flavors and tender texture of the plums while adding a satisfying crunch.
Ingredients for Plum Crisp
- 4 cups Santa Rosa plums (pitted and sliced)
- 1/4 cup granulated sugar
- 1 tablespoon lemon juice (freshly squeezed)
- 1 teaspoon ground cinnamon
- 1/4 teaspoon ground nutmeg
- 2 tablespoons all-purpose flour (to thicken the fruit filling)
For the crisp topping:
- 1 cup old-fashioned rolled oats
- 1/2 cup all-purpose flour
- 1/2 cup packed light brown sugar
- 1/2 teaspoon ground cinnamon
- 1/4 teaspoon salt
- 1/2 cup unsalted butter (cold, cut into small cubes)
Instructions for Preparing Plum Crisp
- Preheat oven to 350°F (175°C). Lightly grease an 8-inch square baking dish.
- Prepare the fruit filling: In a large bowl, combine the sliced Santa Rosa plums, granulated sugar, lemon juice, cinnamon, nutmeg, and 2 tablespoons flour. Toss gently to coat the plums evenly, ensuring the natural tartness balances with the sweet spices.
- Transfer the filling to the prepared baking dish, spreading it out evenly.
- Make the crisp topping: In a medium bowl, mix rolled oats, flour, brown sugar, cinnamon, and salt. Add cold butter cubes. Using your fingers or a pastry cutter, blend the butter into the dry ingredients until the mixture resembles coarse crumbs with some pea-sized pieces for texture.
- Sprinkle the crisp topping evenly over the plum filling.
- Bake for 40-45 minutes or until the topping is golden brown and the fruit is bubbly.
- Cool slightly before serving. We love this crisp warm with a scoop of vanilla ice cream or a dollop of whipped cream.
| Step | Task | Details |
|---|---|---|
| 1 | Oven preparation | 350°F (175°C), grease baking dish |
| 2 | Fruit filling preparation | Toss plums with sugar, lemon, spices, |
| 3 | Arrange filling | Evenly in baking dish |
| 4 | Prepare crisp topping | Mix oats, flour, sugar, and butter |
| 5 | Assemble | Spread topping over plums |
| 6 | Baking | 40-45 minutes until golden & bubbly |
| 7 | Serving | Slightly cool, serve with ice cream |
This Santa Rosa Plum Crisp bursts with the juicy depth of our signature plums contrasted by the crunchy, buttery topping, creating a truly irresistible dessert.
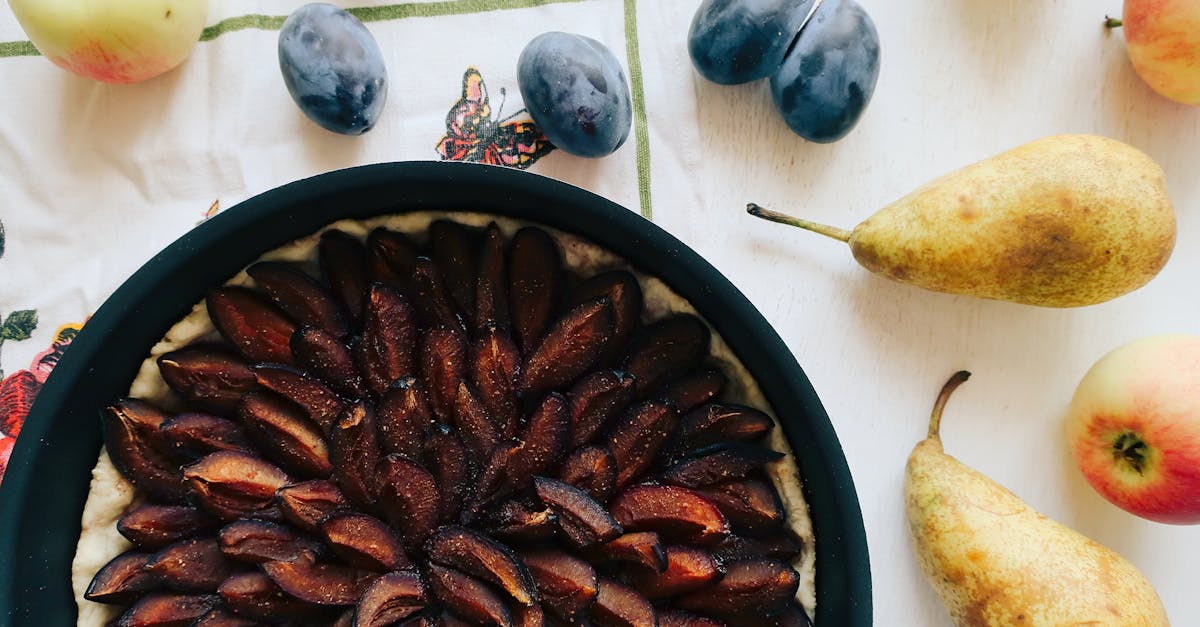
Santa Rosa Plum Tart
The Santa Rosa Plum Tart captures the vibrant blend of sweet and tart in every bite. This elegant dessert showcases our favorite plum’s juicy flavor nestled in a crisp buttery crust — perfect for any occasion.
Ingredients for Plum Tart
To create the perfect Santa Rosa Plum Tart, gather these fresh ingredients:
- 1 ½ cups all-purpose flour
- ½ cup powdered sugar
- ½ teaspoon salt
- ¾ cup unsalted butter, chilled and cubed
- 1 large egg yolk
- 2 tablespoons ice water
- 4 cups Santa Rosa plums, pitted and sliced thin
- ¾ cup granulated sugar
- 2 tablespoons cornstarch
- 1 teaspoon vanilla extract
- 1 teaspoon fresh lemon juice
- Optional: 2 tablespoons sliced almonds or chopped pistachios for topping
- Optional: Powdered sugar for dusting
| Ingredient | Quantity | Preparation |
|---|---|---|
| All-purpose flour | 1 ½ cups | Sifted |
| Powdered sugar | ½ cup | |
| Salt | ½ teaspoon | |
| Unsalted butter | ¾ cup | Chilled, cubed |
| Egg yolk | 1 | |
| Ice water | 2 tablespoons | |
| Santa Rosa plums | 4 cups | Pitted and sliced thin |
| Granulated sugar | ¾ cup | |
| Cornstarch | 2 tablespoons | |
| Vanilla extract | 1 teaspoon | |
| Fresh lemon juice | 1 teaspoon | |
| Sliced almonds/pistachios | 2 tablespoons (optional) | For topping |
| Powdered sugar | For dusting (optional) |
Instructions for Baking Plum Tart
Step 1: Prepare the Tart Crust
In a large mixing bowl, combine the sifted flour, powdered sugar, and salt. Add the chilled cubed butter. Using a pastry blender or your fingers, quickly blend until the mixture resembles coarse crumbs. Stir in the egg yolk and ice water, one tablespoon at a time, until the dough just comes together. Avoid overmixing.
Step 2: Chill the Dough
Form the dough into a disk, wrap it tightly in plastic wrap, and refrigerate for at least 30 minutes. This step ensures a crisp, flaky crust.
Step 3: Prepare the Plum Filling
In a large bowl, toss the thinly sliced Santa Rosa plums with granulated sugar, cornstarch, vanilla extract, and fresh lemon juice. This mixture thickens during baking while maintaining the fruit’s juicy texture.
Step 4: Roll and Fill
Preheat the oven to 375°F (190°C). On a lightly floured surface, roll out the chilled dough into a 12-inch circle. Transfer to a 9-inch tart pan, pressing gently into the edges. Trim any excess dough.
Step 5: Assemble the Tart
Evenly spread the plum filling within the crust. If desired, sprinkle the top with sliced almonds or chopped pistachios for added crunch and visual appeal.
Step 6: Bake to Perfection
Bake the tart for 40 to 45 minutes or until the crust is golden and the filling bubbles gently. Halfway through baking, check to ensure the crust edges don’t overbrown. If needed, cover loosely with foil.
Step 7: Cool and Serve
Let the tart cool completely on a wire rack. Before serving, dust with a light sprinkle of powdered sugar if you like a touch of sweetness and elegance.
“The balance of tartness from the Santa Rosa plums and the buttery crust makes every bite a delightful experience.“
Enjoy this vibrant Santa Rosa Plum Tart fresh with whipped cream or a scoop of vanilla ice cream to highlight the fruit’s luscious flavor.
Grilled Santa Rosa Plums
Grilling Santa Rosa plums imparts a smoky sweetness that elevates their natural balance of tart and sweet flavors. This simple technique makes them a perfect addition to salads, desserts, or as a standalone treat.
Ingredients for Grilled Plums
- 6 ripe Santa Rosa plums, halved and pitted
- 2 tablespoons olive oil or melted butter
- 1 tablespoon honey or maple syrup (optional for added sweetness)
- 1 teaspoon fresh lemon juice
- Pinch of ground cinnamon or cardamom (optional for warmth and spice)
- Fresh mint leaves for garnish (optional)
| Ingredient | Quantity | Notes |
|---|---|---|
| Santa Rosa plums | 6 | Halved and pitted |
| Olive oil or melted butter | 2 tbsp | For brushing |
| Honey or maple syrup | 1 tbsp (optional) | Adds extra sweetness |
| Fresh lemon juice | 1 tsp | Enhances tartness |
| Ground cinnamon or cardamom | Pinch (optional) | Adds warm spice flavor |
| Fresh mint leaves | For garnish (optional) | Brightens the presentation |
Directions for Grilling Plums
- Preheat the grill to medium-high heat, around 375°F to 400°F (190°C to 205°C).
- In a small bowl, whisk together the olive oil or melted butter, fresh lemon juice, honey or maple syrup, and ground spice if using.
- Brush each Santa Rosa plum half generously with the oil mixture. This helps caramelize the fruit and prevents sticking.
- Place the plum halves cut-side down directly on the grill grate. Grill for 3 to 4 minutes without moving to achieve perfect grill marks and caramelization.
- Flip the plums carefully using tongs and grill for an additional 2 to 3 minutes until the skin is slightly charred and the flesh is tender but still holds shape.
- Remove the plums from the grill and transfer to a serving dish. Garnish with fresh mint leaves if desired for a burst of color and a cooling contrast.
These grilled Santa Rosa plums showcase a luscious mix of smoky and fruity tones making them a versatile ingredient in both sweet and savory recipes. Serve warm alongside vanilla ice cream or chopped over a fresh green salad for exciting flavor contrasts.
Cooking and Baking Directions
Mastering the Cooking and Baking Directions for Santa Rosa Plum recipes unlocks the true potential of their unique sweet-tart flavor. Let’s walk through the essential steps to ensure every dish bursts with vibrant taste and perfect texture.
Prep Work
- Wash the Santa Rosa plums thoroughly under cold running water to remove any residue while preserving the delicate skin.
- Use a sharp paring knife or a specialized fruit pitter to carefully pit each plum, minimizing juice loss.
- Depending on the recipe:
- Slice thinly for salads and tarts.
- Cut into wedges for grilling.
- Dice finely for jams and sauces.
- To maintain freshness, prep plums just before cooking or refrigerate briefly covered with plastic wrap.
Cooking Techniques
| Technique | Temperature & Time | Tips for Santa Rosa Plums |
|---|---|---|
| Simmering Jam | Medium-low heat, 20–30 minutes | Stir frequently to prevent sticking and scorch. Use freshly squeezed lemon juice to balance tartness. |
| Baking Crisp | 350°F (175°C), 35–40 minutes | Ensure topping is golden brown and filling is bubbly. Use cold butter for crisp topping texture. |
| Grilling Plums | Medium-high heat, 4–6 minutes | Brush plum wedges with olive oil or melted butter. Flip once to achieve perfect caramelization and grill marks. |
| Baking Tart | 375°F (190°C), 25–30 minutes | Chill crust before baking to create flakiness. Bake until crust is golden and plums soften but hold shape. |
- Always preheat ovens or grills for even cooking.
- Adjust cooking time slightly based on plum ripeness and size to avoid overcooking.
Baking Timelines
Understanding precise baking times ensures optimal texture and flavor in plum dishes:
| Dish | Preparation Time | Baking Time | Total Time |
|---|---|---|---|
| Santa Rosa Plum Jam | 10 minutes | 20–30 minutes | 30–40 minutes |
| Santa Rosa Plum Crisp | 15 minutes | 35–40 minutes | 50–55 minutes |
| Santa Rosa Plum Tart | 20 minutes | 25–30 minutes | 45–50 minutes |
| Grilled Plums | 5 minutes | 4–6 minutes | 9–11 minutes |
“Timing is everything when baking with Santa Rosa plums — balancing the sweet-tart burst with the right level of softness and caramelization makes all the difference.”
Cooling and Serving Suggestions
- After baking, cool baked goods on a wire rack for 15–20 minutes to let the flavors meld and the texture set.
- For jams, allow cool-down to room temperature before transferring to sterilized jars for storage.
- Serve warm Santa Rosa Plum Crisp with a scoop of vanilla ice cream for a contrast of hot and cold textures.
- Present plum tarts with a dollop of lightly whipped cream or drizzled honey to enhance the lush plum flavor.
- Grilled plums shine when served warm over fresh greens or paired with creamy desserts like ricotta or mascarpone.
- Garnish dishes with fresh mint, chopped nuts, or a light sprinkle of powdered sugar to add sophistication and texture.
By following these detailed directions and timelines, we ensure our Santa Rosa plum recipes truly showcase the fruit’s distinct charm and complexity.
Make-Ahead Tips and Storage
Proper storage and strategic planning can extend the freshness and flavor of Santa Rosa plum recipes. Here are our top tips for storing fresh plums and preparing plum dishes ahead of time while maintaining their vibrant taste and texture.
Storing Fresh Plums
To keep Santa Rosa plums at their peak, follow these guidelines:
- Room Temperature: Store unripe plums on the counter for 2-3 days until they yield to gentle pressure, signaling ripeness.
- Refrigeration: Once ripe, place plums in the refrigerator to slow spoilage. Use a perforated plastic bag or a loosely closed container to retain moisture without trapping excess humidity.
- Shelf Life: Fresh plums last 3 to 5 days in the fridge before their texture starts softening excessively.
| Storage Condition | Temperature | Duration | Notes |
|---|---|---|---|
| Room Temperature | 68-72°F (20-22°C) | 2-3 days | For ripening, avoid direct sunlight |
| Refrigerated | 36-40°F (2-4°C) | 3-5 days | Store in breathable container, wash just before use |
Tip: Avoid washing fresh plums before storage to prevent premature decay. Wash them only when ready to use.
Freezing Plum Preparations
Freezing Santa Rosa plum dishes like jams, tarts, or chopped plums preserves their flavor for long-term use. Here’s how to freeze effectively:
- Plum Jam and Sauces: Cool completely then transfer to airtight freezer-safe jars or bags. Leave ½ inch headspace for expansion.
- Chopped Plums: Toss chopped or sliced plums in lemon juice to prevent browning. Spread on a baking sheet to freeze individually, then transfer to freezer bags.
- Pre-Baked Plum Desserts: Wrap tarts or crisps tightly in plastic wrap and aluminum foil. Thaw in the refrigerator before reheating.
| Preparation Type | Freezing Method | Storage Duration | Thawing Tips |
|---|---|---|---|
| Plum Jam or Sauce | Airtight jars/bags, cooled | Up to 12 months | Thaw in fridge overnight |
| Chopped or Sliced Plums | Freeze individually, then bagged | Up to 6 months | Use directly in cooking or thaw |
| Pre-Baked Desserts | Wrap tightly in plastic & foil | Up to 3 months | Thaw in fridge, reheat before serving |
Remember: Label all frozen items with date to track freshness efficiently.
Best Practices for Make-Ahead Plum Dishes
Planning ahead can enhance your experience with Santa Rosa plum recipes. Implement these make-ahead strategies for optimal results:
- Prepare Components Separately: Make the plum filling or jam a day ahead to allow flavors to meld. Store fillings in the fridge.
- Chill Dough Properly: For tarts and crisps, chill pastry dough thoroughly before baking to maintain flakiness.
- Assemble Later: Assemble desserts like crisps or tarts on the day of serving for maximum freshness and texture.
- Reheat Gently: Warm make-ahead plum dishes in a moderate oven (325°F / 160°C) covered loosely with foil to preserve moisture and avoid overcooking.
“Making components in advance and storing them properly means we get to enjoy the fresh, vibrant taste of Santa Rosa plums without rushing on busy days.”
By following these Make-Ahead Tips and Storage techniques, we ensure that the rich flavor and texture of our Santa Rosa plum recipes shine every time.
Conclusion
Exploring Santa Rosa plum recipes opens up a world of vibrant flavors and creative possibilities. Whether we’re making a jam to enjoy year-round or grilling plums for a smoky twist, this fruit brings a unique balance of sweet and tart to every dish. With the right tools and techniques, we can easily highlight the plum’s natural charm in both simple and elegant recipes.
By embracing these recipes and tips, we ensure every bite celebrates the versatility and deliciousness of Santa Rosa plums. Let’s keep experimenting and savoring the delightful tastes this fruit has to offer.
Frequently Asked Questions
What makes Santa Rosa plums unique in flavor?
Santa Rosa plums are prized for their perfect blend of sweet and tart flavors, offering a vibrant taste that enhances both fresh eating and cooking.
Where do Santa Rosa plums originate from?
Santa Rosa plums were developed in California and have since become popular for their versatility in various culinary uses.
What are common uses for Santa Rosa plums in recipes?
They can be used fresh in salads, grilled for smoky sweetness, baked into jams, crisps, tarts, or served as dessert toppings.
What key ingredients complement Santa Rosa plums in cooking?
Common complementary ingredients include tart apples, peaches, sugar, flour, butter, nuts, mint, whipped cream, and honey.
What tools are essential for preparing Santa Rosa plum recipes?
Helpful tools include sharp paring and chef’s knives, measuring cups, mixing bowls, baking dishes, ovens, fruit pitters, and pastry brushes.
How should Santa Rosa plums be prepared before cooking?
Wash thoroughly, pit carefully with a sharp knife or pitter, then slice, wedge, or dice depending on the recipe’s needs.
Can you tell me a simple way to make Santa Rosa plum jam?
Yes, combine chopped plums, sugar, lemon juice, and optionally cinnamon; cook until thick and silky, balancing sweetness with tartness.
What is the best way to grill Santa Rosa plums?
Brush halved plums with olive oil or butter and honey or syrup, grill until caramelized and slightly charred for smoky sweetness.
How do you ensure a flaky crust in a Santa Rosa plum tart?
Chill the dough well before rolling it out and bake until golden to achieve a light, flaky texture that complements the filling.
How can I store fresh Santa Rosa plums and their prepared dishes?
Store fresh plums at room temperature until ripe, then refrigerate. Freeze jams and desserts for longer preservation to maintain flavor and texture.