
San Antonio Chili Queens hold a special place in Tex-Mex history. These legendary women served up hearty bowls of chili that brought the community together and sparked a culinary tradition still celebrated today. Their recipe is a perfect blend of bold spices and rich flavors that make every bite unforgettable.
We’re excited to share this authentic San Antonio Chili Queens recipe with you. It captures the essence of those vibrant chili stands while being easy enough to make at home. Whether you’re a longtime chili lover or trying it for the first time, this dish promises warmth, depth, and a touch of Texas spirit in every spoonful.
Ingredients
To craft an authentic San Antonio Chili Queens recipe, it’s essential to gather vibrant ingredients that deliver the bold flavors and rich textures this dish is famous for. We have categorized everything you need to streamline your cooking process.
Meat and Protein
Our recipe emphasizes a robust, hearty base with quality meats. Using the right cuts and types of protein ensures depth and satisfaction in every bite.
- 2 lbs ground beef (preferably 80/20 for ideal fat content)
- 1 lb beef chuck, cut into 1/2-inch cubes for added texture
- 1/2 lb pork shoulder, finely chopped (optional for extra richness)
- 2 tbsp lard or vegetable oil for browning meat
Vegetables and Spices
This combination creates the signature Tex-Mex aroma and bursting flavors that honor the Chili Queens’ legacy. Fresh and dried spices blend for complexity.
- 1 large yellow onion, finely diced
- 4 cloves garlic, minced
- 2 jalapeños, seeded and chopped (adjust for heat preference)
- 2 tbsp chili powder (blend of ancho, chipotle, and guajillo preferred)
- 1 tbsp ground cumin
- 1 tsp smoked paprika
- 1 tsp dried oregano (Mexican oregano if available)
- 1/2 tsp cayenne pepper (optional for an extra kick)
- 1 tsp salt (adjust to taste)
- 1/2 tsp black pepper
Liquids and Other Essentials
Liquids help meld the flavors, soften the meat, and develop a rich, thick chili consistency.
| Ingredient | Quantity | Purpose |
|---|---|---|
| Crushed tomatoes | 1 can (28 ounces) | Adds acidity and depth |
| Beef broth | 2 cups | Enhances umami and moisture |
| Tomato paste | 3 tbsp | Intensifies tomato flavor |
| Apple cider vinegar | 1 tbsp | Balances flavors with tang |
| Dark beer | 1 cup (optional) | Adds richness and complexity |
- Cornstarch or masa harina (optional), 1-2 tbsp to thicken chili if desired
With these ingredients in place, we’re ready to proceed to the step-by-step process to honor the original San Antonio Chili Queens culinary tradition.
Equipment Needed
To recreate the authentic San Antonio Chili Queens Recipe with precision and ease, we need specific equipment that supports the cooking process while preserving the flavors and textures. Here’s a detailed list of what we’ll use and why:
- Large Heavy-Bottomed Dutch Oven or Stockpot
We require sturdy cookware like a Dutch oven to evenly distribute heat, prevent scorching, and accommodate the volume of ingredients. This pot is ideal for simmering the chili slowly, allowing spices to fully develop their richness.
- Sharp Chef’s Knife
Precision chopping is essential for vegetables and meat preparation. A sharp chef’s knife ensures clean cuts for uniform cooking, enhancing flavor melding.
- Cutting Board
Use a durable, easy-to-clean cutting board for all chopping tasks, especially handling onions, garlic, and jalapeños safely.
- Wooden Spoon or Heat-Resistant Silicone Spoon
Stirring the chili frequently helps to integrate ingredients without damaging the pot’s surface. A wooden or silicone spoon withstands high heat and is comfortable for continuous use.
- Measuring Spoons and Cups
For accuracy, especially with spices and liquids, using standardized measuring tools ensures consistency with the recipe’s bold flavor profile.
- Can Opener
We’ll need it to open canned tomatoes and other essential canned items seamlessly.
- Ladle
When serving, a ladle helps portion the chili while maintaining its hearty texture.
| Equipment | Purpose | Notes |
|---|---|---|
| Dutch Oven / Stockpot | Even cooking and simmering | Heavy-bottomed preferred |
| Chef’s Knife | Chopping meat and vegetables | Sharp, versatile |
| Cutting Board | Safe preparation surface | Durable, easy to clean |
| Wooden / Silicone Spoon | Stirring chili | Heat-resistant and gentle |
| Measuring Spoons / Cups | Accurate spice and liquid amounts | Precision is key |
| Can Opener | Opening canned ingredients | Sturdy and reliable |
| Ladle | Serving chili | Helps preserve texture |
With this essential equipment, we set the stage for a seamless cooking experience that honors the bold, hearty essence of the original San Antonio Chili Queens tradition.
Prep Work
Before we dive into the rich and bold flavors of the San Antonio Chili Queens recipe, proper prep lays the foundation for success. Let’s start by getting our ingredients ready for a smooth cooking process.
Preparing the Meat
We begin with the meat, the heart of this iconic chili. For authentic texture and flavor, use a blend of ground beef and beef chuck. This combination offers the perfect balance of fat and lean protein.
- Trim any excess fat from the beef chuck to avoid overly greasy chili.
- Cut the beef chuck into small, even cubes about ¾ inch in size for even cooking.
- Keep the ground beef cold until ready to brown to maintain its texture.
- Season lightly with salt and set aside.
Our goal is a robust, hearty base that holds up well to slow simmering.
Chopping Vegetables and Aromatics
Next, we prepare the vegetables and aromatics that build the distinctive Tex-Mex aroma.
- Yellow onion: Peel and chop finely for sweetness that balances heat.
- Garlic cloves: Mince finely to release pungent flavor without overpowering.
- Jalapeños: Remove seeds for mild heat or keep them for a spicier kick, and dice finely.
- Additional peppers (optional): Prepare poblano or bell peppers by cleaning and chopping into small pieces.
Sharp, clean cuts are crucial to releasing flavors evenly during cooking.
Measuring Spices
Accurate spice measurement is key to replicating the legendary San Antonio Chili Queens taste. Below is the essential spice blend we use:
| Spice | Amount | Notes |
|---|---|---|
| Chili Powder | 3 tablespoons | Foundation spice, vibrant flavor |
| Ground Cumin | 2 teaspoons | Earthy base notes |
| Paprika | 1 tablespoon | Adds smoky depth |
| Oregano | 1 teaspoon | Classic herbal undertone |
| Cayenne Pepper | ½ teaspoon | Adjust for heat preference |
| Salt | 1 tablespoon | Enhances overall flavors |
| Black Pepper | 1 teaspoon | Freshly ground preferred |
We recommend measuring spices ahead in small bowls or measuring spoons for an efficient cooking flow.
By being meticulous with our meat preparation, precisely chopping vegetables and aromatics, and accurately measuring spices, we set the stage to honor the rich culinary heritage of the San Antonio Chili Queens in every bite.
Cooking Instructions
Let’s dive into the essential steps to bring our San Antonio Chili Queens Recipe to life. Each stage builds rich layers of flavor that honor the legendary Texas tradition.
Browning the Meat
We begin by creating a robust base through perfect browning. Use a large heavy-bottomed Dutch oven or stockpot and heat 2 tablespoons of vegetable oil over medium-high heat. Add the blend of ground beef and cubed beef chuck in a single layer without overcrowding. Allow the meat to sear undisturbed for 4-5 minutes until deeply browned on one side. Then stir and continue cooking for another 5-7 minutes, breaking larger chunks apart to ensure all sides develop that deep, caramelized crust essential for authentic chili flavor. Drain excess fat if there’s more than 2 tablespoons to prevent greasiness.
Sautéing the Vegetables
Next, we sauté our aromatics to release their fragrant character. With the browned meat pushed to the side of the pot, add 1 finely chopped yellow onion, 4 minced garlic cloves, and 2 diced jalapeños to the empty space. Stir frequently and sauté for 5 minutes until the onions turn translucent and soft, and the garlic emits a savory aroma. This step forms the flavor foundation that complements the rich meat, soaking the chili in traditional Tex-Mex warmth.
Combining Ingredients
After our base flavors meld, it’s time to combine the critical components. Stir in our custom spice blend comprised of:
| Spice | Amount |
|---|---|
| Chili powder | 3 tablespoons |
| Cumin | 2 teaspoons |
| Paprika | 1 tablespoon |
| Oregano | 1 teaspoon |
| Cayenne pepper | ½ teaspoon |
| Salt | 1 ½ teaspoons |
| Black pepper | 1 teaspoon |
Add the spice mix directly to the meat and vegetable mixture, stirring constantly for 2 minutes to toast the spices and awaken their complex oils. Then pour in:
- 1 can (28 ounces) crushed tomatoes
- 2 cups beef broth
- 1 cup dark beer (optional but recommended)
Scrape the bottom of the pot to release any stuck bits, enhancing the chili’s depth. Bring the entire mixture to a gentle boil.
Simmering the Chili
Lower the heat to maintain a steady simmer and cover the pot partially with a lid. Let the chili cook for 2 to 3 hours, stirring every 20 minutes to prevent sticking and ensure even cooking. The long simmer allows the flavors to harmonize and the meat to become tender while the sauce thickens naturally. If the chili becomes too thick during cooking, add additional beef broth by ¼ cup increments to reach the desired consistency.
At the end of simmering, taste and adjust seasoning with additional salt or cayenne pepper for that signature bold kick. Our San Antonio Chili Queens Recipe now stands ready to serve, boasting layers of spice, richness, and authenticity.
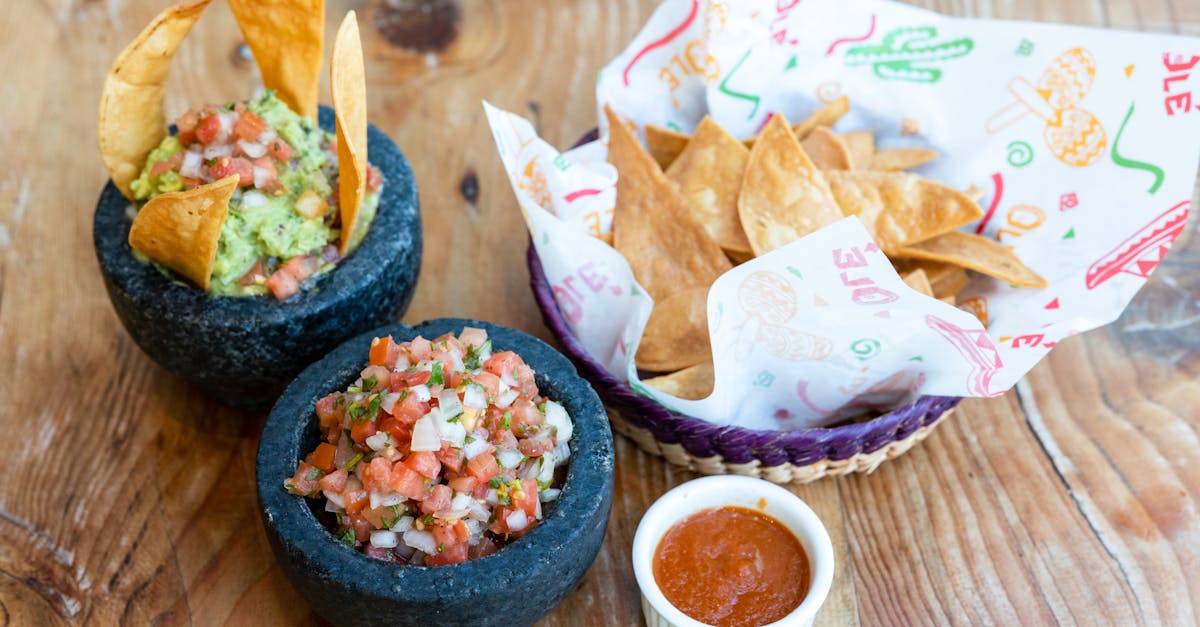
Serving Suggestions
To fully enjoy our San Antonio Chili Queens Recipe, we recommend serving it with complementary sides and garnishes that highlight its bold Tex-Mex flavors. Here are our top serving suggestions to elevate your chili experience:
Traditional Accompaniments
- Cornbread: A warm slice of moist cornbread balances chili’s spice and provides a comforting contrast in texture.
- Tortilla Chips: Crispy tortilla chips are perfect for scooping up chunky chili and adding crunch.
- Rice: Serving chili over fluffy white or Mexican rice adds heartiness and soaks up the flavorful juices.
Garnishes to Enhance Flavor
- Shredded Cheddar or Monterey Jack Cheese: Melts beautifully when sprinkled on hot chili, adding creaminess.
- Fresh Cilantro: Offers a fragrant herbal note that brightens the rich chili.
- Diced Onions: Adds crisp texture and a burst of pungent flavor.
- Sour Cream or Mexican Crema: Balances heat with a cool, creamy topping.
- Sliced Jalapeños or Pickled Jalapeños: Adds extra heat for those who love spice.
- Lime Wedges: A squeeze of fresh lime juice introduces zesty acidity that cuts through the richness.
Beverage Pairings
- Classic Mexican Beer: A cold beer like Dos Equis or Modelo complements the smoky chili flavors.
- Bold Red Wine: Try a Zinfandel or Syrah for its intense fruitiness and spice to match the chili.
- Agua Fresca: Refreshing non-alcoholic options like horchata or tamarind agua fresca keep things light and fresh.
| Serving Component | Description | Purpose |
|---|---|---|
| Cornbread | Moist sweet bread | Balances spice, comforting texture |
| Tortilla Chips | Crispy chips | Adds crunch, scooping vessel |
| Cheese | Shredded cheddar or Monterey Jack | Creamy melt, flavor booster |
| Fresh Cilantro | Chopped herb | Brightens, adds herbal freshness |
| Sour Cream/Mexican Crema | Creamy topping | Soothes heat, creamy contrast |
| Jalapeños | Fresh or pickled hot peppers | Adds heat |
| Lime Wedges | Fresh citrus wedges | Introduces acidity, freshness |
Plating Tips
Serve San Antonio Chili Queens chili in wide shallow bowls to showcase chunky texture and toppings. Use a ladle to portion chili generously and arrange garnishes on the side or directly on top for visual appeal. Pair with a small plate for cornbread or tortillas and offer lime wedges alongside for guests to customize.
Make-Ahead and Storage Tips
Proper make-ahead and storage techniques are essential to preserve the bold flavors and rich texture of our San Antonio Chili Queens recipe. Here’s how we can plan, store, and reheat this iconic chili for maximum enjoyment.
Preparing Chili in Advance
- We recommend making the chili 1 to 2 days ahead to allow the spices and meat to meld deeper, creating richer flavors.
- After cooking, let the chili cool at room temperature for no more than 2 hours to prevent bacterial growth.
- Portion the chili into airtight containers for easy storage and portion control.
Storage Guidelines
Use the following table to understand the best storage practices for our chili:
| Storage Method | Duration | Temperature | Notes |
|---|---|---|---|
| Refrigerator | Up to 4 days | 34°F to 40°F (1°C to 4°C) | Store in airtight containers. Reheat thoroughly. |
| Freezer | Up to 3 months | 0°F (-18°C) or below | Use freezer-safe containers. Thaw in refrigerator overnight before reheating. |
| Leftovers at Room Temp | No more than 2 hours | N/A | To avoid foodborne illness, do not leave chili out longer. |
Reheating Tips
- For stovetop reheating, place the chili in a heavy saucepan over medium heat. Stir regularly to prevent sticking and reheat until it reaches an internal temperature of 165°F (74°C).
- When using a microwave, cover the chili with a microwave-safe lid or plate. Heat at medium power in 1-minute intervals, stirring in between for even warming.
- Add a splash of beef broth or water if the chili has thickened too much after storage to restore the ideal consistency.
Freezing Best Practices
To preserve texture and flavor:
- Allow the chili to cool completely before freezing.
- Divide into single- or family-sized portions for convenient thawing.
- Label containers with the date to track freshness.
- Avoid refreezing defrosted chili to maintain quality and safety.
“The magic of the San Antonio Chili Queens lives on in every well-stored and reheated bowl, bursting with that signature Tex-Mex spirit.“
Applying these Make-Ahead and Storage Tips lets us savor the authentic taste anytime while reducing cooking-time stress and food waste.
Conclusion
Bringing the San Antonio Chili Queens recipe to our kitchens connects us to a rich culinary tradition that’s both bold and welcoming. With the right ingredients and a bit of patience, we can create a chili that’s full of depth and character. This dish isn’t just about flavor—it’s about sharing a piece of Texas history with every hearty spoonful.
Whether we’re cooking for family, friends, or simply enjoying a comforting meal ourselves, this recipe offers a genuine taste of the vibrant Tex-Mex heritage. Let’s savor the warmth, spice, and community that the Chili Queens have inspired for generations.
Frequently Asked Questions
Who were the San Antonio Chili Queens?
The San Antonio Chili Queens were legendary women cooks who popularized Tex-Mex chili by creating community gatherings centered around their hearty, flavorful chili dishes in San Antonio, Texas.
What makes the San Antonio Chili Queens chili recipe authentic?
Its authenticity comes from using quality meats like ground beef and beef chuck, a specific blend of vegetables and spices, and liquids such as crushed tomatoes and beef broth, reflecting the traditional Tex-Mex flavors.
What ingredients are essential for making this chili?
Key ingredients include ground beef, beef chuck, yellow onion, garlic, jalapeños, crushed tomatoes, beef broth, a custom spice blend, and optionally, dark beer for added depth.
What equipment do I need to prepare this chili?
You’ll need a heavy-bottomed Dutch oven or stockpot, a sharp chef’s knife, a durable cutting board, stirring spoon, measuring tools, a can opener, and a ladle for serving.
How should I prepare the meat and vegetables for the chili?
Trim fat from beef chuck and cube it evenly. Finely chop onion, mince garlic, and dice jalapeños using a sharp knife to release full flavors during cooking.
What are the basic steps to cook San Antonio Chili Queens chili?
Brown the meat, sauté the vegetables, add spices, tomatoes, broth, and optional beer, then simmer for 2-3 hours to meld flavors and tenderize meat.
What are some recommended serving suggestions for this chili?
Serve with cornbread, tortilla chips, or rice. Garnish with shredded cheese, cilantro, diced onions, sour cream, jalapeños, and lime wedges for a true Tex-Mex experience.
Can I make this chili ahead of time and store it?
Yes, preparing it 1-2 days in advance enhances flavor. Cool properly, store in airtight containers in the fridge or freezer, and reheat gently to maintain taste and texture.
What beverages pair well with San Antonio Chili Queens chili?
Classic Mexican beers, bold red wines, and refreshing agua fresca complement the chili’s robust Tex-Mex flavors perfectly.
How can I ensure the best flavor and texture when reheating leftover chili?
Reheat slowly over low heat, stirring occasionally to prevent sticking, and add a splash of broth or water if the chili thickens too much.