
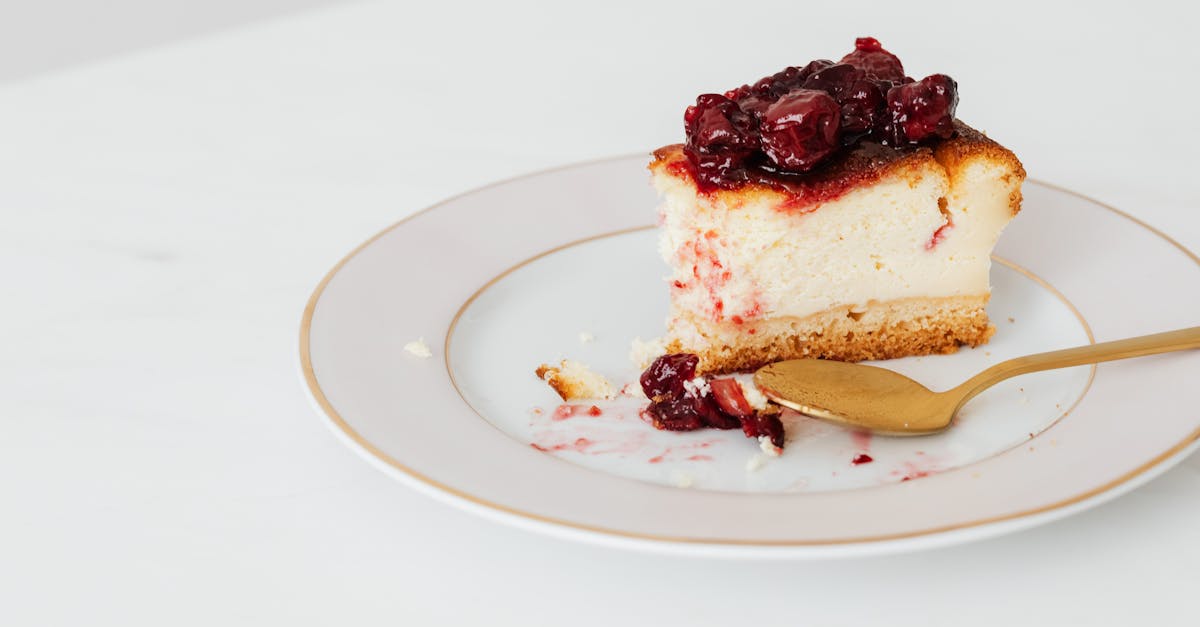
Salmonberry jam is a delightful treat that captures the vibrant flavors of the Pacific Northwest. These unique berries, with their bright orange hue and sweet-tart taste, make for a jam that’s both refreshing and rich. It’s a perfect way to enjoy the season’s bounty long after the harvest.
Making salmonberry jam is simpler than you might think. With just a few ingredients and some patience, we can create a spread that’s ideal for toast, desserts, or even as a glaze for savory dishes. This recipe brings out the natural sweetness of the berries while balancing it with just the right amount of acidity.
Whether you’re a jam enthusiast or trying salmonberries for the first time, this recipe will guide us through a delicious and rewarding process. Let’s dive into making our own batch of homemade salmonberry jam that’s bursting with flavor and color.
Ingredients
To make our vibrant and flavorful Salmonberry Jam, we use a simple list of fresh and natural ingredients. Each component plays a crucial role in bringing out the distinctive sweet-tart character of the salmonberries while ensuring a perfect jam consistency.
| Ingredient | Quantity | Preparation Notes |
|---|---|---|
| Fresh Salmonberries | 4 cups | Rinsed and stemmed |
| Granulated Sugar | 2 cups | Adjust to taste for sweetness level |
| Lemon Juice | 2 tablespoons | Freshly squeezed |
| Pectin (optional) | 1 package | Use if you want a firmer set |
Fresh Salmonberries form the base. We carefully rinse them to remove any debris and gently stem each berry. The granulated sugar balances the natural tartness and helps preserve the jam. Adding fresh lemon juice enhances acidity, brightening the jam’s flavor and improving shelf stability. For those who prefer a thicker jam, incorporating pectin is an option, but not mandatory as salmonberries have natural pectin.
“The quality of your ingredients directly influences the final jam. We recommend sourcing fresh, ripe salmonberries for the best results.”
By combining these ingredients, we capture the essence of the Pacific Northwest in every jar of our homemade salmonberry jam.
Equipment Needed
To create our delicious Salmonberry Jam, having the right equipment ensures a smooth and successful cooking process. Here is the essential gear we rely on to capture the vibrant flavors of fresh salmonberries:
- Large heavy-bottomed saucepan or jam pot
A sturdy pot helps us cook the jam evenly and prevents burning or scorching as the mixture thickens.
- Wooden spoon or heat-resistant silicone spatula
We use this to stir gently but thoroughly, ensuring the sugar dissolves fully and the berries break down properly.
- Fine mesh strainer or food mill (optional)
For a smoother jam texture without seeds, we pass the cooked mixture through a strainer or mill.
- Measuring cups and spoons
Precision is key with our salmonberry jam recipe. We measure sugar, lemon juice, and pectin accurately.
- Candy thermometer
This helps us monitor when the jam reaches the perfect gel stage, usually around 220°F (104°C).
- Jars for canning (sterilized)
We transfer the finished jam into clean, sterilized glass jars to preserve freshness and flavor.
- Jar funnel and ladle
These tools simplify pouring the hot jam into jars without making a mess.
- Canning rack or towel
We use this to safely cool jars after filling.
| Equipment | Purpose |
|---|---|
| Heavy-bottomed saucepan | Even heat distribution during cooking |
| Wooden spoon or silicone spatula | Stirring without scratching the pot |
| Fine mesh strainer or food mill | Removing seeds for smoother texture |
| Measuring cups and spoons | Accurate ingredient measurement |
| Candy thermometer | Monitoring jam temperature to gel stage |
| Sterilized glass jars | Storing and preserving the jam |
| Jar funnel and ladle | Easy and clean jar filling |
| Canning rack or towel | Safe cooling of jars |
Having these tools at hand prepares us to transform fresh salmonberries into a rich, luscious jam that encapsulates the essence of the Pacific Northwest. Our salmonberry jam recipe becomes not only easy but also enjoyable to make with the right equipment by our side.
Prep Work
To ensure our salmonberry jam turns out perfectly, proper preparation of the berries and jars is essential. Let’s walk through the crucial steps to get everything ready for a smooth cooking experience.
Preparing the Salmonberries
First, we gather fresh, ripe salmonberries which form the heart of our jam. Handling them carefully preserves their delicate texture and vibrant flavor.
- Rinse the salmonberries gently in cold water to remove dirt and debris.
- Spread them on a clean kitchen towel or paper towels to drain excess moisture.
- Remove any stems, leaves, or damaged berries to keep the jam pure and smooth.
- Optionally, if you prefer a smoother jam, crush the berries lightly using a potato masher or the back of a spoon for better fruit breakdown during cooking.
| Step | Action | Purpose |
|---|---|---|
| Rinse | Cold water, gentle wash | Remove dirt and impurities |
| Drain | Spread on towel to dry | Prevent watery jam |
| Pick through berries | Remove stems and damaged parts | Maintain jam quality |
| Light crushing (optional) | Mash gently before cooking | Enhance flavor release and texture |
Sterilizing Jars and Lids
Sterilization guarantees our salmonberry jam stays safe and fresh for storage. We focus on clean, bacteria-free jars and lids.
- Wash jars and lids in hot, soapy water; rinse thoroughly.
- Place jars into a large pot filled with water covering the jars entirely.
- Boil jars for 10 minutes to sterilize.
- Simmer lids in hot (not boiling) water for 5 minutes to soften sealing rings without damage.
- Remove jars with tongs and place on a clean towel to dry.
- Keep jars warm until ready to fill to prevent breakage when hot jam is added.
| Item | Sterilization Process | Time |
|---|---|---|
| Jars | Boiling water immersion | 10 minutes |
| Lids | Hot water (below boiling) soak | 5 minutes |
Pro Tip: Never dry sterilized jars with a cloth towel. Let them air dry or stay in the warm water until filling to maintain sterility.
With these prep steps complete, our workspace is set to transform fresh salmonberries into luscious, homemade jam bursting with true Pacific Northwest flavor.
Cooking the Jam
Now that our salmonberries and jars are prepped we move to the crucial step of Cooking the Jam. This part transforms fresh ingredients into a vibrant spread with the perfect balance of sweetness and tartness.
Combining Ingredients
We start by combining the key ingredients in our heavy-bottomed saucepan to build the foundation for salmonberry jam:
- 4 cups of cleaned and lightly crushed fresh salmonberries
- 3 cups of granulated sugar
- 2 tablespoons of freshly squeezed lemon juice
- Optional: 1 packet of fruit pectin (if desired for thicker consistency)
We pour the salmonberries into the saucepan then add the sugar and lemon juice. The lemon juice not only balances the sweetness but also aids in proper gel formation. If using pectin we mix it in now according to the package instructions.
Cooking Process and Consistency Check
We place the saucepan over medium-high heat and bring the mixture to a boil, stirring constantly to prevent scorching. During this stage the sugar dissolves and the jam starts to thicken. Once boiling vigorously we reduce to medium heat and maintain a rolling boil for 10 to 15 minutes while continuing to stir.
To check the jam’s consistency we perform the classic “sheet test”:
| Step | Description |
|---|---|
| 1. Spoon test | Dip a spoon into the jam then lift it out. The jam should flow off slowly in a thick sheet. |
| 2. Plate test | Drop a small spoonful on a cold plate then tilt. If the jam wrinkles and doesn’t run it’s ready. |
If the jam passes both tests it means the pectin and sugars have gelled properly resulting in that perfect luscious texture. We then remove the saucepan from heat and let the jam sit a few minutes before scooping it into sterilized jars.
Throughout the cooking we experience the aroma of fresh salmonberries deepening and the rich color darkening into the signature warm hue of homemade salmonberry jam. This process unlocks the authentic taste of Pacific Northwest berries in every jar.
Canning and Storing
Proper canning and storing of our homemade salmonberry jam ensures it stays fresh, flavorful, and safe for months. Let’s guide you through the essential steps for filling, sealing, and processing the jars.
Filling the Jars
We begin by carefully transferring the hot salmonberry jam into sterilized jars to preserve its vibrant taste and texture.
- Use a ladle and a jar funnel to fill each jar, leaving about 1/4 inch (0.6 cm) of headspace at the top to allow for expansion during processing.
- Wipe the rims of the jars clean with a damp cloth to remove any jam residue. This step is crucial to ensure a proper seal.
- Place the sterilized lids on the jars, centering them to avoid leaks.
- Screw on the metal bands just until fingertip-tight. Avoid over-tightening, as air must escape during processing.
| Step | Details |
|---|---|
| Headspace | 1/4 inch (0.6 cm) |
| Jar cleanliness | Wipe rims clean |
| Lid placement | Center lids |
| Band tightness | Finger-tight (not too tight) |
Sealing and Processing
Sealing is where we guarantee that our salmonberry jam remains safe and shelf-stable for future enjoyment.
- Submerge the jars in a boiling water bath with at least 1-2 inches of water covering them.
- Process the jars for 10 minutes once the water returns to a full boil. This time can vary depending on altitude, so adjust accordingly.
- After processing, carefully remove the jars using a jar lifter.
- Place them upright on a towel or cooling rack and let them cool undisturbed for 12 to 24 hours.
- You’ll hear the satisfying “pop” sound as jars seal; press the center of each lid to ensure it is concave and does not flex.
| Processing Step | Time & Temperature | Notes |
|---|---|---|
| Water bath depth | 1-2 inches above jars | Ensures full coverage |
| Processing duration | 10 minutes (adjust for altitude) | Kills bacteria and seals jars |
| Cooling time | 12-24 hours | Allows vacuum seal to form |
Once cooled, label the jars with the date and contents. Store your salmonberry jam in a cool, dark place for up to one year. Refrigerate after opening and enjoy the bright, sweet-tart flavor long after the berries’ season has passed.
Tips for Perfect Salmonberry Jam
Creating the perfect salmonberry jam requires attention to detail and a few essential tips to ensure the right flavor, texture, and preservation. Here are our top recommendations for crafting the best batch every time.
1. Use Fully Ripe, Fresh Salmonberries
The taste and quality of your jam rely heavily on fresh, ripe salmonberries. Choose berries that are plump with a vibrant orange-pink hue. Avoid underripe or overly soft berries as they can impact sweetness and texture.
2. Properly Measure Ingredients
Precision is essential. Use the exact amounts specified to balance the sweetness and tartness.
| Ingredient | Quantity | Purpose |
|---|---|---|
| Salmonberries | 4 cups (lightly crushed) | Base fruit with natural flavor |
| Granulated sugar | 3 cups | Sweetens and aids preservation |
| Lemon juice | 2 tablespoons | Adds acidity for gel formation |
| Fruit pectin* | 1 packet (optional) | Thicken jam for better set |
*We recommend pectin for firmer jam but omit if you prefer a natural, softer spread.
3. Stir Constantly While Cooking
To prevent burning and sticking, stir the mixture continuously over medium-high heat. This helps maintain even cooking and allows the pectin to activate properly.
“Constant stirring is key to consistent jam texture.”
4. Perform the “Sheet Test” or “Plate Test”
Check the jam’s readiness with simple tests to ensure proper gel formation:
| Test Name | Method | Indicator of Doneness |
|---|---|---|
| Sheet Test | Dip spoon, lift jam, and observe flow off spoon | Jam flows in a thick sheet |
| Plate Test | Place a spoonful on a chilled plate, tilt the plate | Jam wrinkles when pushed gently |
5. Leave Correct Headspace in Jars
When filling sterilized jars, leave 1/4 inch headspace to allow for expansion during processing and to form a vacuum seal.
6. Use a Boiling Water Bath for Sealing
Process jars in a boiling water bath for 10 minutes to kill bacteria and ensure shelf stability. Adjust time for altitude if necessary:
| Altitude Range | Processing Time |
|---|---|
| 0–1,000 feet | 10 minutes |
| 1,001–6,000 feet | 15 minutes |
| Above 6,000 feet | 20 minutes |
7. Label and Store Properly
After cooling, label your jars with the date and contents. Store your salmonberry jam in a cool, dark place to preserve freshness and flavor for up to one year.
8. Experiment with Texture
- For a chunkier jam, gently crush fewer berries.
- For a smoother jam, strain the cooked mixture through a fine mesh before jarring.
Summary Table of Key Tips
| Tip | Importance |
|---|---|
| Use ripe salmonberries | Best flavor and natural sweetness |
| Measure ingredients precisely | Balanced sweet-tart jam |
| Stir constantly during cooking | Prevents burning and uneven gel |
| Perform gel tests | Ensures perfect jam consistency |
| Leave proper jar headspace | Allows safe sealing |
| Boiling water bath processing | Extends shelf life safely |
| Store in cool dark place | Maintains flavor and quality |
By following these tips, we guarantee your salmonberry jam will capture the exotic sweetness and bright tartness of this Pacific Northwest treasure in every jar.
Serving Suggestions
Our Salmonberry Jam bursts with a vibrant sweet-tart flavor that pairs beautifully with many dishes. Here are some creative ways to enjoy our homemade jam to make every bite memorable.
Breakfast Boost
- Spread the jam generously on toasted sourdough or whole-grain bread for a refreshing morning treat.
- Swirl into creamy Greek yogurt or oatmeal for a pop of natural sweetness and color.
- Top pancakes, waffles, or French toast with a spoonful of salmonberry jam and a dollop of whipped cream.
Savory Pairings
- Glaze grilled chicken or pork chops with salmonberry jam mixed with a splash of balsamic vinegar for a tangy finish.
- Add a layer of jam in a cheese sandwich featuring sharp cheddar or brie for a sophisticated sweet-savory contrast.
- Serve alongside charcuterie boards as a unique fruit spread that complements cured meats and assorted cheeses.
Baking Enhancements
- Use the jam as a filling for thumbprint cookies, tarts, or between cake layers for a burst of vibrant flavor.
- Stir into muffin or scone batters to imbue a natural berry sweetness throughout your baked goods.
Table of Serving Ideas
| Serving Style | Dish Examples | Flavor Enhancement |
|---|---|---|
| Breakfast | Toast, yogurt, oatmeal, pancakes | Fresh, bright, and sweet-tart |
| Savory | Grilled meats, cheese sandwiches, charcuterie | Balances richness with acidity |
| Baking | Cookies, tarts, cakes, muffins | Adds natural sweetness and color |
Pro Tip:
“For an elegant appetizer, spread salmonberry jam on crostini topped with goat cheese and a sprinkle of fresh thyme.”
By using these Serving Suggestions we unlock the full potential of our salmonberry jam, making it a versatile staple in our kitchen all year round.
Conclusion
Making salmonberry jam is a rewarding way to bring the Pacific Northwest’s unique flavors into our kitchens. With just a few simple ingredients and the right techniques, we can create a vibrant, sweet-tart spread that elevates everything from breakfast toast to savory dishes.
By following the steps carefully and paying attention to details like berry ripeness and proper sealing, we ensure our jam stays fresh and delicious for months. This recipe not only celebrates a local treasure but also invites us to experiment and enjoy the versatility of homemade preserves year-round.
Frequently Asked Questions
What is salmonberry jam?
Salmonberry jam is a sweet-tart spread made from fresh salmonberries, capturing the unique flavors of the Pacific Northwest. It’s made by cooking salmonberries with sugar and lemon juice, often using pectin for thickness.
What ingredients do I need to make salmonberry jam?
You need fresh salmonberries, granulated sugar, lemon juice, and optionally fruit pectin. Fresh, ripe salmonberries are essential for the jam’s flavor and texture.
What equipment is required to make salmonberry jam?
Key tools include a heavy-bottomed saucepan, wooden spoon or spatula, fine mesh strainer or food mill (optional), measuring cups, candy thermometer, sterilized jars, jar funnel, and ladle.
How should I prepare salmonberries before making jam?
Gently rinse the salmonberries, drain excess moisture, remove stems or damaged berries, and optionally crush them lightly for a smoother jam.
How do I know when the jam is cooked properly?
Maintain a rolling boil for 10-15 minutes, stir constantly, and perform the “sheet test” or “plate test” to check if the jam has gelled correctly.
What is the best way to store salmonberry jam?
Store sealed jars in a cool, dark place for up to one year. After processing in a boiling water bath, allow jars to cool undisturbed to form a vacuum seal.
Can I use salmonberry jam for cooking or baking?
Yes, salmonberry jam is versatile. Use it on toast, in yogurt, as a glaze for meats, or as an ingredient in baked goods like cookies and tarts.
Is it necessary to use pectin in salmonberry jam?
Pectin is optional. It helps thicken the jam and improve gel formation, but you can make jam without it by cooking longer to reach the desired consistency.