
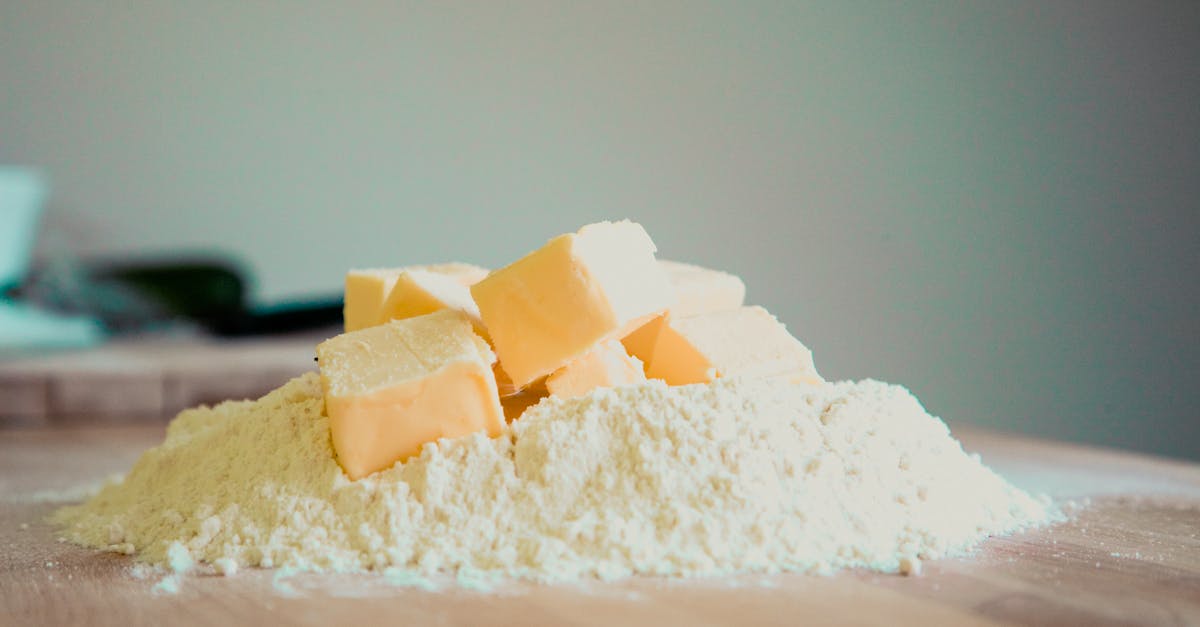
Sal butter is a unique ingredient that’s been cherished in parts of India for centuries. Made from the seeds of the sal tree, this butter offers a rich, nutty flavor that sets it apart from regular dairy butter. Its distinct taste and creamy texture make it a versatile addition to both traditional and modern recipes.
Incorporating sal butter into our cooking not only enhances flavor but also brings a touch of authenticity to dishes inspired by regional cuisine. Whether we’re sautéing vegetables, baking breads, or crafting savory snacks, sal butter adds depth and richness that elevates every bite. Let’s explore some delicious sal butter recipes that showcase this special ingredient’s potential in our kitchens.
Sal Butter Recipes
Using sal butter in our kitchen opens up exciting flavor dimensions. Here are some of our favorite recipes that highlight the unique taste and creamy texture of this ingredient. Each recipe is crafted to balance the nutty richness of sal butter with complementary flavors for an unforgettable meal.
1. Sal Butter Roasted Vegetables
Ingredients:
- 3 cups mixed vegetables (carrots, bell peppers, zucchini, and cauliflower), chopped
- 2 tablespoons sal butter, melted
- 1 teaspoon garlic powder
- 1 teaspoon smoked paprika
- Salt and black pepper to taste
- Fresh thyme for garnish
Instructions:
- Preheat the oven to 425°F (220°C).
- In a large bowl, toss the chopped vegetables with melted sal butter, garlic powder, smoked paprika, salt, and pepper.
- Spread the vegetables evenly on a baking sheet lined with parchment paper.
- Roast for 25-30 minutes, stirring halfway to ensure even cooking and golden edges.
- Garnish with fresh thyme before serving to enhance the aroma.
2. Sal Butter Garlic Naan
Ingredients:
- 2 cups all-purpose flour
- 1 teaspoon sugar
- 1 teaspoon active dry yeast
- ⅓ cup warm water
- ¼ cup plain yogurt
- 3 tablespoons sal butter, melted (plus extra for brushing)
- 3 cloves garlic, finely minced
- Salt to taste
- Fresh cilantro, chopped (optional)
Instructions:
- In a small bowl, dissolve sugar and yeast in warm water let it activate for 5-7 minutes until frothy.
- In a large bowl combine flour, salt, yogurt, and activated yeast mixture. Knead to form a soft dough.
- Cover the dough and let it rise for 1 hour in a warm place.
- Divide the dough into 6 equal parts and roll each into an oval shape.
- Mix minced garlic with melted sal butter.
- Heat a skillet over medium heat and cook each naan for 2 minutes on each side or until bubbles form.
- Brush hot naan with garlic sal butter and sprinkle chopped cilantro.
3. Sal Butter Fish Curry
Ingredients:
- 1 lb firm white fish fillets, cut into chunks
- 2 tablespoons sal butter
- 1 large onion, finely chopped
- 2 tomatoes, pureed
- 1 teaspoon ginger-garlic paste
- 1 teaspoon turmeric powder
- 1 tablespoon coriander powder
- 1 teaspoon red chili powder
- 1 cup coconut milk
- Salt to taste
- Fresh curry leaves
Instructions:
- Heat sal butter in a deep pan over medium heat.
- Add chopped onions and sauté until golden brown.
- Stir in ginger-garlic paste and cook for 2 minutes.
- Add turmeric, coriander, and chili powder; cook the spices for 1 minute.
- Pour in tomato puree and cook until oil separates from the mixture.
- Add fish pieces and salt; cook gently for 5 minutes.
- Pour coconut milk and add fresh curry leaves. Simmer for another 10 minutes on low heat until fish is tender.
- Serve hot with steamed rice.
Nutritional Overview of Sal Butter in Recipes
| Component | Amount per tablespoon (14g) |
|---|---|
| Calories | 120 |
| Total Fat | 13g |
| Saturated Fat | 8g |
| Monounsaturated Fat | 3g |
| Protein | 0g |
| Carbohydrates | 0g |
Sal butter adds a rich buttery flavor while also contributing healthy fats and antioxidants, making it a heartier alternative to regular butter in cooking.
By incorporating sal butter into these recipes we unlock authentic and bold flavors perfect for those seeking something distinctive in their culinary experience.
Ingredients
To create authentic Sal Butter at home, we focus on simple yet quality ingredients that enhance its natural nutty richness. Below are the essentials for crafting the basic form and optional additions to elevate its flavor profile.
For Basic Sal Butter
- Sal seeds (500 grams) – cleaned and dried thoroughly
- Filtered water (as needed) – for soaking and grinding
- Salt (1 teaspoon) – to enhance flavor
- Cold water or ice cubes (for churning) – to help solidify the butter
We recommend starting with fresh, high-quality sal seeds to ensure the characteristic creamy texture and deep nutty aroma.
Optional Add-Ins and Flavorings
To customize our Sal Butter and tailor it to various recipes, these optional ingredients add layers of flavor and aroma:
| Ingredient | Quantity | Purpose |
|---|---|---|
| Garlic powder | ½ teaspoon | Adds a subtle earthy pungency |
| Fresh herbs (rosemary, thyme) | 1 tablespoon, chopped | Infuses aromatic freshness |
| Black pepper | ¼ teaspoon | Provides mild heat and depth |
| Turmeric powder | ¼ teaspoon | Adds color and anti-inflammatory benefits |
| Lemon zest | 1 teaspoon | Brightens flavor with citrus notes |
| Honey | 1 teaspoon | Introduces a touch of natural sweetness |
“Incorporating these flavorings into our sal butter transforms it from a simple spread to a gourmet ingredient, perfect for enhancing diverse dishes.”
By adjusting these add-ins, we can create customized sal butter blends that highlight or complement the dish’s flavor while retaining the authentic base essence.
Equipment Needed
To create authentic sal butter recipes that bring out the nutty richness and creamy texture, having the right equipment is crucial. Below we outline the essential kitchen tools and storage containers to ensure smooth preparation and freshness.
Essential Kitchen Tools
For crafting perfect sal butter, we recommend the following kitchen tools. These assist in processing sal seeds into smooth butter and infusing flavors evenly:
- Heavy-duty grinder or blender: To grind the cleaned and dried sal seeds into a fine paste or oil extract. A high-powered blender ensures a creamy texture.
- Large mixing bowl: For combining ground sal seeds with water and salt during the butter-making process.
- Wooden spoon or spatula: To stir and churn the mixture thoroughly, helping achieve the right consistency.
- Fine mesh strainer or cheesecloth: To filter impurities and obtain a smooth butter without seed residues.
- Measuring spoons and cups: To accurately measure salt, optional spices, and water amounts for perfect balance.
- Small saucepan (optional): For warming or melting ingredients gently if needed in recipes like Sal Butter Garlic Naan.
| Equipment | Purpose | Notes |
|---|---|---|
| Heavy-duty grinder | Grinding sal seeds | Choose one with powerful motor for smoothness |
| Large mixing bowl | Mixing and churning sal seed paste | Use non-reactive material like glass or stainless steel |
| Wooden spoon/spatula | Stirring and churning | Avoid metal to preserve texture |
| Fine mesh strainer | Filtering butter | Essential for smooth final product |
| Measuring spoons/cups | Accurate measurement of ingredients | Accuracy impacts flavor and texture |
| Small saucepan | Warming blended mixtures (optional) | Use low heat to avoid burning |
Storage Containers
Proper storage is essential to maintain the freshness, flavor, and creamy texture of sal butter after preparation:
- Airtight glass jars or containers: Prevent air exposure which can cause oxidation and rancidity. Glass does not absorb odors or stains, maintaining purity.
- Refrigerator-safe containers: Sal butter benefits from cool storage to preserve its healthy fats and antioxidants.
- Sealable plastic bags or silicone storage bags: Useful for portioning butter but ensure they are BPA-free and food grade.
- Labeling stickers or tags: Mark your containers with preparation date and optional flavor notes for easy tracking.
| Container Type | Benefits | Storage Tips |
|---|---|---|
| Airtight glass jars | Long-lasting freshness | Store in refrigerator away from light |
| Refrigerator-safe containers | Retain texture and flavor | Use for daily access |
| Sealable plastic/silicone bags | Space-saving and portion control | Freeze for longer storage |
| Labeling materials | Organize various flavored sal butters | Write date and contents clearly |
Using this equipment ensures that our sal butter recipes retain their rich nutty flavor and creamy quality, making every dish a gourmet delight.
Preparation
Mastering the extraction and preparation of sal butter is essential to unlock its full nutty richness and creamy texture. Let’s walk through the precise steps for creating authentic sal butter and preparing it perfectly for our recipes.
How to Extract Sal Butter
To extract the finest sal butter from the seeds, we follow a traditional yet efficient method. This step ensures the butter captures the deep aromas and smooth consistency needed for versatile cooking.
- Clean and Dry Sal Seeds
- Rinse the seeds thoroughly to remove dirt and debris.
- Spread them on a clean cloth and air dry completely to avoid moisture, which can affect butter quality.
- Roast the Seeds Lightly
- Use a heavy pan over medium heat.
- Roast the seeds for 5-7 minutes, stirring continuously to bring out the nutty flavor without burning.
- Grind the Seeds
- Transfer roasted seeds to a heavy-duty grinder or blender.
- Grind them into a coarse paste adding minimal filtered water for smooth blending.
- Churn the Paste
- Pour the paste into a large mixing bowl.
- Add cold water or ice cubes gradually to aid separation.
- Vigorously churn or whisk for 10-15 minutes until butter solids separate from the watery layer.
- Strain and Collect Butter
- Use a fine mesh strainer to separate the creamy butter solids.
- Gently press to remove excess liquid for a rich, thick texture.
| Step Number | Action | Key Detail |
|---|---|---|
| 1 | Clean & dry seeds | Ensure completely dry |
| 2 | Roast seeds | 5-7 minutes, medium heat |
| 3 | Grind seeds | Add minimal water for smooth paste |
| 4 | Churn paste | Add cold water, churn 10-15 min |
| 5 | Strain butter solids | Use fine mesh strainer |
Preparing Sal Butter for Recipes
Once extracted, preparing sal butter for cooking or baking enhances its natural qualities and tailors it perfectly to our dishes.
- Soften at Room Temperature
Bring the butter to room temperature for easy spreading and mixing.
- Enhance with Optional Flavorings
Mix in complementary ingredients such as:
- Garlic powder for savory depth
- Fresh herbs like cilantro or rosemary for freshness
- Black pepper or turmeric for warmth
- Lemon zest for a bright note
- Honey to balance nutty richness with subtle sweetness
For consistent results, weigh or measure the butter according to recipe specifics.
- Store Properly Before Use
Keep in an airtight container in the refrigerator. Bring back to room temperature before use for optimal texture.
By following these preparation steps, our sal butter will be perfectly positioned to enrich everything from roasted vegetables to fish curry and garlic naan, bringing authentic Indian flavors to every bite.
Sal Butter Recipe 1: Sal Butter Toast Spread
This Sal Butter Toast Spread is a simple yet flavorful way to enjoy the rich, nutty essence of sal butter. Perfect for breakfast or a quick snack, this spread combines the creamy texture of sal butter with aromatic herbs and spices for a savory boost.
Ingredients
- ½ cup softened sal butter (at room temperature)
- 1 tsp garlic powder or 1 clove fresh garlic, minced
- 1 tbsp fresh parsley, finely chopped
- ½ tsp black pepper, freshly ground
- ¼ tsp turmeric powder (optional, for subtle earthiness and color)
- 1 tsp lemon zest (freshly grated)
- Pinch of salt, to taste
- 1 tbsp honey (optional, for a hint of sweetness)
Instructions
- In a medium bowl, place the softened sal butter.
- Add garlic powder, fresh parsley, black pepper, turmeric powder (if using), lemon zest, and a pinch of salt.
- Using a spatula or wooden spoon, blend all ingredients thoroughly until smooth and evenly combined.
- Taste the spread and adjust seasoning—add more salt or honey for balance if desired.
- Transfer the spread to an airtight container or small jar. Chill in the refrigerator for 15-20 minutes to let the flavors meld and the spread firm up slightly.
Serving Suggestions
- Spread generously on warm toasted bread or crispy baguette slices for a delicious start to the day.
- Use as a savory dip for fresh vegetable sticks or crackers.
- Add a dollop onto steamed or roasted vegetables to enhance their flavor.
- Pair with soft cheese and cured meats for a gourmet appetizer board.
- Keep refrigerated and use within one week for peak freshness.
| Ingredient | Measurement | Purpose |
|---|---|---|
| Sal butter | ½ cup | Base spread rich in nutty flavor |
| Garlic powder | 1 tsp | Adds aromatic depth |
| Fresh parsley | 1 tbsp | Fresh herbal note |
| Black pepper | ½ tsp | Mild heat |
| Turmeric powder | ¼ tsp (optional) | Earthy flavor and color |
| Lemon zest | 1 tsp | Bright citrus aroma |
| Salt | Pinch, to taste | Enhances overall flavor |
| Honey | 1 tbsp (optional) | Balances savory with sweetness |
Sal Butter Recipe 2: Sal Butter Curry
This Sal Butter Curry transforms traditional Indian flavors with the rich, nutty essence of sal butter. Let’s explore how to create this creamy, aromatic curry that perfectly balances spice and depth.
Ingredients
- 3 tablespoons sal butter, softened
- 1 large onion, finely chopped
- 2 medium tomatoes, pureed
- 2 cloves garlic, minced
- 1-inch piece ginger, grated
- 2 green chilies, slit
- 1 cup coconut milk
- 1/2 teaspoon turmeric powder
- 1 teaspoon coriander powder
- 1 teaspoon cumin seeds
- 1/2 teaspoon garam masala
- 1/4 teaspoon red chili powder
- Salt, to taste
- 1/4 cup fresh cilantro leaves, chopped (for garnish)
- 2 tablespoons vegetable oil or ghee
- 1 cup mixed vegetables or protein of choice (paneer, chicken, or fish)
Instructions
- Heat oil or ghee in a heavy-bottomed pan over medium heat. Add cumin seeds and let them sizzle for 30 seconds.
- Add the finely chopped onions and sauté until golden brown, about 8 minutes.
- Stir in the minced garlic, grated ginger, and slit green chilies. Cook for 2 minutes until fragrant.
- Add the turmeric, coriander, red chili powder, and salt. Mix well and cook spices for 1 minute.
- Pour in the pureed tomatoes and cook until the oil separates from the masala, about 5-7 minutes.
- Add your choice of mixed vegetables or protein. Sauté briefly to coat with the spice mixture.
- Lower the heat and stir in the softened sal butter. Allow it to melt completely, blending richly with the spices.
- Pour in the coconut milk and simmer for 10-15 minutes, stirring occasionally, until the curry thickens and ingredients are tender.
- Sprinkle garam masala and adjust seasoning as needed.
- Garnish with fresh cilantro before serving hot with steamed rice or naan.
Tips for Perfect Curry
- Soften the sal butter at room temperature for smooth blending.
- Use fresh, high-quality spices for the most vibrant flavor.
- Simmer gently once the coconut milk is added to avoid curdling.
- For a deeper flavor, roast the spices lightly before adding onions.
- Adjust green chili quantity to control the heat level.
- Pair with freshly baked naan or fluffy basmati rice for an authentic dining experience.
| Ingredient | Quantity | Notes |
|---|---|---|
| Sal Butter | 3 tablespoons | Softened at room temperature |
| Onion | 1 large | Finely chopped |
| Tomatoes | 2 medium | Pureed |
| Garlic | 2 cloves | Minced |
| Ginger | 1-inch piece | Grated |
| Green Chilies | 2 | Slit |
| Coconut Milk | 1 cup | Full-fat preferred |
| Turmeric Powder | 1/2 teaspoon | |
| Coriander Powder | 1 teaspoon | |
| Cumin Seeds | 1 teaspoon | Whole |
| Garam Masala | 1/2 teaspoon | |
| Red Chili Powder | 1/4 teaspoon | Adjust for spice level |
| Salt | To taste | |
| Cilantro Leaves | 1/4 cup | Fresh, chopped |
| Vegetable Oil/Ghee | 2 tablespoons | For sautéing |
| Protein/Vegetables | 1 cup | Optional: paneer, chicken, fish |
Sal Butter Recipe 3: Sal Butter Roasted Vegetables
Elevate your roasted vegetables by incorporating Sal Butter to bring a rich, nutty, and creamy flavor that perfectly complements the natural sweetness and earthiness of your garden harvest. This recipe transforms simple veggies into a gourmet side dish bursting with authenticity and depth.
Ingredients
- 3 tablespoons softened Sal Butter
- 1 pound mixed fresh vegetables (see recommended vegetables below)
- 2 cloves garlic, minced
- 1 teaspoon fresh rosemary, chopped
- 1 teaspoon fresh thyme leaves
- 1 tablespoon olive oil
- Salt, to taste
- Black pepper, freshly ground, to taste
- 1 teaspoon lemon juice (optional)
Instructions
- Preheat your oven to 425°F (220°C). This high temperature ensures crisp, caramelized edges on your vegetables.
- In a large mixing bowl, combine the softened Sal Butter, olive oil, minced garlic, rosemary, and thyme. Stir until fully integrated.
- Add the washed and chopped vegetables to the bowl. Toss thoroughly to coat each piece evenly with the sal butter mixture.
- Spread the vegetables on a baking sheet in a single layer to promote even roasting and caramelization.
- Season the vegetables with salt and freshly ground black pepper as desired.
- Roast in the oven for 25 to 30 minutes, stirring halfway through to ensure even cooking. Vegetables should be tender inside with golden crisp edges.
- Remove from the oven and drizzle with lemon juice if using. This adds a bright contrast to the buttery nutty flavors.
- Serve hot as a flavorful side or a standalone dish infused with the unique essence of Sal Butter.
Recommended Vegetables
The following vegetables roast beautifully with Sal Butter, enhancing their texture and flavor:
| Vegetable | Preparation | Notes |
|---|---|---|
| Carrots | Peeled and cut into sticks | Sweetens on roasting |
| Brussels Sprouts | Halved | Crisps nicely and caramelizes |
| Bell Peppers | Cut into chunks | Adds vibrant color and sweetness |
| Zucchini | Sliced | Roasts quickly, tender texture |
| Red Onions | Cut into wedges | Adds mild sweetness and depth |
| Sweet Potatoes | Cubed | Becomes creamy inside |
| Cauliflower | Florets | Crisps on edges, tender center |
Using a combination of these vegetables allows us to enjoy a palette of flavors and textures that Sal Butter enriches with its signature nutty and creamy character.
Make-Ahead Tips for Sal Butter Recipes
Preparing sal butter recipes in advance can save time and enhance flavor development. To make the most of this rich, nutty ingredient, follow our expert tips:
Proper Storage for Freshness and Flavor
- Store homemade sal butter in airtight glass jars to maintain its creamy texture and prevent oxidation.
- Keep it in the coldest part of the refrigerator, ideally between 35°F and 40°F (1.5°C to 4.5°C).
- For extended storage, freeze sal butter in portion-sized containers wrapped tightly with plastic wrap and placed in freezer-safe bags.
| Storage Method | Duration | Temperature | Notes |
|---|---|---|---|
| Refrigeration | Up to 2 weeks | 35°F to 40°F (1.5°C-4.5°C) | Use airtight glass jars to prevent flavor loss |
| Freezing | Up to 3 months | 0°F (-18°C) | Thaw in refrigerator overnight before use |
Enhancing Flavor with Time
- Allow sal butter to rest at room temperature for 30 minutes before use. This softens the texture and intensifies its nutty aroma.
- When making flavored variations (e.g., garlic, turmeric, herbs), prepare them at least 24 hours ahead so the flavors meld beautifully.
“Flavor deepening is one of the key advantages of make-ahead sal butter recipes. It turns simple dishes into gourmet experiences.”
Prepping Ingredients and Components
- Chop vegetables for Sal Butter Roasted Vegetables the day before and store in airtight containers to save prep time.
- For curries, measure spices and prepare coconut milk in advance to streamline cooking.
Tips for Reheating and Serving
- Gently warm sal butter dishes on low heat to preserve its creamy texture and rich flavor.
- Avoid high heat which can cause sal butter to separate or lose its depth.
- For toast spreads, bring to room temperature before serving for easy spreading and optimal taste.
By integrating these make-ahead strategies, we ensure our sal butter recipes deliver convenience without compromising on the authentic, nutty, and aromatic qualities that make this ingredient unique.
Storage and Shelf Life
Proper storage of Sal Butter is crucial to preserve its rich, nutty flavor and creamy texture while preventing spoilage. Following these steps ensures your sal butter maintains peak freshness and extends its shelf life.
Refrigeration
- Transfer the prepared Sal Butter into airtight glass jars or refrigerator-safe containers immediately after making or opening.
- Store jars in the coldest part of the refrigerator—typically the back or lower shelves—where temperatures remain stable.
- Keep the container sealed tightly to prevent absorption of other odors and moisture from the fridge.
- Refrigerated Sal Butter typically stays fresh for 2 to 3 weeks.
Freezing
- For longer storage, place sal butter in freezer-safe, airtight containers or wrap it tightly with plastic wrap followed by aluminum foil.
- To avoid texture changes, portion the sal butter before freezing so you can thaw only what you need.
- Frozen Sal Butter can last up to 3 months without significant quality loss.
- Thaw frozen portions overnight in the refrigerator then allow to come to room temperature before use to restore creaminess.
Room Temperature Storage
- We recommend storing Sal Butter at room temperature only for short periods during preparation or serving.
- Leaving it unrefrigerated for more than a few hours increases the risk of spoilage and diminishes flavor.
- Always return Sal Butter to the refrigerator after use.
Tips for Maintaining Freshness
- Always use a clean, dry utensil to scoop out sal butter to prevent contamination.
- Avoid exposing the butter to direct sunlight or heat sources.
- Label containers with the date of preparation or opening to keep track of freshness.
| Storage Method | Container Type | Shelf Life | Temperature Range | Notes |
|---|---|---|---|---|
| Refrigeration | Airtight glass jar | 2 to 3 weeks | 34°F to 40°F (1°C to 4°C) | Keep in coldest part of fridge |
| Freezing | Freezer-safe containers | Up to 3 months | 0°F (-18°C) or below | Portion before freezing |
| Room Temperature | N/A | A few hours only | 68°F to 72°F (20°C to 22°C) | Avoid prolonged exposure |
“Proper storage unlocks the true potential of sal butter’s rich, nutty aroma and velvety texture, ensuring it enhances every dish impeccably.”
By adhering to these storage guidelines and monitoring the shelf life carefully, we guarantee your sal butter stays fresh and flavorful, ready to elevate your sal butter recipes anytime.
Conclusion
Exploring sal butter opens up a world of rich flavors and culinary creativity. Its unique nutty profile and creamy texture make it a standout ingredient that complements a variety of dishes beautifully.
By mastering the preparation and storage of sal butter, we can enjoy its benefits anytime while adding an authentic touch to our meals. Whether used in traditional recipes or modern twists, sal butter promises to elevate our cooking with its distinctive taste and wholesome goodness.
Frequently Asked Questions
What is sal butter and where does it come from?
Sal butter is a creamy, nutty-flavored ingredient made from the seeds of the sal tree native to India. It is used in cooking to add rich, authentic Indian flavors.
How do I make sal butter at home?
To make sal butter, clean and dry fresh sal seeds, roast them, grind into a paste, then churn with cold water and salt. Optional seasonings can be added for extra flavor.
What dishes can I use sal butter in?
Sal butter is versatile in Indian recipes like roasted vegetables, garlic naan, fish curry, and even toast spreads, enhancing flavor with its nutty richness.
How should I store sal butter?
Store sal butter in airtight glass jars in the fridge for up to two weeks or freeze for longer storage. Use clean utensils to avoid contamination.
What are the health benefits of sal butter?
Sal butter contains healthy fats and antioxidants, making it a nutritious alternative to regular butter that supports heart health and adds essential nutrients.
Can I add flavors to sal butter?
Yes! Garlic powder, fresh herbs, black pepper, turmeric, lemon zest, and honey are common add-ins that enhance sal butter’s taste, giving it a gourmet touch.
What kitchen tools do I need to prepare sal butter?
You’ll need a heavy-duty grinder or blender, a large mixing bowl, a spatula or wooden spoon, and a fine mesh strainer for making smooth, creamy sal butter.
How long does homemade sal butter last?
When stored properly in the refrigerator, sal butter lasts about two weeks. Freezing can extend its shelf life to several months without compromising flavor.
How do I use sal butter in cooking?
Soften sal butter at room temperature before cooking. Use it as a finishing butter, in spreads, or to enhance the flavor of curries, roasted vegetables, and breads.
What are some popular recipes featuring sal butter?
Popular recipes include Sal Butter Roasted Vegetables, Sal Butter Garlic Naan, Sal Butter Fish Curry, Sal Butter Toast Spread, and the rich, aromatic Sal Butter Curry.