
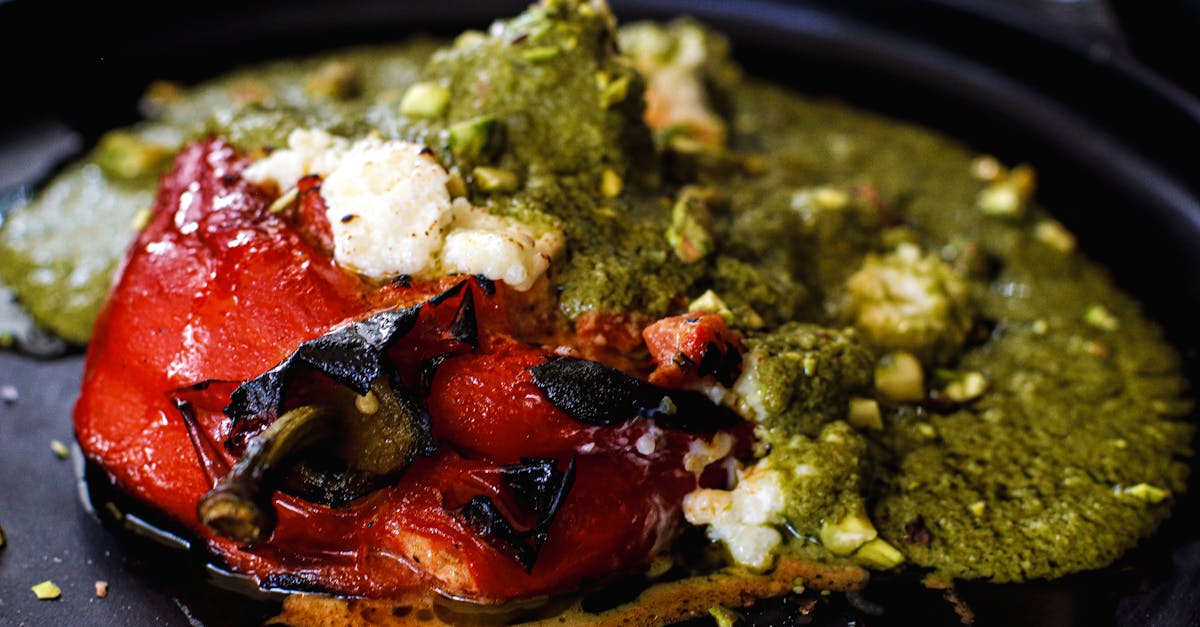
Roasted salsa is a game-changer for anyone who loves bold flavors and homemade goodness. By roasting the tomatoes, peppers, and onions, we bring out a smoky depth that turns ordinary salsa into something truly special. This recipe is perfect for canning, so we can enjoy that fresh, vibrant taste all year long.
Canning our roasted salsa not only preserves the flavors but also lets us share a taste of summer whenever we want. It’s a simple process that yields delicious results, making it a must-try for home cooks who want to stock their pantry with homemade essentials. Let’s dive into creating a roasted salsa that’s bursting with flavor and ready to be canned for future snacking or entertaining.
Ingredients
To create the perfect roasted salsa recipe for canning, we carefully select fresh and vibrant ingredients. These components work together to build a smoky, flavorful salsa that preserves beautifully.
Fresh Vegetables and Herbs
- 4 pounds Roma tomatoes, halved
- 2 large white onions, quartered
- 4-6 jalapeño peppers, stemmed (adjust based on heat preference)
- 3 cloves garlic, peeled
- 1 bunch fresh cilantro, roughly chopped
- 1 large green bell pepper, seeded and quartered
Spices and Seasonings
- 2 teaspoons ground cumin
- 1 tablespoon kosher salt
- 1 teaspoon freshly ground black pepper
- 1 teaspoon smoked paprika
Vinegar and Preservatives
- 1 cup white vinegar (5% acidity for safe canning)
- 1 tablespoon sugar (balances acidity and enhances flavor)
| Ingredient | Purpose | Notes |
|---|---|---|
| White vinegar | Preserves salsa and balances pH | Essential for safe canning |
| Sugar | Enhances flavor | Optional but recommended |
Optional Add-ins
- 1 teaspoon dried oregano, for a more herbal note
- 1 small carrot, peeled and diced, adds natural sweetness and thickness
- 1-2 chipotle peppers in adobo, for extra smoky heat
Our selection ensures this roasted salsa blends layers of fresh, roasted, and spicy flavors with canning safety and shelf stability.
Equipment Needed
To make our roasted salsa recipe for canning a success, we need the right equipment. Having everything prepared will streamline the roasting, cooking, and canning process, ensuring safety and delicious results.
Canning Jars and Lids
Using proper Canning Jars and Lids is essential for safe preservation. We recommend these specific items:
| Equipment | Description | Quantity Needed |
|---|---|---|
| Mason Jars | Quart or pint size with wide-mouth tops | 4-6 jars depending on batch size |
| Two-piece lids | Flat sealing lids + screw bands | Corresponding to jars |
| Jar lifter | For safely handling hot jars | 1 |
| Funnel | Wide-mouth funnel for easy filling | 1 |
“We always stress the importance of new lids for each canning session to guarantee an airtight seal and prevent spoilage.”
Roasting Tools
Roasting vegetables is the cornerstone of our recipe’s rich flavor. These tools help us achieve that perfect char:
- Baking sheet: Heavy-duty sheet pan to hold tomatoes, peppers, and onions.
- Aluminum foil: To line baking sheets for easy cleanup and even roasting.
- Oven or grill: We use a preheated oven at 425°F or a grill set to medium-high.
- Tongs: Heat-resistant tongs help us easily turn roasted vegetables.
Cooking Utensils
To blend and cook the salsa to perfection we rely on the following:
- Large heavy-bottomed saucepan: For simmering salsa evenly.
- Immersion blender or food processor: To blend roasted ingredients while keeping the desired texture.
- Chef’s knife: For chopping any raw ingredients or garnishes.
- Cutting board: Sturdy surface to prepare fresh ingredients.
- Measuring spoons and cups: Accurate spice and liquid measurements ensure balanced flavors.
- Wooden spoon or silicone spatula: For stirring the salsa during cooking without scratching cookware.
Canning Supplies
For a safe and efficient canning process, these Canning Supplies are invaluable:
- Large stockpot or water bath canner: To process sealed jars correctly.
- Canning rack: Keeps jars off the bottom of the pot so heat can circulate.
- Clean kitchen towels: For wiping jar rims before sealing.
- Pot holders: For safely removing hot jars.
- Timer: Precise heat processing times guarantee food safety.
- Jar brush: For thoroughly cleaning jars pre-use.
Preparation
To create the perfect Roasted Salsa for canning, precise preparation is essential. Let’s break down the key steps to set us up for success.
Preparing the Vegetables for Roasting
Begin by selecting fresh, ripe vegetables. Here’s how we prepare them:
- Roma tomatoes: Wash thoroughly, then cut in halves or quarters depending on size.
- White onions: Peel and quarter for even roasting.
- Jalapeño peppers: Rinse and slice in half lengthwise, removing seeds if less heat is preferred.
- Green bell pepper: Core and slice into large chunks.
- Garlic cloves: Peel whole, no need to chop.
- Cilantro: Chop roughly; it will be added after roasting for freshness.
“Properly prepped vegetables ensure even roasting and enhance the smoky depth in our salsa.”
Roasting the Ingredients
Use a heavy-duty baking sheet lined with aluminum foil for easy cleanup. Arrange vegetables in a single layer without overcrowding to promote uniform roasting.
| Ingredient | Oven Temp | Roasting Time | Desired Appearance |
|---|---|---|---|
| Roma tomatoes | 425°F (220°C) | 20-25 minutes | Slightly charred, soft |
| White onions | 425°F (220°C) | 20-25 minutes | Golden edges, caramelized |
| Jalapeño peppers | 425°F (220°C) | 15-20 minutes | Blackened skin, soft |
| Green bell pepper | 425°F (220°C) | 20-25 minutes | Charred spots, tender |
| Garlic cloves | 425°F (220°C) | 15-20 minutes | Soft and aromatic |
Turn the vegetables halfway through roasting. Use heat-resistant tongs to flip peppers and onions gently. When done, allow them to cool just enough to handle but roast the flavors will be intensified with this char.
Prepping Jars and Canning Equipment
While our veggies roast, it’s the perfect time to prep our canning supplies:
- Mason jars and lids: Wash jars and lids in hot soapy water. Rinse well. Place jars in a large stockpot of boiling water for 10 minutes to sterilize.
- Jar lifter: Keep handy to safely remove hot jars.
- Wide-mouth funnel: Prepare to neatly fill jars without spills.
- Canning rack: Place inside the water bath canner to prevent jars from touching the pot directly.
- Water bath canner: Fill with water and bring to a simmer to warm jars before filling.
Tip: “Keeping jars hot prevents cracking when the hot salsa is poured in.”
Having everything sanitized and at the ready ensures a smooth transition from roasting to canning. Next, we’ll combine these beautifully roasted ingredients into our rich, bold Roasted Salsa Recipe For Canning.
Making the Roasted Salsa
Now that our vegetables are perfectly roasted and our canning supplies are prepped, let’s move forward by expertly combining, seasoning, and cooking our roasted salsa to develop the rich smoky flavor that makes this recipe stand out.
Combining Roasted Ingredients
First, transfer the roasted Roma tomatoes, jalapeño peppers, green bell peppers, white onions, and garlic to a large bowl. Let’s do the following:
- Peel the roasted tomatoes if the skins are loose for a smoother texture.
- Remove any charred skin pieces from peppers and onions for optimal flavor.
- Chop the vegetables into coarse chunks for blending.
Next, add the chopped fresh cilantro. This gives the salsa a bright herbaceous note that balances the smoky depth.
“Combining these perfectly roasted ingredients is the foundation of our bold and vibrant roasted salsa.”
Adding Spices and Vinegar
To deepen the flavor and ensure safe preservation, add the following to the bowl:
| Ingredient | Measurement | Purpose |
|---|---|---|
| Ground cumin | 1 tablespoon | Adds warmth and smokiness |
| Smoked paprika | 1 teaspoon | Enhances smoky flavor |
| Kosher salt | 2 teaspoons | Brings out natural flavors |
| Black pepper | ½ teaspoon | Adds subtle heat |
| Dried oregano | 1 teaspoon (optional) | Adds herbal complexity |
| White vinegar | ½ cup | Balances acidity / preserves salsa |
| Granulated sugar | 1 tablespoon | Balances acidity and adds depth |
Tip: If you want an extra smoky heat boost, add chipotle peppers at this stage.
Cooking the Salsa on the Stove
Transfer the combined mixture to a large heavy-bottomed saucepan. Here’s how to proceed:
- Bring the salsa to a simmer over medium heat, stirring occasionally.
- Let it cook gently for 20-25 minutes, uncovered, allowing flavors to meld and the mixture to thicken.
- Use an immersion blender or food processor to blend the salsa to your preferred consistency—chunky or smooth.
- Taste and adjust salt, pepper, or vinegar as needed.
Canning Process
To preserve our roasted salsa for canning safely and effectively, we follow a precise canning process that locks in flavor and prevents spoilage. Here’s how we prepare, fill, seal, and process the jars to ensure long-lasting freshness and taste.
Sterilizing Jars and Lids
Before filling our jars, sterilization is key to avoid contamination.
- Wash Mason jars and lids in hot, soapy water; rinse thoroughly.
- Place jars upright on a canning rack inside a large stockpot or water bath canner.
- Fill the stockpot with water, covering jars by at least 1 inch.
- Bring to a rolling boil and boil for 10 minutes to sterilize jars.
- Keep jars hot in the simmering water until ready to fill. This prevents cracking when adding hot salsa.
- Place lids in a small pot of hot, not boiling water for 5 minutes to soften sealing compound.
- Use a jar lifter to remove jars and a magnetic lid lifter for lids, avoiding direct hand contact.
Filling Jars with Hot Salsa
Filling jars while our salsa is hot ensures safety and optimal vacuum sealing.
- Use a wide-mouth funnel to pour hot, simmered roasted salsa into sterilized jars.
- Leave 1/2 inch headspace at the top to allow proper expansion.
- Wipe rims with a clean, damp cloth to remove any residue that could prevent sealing.
- Insert sterilized lids and screw bands onto jars, tightening until fingertip-tight—not overly tight.
Sealing and Processing Jars in a Water Bath
Proper sealing and processing are vital to preserving salsa safely.
| Step | Details |
|---|---|
| Processor Setup | Use a large stockpot with a canning rack |
| Water Level | Water should cover jars by 1-2 inches |
| Processing Time (pints) | 15 minutes at a rolling boil |
| Processing Time (quarts) | 20 minutes at a rolling boil |
| Cooling | Remove jars with jar lifter, place on towel |
- Place filled jars upright in the canning rack inside the boiling water bath.
- Start timing once water returns to a rolling boil.
- Maintain a steady boil for the full processing time depending on jar size.
- After processing, carefully remove jars and place them on a towel to cool undisturbed for 12-24 hours.
- Check seals by pressing the center of each lid; a sealed lid will not flex up or down.
- Store sealed jars in a cool, dark place and refrigerate any jars that failed to seal.
Storage and Shelf Life
Proper storage and understanding the shelf life of our roasted salsa recipe for canning ensures that every jar retains its vibrant flavor and safety for months to come.
Storing Canned Roasted Salsa
Once sealed and cooled, we should store our sealed jars of roasted salsa in a cool, dark, and dry place like a pantry or cupboard. Ideal storage conditions help maintain the salsa’s rich smoky flavor and prevent spoilage.
| Storage Condition | Recommended Details |
|---|---|
| Temperature | 50°F to 70°F (10°C to 21°C) |
| Light Exposure | Avoid direct sunlight to prevent degradation |
| Humidity | Keep dry to prevent rusting of lids |
| Positioning | Store jars upright to ensure seal integrity |
Tip: Label each jar with the date of canning to track freshness easily.
Best Practices for Long-Term Preservation
To maximize shelf life and safety of our canned roasted salsa, we follow these key practices:
- Use sterilized jars and lids: Proper sterilization prevents bacterial contamination.
- Maintain proper headspace: Leave ½ inch of space in jars to allow for expansion during processing.
- Process in a water bath canner: Follow recommended times based on jar size, altitude, and recipe acidity.
- Check seals before storing: Press the center of each lid after cooling; it should be concave and not pop back.
- Store in a cool, dark place: Avoid temperature fluctuations that could cause spoilage or seal failure.
- Consume within 12 months: While salsa can last up to 18 months, for peak flavor we recommend enjoying it within a year.
| Jar Size | Water Bath Processing Time* | Recommended Storage Duration |
|---|---|---|
| Pint (16 oz) | 15 minutes | Up to 12 months |
| Quart (32 oz) | 20 minutes | Up to 12 months |
*Times based on sea level; increase processing time by 5 minutes for every 1,000 feet above sea level.
Remember: Refrigerate after opening and consume within 7–10 days for the best flavor and safety.
Tips and Variations
Enhancing our roasted salsa recipe for canning comes down to smart adjustments and creative experimentation. Here are key tips to customize and perfect your salsa while maintaining its excellent preservation qualities.
Adjusting Spice Levels
Controlling the heat is crucial in creating a salsa that suits every palate. To adjust spice levels effectively:
- Mild Salsa: Remove seeds and membranes from jalapeños and reduce the number of peppers used. Substitute with milder varieties like Anaheim peppers.
- Medium Heat: Use whole jalapeños with seeds but reduce any hotter peppers or chipotles.
- Spicy Heat: Add extra jalapeños, serranos, or smoked chipotle peppers in adobo sauce. Keep seeds for a fiery kick.
| Spice Level | Jalapeño Quantity | Additional Peppers | Notes |
|---|---|---|---|
| Mild | 1, seeded | None | Remove seeds & membranes |
| Medium | 2, seeded or whole | Optional chipotle | Balanced smoky heat |
| Spicy | 3+, whole | Serrano or chipotle | Very hot, leave seeds in |
Tip: Always taste after blending, then reheat and adjust spices before canning to ensure even heat distribution.
Alternative Roasting Methods
While oven roasting is our go-to, alternative methods add convenience or unique flavors:
- Grilling: Grill tomatoes, peppers, onions, and garlic directly over medium-high heat until charred. This imparts an even smokier aroma.
- Broiling: Use the broiler setting in your oven, placing vegetables on a baking sheet close to the heat source. Flip often to avoid burning.
- Stovetop Skillet: Use a cast iron skillet over medium-high heat to roast vegetables. This method requires close attention and frequent turning.
| Method | Pros | Cons | Flavor Profile |
|---|---|---|---|
| Oven Roasting | Even cooking, hands-off | Longer time, heat indoors | Balanced smoky |
| Grilling | Authentic smoky flavor | Weather dependent | Smokiest, charred notes |
| Broiling | Quick, intense heat | Risk of burning | Intense smoky, crisp |
| Stovetop | Useful without oven or grill | Requires attention | Slightly smoky, caramelized |
Using Different Vegetables
Incorporating various vegetables can elevate the flavor profile and texture of our roasted salsa recipe for canning without sacrificing canning safety. Consider these alternatives and additions:
- Roasted Carrots: Add sweetness and body. Dice small to blend evenly.
- Red Bell Peppers: Substitute or blend with green peppers for a sweeter, less bitter taste.
- Tomatillos: Add tang and brightness; peel husks before roasting.
- Corn Kernels: Add roasted corn for texture and subtle sweetness.
Always maintain proper acidity by balancing with vinegar especially when adding lower-acid vegetables to ensure safe canning.
| Vegetable | Flavor Impact | Preparation | Notes |
|---|---|---|---|
| Carrots | Sweet, earthy | Dice small, roast fully | Supports thickening |
| Red Bell Peppers | Sweet, less bitter | Roast whole or sliced | Milder than green peppers |
| Tomatillos | Tangy, bright | Peel husks, roast | Adds acidity and zing |
| Corn Kernels | Sweet, textured | Roast off cob or loose | Adds crunch and body |
Conclusion
Roasted salsa for canning is a fantastic way to capture bold smoky flavors and preserve them for months to come. With the right ingredients, equipment, and careful preparation, we can create a delicious homemade salsa that’s perfect for snacking or entertaining anytime.
By following safe canning practices, we ensure our salsa stays fresh and flavorful throughout the year. Plus, experimenting with spice levels and roasting methods lets us tailor each batch to our taste preferences.
This recipe not only enhances our pantry but also brings the satisfaction of crafting something truly homemade. Let’s keep enjoying the vibrant taste of roasted salsa whenever we want.
Frequently Asked Questions
What are the benefits of roasting vegetables for salsa?
Roasting tomatoes, peppers, and onions adds a smoky depth and enhances their natural flavors, resulting in a richer, more complex salsa.
Can roasted salsa be safely canned at home?
Yes, roasted salsa can be safely canned using proper sterilization, vinegar for acidity, and water bath canning methods to ensure long-term preservation.
What ingredients are essential for making roasted salsa?
Key ingredients include Roma tomatoes, white onions, jalapeño peppers, garlic, cilantro, green bell pepper, spices like cumin and smoked paprika, vinegar, and sugar.
What equipment do I need for canning roasted salsa?
You’ll need Mason jars with two-piece lids, a jar lifter, funnel, large stockpot or water bath canner, roasting tools like baking sheets and tongs, and utensils like an immersion blender.
How should I prepare vegetables for roasting?
Wash and cut vegetables evenly, remove seeds from peppers if less heat is desired, and roast at about 400°F, flipping occasionally for even charring.
How do I blend the roasted salsa to the right consistency?
After simmering the roasted ingredients with spices, use an immersion blender or food processor to blend until smooth or chunky according to your preference.
What is the proper water bath canning process for roasted salsa?
Fill sterilized jars with hot salsa leaving headspace, seal tightly, then process in boiling water for 15 minutes (pints) or 20 minutes (quarts), cool, and check seals.
How should canned roasted salsa be stored?
Store sealed jars in a cool, dark, and dry place away from direct light and heat, ideally between 50-70°F, to maintain flavor and shelf life.
How long does canned roasted salsa last?
Unopened, it lasts up to 12 months when stored properly. Once opened, refrigerate and consume within 7-10 days for best quality.
How can I adjust the spice level in roasted salsa?
Control heat by varying jalapeño amounts or removing seeds, or add milder or hotter peppers. You can also balance spice with added sugar or acidity.
Are there alternative methods to roast vegetables besides the oven?
Yes, grilling, broiling, or skillet roasting on the stovetop can add unique smoky or charred flavors to the salsa.
Can I add other vegetables to the salsa?
Yes, but when adding lower-acid vegetables like carrots or corn, adjust vinegar levels to maintain safe acidity for canning.