
Power pudding is the ultimate fuel-packed treat that combines nutrition and flavor in every spoonful. Whether you need a quick breakfast boost or a post-workout snack, this recipe delivers energy and satisfaction without compromising on taste. We love how simple ingredients come together to create a creamy, protein-rich pudding that keeps us going all day.
Originating from health-conscious kitchens, power pudding has gained popularity for its versatility and ease of preparation. It’s perfect for busy mornings or anytime you crave something wholesome and delicious. Let’s dive into this recipe and discover how to make a pudding that powers your day with every bite.
Ingredients
To craft our perfect Power Pudding, we combine a blend of carefully selected ingredients. These provide a balance of texture, flavor, and nutrition to keep us fueled and satisfied.
Dry Ingredients
We start with the dry components that build the pudding’s hearty base:
- Rolled oats (½ cup) – for creamy texture and sustained energy
- Chia seeds (2 tbsp) – boost fiber and omega-3 fats
- Protein powder (1 scoop / 25 g) – choose your favorite whey, plant-based, or collagen
- Cocoa powder (1 tbsp, unsweetened) – adds rich chocolate flavor and antioxidants
- Ground cinnamon (½ tsp) – for warmth and metabolism support
- A pinch of sea salt – to elevate all flavors
| Ingredient | Quantity | Role |
|---|---|---|
| Rolled oats | ½ cup | Creamy texture and energy |
| Chia seeds | 2 tbsp | Fiber and omega-3 fats |
| Protein powder | 1 scoop (25 g) | Muscle recovery and protein content |
| Cocoa powder | 1 tbsp | Flavor and antioxidants |
| Ground cinnamon | ½ tsp | Flavor enhancement |
| Sea salt | Pinch | Flavor balance |
Wet Ingredients
Next, we add the ingredients that bring moisture and enhance the pudding’s creaminess:
- Unsweetened almond milk (1 cup) – dairy-free base with mild nutty flavor
- Greek yogurt (¼ cup, plain) – adds richness and probiotics
- Pure vanilla extract (1 tsp) – sweetness without sugar
- Honey or maple syrup (1 tbsp) – optional natural sweetener
Optional Add-Ins
To customize our Power Pudding, we can boost flavor and nutrition with these extras:
- Fresh berries (¼ cup) – vibrant antioxidants and color
- Chopped nuts (2 tbsp) – crunch and healthy fats
- Dark chocolate chips (1 tbsp) – indulgence with antioxidants
- Nut butter (1 tbsp) – extra creaminess and protein
Each element plays a key part in creating the balanced, textured, and nutrient-dense Power Pudding we love preparing and enjoying.
Equipment Needed
To make our Power Pudding perfectly every time, having the right equipment is essential. Here is a detailed list of tools we recommend for a smooth and efficient preparation:
- Mixing Bowl
Use a medium-sized bowl to combine all dry and wet ingredients. A glass or stainless steel bowl works best for easy mixing and cleanup.
- Measuring Cups and Spoons
Accurate measurements ensure balanced flavor and texture. Use standard measuring cups for dry ingredients like oats and protein powder, and spoons for smaller quantities like cocoa powder and sea salt.
- Whisk or Spoon
A sturdy whisk helps blend ingredients smoothly, avoiding lumps especially when combining protein powder with liquids. A wooden or silicone spoon works well if you prefer gentle folding.
- Airtight Container or Jar
For refrigeration and portion control, use containers with lids. Mason jars or small plastic containers are ideal to set the pudding and serve later.
- Refrigerator
Cooling the pudding for at least 3-4 hours or overnight is critical to developing the right creamy texture and thick consistency.
| Equipment | Purpose |
|---|---|
| Mixing Bowl | Combines dry and wet ingredients |
| Measuring Cups | Ensures precise quantity for dry ingredients |
| Measuring Spoons | Measures small quantities like cinnamon |
| Whisk or Spoon | Blends ingredients without lumps |
| Airtight Container | Refrigerates pudding for setting |
| Refrigerator | Chills pudding to achieve creamy texture |
Pro Tip: Using a whisk while adding the almond milk helps integrate the protein powder evenly, creating a smooth, lump-free Power Pudding.
By assembling these essential tools, we set ourselves up for an effortless and quick creation of the nutritious pudding that fuels our day.
Prep Work
Before we dive into combining flavors, let’s focus on preparing our ingredients properly to ensure the best texture and taste for our Power Pudding. Proper prep work sets the stage for smooth blending and helps the pudding achieve its signature creamy consistency.
Preparing Dry Ingredients
We start by measuring and readying all the dry components. Accurate portioning is key for a balanced and nutrient-packed Power Pudding.
- Rolled oats: Measure out ½ cup for a hearty and fibrous base.
- Chia seeds: Add 2 tablespoons to boost omega-3s and thicken the pudding.
- Protein powder: Use 1 scoop, choosing your preferred flavor to enhance protein content.
- Cocoa powder: Add 1 tablespoon for a rich chocolate taste.
- Ground cinnamon: Use ½ teaspoon to add warmth and depth of flavor.
- Sea salt: Just a pinch to balance sweetness and enhance all flavors.
Tip: Sift the cocoa powder and cinnamon together to avoid clumps for a smooth mix.
| Dry Ingredient | Quantity | Purpose |
|---|---|---|
| Rolled oats | ½ cup | Base with fiber |
| Chia seeds | 2 tablespoons | Thickener and omega-3 source |
| Protein powder | 1 scoop | Protein boost |
| Cocoa powder | 1 tablespoon | Chocolate flavor |
| Ground cinnamon | ½ teaspoon | Aroma and spice |
| Sea salt | Pinch | Flavor enhancer |
Preparing Wet Ingredients
Next, we move to the wet ingredients that create the luscious, creamy texture characteristic of Power Pudding.
- Unsweetened almond milk: Measure 1 cup, pour gradually while whisking to avoid lumps.
- Greek yogurt: Add ½ cup for creaminess and additional protein.
- Pure vanilla extract: Use 1 teaspoon for aromatic sweetness.
- Natural sweetener (optional): Choose honey or maple syrup, starting with 1 tablespoon and adjusting to taste.
Pro Tip: Whisk almond milk into the dry mixture slowly. This technique prevents lumps and results in a silky smooth pudding base.
| Wet Ingredient | Quantity | Function |
|---|---|---|
| Unsweetened almond milk | 1 cup | Liquid base for mixing |
| Greek yogurt | ½ cup | Creaminess and protein |
| Pure vanilla extract | 1 teaspoon | Aroma and subtle sweetness |
| Honey or maple syrup (optional) | 1 tablespoon | Natural sweetener |
By attentively preparing these components, we lay the groundwork for a perfectly textured and delicious Power Pudding.
Instructions
Follow these clear and precise steps to prepare our Power Pudding quickly and effortlessly, ensuring a creamy and nutrient-packed result.
Mixing the Ingredients
- In a medium-sized mixing bowl, combine all dry ingredients:
- ½ cup rolled oats
- 2 tablespoons chia seeds
- 1 scoop protein powder
- 1 tablespoon cocoa powder
- ¼ teaspoon ground cinnamon
- A pinch of sea salt
- Sift the cocoa powder and cinnamon into the mixture to prevent clumps and enhance smoothness.
- In a separate small bowl or measuring cup, whisk together the wet ingredients:
- 1 cup unsweetened almond milk
- ½ cup Greek yogurt
- 1 teaspoon pure vanilla extract
- Optional: 1 tablespoon honey or maple syrup for natural sweetness
- Gradually pour the wet ingredients into the dry mix while continuously whisking to create a silky, lump-free base. Whisking at this stage is critical for achieving the pudding’s signature creamy texture.
Cooking or Setting the Pudding
- Transfer the combined mixture into an airtight container suitable for refrigeration.
- Seal it tightly to preserve freshness and prevent odors from affecting the flavor.
- Refrigerate the pudding for at least 3 to 4 hours or, ideally, overnight to allow the oats and chia seeds to fully absorb the liquid and thicken the pudding.
| Step | Time Required | Key Tip |
|---|---|---|
| Refrigeration | 3-4 hours minimum | Use an airtight container |
| Optimal setting | Overnight (8+ hours) | Ensures maximum creaminess |
Final Touches
- Before serving, gently stir the pudding to check the consistency. If it is too thick, add a splash of almond milk to loosen it.
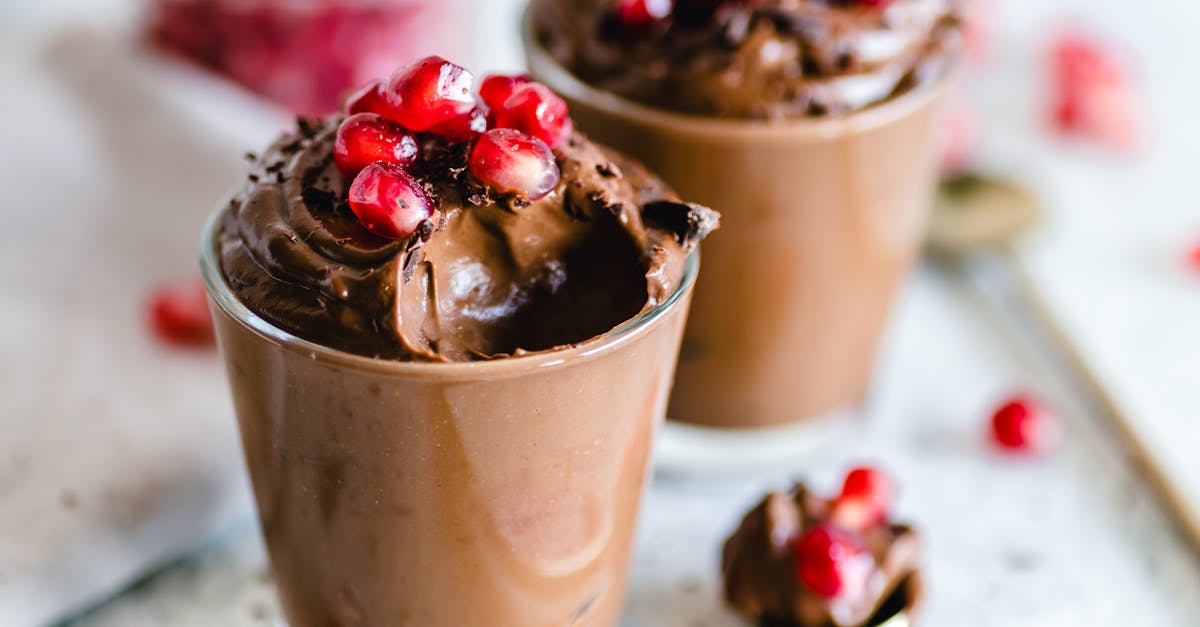
- Customize with your chosen toppings for extra texture and flavor:
- Fresh berries
- Chopped nuts (almonds, walnuts)
- Dark chocolate chips
- A swirl of nut butter (peanut, almond)
- Serve chilled and enjoy your Power Pudding as a nutritious breakfast or energizing post-workout snack.
Pro Tip: For added protein and a flavor boost, sprinkle a few seeds or nuts on top right before serving.
Serving Suggestions
To fully enjoy our Power Pudding and elevate its delicious creamy texture, consider these easy and satisfying serving tips:
- Chill Properly
Always serve the pudding well-chilled. After refrigerating for at least 3-4 hours or overnight, the pudding thickens to a luscious consistency that makes each spoonful irresistibly smooth.
- Top Creatively
Enhance the flavor and add texture by topping your Power Pudding with a variety of nutrient-rich options such as:
- Fresh berries (blueberries, strawberries, raspberries) for a burst of natural sweetness and antioxidants
- Chopped nuts (almonds, walnuts, pecans) to add crunch and healthy fats
- Dark chocolate chips for a rich, indulgent touch
- Nut butters (almond butter or peanut butter) to boost protein and creaminess
- Seeds like pumpkin or sunflower for extra texture and micronutrients
- Layer and Parfait
Transform your pudding into a delightful parfait by layering it in a glass with granola, sliced bananas, or coconut flakes. This adds variety in texture and flavor, perfect for breakfast or a snack on the go.
- Adjust Consistency
If you prefer a thinner pudding, stir in a splash of almond milk before serving to loosen the texture without compromising the creamy feel.
- Pair With Beverages
Serve alongside a hot cup of coffee or green tea for a balanced breakfast experience. The warm beverage contrasts nicely with the cool, velvety pudding.
Quick Serving Tips Table
| Serving Tip | Purpose | Suggested Ingredients |
|---|---|---|
| Top Creatively | Adds flavor and crunch | Berries, nuts, dark chocolate |
| Layer and Parfait | Texture and visual appeal | Granola, banana, coconut flakes |
| Adjust Consistency | Preferred creaminess level | Almond milk |
| Pair With Beverages | Complements flavors | Coffee, green tea |
“Enhancing our Power Pudding with fresh toppings and creative presentation not only enriches the taste but also transforms it into a truly satisfying treat that energizes us throughout the day.”
We recommend experimenting with different topping combinations to find your perfect personalized power pudding experience.
Storage and Make-Ahead Tips
To enjoy Power Pudding at its freshest and creamiest, following proper storage and make-ahead practices is essential. Here are our top tips to keep your pudding delicious and ready whenever you need a nutritious boost.
Refrigeration Guidelines
- Store in an airtight container immediately after preparation to prevent absorption of fridge odors and maintain texture.
- Refrigerate for 3-4 hours minimum for the pudding to fully set. Overnight chilling will enhance creaminess and flavor melding.
- Keep the pudding refrigerated and consume within 3-4 days for optimal freshness and safety.
Freezing Power Pudding
We recommend freezing only if you need longer storage:
| Step | Instructions |
|---|---|
| Portioning | Divide pudding into single-serve airtight containers or freezer bags |
| Freezing Duration | Freeze for up to 1 month |
| Thawing Instructions | Thaw overnight in the fridge before serving |
| Post-Thaw Adjustment | Whisk gently and add a splash of almond milk to restore creaminess if separation occurs |
Make-Ahead Preparation
- Prepare in advance to save time. Mix Power Pudding the night before or up to 2 days ahead.
- Customize with add-ins and toppings just before serving to maintain texture and flavor integrity.
- If adding crunchy toppings like nuts or granola, store them separately and sprinkle when ready to eat.
Serving After Storage
- Give the pudding a gentle stir or whisk after chilling to smooth out any settling.
- Adjust the consistency by adding a small amount of almond milk if it thickens too much during storage.
- Always serve well-chilled to experience the luscious texture that defines our Power Pudding.
“Storing Power Pudding correctly not only preserves its creamy texture but also enhances its flavors, making it your go-to nutritious snack anytime!“
Following these Storage and Make-Ahead Tips guarantees you’ll always have a rich, protein-packed Power Pudding ready to fuel your day efficiently.
Conclusion
Power pudding offers a convenient and delicious way to fuel our days with wholesome nutrition. Its adaptability lets us tailor each serving to our taste and dietary needs without sacrificing flavor or texture. By preparing it ahead of time, we save valuable minutes during busy mornings while still enjoying a satisfying, protein-packed snack.
Whether we’re refueling after a workout or seeking a quick breakfast, this recipe fits seamlessly into our routines. With simple ingredients and easy steps, it’s a smart choice for anyone looking to boost energy and stay nourished. Let’s keep experimenting with toppings and mix-ins to make every bowl uniquely ours.
Frequently Asked Questions
What is power pudding and why is it popular?
Power pudding is a creamy, protein-rich treat made with wholesome ingredients like oats, chia seeds, and Greek yogurt. It’s popular for quick breakfasts and post-workout snacks due to its nutrition, flavor, and ease of preparation.
What are the main dry ingredients in power pudding?
The main dry ingredients include rolled oats, chia seeds, protein powder, cocoa powder, ground cinnamon, and a pinch of sea salt. These create a hearty and nutrient-dense base.
Which wet ingredients are used in power pudding?
Wet ingredients typically include unsweetened almond milk, Greek yogurt, pure vanilla extract, and optional natural sweeteners like honey or maple syrup to enhance creaminess and flavor.
How do I prepare power pudding for the best texture?
Whisk dry ingredients first, sift powders to avoid lumps, then gradually whisk in wet ingredients like almond milk for a smooth mix. Refrigerate in an airtight container for 3-4 hours or overnight.
Can I customize my power pudding with toppings?
Yes, toppings such as fresh berries, chopped nuts, dark chocolate chips, or nut butter can be added before serving to boost flavor, texture, and nutrition.
How should power pudding be stored?
Store power pudding in an airtight container in the refrigerator for up to a few days. For longer storage, freeze in single-serve containers up to a month, thawing in the fridge before eating.
What equipment is needed to make power pudding?
You need a medium bowl for mixing, measuring cups and spoons for accuracy, a whisk or spoon for blending, and an airtight container for refrigeration.
Can power pudding be made ahead of time?
Yes, it’s ideal to prepare power pudding the night before or at least 3-4 hours in advance to allow it to set and develop the perfect creamy texture.
How can I adjust the pudding’s consistency?
If the pudding is too thick, gently stir in a little extra almond milk until you reach the desired creaminess before serving.
What are some serving suggestions for power pudding?
Serve well-chilled with toppings or layered as a parfait with granola and fruit. Pair it with coffee or green tea for a balanced breakfast or snack.