
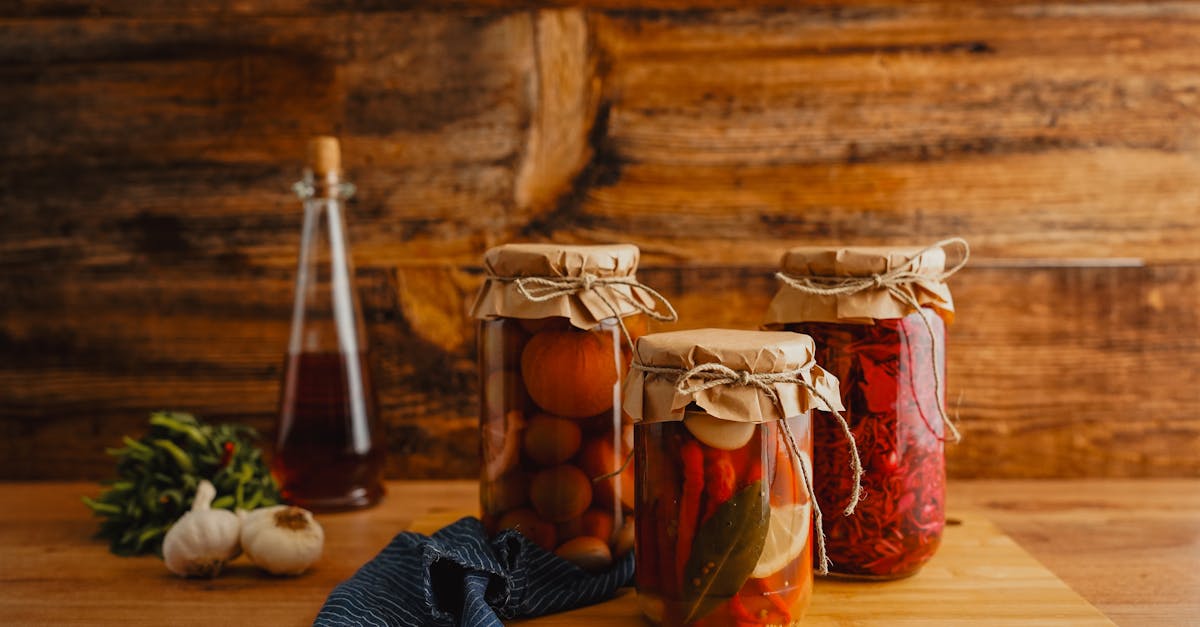
Canning cherry peppers is a fantastic way to preserve their vibrant flavor and fiery kick all year round. These small, round peppers pack a punch and add a zesty touch to salads, sandwiches, and antipasto platters. By canning them ourselves, we can enjoy their fresh taste long after harvest season ends.
This recipe guides us through a simple and reliable method to safely preserve cherry peppers, ensuring they stay crisp and flavorful. Whether we prefer them mild or spicy, canning allows us to customize the heat level and seasoning to suit our taste. Let’s dive into this easy process that turns fresh cherry peppers into a pantry staple we’ll reach for again and again.
Ingredients
To start our recipe for canning cherry peppers, we gather fresh and high-quality ingredients. Each plays a crucial role in preserving the bold flavor and heat of the peppers while ensuring safe canning.
- Fresh cherry peppers — 4 pounds, washed and stems trimmed
- Distilled white vinegar — 3 cups (5% acidity for safe preservation)
- Water — 3 cups
- Kosher salt — 2 tablespoons, non-iodized for genuine flavor
- Granulated sugar — 2 tablespoons, to balance acidity and heat
- Garlic cloves — 4 large, peeled and lightly smashed
- Whole black peppercorns — 1 tablespoon, adds a gentle spice layer
- Dried oregano — 2 teaspoons, a traditional herb complement
- Optional: mustard seeds — 1 teaspoon, for added aroma
| Ingredient | Quantity | Notes |
|---|---|---|
| Cherry peppers | 4 pounds | Washed and trimmed |
| Distilled white vinegar | 3 cups | 5% acidity, crucial for safety |
| Water | 3 cups | Pure, no chlorine |
| Kosher salt | 2 tablespoons | Non-iodized |
| Granulated sugar | 2 tablespoons | Balances heat and acidity |
| Garlic cloves | 4 large | Peeled, lightly smashed |
| Whole black peppercorns | 1 tablespoon | Adds spice nuances |
| Dried oregano | 2 teaspoons | Traditional herb flavor |
| Mustard seeds (optional) | 1 teaspoon | For aroma |
By combining these ingredients precisely, we ensure that our cherry peppers remain vibrant, flavorful, and perfectly preserved. The balance of vinegar and salt is essential to the canning process, while the sugar and spices layer in complexity and depth.
Equipment Needed
To ensure our recipe for canning cherry peppers is successful and safe, we need the right equipment. Preparing with proper tools helps us maintain quality and prevents any contamination during the canning process. Here’s what we will need.
Jars and Lids
We must use glass canning jars designed to withstand heat, typically Mason jars. These jars come in various sizes but pint or half-pint jars work best for cherry peppers as they fit well in canning pots and allow for easy storage.
The jars require new two-piece lids which consist of a flat metal lid with a sealing compound and a screw band to hold the lid in place during processing. Using new lids every time ensures a proper vacuum seal.
| Equipment Item | Purpose | Specifications |
|---|---|---|
| Mason Jars | Hold the cherry peppers and brine | Pint (16 oz) or Half-Pint (8 oz) |
| Two-Piece Canning Lids | Create airtight seal during processing | New lids only, flat lid + screw band |
Canning Pot and Rack
We need a large canning pot deep enough to fully submerge the jars in water by at least 1-2 inches. The pot should have a lid to maintain consistent temperature during processing.
A canning rack sits inside the pot preventing jars from touching the bottom, avoiding breakage during boiling. The rack also allows water to circulate evenly around the jars.
| Equipment Item | Purpose | Key Feature |
|---|---|---|
| Canning Pot | Boil jars for safe preservation | Deep with lid, fits jars fully submerged |
| Canning Rack | Protect jars, allow water flow | Fits inside the canning pot |
Other Essential Tools
Alongside jars and pot, we use several other tools for efficiency and safety:
- Jar lifter: To safely remove hot jars from boiling water without burns.
- Magnetic lid lifter: Helps lift sterilized lids out of hot water without contamination.
- Funnel: Wide-mouth funnel assists in filling jars cleanly, reducing spills.
- Bubble remover/headspace tool: Removes air bubbles from the jar before sealing and checks headspace accuracy.
- Clean towels: To wipe jar rims ensuring clean sealing surfaces.
- Kitchen timer and thermometer: To monitor processing time and water temperature precisely.
These tools streamline our cherry pepper canning process while ensuring food safety and quality preservation.
Preparing the Cherry Peppers
Before we begin the canning process, it is crucial to prepare the cherry peppers properly. This step ensures safety, enhances flavor, and preserves the peppers’ vibrant texture.
Washing and Sorting
We start by thoroughly washing the cherry peppers to remove any dirt, debris, or pesticides. Use cold running water and gently rub each pepper. Avoid soaking to prevent waterlogging which can affect texture.
Next, we sort the peppers by size and quality. Remove any peppers that are:
- Soft or bruised
- Discolored or moldy
- With blemishes or cuts
Selecting fresh, firm peppers helps guarantee a superior final product and improves the shelf life of the canned peppers.
| Step | Detail | Purpose |
|---|---|---|
| Wash | Cold running water | Remove contaminants |
| Rub gently | Hands or soft brush | Get rid of dirt |
| Sort | Discard damaged peppers | Ensure quality and safety |
Coring and Preparing Peppers
After washing and sorting, we move on to coring and prepping the cherry peppers. This step allows the pickling solution to penetrate evenly, enhancing flavor and safety.
Instructions:
- Use a small paring knife or a coring tool to carefully remove the stem and core without tearing the pepper walls.
- For a milder product, we remove the seeds; for more heat, leave some or all seeds intact.
- Optionally, slice the peppers in halves or leave whole depending on your preference and jar size.
“Proper coring prevents bitter bites and allows the pickling brine to fully infuse each pepper.”
Be consistent in your preparation to ensure uniform texture and taste in every jar.
| Action | Tool Required | Notes |
|---|---|---|
| Remove stems | Paring knife or corer | Avoid tearing pepper flesh |
| Remove cores | Paring knife | Optional seed removal for heat |
| Slice or leave whole | Knife | Based on jar size and preference |
With the cherry peppers washed, sorted, and prepped, we are ready to proceed confidently to the next stage of brining and canning.
Making the Pickling Brine
The pickling brine is the heart of our recipe for canning cherry peppers. It not only preserves the peppers safely but also infuses them with the bold, tangy flavors we love. Let’s craft a perfectly balanced brine that highlights the peppers’ heat and aroma.
Ingredients for Brine
To achieve the ideal pickling brine that ensures safety and flavor, gather the following ingredients in the exact measurements:
| Ingredient | Quantity | Notes |
|---|---|---|
| Distilled white vinegar | 4 cups (32 fl oz) | 5% acidity recommended |
| Water | 4 cups (32 fl oz) | Use filtered or bottled water |
| Kosher salt | 3 tablespoons | Non-iodized preferred |
| Granulated sugar | 2 tablespoons | Balances acidity |
| Garlic cloves | 4 cloves | Crushed for flavor |
| Whole black peppercorns | 1 tablespoon | Adds subtle spice |
| Dried oregano | 2 teaspoons | Earthy herbal undertone |
| Mustard seeds (optional) | 1 teaspoon | Adds mild pungency (optional) |
Preparing the Brine
- In a large saucepan, combine the distilled white vinegar and water in equal parts. This balance maintains food safety by keeping the correct acidity level.
- Add the kosher salt and granulated sugar to the liquid. Stir consistently over medium heat until both dissolve fully.
- Toss in the crushed garlic cloves, whole black peppercorns, dried oregano, and optional mustard seeds. Bring the mixture to a gentle boil.
- Once boiling, reduce heat and simmer the brine for 5 minutes to allow the spices to infuse their aroma fully.
- Remove from heat and keep the hot pickling brine ready for pouring over the prepped cherry peppers immediately.
Tip: Use a funnel when filling jars with brine to avoid spills and maintain cleanliness. Keeping the brine hot ensures the jars seal properly and the peppers marinate perfectly.
This meticulously prepared pickling brine guarantees our cherry peppers will retain their signature bold flavor and crisp texture while preserving them safely for shelf storage.
Packing the Jars
Proper packing of the jars is a critical step to ensure our cherry peppers are preserved safely with optimal flavor and texture. Let’s move carefully through this phase to lock in the bold essence of our peppers.
Packing Peppers into Jars
First, we firmly pack the prepared cherry peppers into the sterilized Mason jars.
- Leave about a half-inch headspace at the top for expansion during processing.
- If you prefer, arrange the peppers whole for a rustic look or slice them to fit more peppers per jar.
- Distribute garlic cloves, black peppercorns, oregano, and optional mustard seeds evenly among the jars for balanced seasoning.
- Press the peppers down gently but firmly to remove air pockets and ensure the brine will fully cover the contents.
Adding Brine to Jars
Next, we pour the hot pickling brine over the peppers.
- Use a ladle and a wide-mouth funnel for a neat pour.
- Fill each jar so the liquid covers the peppers completely, still maintaining the half-inch headspace.
- The hot brine helps seal the jars and starts the pickling process immediately.
Removing Air Bubbles
To ensure a proper seal and prevent spoilage, we must eliminate trapped air:
- Insert a non-metallic bubble remover or a clean plastic spatula between the peppers and the jar edge.
- Gently move it up and down to release any air bubbles rising to the surface.
- Check the headspace again and add more brine if needed to keep peppers submerged.
Sealing the Jars
Finally, we prepare our jars for processing:
- Wipe the jar rims clean using a damp, lint-free cloth to remove any residue.
- Place a new two-piece canning lid on each jar.
- Screw the metal ring bands down finger-tight only to avoid interference with venting during canning.
| Step | Details |
|---|---|
| Headspace | 1/2 inch below jar rim |
| Pepper Packing | Firm but not crushed, air pockets removed |
| Brine Temperature | Hot, freshly prepared |
| Lid Tightness | Finger-tight, not overly tightened |
Following these steps precisely ensures our canned cherry peppers will be flavorful, safe, and shelf-stable for months to come.
Processing the Jars
Now that our jars are filled with cherry peppers and hot brine, the next crucial step is processing the jars to ensure safe preservation. This step guarantees that the peppers remain flavorful and shelf-stable while preventing spoilage or contamination.
Water Bath Canning Method
We use the Water Bath Canning Method because it is ideal for high-acid foods like pickled cherry peppers. Here’s how we proceed:
- Fill a large canning pot with water deep enough to cover the jars by at least 1-2 inches.
- Place the canning rack inside the pot to prevent jars from touching the bottom.
- Preheat the water to a simmer about 180°F but do not boil yet.
- Carefully lower the packed and sealed jars into the water bath using a jar lifter.
- Ensure the jars are upright and fully submerged with water covering at least 1 inch above the lids.
- Cover the pot with a lid to maintain temperature during processing.
This method uses boiling water’s heat to destroy any harmful bacteria and to create a vacuum seal. We always make sure jar lids are new and sealed properly for airtight preservation.
Processing Time and Temperature
The exact Processing Time and Temperature are critical to the success of our canning. Following USDA guidelines for pickled cherry peppers ensures safety and quality:
| Jar Size | Processing Time (minutes) | Water Temperature |
|---|---|---|
| Half-Pint | 10 | 212°F (boiling) |
| Pint | 15 | 212°F (boiling) |
- Start timing once the water reaches a rolling boil.
- Maintain a gentle but continuous boil throughout the entire processing time.
- When the time finishes, carefully remove jars with the jar lifter.
- Place jars on a towel and let them cool undisturbed for 12-24 hours.
During cooling, you’ll often hear a satisfying “pop” sound confirming a proper vacuum seal. We then test seals by pressing the center of each lid. If sealed correctly, the lid will be concave and not flex.
By strictly following these processing steps we confidently preserve the bold heat and crispness of our cherry peppers, ensuring a delicious pantry staple ready to enhance any meal.
Cooling and Storing
After processing our canned cherry peppers, proper cooling and storing are essential to preserve their texture, flavor, and safety. Let’s walk through the best practices to ensure our jars remain delicious and shelf-stable.
Cooling the Jars
Once we remove the jars from the boiling water bath, we need to cool them carefully to allow the vacuum seal to form perfectly.
- Place the jars upright on a clean towel or cooling rack.
- Leave ample space between the jars for air circulation.
- Avoid placing them directly on a cold surface or in a draft to prevent jar breakage.
- Let the jars cool undisturbed for 12 to 24 hours at room temperature.
- Do not tighten or loosen the metal bands during cooling.
- After cooling, check the seal by pressing the center of each lid; a proper seal feels firm and concave with no movement or popping sound.
“A solid vacuum seal ensures the peppers stay fresh and safe for long-term storage.“
| Step | Action | Reason |
|---|---|---|
| Remove jars | From boiling water bath | Prevent over-processing |
| Place jars | On clean towel or cooling rack | Protect jars and allow air flow |
| Cool jars | 12 to 24 hours, room temperature | Secure vacuum seal formation |
| Do not adjust lids | During cooling | Maintain proper seal formation |
| Test seal | Press lid center after cooling | Confirm airtight closure |
Storing Tips for Canned Cherry Peppers
Proper storage extends the shelf life and keeps the bold flavor and crisp heat intact in our cherry peppers.
- Store sealed jars in a cool, dark place with a stable temperature (ideally between 50°F to 70°F).
- Avoid exposure to direct sunlight, which can degrade color and flavor.
- Once opened, keep jars refrigerated and consume within 1 to 2 months for best quality.
- Regularly inspect sealed jars for bulging lids, leaks, or off-smells before use.
- Label jars with the canning date so we use older stock first.
| Storage Condition | Recommendation | Purpose |
|---|---|---|
| Temperature | 50°F to 70°F | Preserve flavor and texture |
| Light exposure | Store in a dark place | Protect color and nutrients |
| After opening | Refrigerate and use in 1-2 months | Maintain freshness and safety |
| Jar inspection | Check for seal integrity | Ensure safe consumption |
By following these cooling and storing steps, we can confidently enjoy our home-canned cherry peppers‘ vibrant flavor and heat throughout the year.
Safety Tips for Canning
Ensuring the safety of our canned cherry peppers is paramount to preserving their bold flavor and heat. By following these critical safety tips, we protect our pantry staples from spoilage and unsafe consumption.
Use Proper Equipment and Inspect Jars
- Always use heat-resistant glass Mason jars, preferably pint or half-pint sizes, designed for canning.
- Inspect jars for cracks, chips, or defects before use to prevent breakage.
- Use new two-piece lids for every canning session to guarantee an airtight seal.
- Employ recommended tools such as a jar lifter, magnetic lid lifter, and funnel to minimize handling contamination.
Maintain Strict Sanitation
- Sterilize jars and lids by boiling or running them through a dishwasher cycle on high heat.
- Wash hands thoroughly before handling peppers, jars, and equipment.
- Use clean towels and sanitize work surfaces before beginning.
Follow Recommended Ratios and Processing Times
- Use the exact vinegar-to-water ratio provided in the recipe to ensure adequate acidity.
- Adhere strictly to processing times based on jar size to eliminate harmful bacteria. Refer to the table below:
| Jar Size | Processing Time (Water Bath Method) |
|---|---|
| Half-pint | 10 minutes |
| Pint | 15 minutes |
- Maintain a rolling boil throughout the processing time to ensure proper sealing and microbiological safety.
Manage Headspace and Remove Air Bubbles
- Leave a ½ inch headspace to allow for expansion during processing.
- Use a non-metallic bubble remover to eliminate trapped air which could compromise the seal and shelf life.
Ensure Proper Sealing and Cooling
- Wipe jar rims clean before applying lids for a tight seal.
- Secure ring bands finger-tight — not overly tight — to allow air to escape during canning.
- Let jars cool undisturbed for 12 to 24 hours, checking for the characteristic “pop” sound that confirms sealing.
- After cooling, press the center of each lid to verify it doesn’t flex or move, indicating a vacuum seal.
Safe Storage Practices
- Store sealed jars in a cool, dark place with a stable temperature.
- Avoid exposing jars to direct sunlight or fluctuating temperatures.
- Routinely inspect jars for bulging lids, leaks, cloudiness, or off odors — signs of spoilage.
- Label jars with the date of canning and consume within one year for optimal safety and quality.
Conclusion
Canning cherry peppers is a rewarding way to keep their bold flavor and heat ready whenever we want. With the right ingredients, equipment, and careful attention to safety, we can create a versatile pantry staple that enhances countless dishes.
By following a reliable process, we ensure our peppers stay crisp, flavorful, and shelf-stable for months. This method not only preserves freshness but also lets us customize heat and seasoning to suit our tastes.
Embracing canning means enjoying the vibrant taste of cherry peppers year-round while confidently maintaining food safety. It’s a simple skill that brings lasting satisfaction to our kitchen and meals.
Frequently Asked Questions
What are the benefits of canning cherry peppers?
Canning cherry peppers preserves their flavor and heat year-round. It allows you to customize the heat and seasoning, making them a versatile, convenient pantry staple for various dishes.
What ingredients are needed for pickling cherry peppers?
You’ll need fresh cherry peppers, distilled white vinegar, water, kosher salt, granulated sugar, garlic cloves, whole black peppercorns, dried oregano, and optional mustard seeds.
What equipment is essential for safe canning?
Use glass Mason jars with new two-piece lids, a large canning pot with a lid, a canning rack, jar lifter, magnetic lid lifter, funnel, bubble remover, clean towels, kitchen timer, and thermometer.
How should cherry peppers be prepared before canning?
Wash peppers under cold water, discard soft or damaged ones, remove stems and cores, choose whether to remove seeds for milder heat, and slice or leave whole based on preference.
How is the pickling brine made for cherry peppers?
Combine distilled white vinegar and water, dissolve kosher salt and sugar, and simmer with garlic, black peppercorns, oregano, and optional mustard seeds to create a flavorful, hot brine.
How should jars be packed with cherry peppers?
Firmly pack prepared peppers into sterilized jars, leaving a half-inch headspace. Add garlic, peppercorns, oregano, and mustard seeds evenly, then cover with hot brine and remove air bubbles before sealing.
What is the Water Bath Canning Method?
It involves submerging jars of high-acid foods like pickled cherry peppers in boiling water for a specific time to create a vacuum seal and kill harmful bacteria for safe preservation.
How should canned cherry peppers be cooled and stored?
Cool jars upright on a towel or rack for 12-24 hours away from drafts. Store sealed jars in a cool, dark place with stable temperature and check regularly for spoilage signs.
What safety tips are important when canning cherry peppers?
Use proper equipment, sterilize jars, follow vinegar ratios and processing times, manage headspace, ensure airtight seals, cool jars properly, store in suitable conditions, and inspect for spoilage regularly.