
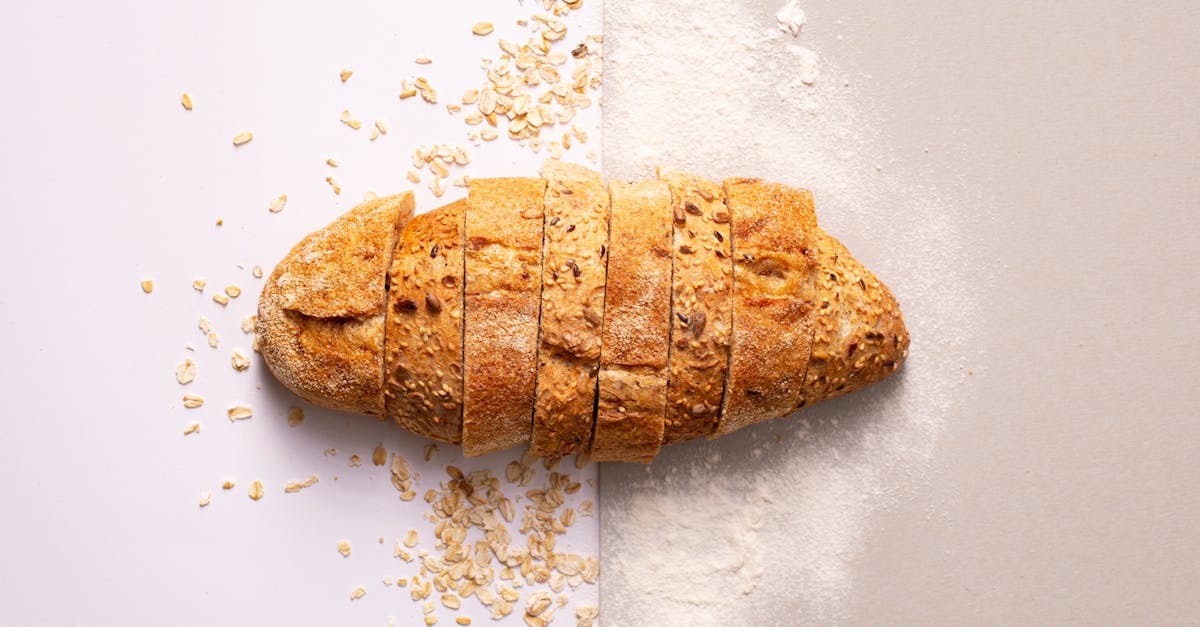
Bimini bread is a deliciously soft and slightly sweet loaf that hails from the beautiful islands of the Bahamas. Known for its fluffy texture and subtle vanilla flavor, this bread is a staple in Bahamian households and pairs perfectly with everything from breakfast jams to savory stews.
We love how easy it is to make and how it brings a touch of island warmth to any meal. Whether you’re new to Caribbean baking or a seasoned bread lover, this recipe for Bimini bread will quickly become a favorite in your kitchen. Let’s dive into creating this authentic treat that’s as comforting as it is flavorful.
Ingredients
To create the perfect Bimini bread, we start by gathering all the essential ingredients. Each component plays a vital role in achieving that distinct fluffy texture and subtle sweetness unique to this Bahamian classic.
Dry Ingredients
We need precise amounts of these dry ingredients to ensure the bread rises beautifully and develops a soft crumb:
- 3 ½ cups all-purpose flour, sifted for lightness
- ¼ cup granulated sugar to bring out the gentle sweetness
- 1 tablespoon active dry yeast to make the bread rise
- 1 teaspoon salt to balance the flavors
- 1 teaspoon baking powder for extra fluffiness
| Dry Ingredient | Quantity | Purpose |
|---|---|---|
| All-purpose flour | 3 ½ cups | Structure and texture |
| Granulated sugar | ¼ cup | Sweetness |
| Active dry yeast | 1 tablespoon | Leavening agent |
| Salt | 1 teaspoon | Flavor balance |
| Baking powder | 1 teaspoon | Additional leavening |
Wet Ingredients
- 1 cup warm whole milk (about 110°F) to activate yeast and soften dough
- ¼ cup unsalted butter, melted and slightly cooled for richness
- 2 large eggs, beaten to bind and enrich the dough
- 1 teaspoon pure vanilla extract to impart a delicate island aroma
| Wet Ingredient | Quantity | Purpose |
|---|---|---|
| Warm whole milk | 1 cup | Activates yeast and hydrates dough |
| Unsalted butter | ¼ cup | Adds richness and moisture |
| Large eggs | 2 | Binds and enriches dough |
| Vanilla extract | 1 teaspoon | Infuses subtle flavor |
Equipment Needed
To achieve the perfect Bimini bread texture and flavor, having the right equipment is essential. Let’s go through the tools we need to bring this recipe to life efficiently and with confidence.
- Large mixing bowl
We need a spacious bowl to combine all ingredients. It allows room for the dough to rise without spilling over.
- Measuring cups and spoons
Accurate measurement ensures consistent results. Use dry measuring cups for flour and sugar and liquid measuring cups for milk.
- Stand mixer with dough hook or wooden spoon
Using a stand mixer with a dough hook makes kneading easier and more uniform. Alternatively, a sturdy wooden spoon works well for hand mixing.
- Plastic wrap or clean kitchen towel
Cover the dough during rising to maintain warmth and prevent drying out.
- Loaf pan (9×5 inches)
Our bread needs shape. A standard 9×5 inch loaf pan will create the classic Bimini bread loaf form.
- Oven thermometer (optional but recommended)
Ensuring your oven reaches the correct baking temperature is key to perfect crust and crumb.
- Cooling rack
After baking, we need a rack to cool the bread evenly, preventing sogginess.
| Equipment | Purpose |
|---|---|
| Large mixing bowl | Combine and allow dough to rise |
| Measuring cups and spoons | Precise ingredient measurements |
| Stand mixer or wooden spoon | Knead dough efficiently |
| Plastic wrap/kitchen towel | Cover for dough rising |
| 9×5 inch loaf pan | Shape the bread |
| Oven thermometer | Verify baking temperature (optional) |
| Cooling rack | Cool bread evenly without moisture accumulation |
Having these tools ready helps us maintain control throughout each stage. In particular, the stand mixer with dough hook can save time and effort, ensuring we get a smooth elastic dough that contributes to the fluffy texture typical of Bimini bread. Covering the dough correctly during proofing and cooling on a rack are small but vital steps toward bakery-quality results in our kitchen.
Instructions
Follow these clear and precise steps to achieve the perfect Bimini Bread. Each stage is crucial to develop the signature soft and fluffy texture that defines this Bahamian favorite.
Preparing the Dough
- Warm the Milk: Heat whole milk to about 110°F (43°C), warm but not hot, to activate the yeast.
- Activate the Yeast: In a small bowl, combine the active dry yeast with 1 tablespoon of the granulated sugar and the warm milk. Let it sit for 5 to 10 minutes until foamy.
- Mix Dry Ingredients: In a large mixing bowl, whisk together the all-purpose flour, remaining sugar, salt, and baking powder.
- Combine Wet Ingredients: In a separate bowl, beat the eggs lightly, then add the melted unsalted butter and vanilla extract.
- Form the Dough: Pour the yeast mixture and the wet ingredients into the dry ingredients. Stir using a wooden spoon or a stand mixer fitted with a dough hook until a shaggy dough forms.
- Knead the Dough: Knead on a floured surface or with the mixer on medium speed for 8 to 10 minutes until the dough is smooth and elastic.
First Rise
- Lightly grease a large bowl with butter or oil.
- Place the dough in the bowl and turn it once to coat with oil.
- Cover the bowl tightly with plastic wrap or a damp kitchen towel.
- Let the dough rise in a warm, draft-free place for 1 to 1 ½ hours or until it has doubled in size.
Shaping the Dough
- After the first rise, gently punch down the dough to release excess air.
- Turn it out onto a lightly floured surface.
- Shape the dough into a smooth loaf approximately the size of your 9×5 inch loaf pan.
- Place the shaped dough into the greased loaf pan, ensuring it fits comfortably without stretching.
Second Rise
- Cover the loaf pan loosely with plastic wrap or a towel.
- Allow the dough to rise again in a warm area for about 45 minutes to 1 hour.
- The dough should rise just above the rim of the pan, indicating it is ready for baking.
Baking the Bread
- Preheat the oven to 350°F (175°C). Use an oven thermometer if available for accuracy.
- Place the loaf pan on the middle rack of the oven.
- Bake for 30 to 35 minutes, until the bread is golden brown on top and sounds hollow when tapped.
- Optional: Insert an instant-read thermometer into the center of the bread; it should read around 190°F (88°C) when done.
- Remove the bread from the oven and immediately transfer it to a cooling rack.
- Let the Bimini Bread cool completely before slicing to preserve its delicate texture.
| Step | Time | Temperature | Notes |
|---|---|---|---|
| Warm Milk | – | 110°F (43°C) | Activates yeast |
| First Rise | 1 – 1 ½ hours | Room temperature | Dough doubles in size |
| Second Rise | 45 mins – 1 hour | Room temperature | Dough rises above pan rim |
| Baking | 30 – 35 minutes | 350°F (175°C) | Golden brown and hollow sound |
| Internal Temp | – | 190°F (88°C) | Optional for doneness |
By carefully following these steps, we ensure the authentic Bimini Bread emerges with its iconic soft crumb and subtle vanilla sweetness every time.
Tips for Perfect Bimini Bread
Achieving the fluffy texture and subtle vanilla sweetness that define Bimini Bread requires attention to detail and a few key baking tips. Here are our best recommendations to ensure your loaf comes out perfect every time.
1. Activate Yeast Properly
Use warm milk at about 110°F (43°C) to activate the yeast. Milk that is too hot will kill the yeast, while cooler milk slows fermentation. Check the temperature with an oven thermometer or test by touch—it should feel warm but not hot.
| Ingredient | Ideal Temperature for Preparation |
|---|---|
| Milk | 110°F / 43°C |
| Oven | 350°F / 177°C |
2. Accurate Measuring is Crucial
To maintain the balance of sweetness and texture, measure your ingredients precisely using:
- Measuring cups for flour and sugar
- Measuring spoons for baking powder, salt, and vanilla extract
Pro tip: Spoon the flour into the measuring cup lightly and level it off with a knife to avoid compacting, which leads to dense bread.
3. Knead the Dough Until Smooth and Elastic
Use a stand mixer with a dough hook or knead by hand for 8-10 minutes. Proper kneading develops gluten, crucial for the bread’s signature softness and structure. The dough should be smooth, slightly tacky but not sticky.
“If the dough sticks to your fingers excessively, add flour a teaspoon at a time.“
4. Let the Dough Rise Twice
Both rises are essential to build volume and light crumb:
- First rise: Let the dough double in size in a warm draft-free spot for 1-1.5 hours.
- Second rise: After shaping in the loaf pan, let the dough rise about 45 minutes until it reaches the top of the pan.
Use a clean kitchen towel or plastic wrap to cover the dough during rising to retain moisture.
5. Maintain Oven Temperature
Preheat your oven to 350°F (177°C) and bake for 30-35 minutes. Avoid opening the oven door during the first 20 minutes to prevent the bread from collapsing.
Use an oven thermometer to confirm the temperature if your oven temperature is inconsistent.
6. Check for Doneness
The bread is done when it is golden brown and sounds hollow when tapped on the bottom. Internal temperature should reach 190°F (88°C) for fully baked bread.
7. Cool Properly
Place bread on a cooling rack and let cool completely before slicing. This prevents sogginess and allows the crumb to set fully.
By focusing on these tips and following our precise instructions, you guarantee an authentic Bimini Bread experience with every bake.
Serving Suggestions
To fully enjoy our Bimini Bread, we want to explore versatile serving options that complement its soft, fluffy texture and subtle vanilla flavor. Here are some delicious ways to elevate your Bimini Bread experience:
Classic Butter and Jam
Slather slices with rich unsalted butter that melts perfectly into the tender crumb. Top with tropical fruit jams like mango or guava for a sweet island-inspired breakfast or snack.
Sandwich Base
Use our Bimini Bread as the foundation for scrumptious sandwiches. Its light texture pairs wonderfully with both savory and sweet fillings. Try:
- Jerk chicken with pineapple salsa for a Bahamian twist
- Roasted turkey and creamy avocado for a fresh lunch option
- Peanut butter and banana slices to delight kids and adults alike
Toasted with Spices
Toast slices lightly then sprinkle with cinnamon and a drizzle of honey or maple syrup. The warmth of the spices enhances the bread’s vanilla notes, creating an aromatic treat.
Accompaniment to Soups and Stews
Serve warm Bimini Bread alongside hearty Caribbean meals such as conch chowder or seafood stew. Its soft, pillowy crumbs soak up savory broths perfectly.
| Serving Style | Best Paired With | Taste & Texture Highlight |
|---|---|---|
| Butter and Jam | Tropical fruit preserves | Creamy, sweet, classic |
| Sandwich | Jerk chicken, roasted turkey, peanut butter | Versatile, satisfies savory or sweet cravings |
| Toasted with Spices | Cinnamon, honey, maple syrup | Warm, aromatic, enhanced vanilla flavor |
| Soup & Stew Accompaniment | Conch chowder, seafood stew | Soft, absorbent, balances rich flavors |
Presentation Tip
Serve Bimini Bread sliced slightly thick to showcase its soft interior. Arrange on a vibrant platter with fresh fruit or alongside your main dish. Garnish with fragrant herbs like mint or basil to add a refreshing green contrast.
“The true beauty of Bimini Bread lies not just in its texture and flavor but in its adaptability across meals. Whether breakfast, lunch, or dinner, it brings a taste of the islands to any table.”
Let’s make every meal memorable by pairing Bimini Bread creatively to complement its unique qualities.
Storage and Shelf Life
Proper storage of Bimini bread is crucial to maintain its signature softness and freshness. To preserve the bread’s delicate texture and subtle vanilla flavor, follow these guidelines carefully.
Room Temperature Storage
- Once cooled completely on a cooling rack, wrap the bread tightly in plastic wrap or place it inside an airtight container.
- Store at room temperature away from direct sunlight and heat sources.
- Bimini bread will stay fresh this way for up to 2 days.
- Avoid refrigerating at room temperature to prevent drying out or becoming stale.
Refrigeration
- For longer storage up to 1 week, wrap the bread tightly in plastic wrap, then place it in a resealable plastic bag.
- Keep the bread in the refrigerator’s main compartment on a shelf, not in the door.
- When ready to use, bring the bread to room temperature or warm gently in the oven to restore softness.
Freezing
Freezing is an excellent option to extend the shelf life of Bimini bread without compromising its quality.
- Slice the bread before freezing for quick access.
- Wrap each slice or the whole loaf tightly in plastic wrap and then in aluminum foil or place in a freezer-safe bag.
- Label with the freezing date for easy tracking.
- Store in the freezer for up to 3 months.
| Storage Method | Wrapping | Environment | Shelf Life |
|---|---|---|---|
| Room Temperature | Plastic wrap / Airtight box | Cool dry place | 2 days |
| Refrigerator | Plastic wrap + resealable bag | Main compartment | 1 week |
| Freezer | Plastic wrap + foil / freezer bag | Freezing temperature | Up to 3 months |
Tips for Best Results
- Always allow the bread to cool completely before wrapping to prevent condensation and sogginess.
- When reheating refrigerated or frozen bread, wrap in foil and warm in a 300°F (150°C) oven for 10-15 minutes.
- Avoid microwaving as it can make the bread rubbery or dry.
“Proper storage extends the unique Bimini bread experience from its first fresh bite to days or weeks after baking.“
Following these storage and shelf life tips, we can enjoy the irresistible soft crumb and island warmth of Bimini bread anytime.
Conclusion
Bimini bread brings a taste of the Bahamas right to our kitchen, offering a soft texture and subtle sweetness that’s hard to resist. With its simple ingredients and straightforward process, it’s a rewarding bake for anyone looking to add a bit of island charm to their meals. Whether enjoyed fresh, toasted, or paired with savory or sweet toppings, this bread is sure to become a favorite in our home. By mastering the recipe and storage tips, we can keep that delightful softness and flavor alive for days. Let’s bake, share, and savor every slice together.
Frequently Asked Questions
What is Bimini bread?
Bimini bread is a soft, slightly sweet loaf from the Bahamas known for its fluffy texture and subtle vanilla flavor. It’s a versatile staple used in many Bahamian meals.
What ingredients are needed to make Bimini bread?
Key ingredients include all-purpose flour, sugar, active dry yeast, salt, baking powder, warm whole milk, unsalted butter, eggs, and vanilla extract.
What equipment do I need to bake Bimini bread?
You’ll need a large mixing bowl, measuring cups and spoons, a stand mixer or wooden spoon for kneading, a 9×5 inch loaf pan, plastic wrap or a kitchen towel, and a cooling rack.
How do you make Bimini bread?
Mix dry and wet ingredients, knead the dough, let it rise twice until doubled in size, then bake in a preheated oven until golden and cooked through.
How important is the dough rising process?
Very important—two rises help develop the bread’s volume, softness, and light texture, which are key characteristics of authentic Bimini bread.
How can I tell when Bimini bread is done baking?
Tap the bottom of the loaf; it should sound hollow. The crust should be golden brown and the bread firm but soft inside.
What are the best ways to serve Bimini bread?
Serve with butter and tropical jams, use as sandwich bread (jerk chicken or peanut butter and banana), toast with cinnamon and honey, or enjoy it alongside Caribbean soups and stews.
How should I store Bimini bread to keep it fresh?
Wrap it tightly in plastic wrap or use an airtight container. Store at room temperature for 2 days, refrigerate up to 1 week, or freeze slices for up to 3 months.
Can beginners make Bimini bread successfully?
Yes, the recipe is straightforward and suitable for both novice and experienced bakers, especially if steps like yeast activation and kneading are carefully followed.
Does Bimini bread have a unique flavor?
Yes, it has a subtle vanilla sweetness and a rich, soft crumb that sets it apart from other breads.