
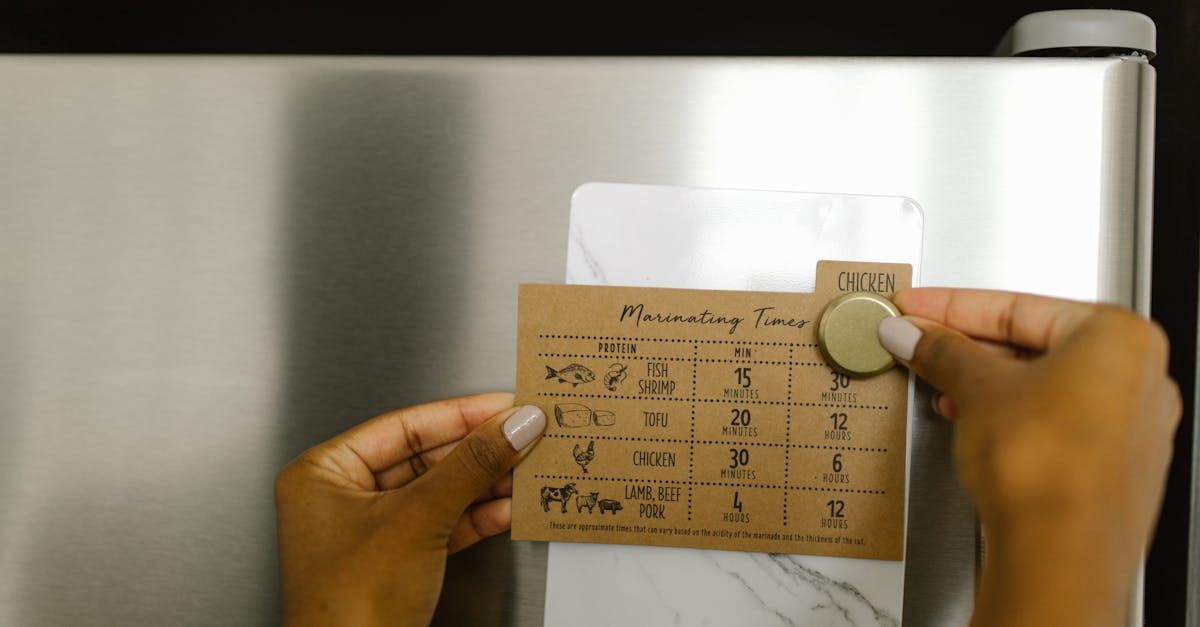
Keeping our kitchen organized while staying inspired to cook can be a challenge. That’s where recipe calendar magnets come in handy. These clever tools combine practicality with creativity, helping us plan meals and keep favorite recipes right at our fingertips.
Recipe calendar magnets not only add a splash of personality to our fridge but also make meal planning effortless. Whether we’re juggling busy weeknights or looking to try something new, having a visual, magnetic calendar with recipes keeps everything on track. Plus, they’re easy to customize and update as our tastes evolve.
By using recipe calendar magnets, we turn meal prep into a fun and organized routine. They’re perfect for anyone wanting to streamline cooking plans without sacrificing style or convenience. Let’s explore how to create these handy kitchen companions that’ll keep us inspired all year long.
Materials Needed for Recipe Calendar Magnets
To create our personalized recipe calendar magnets, gathering the right materials is essential. These items ensure durability, ease of use, and a professional finish that brightens up our kitchen space.
Magnetic Sheets or Strips
We recommend using magnetic sheets or strips as the base for our calendar magnets. These provide a flexible yet sturdy backing that adheres to refrigerators or metal boards effortlessly. Choose magnetic material with strong adhesion to hold the magnets firmly without sliding.
| Material Type | Description | Size Options | Strength |
|---|---|---|---|
| Magnetic Sheets | Flexible sheet, easy to cut | Typically 8.5″x11″ or larger | Moderate to strong magnetic force |
| Magnetic Strips | Thin strips, peel-and-stick | Rolls or pre-cut pieces | Moderate magnetic force |
Printable Sticker Paper or Cardstock
For the surface where we print our calendar and recipes, printable sticker paper or cardstock is perfect. Sticker paper allows us to attach designs directly to magnetic sheets. Cardstock provides durability and a vibrant print surface but requires adhesive.
- Printable Sticker Paper: Choose matte or glossy finish based on your preferred look.
- Cardstock: Opt for heavyweight (at least 80 lb) for durability.
Laminating Sheets or Clear Contact Paper
To protect our printed recipes from spills and kitchen mess, laminating sheets or clear contact paper are vital. They seal and strengthen the calendar magnets, extending their life in a busy cooking environment.
- Laminating Sheets: Provide a professional finish and high durability.
- Clear Contact Paper: A budget-friendly option that offers moisture resistance.
Scissors and Cutting Tools
Accurate cutting is key for well-finished recipe calendar magnets. A sharp pair of scissors or a craft knife will help us trim magnetic sheets, sticker paper, and laminates precisely.
- Scissors: For general cutting.
- Craft Knife with Cutting Mat: For straight lines and detailed cuts.
Printer and Ink
To bring our calendar designs to life, a reliable printer with vibrant ink is necessary. An inkjet printer works exceptionally well for rich colors and photo-quality prints we want on our magnets.
- Use high-quality ink cartridges for vivid and lasting prints.
- Ensure your printer settings are optimized for the paper type used.
Design Software or Templates
We create or customize our recipe calendar designs using intuitive design software or ready-to-use templates. These tools make it simple to layout text, add images, and ensure everything fits perfectly on the magnet size we choose.
- Popular options include:
- Canva
- Adobe Illustrator
- Microsoft Publisher
- Pre-made printable calendar templates available online
Designing Your Recipe Calendar Magnets
Designing your personalized recipe calendar magnets is where creativity meets functionality. Let’s dive into how to select layouts, choose recipes, format content, and enhance visuals for magnets that are both practical and eye-catching.
Choosing a Calendar Layout
Selecting the right calendar layout sets the foundation for usability. We recommend opting for a monthly grid or a weekly planner style depending on how detailed you want your meal planning to be.
| Layout Type | Best For | Space Per Day | Visual Appeal |
|---|---|---|---|
| Monthly Grid | Overview of meals for the month | Moderate | Compact and clear |
| Weekly Planner | Detailed daily meals | Larger spaces | Room for notes and variations |
Remember to choose templates with ample space for recipe titles and brief notes. A clean layout with legible fonts ensures your magnets remain functional in kitchen environments.
Selecting Recipes to Include
When selecting recipes, balance variety and familiarity to keep your meal calendar both inspiring and manageable. Consider including:
- Family favorites for comfort and ease
- Quick weekday recipes to save time
- Special occasion dishes for weekends or holidays
- Recipes that use seasonal ingredients for freshness and flavor
We suggest limiting the number of recipes per magnet to maintain clarity. Prioritize those you cook often or want to try next. This targeted approach makes your recipe calendar magnets a practical daily tool.
Formatting Recipes for Magnet Size
Your recipes must fit well on the magnet without overcrowding. To format effectively:
- Use concise ingredient lists—limit to essentials
- Break steps into short, numbered instructions
- Choose a readable font size (12-14 pt)
- Align text consistently—left alignment improves readability
| Formatting Element | Recommendation |
|---|---|
| Font Style | Sans-serif for clarity |
| Font Size | 12-14 pt |
| Text Alignment | Left aligned |
| Step Format | Numbered or bullet points |
| Ingredient Layout | Simple lists |
By tailoring your content to the magnet’s dimensions, you maximize legibility ensuring quick reference while cooking.
Adding Decorative Elements
Adding decorative touches elevates your recipe calendar magnets from practical tools into eye-catching kitchen art. Consider:
- Borders or frames to define each day or recipe
- Themed icons like vegetables, utensils, or seasonal motifs
- Color coding different meal types (e.g., breakfast, lunch, dinner) for instant recognition
- Soft background patterns that don’t compete with text visibility
⚠️ Keep decorations subtle to avoid distracting from the important recipe details. Use contrasting colors between text and background for easy viewing under various kitchen lighting conditions.
Incorporate your personal style and kitchen décor theme to make your recipe calendar magnets uniquely yours—combining style with everyday functionality.
Preparing the Recipe Calendar Magnets
Getting our recipe calendar magnets ready involves a few precise steps to ensure durability and visual appeal. Let’s follow each phase carefully for the best results.
Printing the Calendar and Recipes
We start by printing our customized recipe calendar layouts and chosen recipes on high-quality paper or printable sticker sheets.
- Use a reliable printer with vibrant ink for crisp and colorful results.
- Select sticker paper or heavy cardstock depending on whether we want adhesive magnets or printed inserts.
- Print in high resolution (300 dpi or higher) to keep text and images clear.
- Ensure legible fonts and balanced colors to maintain readability on the magnets.
| Material Type | Ideal Use | Printer Settings |
|---|---|---|
| Sticker Paper | Adhesive-backed magnets | Vibrant, photo quality |
| Heavy Cardstock | Insert magnets | Matte or glossy finish |
Cutting Out the Magnet Shapes
Precision here helps every magnet fit perfectly and look professional.
- Use sharp scissors or a craft knife for smooth edges.
- Cut closely around the design leaving minimal margin to reduce bulk.
- For uniform shapes, consider using a template or die-cut tool.
- Keep safety in mind, working gently to avoid jagged cuts.
Laminating for Durability
Laminating protects the print and makes the magnets easier to clean.
- Choose clear laminating sheets or use a laminator machine.
- Trim printed pieces slightly smaller than the lamination sheet for complete sealing.
- Press out all air bubbles to avoid imperfections.
- Cut laminated sheets precisely, avoiding peeling edges.
Using lamination extends the lifespan of our recipe calendar magnets and protects them from moisture and stains in the kitchen.
Attaching Magnetic Backing
This final step transforms our recipes into functional magnets.
- Cut magnetic sheets or strips to the exact size of each laminated recipe.
- Peel off the adhesive backing or apply strong glue if non-adhesive magnets are used.
- Press firmly and evenly to ensure secure adhesion.
- Test each magnet by placing it on a metal surface to confirm strength and stability.
By following these carefully ordered steps our recipe calendar magnets will be durable, visually appealing, and a practical organizing tool for our kitchen space.
Using Your Recipe Calendar Magnets
Using our recipe calendar magnets effectively transforms meal planning into a seamless and enjoyable kitchen routine. These versatile tools keep us organized while inspiring culinary creativity every week.
Organizing Weekly Meal Plans
We start by using the magnets to map out each week’s meals clearly and efficiently. Assign a magnet to each day and slot dinner or lunch recipes according to our schedule. This method helps us balance a variety of dishes, from quick weekday dinners to special weekend meals.
Tips for organizing:
- Group recipes by type (e.g., vegetarian, protein-rich, quick meals).
- Use color-coded magnets to signify meal categories or dietary preferences.
- Keep popular dishes rotated to maintain excitement without repetition.
| Day | Recipe Type | Notes | Magnet Color |
|---|---|---|---|
| Monday | Quick Pasta | Ready in 20 minutes | Yellow |
| Tuesday | Vegetarian Stir Fry | Add extra veggies | Green |
| Wednesday | Family Favorite | Double portions for leftovers | Blue |
| Thursday | Grilled Protein | Marinate overnight | Red |
| Friday | Seasonal Dish | Use fresh market produce | Orange |
Displaying on Your Refrigerator
Our recipe calendar magnets shine when displayed prominently on a refrigerator or any magnetic surface in the kitchen. Placing them where everyone can see encourages family engagement and simplifies grocery shopping.
Recommendations for optimal display:
- Arrange magnets in a grid layout matching the calendar format.
- Leave space for sticky notes or reminders next to the magnet schedule.
- Combine magnets with a whiteboard or chalkboard for extra notes or substitutions.
“Having our recipe calendar magnets front and center increases meal prep efficiency and keeps everyone informed about what’s cooking.”
Updating Recipes Monthly
To keep our cooking routine fresh and aligned with seasonal produce or changing tastes, we update our recipe calendar magnets monthly. This flexibility allows us to explore new recipes while retaining favorites.
Steps for seamless monthly updates:
- Remove old recipe magnets carefully to avoid damage.
- Select new recipes based on current preferences and seasonal ingredients.
- Design and print updated magnets using our established layout templates.
- Laminate and attach magnetic backing as before for durability.
- Display the newly updated calendar prominently.
This approach ensures our recipe calendar magnets stay dynamic and useful, reflecting our evolving culinary adventures.
Tips for Customization and Personalization
Customizing and personalizing recipe calendar magnets turns them into not just functional tools but a reflection of our unique kitchen style and lifestyle needs. Here are strategies to make these magnets truly yours.
Seasonal Themes and Holidays
Adapting your recipe calendar magnets to reflect seasonal themes and holidays enhances engagement and keeps your meal planning exciting year-round. We recommend updating your magnet designs with:
- Spring: Fresh pastel colors and recipes featuring vibrant vegetables, herbs, and light salads.
- Summer: Bright hues, BBQ favorites, and cool desserts.
- Fall: Warm tones with hearty stews, pumpkin-based dishes, and apple-inspired treats.
- Winter: Cozy color palettes showcasing comfort foods and festive holiday meals.
Incorporate holiday motifs such as snowflakes for winter or pumpkins for fall to emphasize special occasions. This keeps your kitchen visually fun and aligns meals with seasonal ingredient availability.
| Season | Color Palette | Suggested Recipe Types | Visual Elements |
|---|---|---|---|
| Spring | Pastels (mint, pink) | Light salads, herb dishes | Flowers, fresh leaves |
| Summer | Bright (yellow, red) | BBQ, chilled desserts | Suns, grills |
| Fall | Warm (orange, brown) | Stews, pumpkin dishes | Leaves, pumpkins |
| Winter | Cozy (blue, white) | Comfort food, holiday specialties | Snowflakes, ornaments |
Family Favorites and Dietary Needs
Personalizing your magnets to feature family favorites and dietary preferences ensures everyone enjoys the meals and feels involved in planning. To tailor the calendar effectively:
- Include tried-and-true recipes the family loves.
- Identify dietary restrictions such as gluten-free, vegetarian, or low-carb options.
- Use color coding or small icons (e.g., a green leaf for vegetarian or a no-gluten symbol) to quickly identify special diets.
- Rotate family favorites with new experimental dishes to balance familiarity and variety.
Remember, designing magnets that reflect real dietary needs avoids last-minute meal substitutions and promotes healthy eating habits.
| Category | Icon Symbol | Example Recipes |
|---|---|---|
| Gluten-Free | 🚫🌾 | Quinoa salads, grilled chicken |
| Vegetarian | 🌿 | Veggie stir-fry, lentil soup |
| Low-Carb | 🔻 | Zucchini noodles, grilled fish |
| Family Favorites | ⭐ | Meatloaf, macaroni and cheese |
Gift Ideas Using Recipe Calendar Magnets
Recipe calendar magnets make thoughtful and practical gifts for friends and family who love cooking or meal planning. Here are some personalization tips for gifting:
- Customize magnet recipes to match the recipient’s tastes and kitchen style.
- Include family recipes or local favorites for a sentimental touch.
- Create a themed set such as “Quick Weeknight Dinners” or “Healthy Breakfasts.”
- Package magnets in a decorative box with a handwritten note explaining meal plan tips.
“A personalized recipe calendar magnet is not just a gift but an invitation to a stress-free, creative cooking journey.”
We suggest pairing the magnets with kitchen accessories such as measuring spoons or recipe cards for a complete gift set that delights both practically and aesthetically.
Care and Maintenance of Recipe Calendar Magnets
To ensure our recipe calendar magnets remain functional, vibrant, and durable, we must follow essential care and maintenance steps. Proper upkeep enhances their lifespan and keeps our kitchen organized with style.
Cleaning and Handling
- Use a soft damp cloth to gently wipe the magnets. Avoid abrasive materials or harsh chemicals that can damage the laminated surface or the magnetic backing.
- For stubborn spots, apply a mild soap diluted in water. Wipe softly, then dry immediately with a clean cloth.
- Always handle magnets with dry hands to prevent moisture build-up, which could degrade adhesive bonds or cause curling.
Storage and Placement
- Keep our recipe calendar magnets on clean, dry, and smooth metal surfaces like refrigerators or magnetic boards for optimum adhesion.
- Avoid placing magnets on surfaces exposed to excessive heat or direct sunlight, which can cause colors to fade and lamination to warp.
- Store unused magnets in a flat, cool spot, ideally between two sheets of cardboard or inside a storage box to prevent bending or scratches.
Repair Tips for Longevity
If a magnet starts peeling or the lamination loosens, consider the following quick fixes:
| Issue | Solution |
|---|---|
| Peeling laminate edges | Apply a thin layer of clear craft glue, press flat, let dry overnight. |
| Weakened magnetic backing | Replace the magnetic strip by carefully removing old backing and gluing a new one. |
| Surface scratches | Use a clear protective spray or replace the affected magnet for best results. |
Seasonal Updates and Refreshing Appearance
- Periodically remove our calendar magnets to clean both the magnets and the surface area. This prevents dust accumulation and maintains strong magnetic grip.
- When refreshing recipes for a new month or season, inspect magnets for wear and reprint or re-laminate any faded or damaged pieces.
- Incorporate new seasonal designs or themes to keep the magnet display feeling fresh and inspiring.
“Maintenance is the key to keeping our recipe calendar magnets not just a tool but a vibrant part of our kitchen’s daily rhythm.”
Adhering to these care practices guarantees that our personalized recipe calendar magnets stay visually appealing and structurally sound, supporting effortless meal planning and kitchen organization for years to come.
Conclusion
Recipe calendar magnets offer a smart way to bring order and creativity into our kitchens. They make meal planning accessible and enjoyable while reflecting our personal tastes and lifestyles.
By investing a little time in crafting and maintaining these magnets, we create a lasting tool that keeps our cooking routines fresh and inspired. They’re more than just organizers—they’re a fun, functional addition that helps us stay motivated and connected to what we cook every day.
Frequently Asked Questions
What are recipe calendar magnets?
Recipe calendar magnets are magnetic meal planners that combine a calendar layout with recipe details. They help organize meals by day, making meal planning easier and more visually appealing in the kitchen.
How do recipe calendar magnets improve kitchen organization?
They streamline meal prep by visually organizing recipes by date, reducing last-minute decisions and grocery hassles. Their magnetic backing allows easy display and rearrangement on your fridge or metal surfaces.
Can I customize recipe calendar magnets?
Yes, they are highly customizable. You can choose your favorite recipes, layouts (weekly or monthly), colors, and add decorative elements to reflect your style and dietary needs.
What materials do I need to make recipe calendar magnets?
You’ll need magnetic sheets or strips for the backing, printable sticker paper or cardstock for designs, laminating sheets or clear contact paper for protection, scissors or cutting tools, a reliable printer, and design software or templates.
How do I create durable recipe calendar magnets?
Print your designs on quality paper, cut precisely, laminate to protect from moisture, and securely attach the magnetic backing. Using good materials and careful steps ensures long-lasting magnets.
How should I organize meals using recipe calendar magnets?
Assign each magnet to a day of the week, use color coding for meal types, group recipes by category, and arrange magnets in a grid layout on your fridge. This method balances variety and simplifies grocery shopping.
How often should I update my recipe calendar magnets?
Monthly updates are recommended. Remove old magnets, choose new recipes based on seasonality and preferences, and reprint to keep your meal planning fresh and inspiring.
Can recipe calendar magnets be personalized as gifts?
Absolutely. Tailor them with the recipient’s favorite recipes, seasonal themes, or dietary preferences. Personalized magnets make thoughtful, practical gifts for cooking enthusiasts.
How do I care for and maintain recipe calendar magnets?
Clean gently with a soft damp cloth and mild soap if needed. Handle with dry hands, avoid excessive heat, store on clean metal surfaces, and repair any peeling or weak magnets to prolong their life.
What design tips help make recipe calendar magnets functional and attractive?
Use legible fonts, concise ingredient lists, clear instructions, and add decorative borders or icons. Choose between monthly grids or weekly planners to suit your detail preferences and enhance usability.