
Exploring pottery glaze recipes for Cone 10 opens up a world of creative possibilities for ceramic artists. At this high firing temperature, glazes mature beautifully, offering rich textures and vibrant colors that can transform any piece into a work of art. Whether we’re aiming for glossy finishes or matte surfaces, Cone 10 glazes provide durability and depth that stand the test of time.
Mastering these recipes allows us to customize our pottery with unique effects, from subtle ash glazes to bold crystalline patterns. Understanding the chemistry behind Cone 10 firing helps us achieve consistent results and push the boundaries of our craft. Let’s dive into some tried-and-true glaze recipes that will inspire and elevate our ceramic projects.
Ingredients for Pottery Glaze Recipes Cone 10
To master Pottery Glaze Recipes Cone 10, understanding the essential ingredients is key. These ingredients form the foundation of durable, vibrant, and varied glaze finishes that excel at high firing temperatures.
Common Raw Materials
Our Cone 10 pottery glazes rely on a balanced blend of raw materials. These create the glassy matrix and influence melting behavior, texture, and surface finish. The main categories include:
- Feldspars: The primary fluxing agents that help lower the melting point. Common examples are Potash Feldspar and Sodium Feldspar.
- Silica (Quartz): Provides the glass former essential for glaze structure and hardness.
- Kaolin (China Clay): Acts as a refractory white clay that stabilizes the glaze during firing.
- Ball Clay: Adds plasticity and opacity, improving glaze suspension.
- Whiting (Calcium Carbonate): A flux that promotes melting and can affect opacity and texture.
Here’s a concise overview of their roles:
| Ingredient | Role/Function | Impact on Glaze |
|---|---|---|
| Feldspar | Flux | Lowers melting temperature |
| Silica | Glass former | Creates hardness and gloss |
| Kaolin | Refractory clay | Stabilizes glaze, controls flow |
| Ball Clay | Plasticizer | Improves suspension and texture |
| Whiting | Flux | Adds calcium, affects opacity |
Colorants and Additives
To achieve unique colors and textures in Cone 10 glazes, we carefully incorporate colorants and additives. These modify the base glaze’s appearance and surface properties.
- Metal Oxides: Common colorants include Copper Oxide (greens and reds), Iron Oxide (earth tones), Cobalt Oxide (blues), Manganese Dioxide (purples and browns), and Titanium Dioxide (opacity and mattes).
- Zirconium Silicate: Adds opacity and opacity control, often used to create matte or satin finishes.
- Bentonite: A small amount improves suspension and adhesion of glaze to the ceramic surface.
- Tin Oxide: Provides bright white opacity.
- Frits: Pre-melted glass compounds that stabilize glaze melting and enhance consistency.
Each additive affects color and surface texture differently, allowing us to push glazes toward gloss, matte, satin, or textured finishes.
| Additive / Colorant | Purpose | Typical Effects |
|---|---|---|
| Copper Oxide | Colorant | Greens to reds depending on atmosphere |
| Iron Oxide | Colorant | Browns, reds, and earth tones |
| Cobalt Oxide | Colorant | Bright blues |
| Manganese Dioxide | Colorant | Purples and dark browns |
| Titanium Dioxide | Opacifier, mattifier | Matte surfaces |
| Zirconium Silicate | Opacity control | Opaqueness and texture |
| Bentonite | Suspension aid | Better glaze application |
| Tin Oxide | Opacifier | Brilliant white opacity |
By combining these core raw materials with carefully selected colorants and additives, we create a robust palette of Cone 10 glazes ready to transform any ceramic piece into a lasting work of art.
Tools and Equipment Needed
To successfully create Pottery Glaze Recipes Cone 10, we must equip ourselves with the right tools and equipment. These essentials ensure precise mixing, safe handling, and proper firing conditions to achieve the vibrant, durable finishes that Cone 10 glazes promise.
Mixing Tools
Accurate mixing is critical for consistent glaze quality. We use the following tools for blending raw materials and additives:
- Large mixing buckets with measurement marks for precise ingredient ratios
- Electric mixing drill with a paddle attachment to ensure thorough, uniform blending
- Digital scale accurate to 0.1 grams for weighing raw materials
- Sieve or mesh screen (80-100 mesh) to remove clumps and ensure fine particle size
- Stirring sticks and spatulas for hand mixing small test batches
- Measuring spoons and cups for additives and colorants
- Containers with tight lids to store prepared glazes, preventing moisture contamination
Kiln Requirements for Cone 10
Firing to Cone 10 demands a kiln that reaches approximately 2381°F (1305°C). Our kiln must offer precise temperature control and uniform heat distribution to develop the rich textures and colors of Cone 10 glazes.
| Requirement | Specification |
|---|---|
| Maximum Temperature | 2381°F (1305°C) |
| Temperature Control | Programmable digital controller |
| Firing Atmosphere | Oxidation or reduction compatible |
| Size | Suitable for your project scale |
| Ventilation | Proper vent or chimney recommended |
We quote ceramic artist Peter Voulkos:
“The kiln is the heart of the glaze’s transformation — mastery over its fire is mastery over the glaze itself.”
Safety Gear
Handling glaze materials and firing at Cone 10 temperatures demands strict safety precautions. We always prioritize protective equipment such as:
- N95 or better dust mask to avoid inhaling ceramic dust and glaze powders
- Chemical-resistant gloves for handling glaze ingredients and colorants
- Safety goggles to protect eyes from dust and splashes
- Apron or lab coat to protect clothing from stains and contamination
- Fire-resistant gloves and kiln gloves for safe kiln loading and unloading
- Well-ventilated workspace or dust extraction system to reduce airborne particles
By using this essential gear, we ensure safety while crafting stunning Cone 10 glaze finishes with confidence and skill.
Preparing Your Glaze
To achieve perfect Cone 10 pottery glazes, careful preparation is essential. Precision in measuring, mixing, and testing ensures consistent results and unlocks the full potential of our glaze recipes.
Measuring and Mixing Ingredients
Accurate measuring is the foundation of successful glaze preparation. We recommend using a digital scale for precision, weighing each ingredient to the nearest gram. Use the following guidelines when measuring:
| Ingredient | Measurement Unit | Preparation Notes |
|---|---|---|
| Feldspar | grams | Fine powder, sifted to remove lumps |
| Silica | grams | Use high-purity, fine mesh |
| Kaolin | grams | Dry and finely powdered |
| Ball Clay | grams | Measure dry; helps suspension |
| Whiting | grams | Handle with gloves; avoid inhaling dust |
| Colorants/Oxides | grams or % | Mix thoroughly to prevent clumping |
| Additives/Frits | grams | Select based on desired melt and texture |
After weighing, combine all dry materials in a large container. Use a sieve or fine mesh to ensure uniform texture. Then, gradually add water while mixing with an electric drill mixer at low speed to avoid aeration. Aim for a smooth, lump-free glaze slurry.
Adjusting Viscosity and Texture
The viscosity of the glaze determines how well it applies to pottery. Our target consistency resembles heavy cream, which adheres evenly without dripping excessively.
To adjust viscosity:
- Add water in 5-10 ml increments for thinning.
- Incorporate small amounts of deflocculants (such as sodium silicate) sparingly to improve fluidity without weakening the glaze.
- For thicker textures, gently add ball clay or bentonite in 0.5% increments.
We use a viscometer or the simple flow test: tilt a small container with glaze and time the flow. Ideal glaze flow time ranges from 15 to 25 seconds over a 60 ml orifice.
Testing Small Batches
Before glazing your entire project, always test small batches:
- Prepare about 100-200 ml of the mixed glaze following your recipe.
- Apply the test glaze on small ceramic tiles or test pots.
- Fire to Cone 10 following your kiln schedule.
- Observe the surface for texture, color, fit, and durability.
- Adjust the recipe as necessary based on firing results.
“Routine testing is key to developing mastery over Cone 10 glazes. Each small batch offers valuable insight into how slight modifications affect the final fired surface.”
By following these steps, we ensure our Pottery Glaze Recipes Cone 10 deliver consistent, vibrant, and durable finishes every time.
Application Techniques
Mastering application techniques is essential for achieving flawless Cone 10 pottery glaze finishes. Each method affects the texture, thickness, and final appearance of the glaze, so selecting the right approach helps us bring our artistic vision to life.
Dipping
Dipping is one of the most efficient ways to apply Cone 10 glazes evenly and consistently.
- Prepare the glaze slurry to a smooth, creamy consistency, approximately 70-80 seconds on a flow cup.
- Fully submerge the pottery piece into the glaze for 3 to 10 seconds depending on desired thickness.
- Withdraw the piece slowly and hold it above the container to let excess glaze drip off evenly.
- Rotate the piece gently to prevent drips or pooling in one area.
- Allow the piece to dry completely on a wire rack before firing.
“Dipping produces a uniform, glossy surface ideal for achieving consistent results across multiple pieces.”
| Step | Detail |
|---|---|
| Glaze Viscosity | 70-80 seconds flow cup |
| Dip Time | 3-10 seconds |
| Drying Time | Until surface is completely dry |
| Drip Control | Hold and rotate piece to avoid pooling |
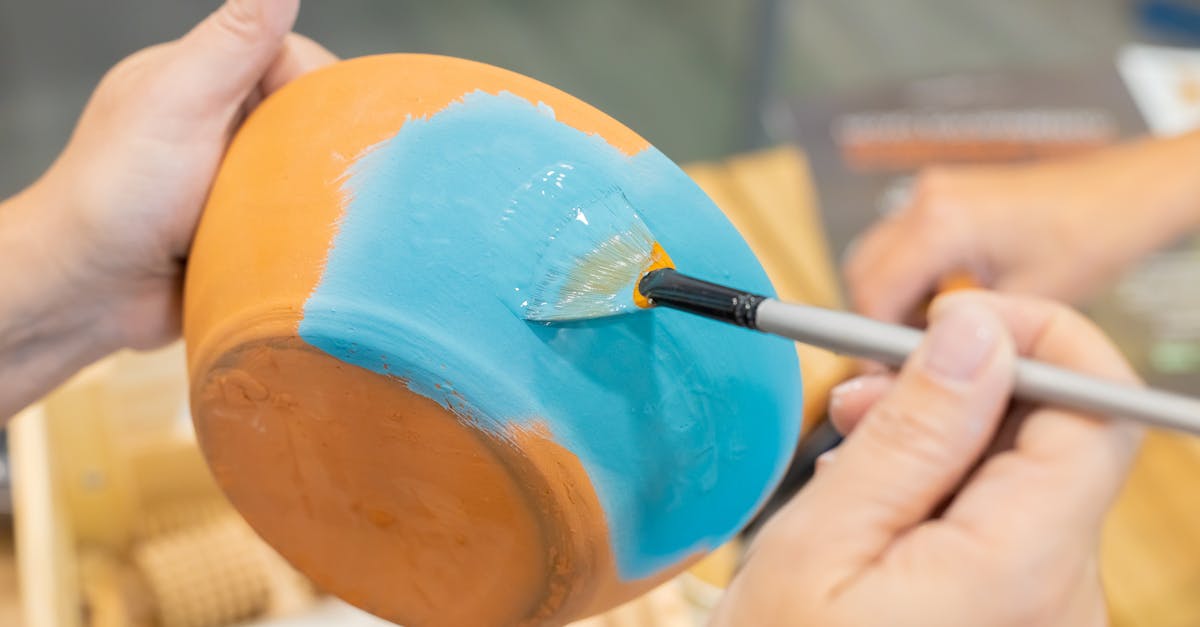
Brushing
Brushing allows us precision and control, making it perfect for smaller pieces or detailed glazing.
- Use a high-quality, soft bristle brush to avoid streaks.
- Thin the glaze slightly with water (up to 10%) to improve flow.
- Apply multiple thin coats rather than a single thick layer to prevent runs.
- Brush in one consistent direction for each layer.
- Let each coat dry thoroughly, usually about 15-20 minutes, before applying the next.
- Avoid overworking the glaze while it is still wet, which can cause texture inconsistencies.
“Brushing creates textured, layered surfaces and allows for creative effects like patterns or color blending.”
| Tip | Recommendation |
|---|---|
| Brush Type | Soft natural or synthetic bristles |
| Glaze Thinning | Up to 10% water |
| Number of Coats | 2-3 thin coats |
| Drying Time Between Coats | 15-20 minutes |
Spraying
Spraying offers smooth, even coverage with minimal brush marks, ideal for large or complex shapes.
- Thin the glaze to a milk-like consistency (approx. 50-60 seconds flow cup).
- Use a spray gun or airbrush with adjustable air pressure (20-30 psi is typical).
- Apply light, multiple coats allowing each to flash off for 1-2 minutes.
- Maintain a consistent distance of about 8-12 inches from the piece.
- Rotate the piece or spray from multiple angles to ensure full coverage.
- Always wear a mask and ventilate the workspace when spraying to avoid inhaling dust or mist.
| Parameter | Ideal Range |
|---|---|
| Glaze Viscosity | 50-60 seconds flow cup |
| Air Pressure | 20-30 psi |
| Distance from Piece | 8-12 inches |
| Drying Time Between Coats | 1-2 minutes |
Firing Process
The firing process is crucial for transforming our pottery glazes into durable, vibrant finishes at Cone 10. Proper firing ensures glaze maturation, texture development, and color depth.
Loading the Kiln
Careful kiln loading maximizes heat distribution and prevents damage. We arrange pieces to allow ample space between them, enabling even heat circulation. Avoiding direct contact of glazed surfaces minimizes stickiness and defects.
- Use stilts for pieces with fully glazed bottoms.
- Place heavier ware on lower shelves and lighter pieces above.
- Ensure kiln shelves are clean to prevent glaze runs from fusing.
Maintaining an organized kiln load helps achieve consistent Cone 10 glaze recipes results.
Firing Schedule for Cone 10
Our firing schedule must reach approximately 2381°F (1305°C) for Cone 10 maturation. This controlled temperature increase develops the glaze’s texture, color, and durability.
| Firing Stage | Temperature Range °F (°C) | Rate (°F per Hour) | Purpose |
|---|---|---|---|
| Bisque to 1000°F | Room temperature to 1000°F (538°C) | 100°F/hr (38°C/hr) | Driving off moisture and organic materials |
| Soak at 1000°F | 1000°F (538°C) | 1 hour | Even heat distribution |
| Ramp to Cone 10 Peak | 1000°F to 2381°F (538°C to 1305°C) | 150°F/hr (65°C/hr) | Melting and maturing glaze components |
| Soak at Peak Temp | 2381°F (1305°C) | 15-30 minutes | Ensures glaze glaze fusion and uniformity |
Quoting well-known ceramicist Edwin Nash:
“A well-structured firing schedule is the backbone of successful high-temperature glazes.”
Cooling and Unloading
Cooling must be gradual to prevent thermal shock, which can crack pieces or damage the glaze surface. After peak holding, reduce temperature at a controlled rate:
- Cool from 2381°F to 1000°F (1305°C to 538°C) at 100°F/hr (38°C/hr).
- Allow the kiln to cool naturally to room temperature before unloading, often requiring 12-24 hours.
We always wear protective gloves when unloading and inspect each piece carefully for defects or glaze runs that could stick kiln shelves.
By mastering this firing process, we unlock the full potential of our Cone 10 pottery glaze recipes for stunning, durable results.
Troubleshooting Common Issues
When working with Pottery Glaze Recipes Cone 10, certain challenges can arise that affect the final appearance and durability of our glazes. Understanding these common issues enables us to troubleshoot effectively and refine our ceramic pieces for consistently stunning results.
Crawling and Pinholing
Crawling appears as areas where the glaze pulls away from the pottery surface, creating bare spots or rough textures. Pinholing manifests as tiny holes or craters on the glaze surface after firing.
To prevent crawling:
- Ensure the bisque surface is clean and free of dust or oils.
- Apply glaze evenly without overly thick layers.
- Adjust glaze composition by reducing materials high in flux or increasing clay content to improve adhesion.
- Check for proper drying before firing to avoid trapped gases releasing during firing.
To minimize pinholing:
- Sieve the glaze thoroughly to remove lumps and impurities.
- Adjust firing ramp to allow a longer soak at lower temperatures, facilitating gas escape.
- Modify glaze water content for proper viscosity during application.
| Issue | Causes | Solutions |
|---|---|---|
| Crawling | Dirty bisque, thick glaze, high flux | Clean surface, thin application, adjust flux/clay ratio |
| Pinholing | Impurities, rapid firing, improper viscosity | Sieve glaze, slow firing ramp, modify water content |
Glaze Fit and Crazing
An improper glaze fit leads to adhesion problems and surface defects. Crazing occurs when glaze contracts more than the clay body creating fine cracks after cooling.
To check for glaze fit:
- Perform thermal expansion compatibility tests between body and glaze.
- Adjust the recipe by increasing silica or decreasing flux if glaze is too soft.
- Conduct test firings with small samples to evaluate fit.
To resolve crazing:
- Increase the coefficient of thermal expansion in the glaze by modifying feldspar or other fluxes.
- Use ball clay or other materials in the body to match glaze expansion.
- Allow slow cooldown phases to reduce thermal shock.
| Problem | Indicators | Adjustments |
|---|---|---|
| Poor Glaze Fit | Flaking, peeling | Test thermal expansion, alter glaze flux/silica |
| Crazing | Fine cracks on surface | Adjust expansion coefficient, slow cooling |
Color Variations
Color Variations in Cone 10 glazes can result from inconsistent application, firing atmosphere, or material impurities.
To achieve consistent color:
- Measure colorants precisely using a digital scale.
- Stir glaze batches thoroughly to ensure even dispersion.
- Maintain consistent kiln temperature and atmosphere throughout firing.
- Use stable metal oxides and frits for predictable results.
Occasional variations can be embraced as unique effects; however, controlling key variables ensures reliable color reproduction.
| Cause | Effect | Best Practice |
|---|---|---|
| Inconsistent mixing | Uneven color patches | Mix thoroughly with electric drill |
| Variable firing atmosphere | Color shifts (oxidation/reduction) | Control kiln atmosphere precisely |
| Impurities in colorants | Unpredictable hues | Use high-purity oxides and carefully source materials |
Make-Ahead and Storage Tips
Proper make-ahead practices and storage techniques ensure that our Cone 10 pottery glazes maintain their quality and performance over time. By following these guidelines, we can keep our glazes fresh, ready to use, and consistent with every firing.
Storing Mixed Glaze Safely
To store mixed Cone 10 glazes safely, always use airtight containers such as plastic or glass jars with secure lids. This prevents contamination and moisture loss, which can alter glaze chemistry and application. Label each container clearly with the recipe name, mix date, and any relevant firing notes to track freshness and batch consistency.
Keep glaze containers in a cool, dark place away from direct sunlight and temperature extremes. These conditions help stabilize the glaze suspension and prevent premature separation or degradation. When returning to use, always stir the glaze thoroughly to recombine any settled materials for even application.
Tip: Avoid metal containers unless they are ceramic-lined to prevent reactions with glaze ingredients.
Extending Shelf Life
Extending the shelf life of prepared Cone 10 glazes involves controlling storage conditions and managing hydration levels. Here are key factors affecting longevity and a table summarizing best practices:
| Factor | Recommendation | Reason |
|---|---|---|
| Container Type | Airtight, non-reactive (plastic/glass) | Prevents moisture loss and contamination |
| Storage Environment | Cool, dark, stable temperature (~60-75°F / 15-24°C) | Maintains glaze consistency |
| Hydration | Keep glaze at typical brushing/dipping viscosity | Too dry or too wet affects application |
| Stirring Frequency | Stir before each use | Re-homogenizes suspended materials |
| Additives | Avoid adding water repeatedly; add small amounts if needed | Excess water dilutes glaze chemistry |
If a glaze thickens over time due to drying, cautiously add distilled water in small increments while mixing to restore original consistency. Avoid over-thinning, which can cause glaze defects when fired.
For long-term storage beyond several months, we recommend preparing smaller batches to minimize waste and variability. Regularly testing stored glazes on test tiles before major projects ensures reliability and color accuracy.
By adhering to these Make-Ahead and Storage Tips we maintain the integrity of our Cone 10 pottery glaze recipes and ensure every fired piece reflects the intended vibrant and durable finish.
Conclusion
Exploring Cone 10 glaze recipes opens up a world of creative possibilities for durable and vibrant pottery. By combining the right ingredients with precise preparation and firing techniques, we can consistently achieve stunning finishes that elevate our ceramic art.
Staying mindful of application methods, kiln management, and troubleshooting helps us refine our craft and overcome common challenges. With proper storage and care, our glaze recipes remain reliable for future projects, ensuring every piece showcases the full potential of Cone 10 firing.
Embracing these practices empowers us to push the boundaries of texture, color, and durability in our pottery work.
Frequently Asked Questions
What is a Cone 10 glaze in pottery?
Cone 10 glaze is a high-fire ceramic glaze fired at about 2381°F (1305°C). It produces durable, vibrant, and often textured finishes, suitable for both glossy and matte effects.
Why is mastering glaze chemistry important for Cone 10?
Understanding glaze chemistry helps potters achieve consistent results and explore unique surface effects by balancing ingredients and firing conditions for optimal texture and color.
What are the essential ingredients in Cone 10 glaze recipes?
Key ingredients include feldspars, silica, kaolin, ball clay, and whiting. These form a strong base, often combined with metal oxides and frits to add color and modify surface textures.
What equipment is needed to prepare Cone 10 glazes?
You need mixing buckets, an electric mixing drill, a digital scale, sieves, storage containers, and safety gear to ensure accurate preparation and safe handling.
What firing temperature is required for Cone 10 glazes?
Cone 10 glazes require firing at approximately 2381°F (1305°C) to mature properly and achieve their distinctive durable and vibrant finishes.
How should glaze ingredients be measured and mixed?
Use a digital scale for precise measurements, mix thoroughly with an electric drill, and adjust viscosity for even application. Always test small batches before large projects.
What are the primary glaze application methods for Cone 10 pottery?
The main methods are dipping, brushing, and spraying. Each requires specific glaze consistencies and drying times to ensure smooth, even coverage.
What is important during the firing process of Cone 10 glazes?
Proper kiln loading, gradual heating and cooling, and following a structured firing schedule help prevent defects and ensure glaze maturation and durability.
How can common glaze issues like crawling or pinholing be fixed?
Ensure clean bisque surfaces, adjust glaze formula for fit and texture, and test thermal expansion compatibility to reduce defects like crawling, pinholing, and crazing.
How should Cone 10 glazes be stored for long-term use?
Store mixed glazes in airtight containers, in cool, dark places. Stir periodically and prepare small batches to maintain quality and reliable color over time.