
There’s something magical about making pizza dough from scratch, especially when it’s as simple and reliable as the Pizza Camp dough recipe. This recipe has become a favorite among home cooks and pizza enthusiasts for its perfect balance of chewiness and crispiness. Whether you’re a beginner or a seasoned pro, this dough is easy to work with and yields delicious results every time.
Ingredients
To master the Pizza Camp Dough Recipe, gathering the right ingredients is essential. Below we list the core components and some optional add-ins to customize your pizza experience.
Dough Ingredients
Our Pizza Camp dough relies on straightforward pantry staples delivered in precise amounts for consistent results:
| Ingredient | Quantity | Preparation Notes |
|---|---|---|
| All-purpose flour | 4 cups (480 g) | Spoon and level for accuracy |
| Instant yeast | 1 teaspoon | No proofing needed |
| Kosher salt | 1 1/2 teaspoons | Adds essential flavor |
| Warm water | 1 1/2 cups (355 ml) | Around 110°F to activate yeast |
| Olive oil | 2 tablespoons | For tenderness and richness |
| Sugar | 1 teaspoon | Feeds the yeast, enhances browning |
These ingredients form the vital foundation for a dough that is chewy yet crisp with a perfect crust.
Optional Toppings and Add-Ins
Enhance your homemade pizza by customizing toppings to suit your tastes. Here are a few popular choices we love to add:
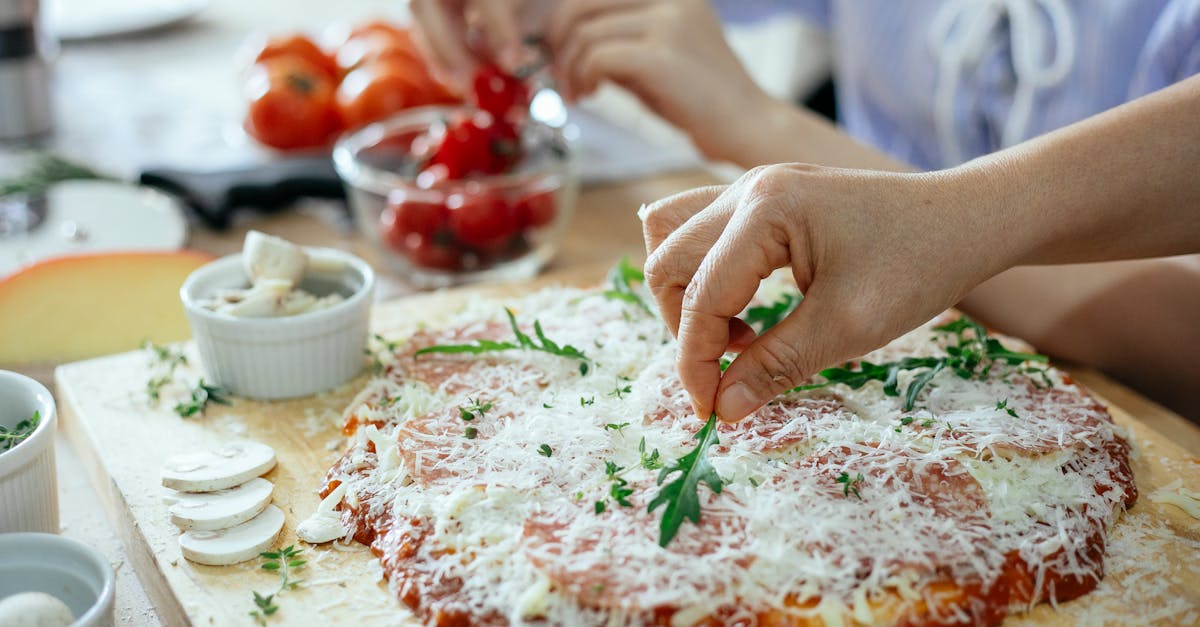
- Shredded mozzarella for that gooey melt
- Fresh basil leaves to brighten flavors
- Sliced pepperoni for a classic spicy kick
- Roasted garlic for an aromatic depth
- Parmesan cheese to add a salty sharpness
- Red pepper flakes to introduce heat
We encourage experimenting with these add-ins to create unique and delicious pizzas every time.
Equipment Needed
To craft the perfect Pizza Camp Dough, having the right equipment is just as crucial as quality ingredients. Proper tools help us achieve the ideal dough texture and make the process smooth and enjoyable.
Essential Tools for Mixing and Kneading
- Large Mixing Bowl: We need a spacious bowl to combine the flour, yeast, salt, and liquids without spilling.
- Digital Kitchen Scale: For precise measurements of flour and water, ensuring consistent dough every time.
- Wooden Spoon or Dough Whisk: Ideal for initially mixing the ingredients until they come together smoothly.
- Stand Mixer with Dough Hook (optional): This tool saves effort and time during kneading, especially if making larger batches.
- Bench Scraper: Great for folding and scraping dough off the work surface, helping us maintain a clean and organized workspace.
Tools for Dough Handling and Cooking Preparation
- Flour Sifter or Fine Mesh Strainer: To dust the work surface lightly with flour for easy dough handling.
- Clean Kitchen Towel or Plastic Wrap: We cover the dough during fermentation to retain moisture and allow it to rise properly.
- Rolling Pin (optional): While hand-stretching is traditional, a rolling pin can help beginners shape the dough evenly.
- Pizza Peel or Baking Sheet: For transferring the dough to the oven without losing its form or structure.
- Pizza Stone or Cast Iron Skillet: These hold and evenly distribute heat for a crispy crust and chewy interior, mimicking professional pizza ovens at home.
| Equipment | Purpose |
|---|---|
| Large Mixing Bowl | Combining ingredients |
| Digital Kitchen Scale | Accurate ingredient measurement |
| Wooden Spoon/Dough Whisk | Initial dough mixing |
| Stand Mixer with Hook | Efficient kneading (optional) |
| Bench Scraper | Handling and folding dough |
| Flour Sifter | Dusting work surface |
| Kitchen Towel/Plastic Wrap | Covering dough during fermentation |
| Rolling Pin | Shaping dough (optional) |
| Pizza Peel/Baking Sheet | Moving dough into oven |
| Pizza Stone/Cast Iron | Baking surface for ideal crust texture |
Pro Tip
“Using a pizza stone preheated for at least 45 minutes in a hot oven gives us that authentic crispy bottom that elevates the Pizza Camp Dough to the next level.”
Equipping ourselves with these tools ensures we prepare the dough correctly, leading to a consistently delicious pizza experience.
Make-Ahead Instructions
Preparing our Pizza Camp Dough in advance saves us valuable time on pizza night while enhancing flavor and texture. Follow these step-by-step make-ahead instructions to ensure our dough is ready when we are:
- Mix the Dough: Combine all-purpose flour, instant yeast, kosher salt, warm water, olive oil, and sugar as per the Pizza Camp Dough Recipe ratios. Stir with a wooden spoon or dough whisk until just combined.
- First Rise: Cover the dough tightly with plastic wrap or a damp kitchen towel. Let it rise at room temperature for 1 to 2 hours, or until it doubles in size.
- Divide and Shape: Punch down the dough gently to deflate. Divide into equal portions depending on the number of pizzas we want to make. Shape each portion into a ball.
- Refrigerate Overnight: Place dough balls in an airtight container or cover them well with plastic wrap. Refrigerate for up to 72 hours. This slow cold fermentation develops flavor and improves crust texture.
- Bring to Room Temperature Before Use: On pizza day, remove dough from fridge and let it warm for 1 to 2 hours at room temperature before stretching and baking. This step relaxes the gluten and makes handling easier.
| Step | Time Required | Purpose |
|---|---|---|
| First Rise | 1 – 2 hours | Dough doubles in size for good yeast action |
| Cold Fermentation | Up to 72 hours | Develops flavor and chewy crust texture |
| Rest at Room Temperature | 1 – 2 hours | Gluten relaxation for easier shaping |
Pro tip: Slower fermentation enhances the dough’s complex flavor and crispiness while keeping the chewiness we love. We can refrigerate the dough up to three days to fit our schedule.
By mastering these make-ahead techniques we ensure our Pizza Camp Dough is flexible and delicious, perfect for any pizza occasion.
Instructions
Follow these step-by-step instructions to craft the perfect Pizza Camp Dough. Each stage builds on the previous one to deliver a chewy yet crisp crust every time.
Preparing the Dough
- In a large mixing bowl, combine 3 ½ cups of all-purpose flour, 1 teaspoon of instant yeast, and 2 teaspoons of kosher salt.
- In a separate container, mix 1 ½ cups of warm water (about 105°F), 2 tablespoons of olive oil, and 1 teaspoon of sugar until the sugar dissolves.
- Gradually pour the wet ingredients into the dry mix.
- Using a wooden spoon or dough whisk, mix the ingredients until a shaggy dough forms.
- Transfer the dough to a floured surface and knead for 8-10 minutes by hand or use a stand mixer with a dough hook on medium speed for 6-7 minutes. The dough should be smooth and slightly tacky but not sticky.
Tip: Use a digital kitchen scale for precise flour measurement. Too much or too little flour can affect the final texture.
First Rise
- Lightly oil a large bowl and place the kneaded dough inside.
- Cover the bowl with a damp kitchen towel or plastic wrap to maintain moisture.
- Let the dough rise at room temperature for 1 to 1 ½ hours or until it doubles in size.
| Stage | Duration | Result |
|---|---|---|
| First Rise | 1–1 ½ hours | Dough doubles in size |
| Temperature | ~70-75°F | Ideal for yeast growth |
Pro insight: Proper first rise unlocks the dough’s airy, chewy texture.
Shaping the Dough
- Gently punch down the dough on a floured surface to release excess air.
- Divide the dough into 2 equal portions for medium pizzas or smaller sizes as preferred.
- Shape each portion into a tight ball by folding the edges under themselves.
- Lightly flour each dough ball to prevent sticking.
Second Rise
- Place the dough balls on a lined tray or in separate containers.
- Cover with plastic wrap or a damp towel.
- Refrigerate for up to 72 hours for slow fermentation which deepens flavor and improves crust texture.
- Before baking, allow dough to rest at room temperature for at least 1 hour to relax gluten for easier stretching.
Remember: Slow, cold fermentation enhances the dough’s complex flavor and chewy yet crisp texture.
Cooking the Dough
- Preheat your oven and pizza stone or cast iron skillet to 500°F for at least 45 minutes.
- On a floured surface, gently stretch the dough ball into a 12-inch circle, avoiding pressing out air bubbles.
- Add toppings of choice sparingly to maintain crust integrity.
- Transfer the pizza to the preheated stone or skillet using a pizza peel or baking sheet.
- Bake for 8-12 minutes, rotating halfway to ensure even cooking.
- The crust should be golden brown with slight charring on the edges and crisp beneath.
Final touch: Allow pizza to cool slightly before slicing to let the cheese set and flavors meld.
Tips for Perfect Pizza Camp Dough
Achieving the perfect Pizza Camp Dough requires attention to detail and a few essential tips. Let’s explore the steps and techniques that guarantee a beautifully chewy, crispy crust every time.
1. Measure Ingredients Precisely
Using a digital kitchen scale is crucial for consistency. Flour and water ratios directly impact dough hydration and texture.
| Ingredient | Amount | Note |
|---|---|---|
| All-purpose flour | 500 grams | Measure by weight, not volume |
| Warm water | 325 grams | 70°F to 75°F (21°C to 24°C) |
| Instant yeast | 2 grams | Accurate measurement vital |
| Kosher salt | 10 grams | Adds flavor and controls yeast |
| Olive oil | 15 grams | Enhances softness |
| Sugar | 5 grams | Feeds yeast for better rise |
2. Use Warm Water, Not Hot
The water temperature should be warm but never hot to the touch. Ideal range is 70°F to 75°F. Too hot water will kill the yeast, preventing proper fermentation.
“Yeast thrives in a warm environment but dies quickly at temperatures above 120°F.”
3. Knead with Purpose
We recommend kneading the dough for about 8 to 10 minutes until it’s smooth and elastic. Proper kneading develops gluten, which gives the dough structure and that desirable chewy texture.
4. Allow for Slow, Controlled Fermentation
Slow fermentation enhances flavor complexity and texture. After kneading, let the dough rise for 1 to 2 hours at room temperature until it doubles in size. For deeper flavor:
- Refrigerate dough balls for up to 72 hours.
- Bring dough to room temperature before use (about 1 hour).
5. Keep Your Workspace Well-Floured
When shaping and stretching the dough, dust your surface and hands generously with flour to avoid sticking but avoid adding too much extra flour into the dough, which can dry it out.
6. Use a Pizza Stone or Cast Iron Skillet
Preheat your pizza stone or cast iron skillet for at least 45 minutes at 500°F (260°C). This high heat gives the crust a crispy bottom without overbaking toppings.
7. Stretch, Don’t Roll
To preserve the gas bubbles in the dough, which make the crust light and airy, always stretch the dough by hand instead of using a rolling pin.
Recap: Key Factors for Perfect Pizza Camp Dough
| Step | Purpose | Pro Tip |
|---|---|---|
| Precise measurement | Consistency and hydration control | Use a digital scale |
| Warm water | Activate yeast without killing it | 70°F to 75°F |
| Proper kneading | Gluten development for structure | Knead until elastic and smooth |
| Slow fermentation | Build flavor and chewiness | Refrigerate dough balls for up to 72 hours |
| Floured workspace | Prevent sticking and tearing | Use minimal extra flour during shaping |
| Preheated stone/skillet | Crispy crust base | Heat at 500°F for 45 mins |
| Hand stretching | Preserve airy dough texture | Avoid rolling pins |
By mastering these essential tips, our Pizza Camp Dough will consistently deliver that perfect balance of softness inside and crispiness outside while boasting rich, complex flavors.
Serving Suggestions
To highlight the versatility of the Pizza Camp Dough, we recommend these serving approaches that maximize flavor and presentation for any occasion.
Classic Margherita Style
Start with a thin layer of crushed San Marzano tomatoes. Add torn fresh mozzarella and a handful of basil leaves after baking. Drizzle with extra virgin olive oil to finish. This combination lets the chewy yet crisp crust shine with bold yet simple flavors.
Loaded Meat Lover’s Delight
Top your stretched dough with sliced pepperoni, crumbled sausage, and chopped bacon. Sprinkle shredded mozzarella generously. Optionally, add caramelized onions or roasted garlic for an aromatic boost. Bake until edges turn golden brown and toppings bubble.
Vegetarian Freshness
Use a base of pesto or garlic-infused olive oil. Layer with sliced bell peppers, mushrooms, red onions, and black olives. Add dollops of ricotta cheese before baking. Finish with arugula tossed in lemon juice for a fresh peppery contrast.
Sweet and Savory Twist
Spread a thin layer of fig jam or honey on the dough. Top with crumbled goat cheese and prosciutto slices. Once baked, garnish with toasted walnuts and fresh thyme to blend sweet and savory notes.
Serving Tips Table
| Serving Style | Key Toppings | Flavor Profile | Baking Note |
|---|---|---|---|
| Classic Margherita | San Marzano tomatoes, fresh mozzarella, basil, olive oil | Fresh, simple, herbal | Bake until mozzarella melts and crust browns |
| Meat Lover’s Delight | Pepperoni, sausage, bacon, mozzarella | Rich, savory, meaty | Bake until crust crispy and meats crisped |
| Vegetarian Freshness | Pesto, bell peppers, mushrooms, ricotta, arugula | Earthy, fresh, tangy | Bake until vegetables soften and cheese sets |
| Sweet and Savory Twist | Fig jam, goat cheese, prosciutto, walnuts, thyme | Sweet, creamy, nutty | Bake until crust golden and cheese slightly browned |
Portion and Presentation
We recommend dividing your Pizza Camp Dough into 8-10 ounce balls for individual pizzas, which create a perfect handheld size with a balanced thickness. Serve sliced into wedges on a wooden board with small bowls of dipping sauces such as garlic butter or spicy marinara for an interactive experience.
“Serving pizza with complementary toppings and side sauces elevates the simple pleasure of pizza dough into a gourmet experience,” we find.
Pairing Suggestions
Pair your pizza servings with refreshing beverages like a crisp craft lager, classic Italian soda, or a chilled glass of Sauvignon Blanc to cut through richness and enhance the dough’s flavor complexity.
By applying these serving suggestions we ensure each Pizza Camp creation is as visually inviting as it is delicious, providing multiple ways for us to enjoy the fruits of our dough-making labor.
Conclusion
Mastering the Pizza Camp Dough recipe opens up endless possibilities for homemade pizza nights. With its perfect texture and flavor, this dough serves as a reliable foundation for any topping combination we crave. Whether we’re crafting a classic Margherita or experimenting with bold flavors, the process becomes enjoyable and rewarding.
Having the right tools and techniques on hand ensures consistent results every time. Plus, the option to prepare dough ahead of time adds convenience without sacrificing quality. Embracing these tips helps us create pizzas that bring friends and family together around the table, making every bite memorable and satisfying.
Frequently Asked Questions
What makes the Pizza Camp dough recipe special?
The Pizza Camp dough recipe is known for its simplicity, reliability, and ideal texture. It strikes a perfect balance between chewiness and crispiness, making it suitable for beginners and experienced cooks alike. This recipe consistently delivers delicious homemade pizza crusts.
What ingredients do I need for the Pizza Camp dough?
You’ll need all-purpose flour, instant yeast, kosher salt, warm water (70°F to 75°F), olive oil, and sugar. These ingredients work together to create a chewy yet crisp crust that’s the base for your pizza.
What tools are essential for making this dough?
Key tools include a large mixing bowl, a digital kitchen scale, and a wooden spoon or dough whisk. Optional items like a stand mixer, bench scraper, pizza peel, and a pizza stone or cast iron skillet help with kneading, shaping, and baking.
Can I prepare the dough in advance?
Yes! The dough can be made ahead and refrigerated for up to 72 hours. Slow refrigeration enhances flavor and texture. Just bring the dough to room temperature before shaping and baking.
How long should I knead the pizza dough?
Knead the dough for about 8 to 10 minutes. This helps develop gluten, which is important for the dough’s structure and chewy texture.
What’s the best way to activate the yeast?
Use warm water between 70°F and 75°F to activate yeast without killing it. This temperature range optimizes yeast activity for proper dough rising.
How do I achieve a crispy crust?
Preheat a pizza stone or cast iron skillet in the oven for at least 45 minutes before baking. The hot surface crisps the crust quickly, giving you that perfect texture.
Can I customize the toppings?
Absolutely! The dough pairs well with classic toppings like mozzarella, fresh basil, pepperoni, and Parmesan, plus options like roasted garlic or red pepper flakes. Customize to your taste.
How should I shape the dough?
Stretch the dough by hand on a well-floured surface to keep it airy. Avoid rolling pins, which can compress the dough and reduce its light texture.
What are some pizza serving suggestions?
Try classics like Margherita or meat lover’s, or vegetarian and sweet-savory twists. Portion dough into 8–10 ounce balls for individual pizzas, serve with dipping sauces, and pair with refreshing beverages for a great meal.