
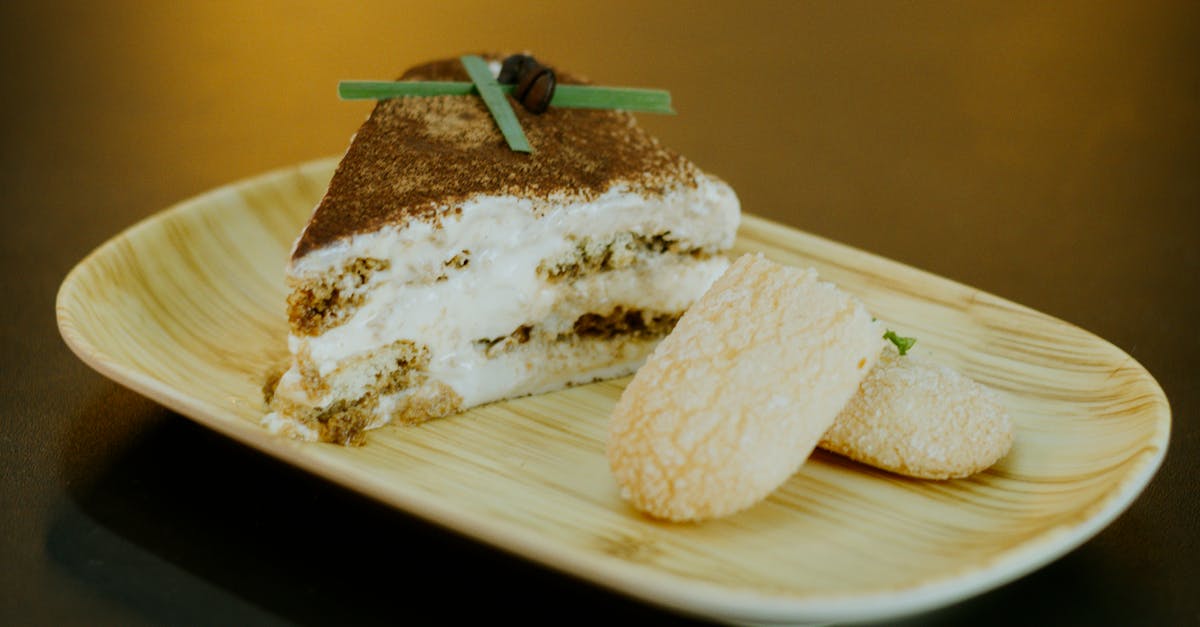
If there’s one dessert that brings back nostalgic memories for many of us, it’s the classic Pinoy mocha cake. This beloved Filipino treat is a delightful combination of soft, coffee-flavored sponge layers and creamy mocha frosting. Perfect for celebrations or as an afternoon pick-me-up, it’s a dessert that never fails to impress with its rich yet balanced flavors.
What makes this cake so special is its unique blend of coffee and chocolate, creating a flavor profile that’s both comforting and indulgent. It’s a staple in Filipino bakeries and often graces our tables during birthdays, holidays, and family gatherings. With this recipe, we’ll show you how to recreate this iconic cake at home, so you can enjoy its delicious taste anytime.
Ingredients
To make the classic Pinoy mocha cake, we’ll need specific ingredients for the different components: the mocha sponge, the coffee syrup, and the mocha buttercream frosting. Here’s everything you’ll need to create this indulgent dessert.
For The Mocha Sponge Cake
- 1 ¾ cups all-purpose flour, sifted
- 1 ¼ teaspoons baking powder
- ¼ teaspoon salt
- 5 large eggs, separated
- 1 cup granulated sugar, divided into ⅔ cup and ⅓ cup
- ½ teaspoon cream of tartar
- ½ cup fresh milk
- 1 tablespoon instant coffee, dissolved in 1 tablespoon hot water
- 1 teaspoon vanilla extract
For The Coffee Syrup
- ½ cup water
- 2 tablespoons granulated sugar
- 1 teaspoon instant coffee
For The Mocha Buttercream Frosting
- 1 cup unsalted butter, softened
- 3 cups powdered sugar, sifted
- 3 tablespoons cocoa powder, sifted
- 2 tablespoons instant coffee, dissolved in 2 tablespoons hot water
- 1 teaspoon vanilla extract
- 2–3 tablespoons fresh milk (or as needed for consistency)
Tip: Using freshly brewed strong coffee in place of instant coffee for any part of this recipe can elevate the flavor of the cake.
Tools And Equipment
To ensure our Pinoy Mocha Cake turns out perfectly, it’s important to have the right tools and equipment on hand. Below is a list of essentials you’ll need, along with their uses in this recipe. Having these items ready before starting makes the process smooth and efficient.
Baking Tools and Equipment Checklist
| Tool/Equipment | Purpose |
|---|---|
| Mixing Bowls | For combining dry and wet ingredients separately. |
| Electric Hand Mixer | To efficiently beat the eggs and whip the mocha buttercream frosting. |
| Rubber Spatula | For folding the batter gently to maintain its airy texture. |
| Measuring Cups/Spoons | To measure ingredients accurately and ensure flavor precision. |
| Fine-Mesh Sifter | For aerating dry ingredients like flour and cocoa powder to avoid lumps. |
| 8-Inch Round Cake Pans | To bake the mocha sponge layers evenly. Use non-stick pans if possible. |
| Parchment Paper | To line the cake pans for an easy release after baking. |
| Cooling Rack | To cool the cake layers completely before frosting. |
| Offset Spatula | For spreading and smoothing the mocha buttercream frosting neatly. |
| Pastry Brush | To evenly apply the coffee syrup to the sponge layers. |
| Kitchen Scale | For weighing ingredients where precision is critical (optional but helpful). |
Optional but Helpful Tools
- Cake Turntable: Makes frosting and decorating the cake much easier.
- Piping Bag with Tips: If you want to add decorative designs using the mocha buttercream.
- Knife or Cake Leveler: For leveling the cake layers for uniform stacking.
Remember, while some tools like a pastry brush or electric mixer enhance convenience, substitutions can be made if they’re unavailable. For example, a spoon could replace the pastry brush for the coffee syrup application. Using the correct tools ensures that our moist mocha sponge cake and creamy frosting come together seamlessly.
Directions
Let’s walk through the step-by-step process of making the Pinoy Mocha Cake. Follow these instructions closely to achieve the fluffy mocha sponge, rich frosting, and a beautifully layered cake that’s sure to impress.
Prep
- Preheat oven to 350°F (175°C). Line two 8-inch round cake pans with parchment paper and lightly grease the sides.
- Sift dry ingredients (all-purpose flour, baking powder, and salt) into a medium bowl; this ensures a smooth and lump-free batter.
- Dissolve 2 tablespoons of instant coffee granules in ¼ cup warm water. Let it cool—it will be added to the batter for that signature mocha flavor.
- Bring all refrigerated ingredients, like eggs and milk, to room temperature to ensure even mixing.
Making The Mocha Sponge Cake
- Using a stand mixer or electric hand mixer, beat egg whites on medium speed until frothy. Gradually add ½ cup granulated sugar, one tablespoon at a time. Increase speed to high and beat until stiff peaks form. Set aside.
- In a separate bowl, whisk egg yolks and remaining ½ cup granulated sugar until pale and fluffy. Slowly drizzle in ⅓ cup vegetable oil and the cooled coffee mixture.
- Gradually add the sifted dry ingredients to the wet mixture, alternating with ½ cup whole milk, starting and ending with the dry ingredients. Mix until just combined—avoid overmixing.
- Gently fold the beaten egg whites into the batter in thirds using a rubber spatula. This step ensures a light and airy texture.
- Divide the batter evenly between the prepared pans. Bake for 28-30 minutes, or until a toothpick inserted in the center comes out clean.
- Cool the cakes in the pans for 10 minutes before transferring them to a cooling rack to cool completely.
Preparing The Coffee Syrup
- In a small saucepan, combine ½ cup water, ¼ cup sugar, and 1 tablespoon instant coffee.
- Bring to a gentle simmer, stirring until the sugar completely dissolves.
- Remove from heat and let it cool to room temperature. This moistening syrup enhances the cake’s coffee flavor and texture.
Making The Mocha Buttercream Frosting
- In a large bowl, beat 1 cup unsalted butter (softened) on medium speed until creamy and pale, about 2 minutes.
- Gradually add 2 cups powdered sugar, ½ cup at a time, and continue to beat until fluffy.
- Dissolve 1 tablespoon cocoa powder and 2 teaspoons coffee granules in 2 tablespoons milk. Add this mixture to the buttercream.
- Increase speed to medium-high and beat for another 2-3 minutes until smooth and spreadable. Adjust with 1 tablespoon milk if the frosting is too thick.
Assembling The Pinoy Mocha Cake
- Place one of the cooled sponge cakes on a serving plate or cake board.
- Using a pastry brush, generously coat the top with coffee syrup.
- Spread a thick layer of mocha buttercream frosting over the syrup-moistened cake.
- Place the second sponge layer on top and repeat the brushing with coffee syrup. Frost the top and sides of the entire cake using an offset spatula.
- Smooth the frosting evenly. If desired, decorate with piped frosting using a piping bag or garnish with a dusting of cocoa powder.
- Chill the cake in the refrigerator for 30 minutes to set the frosting before slicing and serving.
Make-Ahead Tips
When preparing a Pinoy Mocha Cake, a little planning can go a long way in easing the process. Below are some practical make-ahead strategies to help us create this classic Filipino dessert with less stress while ensuring its flavors remain fresh and delicious.
1. Prepare the Mocha Sponge in Advance
We can bake the mocha sponge cake up to two days ahead. Allow the cakes to cool completely on a wire rack before wrapping them tightly in plastic wrap. For optimal freshness, store the wrapped layers in an airtight container or resealable bag and keep them at room temperature. If we need to store for longer, refrigerate for up to 4 days or freeze for up to 1 month.
Quick Tip: Freeze the sponge layers if assembling the cake later. Thawed cake layers are easier to work with and less prone to crumbling.
2. Make the Coffee Syrup Ahead of Time
The coffee syrup, which enhances the cake’s signature mocha flavor, can be prepared ahead and stored. Once cooled, transfer the syrup into a clean, airtight jar and refrigerate. This syrup stays fresh for up to 1 week.
3. Pre-Mix the Mocha Buttercream Frosting
The frosting can also be prepared in advance. Beat the ingredients until smooth and fluffy, then store the frosting in an airtight container in the refrigerator for up to 3 days. When ready to use, let it come to room temperature and re-whip for a few minutes to restore its creamy consistency.
4. Assemble and Chill for Best Results
For a moist and flavor-packed Pinoy Mocha Cake, we recommend assembling the cake at least 4 to 6 hours before serving. This allows the flavors to meld beautifully. After assembling, cover the cake loosely with plastic wrap and refrigerate until serving time.
| Task | How Far Ahead | Storage Instructions |
|---|---|---|
| Bake Mocha Sponge | 2 days to 1 month | Wrap and refrigerate/freezer-safe bag |
| Prepare Coffee Syrup | 1 week | Store in a clean, airtight jar |
| Make Frosting | 3 days | Airtight container in the refrigerator |
| Fully Assemble the Cake | 6 hours | Chill wrapped loosely in plastic wrap |
By following these make-ahead tips, we’ll have more time to enjoy the process and less to worry about on the day we serve this delectable Pinoy Mocha Cake.
Storage Instructions
Proper storage is essential to maintain the freshness and flavors of our Pinoy Mocha Cake. Whether you want to keep leftovers or prepare the cake ahead of time, follow these precise steps to preserve its soft texture and delectable mocha taste.
Short-Term Storage (Up to 3 Days)
- Room Temperature: If the weather is cool and dry, store the fully assembled cake in an airtight container. Place it in a cool spot away from heat and sunlight for up to one day.
- Refrigerator: For warmer climates, tightly cover the cake with plastic wrap or transfer it to a cake keeper. Store in the refrigerator for up to 3 days to keep the frosting creamy and the sponge moist. Allow the cake to sit at room temperature for 20–30 minutes before serving to soften.
Long-Term Storage (Up to 1 Month)
If you plan to store the cake for a longer period, freezing is the best option:
- Freezing Cake Layers:
- Wrap individual mocha sponge layers tightly in plastic wrap, then a layer of aluminum foil for extra protection. Refrigerate completely before freezing to avoid condensation.
- Label with the date. Layers will stay fresh for up to 1 month.
- Freezing Assembled Cake:
- Place the assembled cake on a freezer-safe cake board and freeze it uncovered for one hour to firm up the frosting.
- Once solid, wrap the entire cake securely in plastic wrap and foil, ensuring it is airtight to prevent freezer burn.
| Storage Method | Temperature | Storage Duration |
|---|---|---|
| Room temperature (assembled) | Cool and dry spot | Up to 1 day |
| Refrigerator (assembled) | 35–40°F (1.6–4.4°C) | Up to 3 days |
| Freezer (layers) | 0°F (-18°C) | Up to 1 month |
| Freezer (assembled cake) | 0°F (-18°C) | Up to 1 month |
Thawing Instructions
- For cake layers, transfer them from the freezer to the refrigerator and leave overnight. Bring them to room temperature before frosting or assembling.
- For a frozen assembled cake, thaw in the refrigerator for 4–6 hours before serving. For best taste, let it rest at room temperature for another 30 minutes.
Expert Tip:
Always use airtight containers when storing to lock in the moisture and prevent the cake from absorbing odors from the fridge or freezer. If freezing, avoid decorating with whipped cream or delicate toppings until after thawing to maintain their freshness and texture.
Conclusion
The Pinoy Mocha Cake is more than just a dessert—it’s a slice of tradition and comfort that brings people together. With its perfect balance of coffee and chocolate flavors, it’s a treat that never fails to impress. By following the recipe and tips we’ve shared, you can recreate this beloved classic in your own kitchen and savor its rich, nostalgic taste anytime.
Whether it’s for a special occasion or a simple indulgence, this cake is sure to delight family and friends. So grab your tools, gather your ingredients, and let’s get baking!
Frequently Asked Questions
What is a Pinoy Mocha Cake?
A Pinoy Mocha Cake is a classic Filipino dessert featuring soft coffee-flavored sponge layers and creamy mocha frosting. It’s a nostalgic treat often served at celebrations, loved for its unique blend of coffee and chocolate flavors.
Can I use freshly brewed coffee instead of instant coffee?
Yes, freshly brewed strong coffee can be used for both the sponge cake and frostings. It enhances the overall flavor of the cake and adds richness.
What tools do I need to bake this cake?
Essential tools include mixing bowls, an electric hand mixer, cake pans, a cooling rack, and a spatula. Optional tools like a cake turntable and piping bag can enhance decoration.
How do I store the Pinoy Mocha Cake?
You can store the cake at room temperature in an airtight container for one day or refrigerate it for up to three days. For longer storage, freeze the cake layers or fully assembled cake using proper wrapping techniques.
Can the cake be made ahead of time?
Yes, the mocha sponge cake can be baked up to two days in advance, and the frosting can be made ahead as well. It’s best to assemble the cake 4–6 hours before serving for optimal flavor.
How do I prevent the cake from becoming dry?
To keep the cake moist, use a coffee syrup to brush the layers before frosting. Store it in an airtight container to lock in moisture.
Can I substitute ingredients in the recipe?
Yes, some substitutions can be made, such as using plant-based milk or vegan butter for dietary preferences, but the taste and texture might vary.
How do I achieve a light and airy sponge?
Ensure you beat the egg whites to stiff peaks and gently fold them into the batter without overmixing to maintain the cake’s light texture.
What’s the best way to frost and decorate the cake?
Use an offset spatula for an even application of frosting. For decoration, add piping details, chocolate shavings, or dust cocoa powder for a professional touch.
How should I thaw frozen cake layers?
Thaw frozen layers by transferring them to the refrigerator overnight. Once thawed, allow them to reach room temperature before assembling or serving.