
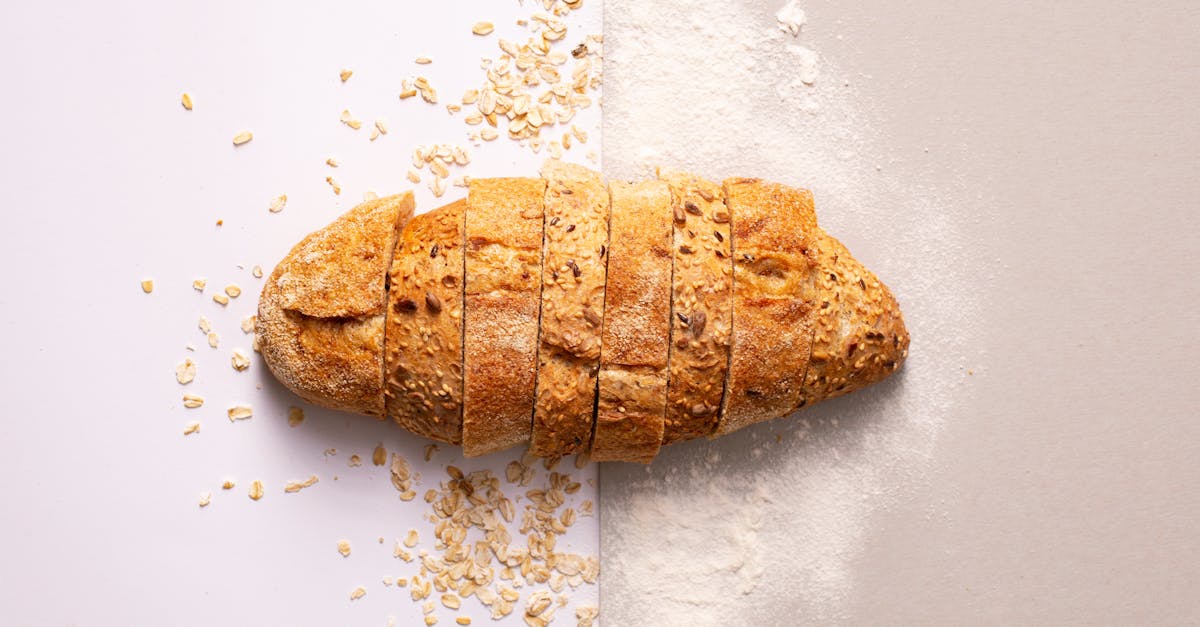
Pilot bread, also known as hardtack, has a rich history as a durable and simple staple for sailors, soldiers, and pioneers. Its long shelf life made it essential for long voyages and tough conditions. Today, pilot bread offers a nostalgic taste of the past with a satisfying crunch that’s perfect for snacks or creative recipes.
We love how easy it is to make pilot bread at home using just a few basic ingredients. It’s a versatile treat that pairs well with everything from cheese to jam or hearty soups. Whether you’re looking to try a traditional recipe or add a unique twist to your pantry, our pilot bread recipe is a must-try for anyone who enjoys classic, no-fuss baked goods.
Ingredients
To create authentic Pilot Bread, we use a simple list of staple ingredients that ensure durability and that classic crisp texture. Here is what we need to gather before starting:
- All-purpose flour – 3 cups, sifted for a light, even dough
- Salt – 1 teaspoon, to enhance flavor and act as a preservative
- Baking powder – 1 teaspoon, to provide slight leavening for a perfect balance
- Water – 1 cup, lukewarm, for easy dough formation
| Ingredient | Quantity | Purpose |
|---|---|---|
| All-purpose flour | 3 cups | Base flour creates texture |
| Salt | 1 teaspoon | Flavor and preservation |
| Baking powder | 1 teaspoon | Light leavening |
| Water | 1 cup | Dough binding |
Tip: Using lukewarm water helps the ingredients blend smoothly, allowing us to form a consistent dough without lumps.
These basic ingredients make Pilot Bread incredibly versatile. We encourage experimenting with different flour types or adding seeds for creative twists, but the classic recipe keeps it straightforward and true to tradition.
Equipment Needed
To create perfect pilot bread we need the right tools to ensure a smooth baking process and authentic texture. Here is the essential equipment list with details on their purpose.
| Equipment | Purpose |
|---|---|
| Mixing Bowl | To combine flour, salt, baking powder, and water evenly |
| Rolling Pin | To roll out the dough into a thin, uniform sheet |
| Baking Sheet | To bake the pilot bread flat and crisp |
| Parchment Paper | To prevent sticking and ease cleanup on the baking sheet |
| Fork or Dough Docker | To prick holes in the dough allowing steam to escape during baking |
| Cooling Rack | To cool the pilot bread evenly and maintain crispness |
| Measuring Cups & Spoons | To ensure precise ingredient quantities for consistency |
Step-by-step Equipment Use
- Mixing Bowl: We start by mixing the dry ingredients in the bowl, adding water gradually until the dough forms.
- Rolling Pin: Next we roll the dough evenly, aiming for a thickness around 1/4 inch.
- Fork or Dough Docker: We then pierce the dough systematically with a fork to create tiny holes that prevent puffing.
- Baking Sheet & Parchment Paper: We place the dough on parchment-lined baking sheets for easy handling.
- Cooling Rack: After baking, we transfer the pilot bread here to cool evenly, keeping the desired hardness.
These tools are straightforward but critical for achieving the classic pilot bread texture that balances durability with just enough crunch. Having this equipment at hand empowers us to bake authentic hardtack confidently and consistently.
Preparing the Dough
To create the perfect Pilot Bread dough, we must follow precise steps that build the foundation for its signature crunch and durability. This stage demands attention to detail as it sets the texture and structure for our classic hardtack.
Measuring Ingredients
Accurate measurement is essential to achieve the authentic texture of Pilot Bread. Here is the breakdown of our key ingredients and their exact amounts:
| Ingredient | Quantity | Notes |
|---|---|---|
| All-purpose flour | 3 cups (360 g) | Sifted for aeration |
| Salt | 1 tsp | Enhances flavor and preservation |
| Baking powder | ½ tsp | Leavens slightly for texture |
| Lukewarm water | 1 cup (240 ml) | Approximately; adjust as needed |
“Precision in measuring leads to consistent results every time we bake this traditional biscuit.”
Mixing the Dough
We begin mixing by combining the dry ingredients first. In a spacious mixing bowl, we whisk together the flour, salt, and baking powder until the mixture is uniform. This step ensures that leavening and seasoning are evenly distributed:
- Slowly add the lukewarm water to the dry mix.
- Stir with a wooden spoon or spatula until a shaggy dough forms.
- If the dough feels too dry or crumbly, incorporate a tablespoon of water at a time until it holds together without stickiness.
Mixing until all ingredients just come together is crucial; overmixing can develop excess gluten, leading to a tougher pilot bread.
Kneading the Dough
Kneading activates the gluten network to provide enough structure for our hardtack to hold firm yet remain brittle enough for the traditional crunch:
- Lightly flour a clean surface.
- Transfer the dough onto the surface.
- Using the heels of our hands, press and fold the dough over itself.
- Continue kneading with a rhythm for about 6 to 8 minutes until it turns smooth and elastic.
Tip: The dough should feel firm but pliable—not sticky or overly dry. If sticky, dust with a bit more flour. If dry, add tiny amounts of water.
This step ensures that our Pilot Bread will have the perfect balance between durability and crushable crunch, ready for shaping and baking.
Resting and Proofing
Proper Resting and Proofing are crucial steps in perfecting our pilot bread recipe. These stages develop the dough’s structure and flavor while ensuring the right texture for our hardtack.
First Rise
During the First Rise, we allow the dough to ferment and expand naturally. This step activates the yeast (if using) or helps hydrate the flour, which is essential for achieving the sturdy texture and slight airiness that define pilot bread.
- Place the dough in a lightly oiled mixing bowl to prevent sticking.
- Cover the bowl with a clean kitchen towel or plastic wrap.
- Let the dough rest in a warm environment, ideally around 75°F to 80°F (24°C to 27°C).
- Allow the dough to rise until it doubles in size. This usually takes 1 to 2 hours depending on ambient temperature.
| Step | Details |
|---|---|
| Environment | Warm (75°F-80°F / 24°C-27°C) |
| Duration | 1 to 2 hours |
| Indicator | Dough doubles in size |
This first rise ensures that the gluten develops properly, providing the classic resilience pilot bread is known for.
Shaping the Dough
After the first rise, we move on to shaping the dough to prepare it for baking. Proper shaping contributes significantly to the hardtack‘s final crispness and uniformity.
- Lightly flour your work surface to prevent sticking.
- Turn out the risen dough and gently deflate it with your hands to release excess gas.
- Roll the dough out evenly using a rolling pin to around 1/4 inch (6 mm) thickness — not too thin to break, and not too thick to stay doughy.
- Cut the dough into rectangular or square pieces, typically about 3 x 4 inches (7.5 x 10 cm) for traditional pilot bread.
- Use a fork or dough docker to prick holes evenly across each piece. These perforations prevent bubbling and ensure even baking.
Second Rise
The Second Rise is shorter yet vital to soften the dough slightly before baking, enhancing the texture without compromising the characteristic firmness.
- Arrange the cut pieces on a baking sheet lined with parchment paper.
- Cover loosely with a clean cloth or plastic wrap to avoid drying out.
- Allow the dough to rest for 30 to 45 minutes at room temperature.
- The dough will puff slightly, indicating readiness for the oven.
| Step | Details |
|---|---|
| Duration | 30 to 45 minutes |
| Purpose | Slight puffing for better texture |
| Preparation | Covered loosely, at room temperature |
By respecting these Resting and Proofing phases, we set our pilot bread on the path to perfect durability, light crunch, and that nostalgic flavor we seek.
Baking the Pilot Bread
Baking the pilot bread involves precise temperature control and timing to achieve its signature dry, crisp texture. Let’s walk through the key steps to ensure our hardtack turns out perfectly.
Preheating the Oven
We begin by Preheating the Oven to create an optimal baking environment. Set the oven to a steady 375°F (190°C). This temperature allows the bread to bake evenly, drying out thoroughly without burning.
- Place the baking sheet on the middle rack to promote even heat circulation.
- Avoid opening the oven door frequently to maintain a consistent temperature.
Baking Time and Temperature
Baking pilot bread requires patience to develop its characteristic hardness and dryness. Here’s the recommended baking schedule:
| Step | Temperature | Duration | Purpose |
|---|---|---|---|
| Initial Bake | 375°F | 25 minutes | Sets the dough and starts drying |
| Flip and Bake | 375°F | 20 minutes | Ensures even crispness |
| Low-temp Drying | 250°F | 10-15 minutes | Removes residual moisture |
- After the initial bake, flip each piece to expose the other side for equal drying.
- The final low-temperature phase guarantees a long-lasting hardtack by removing all moisture.
Checking for Doneness
To confirm our pilot bread is perfectly baked, we check for:
- A uniform golden-brown color on both sides.
- A firm, bone-dry texture that produces a satisfying snap.
- No softness or sponginess when pressed.
“Perfect pilot bread should feel weighty yet brittle, ready to withstand storage without losing its crunch.”
If any softness remains, return the bread to the oven for additional drying time in 10-minute increments, maintaining the low temperature.
By mastering these baking steps, we ensure our homemade pilot bread captures the authentic taste and texture of this timeless classic.
Cooling and Storing
Once our pilot bread emerges from the oven with that perfect golden-brown crispness, the next critical step is cooling and storing it properly to preserve its iconic texture and flavor. Here’s how we handle this crucial phase:
Cooling Process
- Remove the bread from the baking sheet immediately using a spatula to avoid steam buildup underneath.
- Transfer the pilot bread to a wire cooling rack. This allows air to circulate fully around the pieces, preventing any moisture from softening the bread.
- Let the bread cool at room temperature for at least 1 to 2 hours. The goal here is to reach a completely dry, bone-dry texture that ensures long shelf life.
- Avoid stacking or covering the bread during cooling. Any trapped moisture can lead to unwanted soft spots or mold growth.
“Patience during cooling is key to achieving pilot bread’s legendary durability and crunch.”
Storing Tips
Proper storage guarantees that our pilot bread stays fresh and retains its signature crunch for weeks or even months.
| Storage Method | Description | Duration | Notes |
|---|---|---|---|
| Airtight Container | Place cooled bread in a sealed container or jar | Up to 1 month | Keep in a cool, dry place |
| Vacuum-Sealed Bags | Use vacuum sealing to remove air | Several months | Best for long-term preservation |
| Resealable Plastic Bags | Use only if airtight and stored in a dry environment | 2 to 3 weeks | Check regularly for moisture |
- Store pilot bread in a cool, dry environment away from direct sunlight.
- Avoid refrigeration which may introduce moisture and soften the bread.
- Before consuming after storage, inspect for any signs of moisture or mold.
Re-crisping Stored Pilot Bread
If the bread softens slightly over time, we recommend re-crisping it:
- Preheat the oven to 300°F (150°C).
- Place the pilot bread in a single layer on a baking sheet.
- Bake for 5 to 10 minutes until the bread regains its crunch.
- Cool completely before storing again.
By following these cooling and storing guidelines, we ensure our homemade pilot bread captures the timeless crunch and resilience that made it a staple for generations.
Serving Suggestions
Pilot bread is incredibly versatile, making it perfect for a variety of snacking and meal ideas. Here are some of our favorite ways to enjoy this classic, crisp delight:
1. Classic Butter and Jam
Spread a generous layer of buttery softness on a crispy slice of pilot bread, then top it with your favorite jam or marmalade. The contrast between the crunchy bread and the creamy spread creates a satisfying bite that harkens back to simple, timeless flavors.
2. Savory Cheese and Meat Toppers
Layer pilot bread with slices of sharp cheddar, Swiss, or gouda cheese, paired with cured meats like salami or prosciutto. Add a touch of mustard or sliced pickles to enhance the flavor profile. The sturdy texture holds up excellently to these rich toppings.
3. Dips and Spreads Accompaniment
Use pilot bread as a crunchy base for hummus, guacamole, or spinach artichoke dip. Its dense texture makes it a perfect vehicle for scooping and dipping without crumbling.
4. Soup and Stew Side
Serve pilot bread alongside hearty soups or stews. Use it to soak up broths and sauces, adding a delightful crunchy contrast to warm, comforting bowls.
5. Sweet Treat with Honey and Nuts
Top pilot bread with a drizzle of honey and sprinkle chopped nuts or dried fruit for a naturally sweet, energy-boosting snack. This combination highlights the nostalgic sweetness that complements the bread’s subtly salty foundation.
Serving Suggestions Table
| Serving Style | Recommended Toppings/Pairings | Flavor Profile | Ideal Occasion |
|---|---|---|---|
| Classic Butter and Jam | Butter, Fruit Jam or Marmalade | Sweet, creamy, buttery | Breakfast or Elegant Tea Snack |
| Savory Cheese and Meat | Cheese (Cheddar, Gouda), Cured Meats | Savory, rich, tangy | Lunch or Casual Gatherings |
| Dips and Spreads | Hummus, Guacamole, Spinach Dip | Savory, fresh, creamy | Appetizers or Parties |
| Soup and Stew Side | Any hearty soup or stew | Crunchy and hearty | Comfort Meals |
| Sweet Treat with Honey and Nuts | Honey, Nuts, Dried Fruits | Sweet, crunchy, nutty | Quick Snack or Dessert |
Pro Tips for Serving Pilot Bread:
- Always serve pilot bread freshly crisped or lightly toasted to revive its crunch if stored for long periods.
- Pair it with beverages like black coffee, herbal tea, or bold red wine to complement its rustic flavor.
- Experiment by adding spice elements such as chili flakes or smoked paprika over savory toppings for a modern twist.
“Pilot bread’s durability and neutral flavor make it a perfect canvas for creativity in the kitchen.”
By exploring these serving options, we bring out the best in pilot bread, transforming it into both a nostalgic treat and a versatile ingredient in our culinary repertoire.
Tips for Perfect Pilot Bread
Achieving the ideal pilot bread requires attention to detail throughout the baking process. Here are essential tips to ensure our hardtack turns out crisp, durable, and flavorful every time.
1. Use the Right Flour and Measure Precisely
We recommend using all-purpose flour for classic texture and flavor. Accurate measurements are critical—too much flour results in a tough bread, while too little water creates a dough that won’t hold together. Use a kitchen scale for precision.
| Ingredient | Measurement | Tip |
|---|---|---|
| All-purpose flour | 2 cups (240g) | Sift before measuring for consistency |
| Salt | 1 tsp (5g) | Enhances flavor |
| Baking powder | 1/2 tsp (2g) | Adds slight lift |
| Lukewarm water | 3/4 cup (180ml) | Ensures proper hydration |
2. Achieve the Perfect Dough Consistency
Our goal is a firm but pliable dough. It should not be sticky or crumbly. Knead gently just until smooth to avoid overworking, which can make the bread brittle. Let the dough rest after kneading to relax the gluten for easier rolling.
3. Roll Evenly and Perforate
Roll the dough out to an even thickness of about 1/4 inch (6mm) to ensure uniform baking and crispness. Use a fork or toothpick to create holes evenly spaced across the surface. These perforations prevent bubbling and promote a dry, brittle texture.
4. Control Oven Temperature and Bake Time
Preheat the oven exactly to 375°F (190°C). Bake the bread for 30 minutes on one side, then flip and bake for another 20 minutes. Lower the oven to 200°F (93°C) for a final drying phase lasting 30 minutes to remove moisture thoroughly.
| Baking Stage | Temperature | Time | Purpose |
|---|---|---|---|
| Initial Bake | 375°F (190°C) | 30 minutes | Set structure and color |
| Flip and Bake | 375°F (190°C) | 20 minutes | Even browning |
| Low-temp Drying | 200°F (93°C) | 30 minutes | Remove residual moisture |
5. Cool Completely on a Wire Rack
Allow the pilot bread to cool fully on a wire rack. Cooling is crucial as it prevents moisture buildup and keeps the bread dry and crunchy. Avoid stacking the bread immediately after baking to maintain its crisp texture.
6. Store in Airtight Containers or Vacuum-Sealed Bags
To preserve the legendary crunch and longevity, store the bread in an airtight container or vacuum-sealed bags. Keep it in a cool, dry place away from humidity. If the bread softens, re-crisp it in a low oven at 250°F (120°C) for 10 minutes.
7. Experiment with Flavor Variations
For creative twists, consider adding sesame seeds, herbs, or spices directly into the dough. However, for authentic pilot bread, stick to the classic recipe outlined for the iconic flavor and texture.
Pro Tip: Remember that uniform thickness and thorough drying are the keys to homemade pilot bread that lasts and delivers that nostalgic crunch with every bite.
By following these tips and paying close attention to each stage, we can master the art of baking perfect pilot bread every time.
Conclusion
Making pilot bread at home is a rewarding experience that connects us to a rich culinary history. With just a few simple ingredients and some attention to detail, we can create this timeless, durable bread that’s perfect for snacks or creative recipes.
By mastering the techniques of mixing, rising, and baking, we ensure every batch has that classic crunch and flavor. Plus, the versatility of pilot bread means it can easily adapt to our favorite toppings and pairings.
Whether we stick to the traditional recipe or experiment with new variations, pilot bread offers a unique taste of the past that fits right into our modern kitchens. Let’s keep this heritage alive by baking and sharing pilot bread with those we care about.
Frequently Asked Questions
What is pilot bread and why was it historically important?
Pilot bread, also known as hardtack, is a durable, long-lasting baked good used mainly by sailors, soldiers, and pioneers as a reliable food source during long journeys due to its long shelf life.
What ingredients are needed to make traditional pilot bread?
The basic ingredients include all-purpose flour, salt, baking powder, and lukewarm water. These ensure the right texture and flavor for authentic pilot bread.
Can I use different types of flour or add seeds to pilot bread?
Yes, you can experiment with various flours or add seeds for flavor and texture variations, but sticking to the classic recipe guarantees traditional results.
What equipment is necessary for baking pilot bread at home?
You need a mixing bowl to combine ingredients, a rolling pin to shape the dough, and a baking sheet for baking. A wire rack is also helpful for cooling.
How do I prepare the dough to achieve the authentic pilot bread texture?
Use precise measurements, mix ingredients carefully without overmixing, and knead until you get the right dough consistency that’s firm but workable.
Why are resting and proofing important for pilot bread dough?
Resting allows the dough to ferment and expand during the first rise, developing flavor and structure. The second rise improves texture before baking.
What is the ideal baking process for pilot bread?
Preheat the oven to 375°F (190°C), bake initially, flip for even crispness, then dry the bread at a lower temperature until golden brown and bone-dry.
How do I know when pilot bread is fully baked?
It should have a uniform golden-brown color and a firm, dry texture that is crisp and not soft or doughy.
What are the best methods for cooling and storing pilot bread?
Cool completely on a wire rack to avoid moisture buildup, then store in airtight containers or vacuum-sealed bags to maintain its crunch for weeks or months.
How can I serve pilot bread?
Serve it with butter and jam, alongside cheese and cured meats, as a dip base, with soups and stews, or topped with honey and nuts. Toasting enhances crunch.
What tips ensure perfect pilot bread every time?
Use the right flour, measure ingredients precisely, roll dough evenly, perforate for proper baking, control oven temperature and baking time, and cool and store correctly.
Can I add my own flavor variations to pilot bread?
Yes, feel free to add spices, seeds, or flavorings, but ensure they don’t affect the dough texture or long shelf life typical of traditional pilot bread.