
Pillow cookies are the ultimate treat for anyone who loves soft, chewy, and melt-in-your-mouth desserts. These cookies get their name from their pillowy texture that feels like a little cloud with every bite. Perfect for snacking or sharing, pillow cookies bring a comforting sweetness that’s hard to resist.
We’ve perfected a pillow cookie recipe that’s simple to make and uses everyday ingredients. Whether you’re baking for a special occasion or just craving something cozy, this recipe delivers consistent softness and rich flavor every time. Let’s dive into making these irresistible pillow cookies that will quickly become a favorite in your kitchen.
Pillow Cookie Recipe Ingredients
To create our signature Pillow Cookies with that irresistibly soft, chewy texture, we rely on a balanced mix of simple, quality ingredients. Below, we break down everything you need to bake these delightful treats perfectly every time.
Dry Ingredients
Our dry ingredients form the foundation of the cookie’s tender crumb and structure. Here’s what we use, measured precisely for consistent softness:
- All-purpose flour – 2 ½ cups, sifted to avoid lumps and ensure lightness
- Baking powder – 1 ½ teaspoons, for the perfect gentle rise
- Baking soda – ½ teaspoon, to balance acidity and aid leavening
- Salt – ½ teaspoon, to enhance flavor depth and balance sweetness
- Cornstarch – 2 tablespoons, for added softness and a pillowy texture
| Ingredient | Measurement | Purpose |
|---|---|---|
| All-purpose flour | 2 ½ cups | Base structure |
| Baking powder | 1 ½ teaspoons | Leavening agent |
| Baking soda | ½ teaspoon | Leavening and balance acidity |
| Salt | ½ teaspoon | Flavor enhancer |
| Cornstarch | 2 tablespoons | Softens texture |
Wet Ingredients
The wet ingredients bring richness and moisture that define the melt-in-your-mouth experience of Pillow Cookies. We use these key elements to combine and hydrate the dough perfectly:
- Unsalted butter – 1 cup (2 sticks), softened to room temperature for easy creaming
- Granulated sugar – ¾ cup, for balanced sweetness and slight crisp edges
- Brown sugar – ½ cup, packed, adds moisture and depth of flavor
- Large eggs – 2, at room temperature to help bind and add tenderness
- Pure vanilla extract – 2 teaspoons, for aromatic warmth and enhanced sweetness
Optional Add-Ins and Toppings
To customize our Pillow Cookies, we often add a few flavorful extras that blend beautifully without compromising their signature softness:
- Mini chocolate chips – 1 cup, for gooey pockets of chocolate
- Chopped nuts (pecans or walnuts) – ½ cup, for subtle crunch contrast
- Powdered sugar – for dusting after baking, giving a delicate, snowy finish
- Sea salt flakes – a light sprinkle on top before baking, for a sophisticated flavor pop
Using these optional ingredients lets us tailor each batch to the occasion or mood while keeping the base texture intact.
Equipment Needed
To achieve the perfect Pillow Cookie texture every time, having the right equipment is essential. Below is a detailed list of tools we recommend for preparing and baking these soft, chewy cookies flawlessly.
| Equipment | Purpose |
|---|---|
| Mixing Bowls | For combining wet and dry ingredients separately |
| Electric Mixer | Ensures thorough creaming of butter and sugars |
| Measuring Cups & Spoons | Accurate measurement of ingredients |
| Rubber Spatula | Scrapes down bowl sides to fully incorporate batter |
| Cookie Scoop | Creates uniform cookie sizes for even baking |
| Baking Sheets | Provides a flat surface for cookie placement |
| Parchment Paper or Silicone Mats | Prevent sticking and ensure easy cleanup |
| Cooling Rack | Allows cookies to cool evenly without steaming |
| Sifter or Fine Mesh Strainer | Aerates flour and dusts powdered sugar if used |
We always start by preheating the oven and preparing our baking sheets with parchment or silicone liners to guarantee even baking and prevent spreading. Using an electric mixer helps us cream the butter and sugars until light and fluffy, a key step for that pillowy softness.
For shaping, a cookie scoop comes in handy. It ensures all cookies are the same size, promoting uniform baking and consistent texture. When sprinkling powdered sugar on top, a sifter is best to create a delicate, even dusting that enhances the pleasant sweetness and presentation.
Using a cooling rack immediately after baking prevents sogginess and preserves the signature light, airy quality in each Pillow Cookie. Equipped with these tools we streamline the baking process while guaranteeing irresistibly tender cookies every time.
Preparing the Dough
To achieve the perfect pillow cookie texture, we must carefully prepare the dough by properly mixing our ingredients and allowing time for chilling. These steps build the foundation for soft, chewy cookies that almost melt in your mouth.
Mixing the Ingredients
First, we combine the dry and wet ingredients with precision to create a smooth, cohesive dough. Follow these steps for optimal results:
- Cream Butter and Sugars: Using softened unsalted butter, beat it together with granulated sugar and brown sugar until the mixture is light and fluffy. This incorporates air to promote tenderness.
- Add Eggs and Vanilla: Beat in eggs one at a time, ensuring each is fully incorporated, then add pure vanilla extract for rich flavor depth.
- Combine Dry Ingredients Separately: In another bowl, whisk together all-purpose flour, baking powder, baking soda, salt, and cornstarch. The cornstarch plays a key role in keeping our cookies soft and airy.
- Blend Dry and Wet Mixtures: Gradually add the dry ingredients to the wet, mixing on low speed or folding with a rubber spatula just until combined. Avoid overmixing to maintain pillow-like tenderness.
- Add Optional Mix-Ins: If desired, gently fold in add-ins such as mini chocolate chips or chopped nuts to customize texture and flavor.
| Ingredient | Measurement | Notes |
|---|---|---|
| Unsalted butter | 1 cup (2 sticks) | Softened |
| Granulated sugar | ¾ cup | |
| Brown sugar | ¾ cup | Packed |
| Eggs | 2 large | Room temperature |
| Vanilla extract | 2 tsp | Pure extract preferred |
| All-purpose flour | 2 ½ cups | Sifted |
| Baking powder | 1 tsp | |
| Baking soda | ½ tsp | |
| Salt | ½ tsp | |
| Cornstarch | 2 tsp | For extra softness |
Pro Tip: Use an electric mixer for creaming butter and sugars to achieve a light, airy base for your dough.
Chilling the Dough
Chilling the dough is a crucial step in ensuring our pillow cookies retain their shape and achieve that irresistible tender texture.
- Wrap the Dough: Shape your dough into a ball or flatten into a disk, then tightly wrap it in plastic wrap.
- Refrigerate Time: Place the dough in the refrigerator for at least 1 hour, preferably 2 to 3 hours. This resting period allows the flour to hydrate and the fats to solidify, preventing excessive spreading while baking.
- Optional Overnight Chill: For even better flavor development and texture, we recommend chilling overnight.
“Chilled dough creates cookies that are thick, soft, and perfectly pillowy – the hallmark of our signature pillow cookie recipe.”
Before baking, let the dough sit at room temperature for 5-10 minutes if too firm, making it easier to scoop and shape into cookies while preserving the softness that defines our recipe.
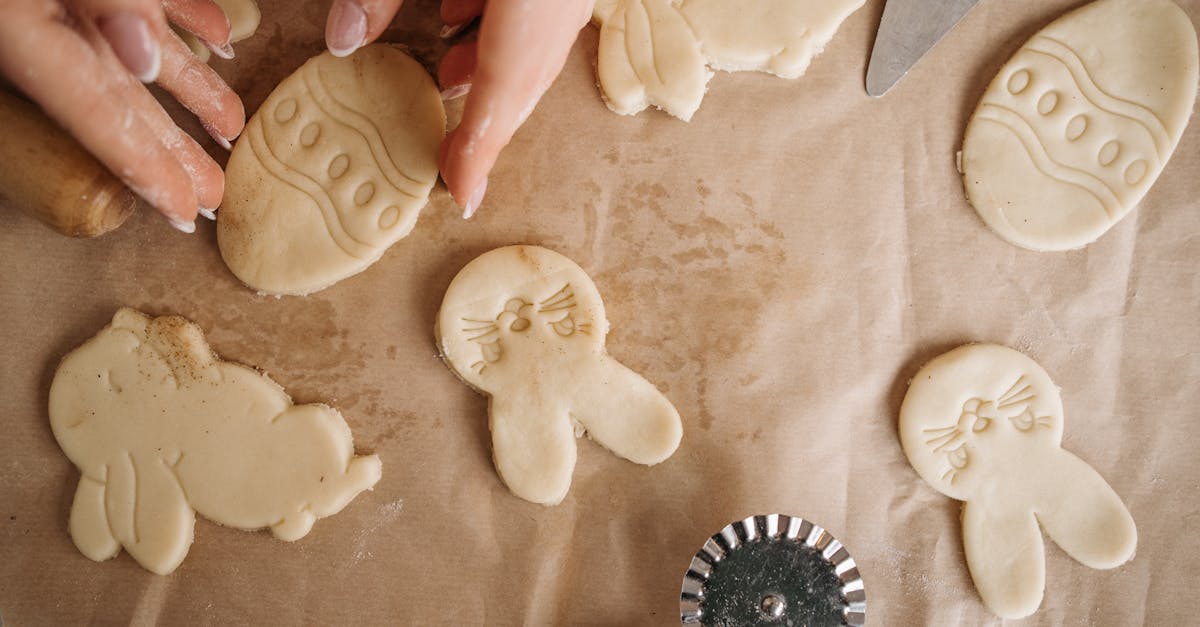
Shaping the Pillow Cookies
To create the signature pillowy texture of our Pillow Cookies, shaping the dough correctly is crucial. Follow these steps to ensure each cookie rises soft and tender with that irresistible melt-in-your-mouth feel.
- Scoop the Dough Evenly
Use a cookie scoop or a tablespoon to portion the dough into uniform balls. This ensures consistent baking and evenly puffed cookies. We recommend a 1.5-tablespoon scoop for perfectly sized Pillow Cookies.
- Roll into Smooth Balls
Gently roll each dough portion between your palms to create a smooth, round ball. Avoid compressing the dough too much to keep the light, airy interior intact.
- Space Dough Balls Properly
Place the dough balls on a prepared baking sheet lined with parchment paper or a silicone mat. Leave about 2 inches of space between each ball to allow for subtle spreading while maintaining the delicate pillow shape.
| Step | Tips |
|---|---|
| Scoop | Use 1.5 tablespoon cookie scoop |
| Roll | Gentle rolling to smooth without compressing |
| Spacing | 2 inches apart for optimal rise |
- Optional: Light Dusting with Powdered Sugar
For an added touch of sweetness and a soft finish, lightly dust each dough ball with powdered sugar before baking. This step enhances the cozy appearance and texture of the cookies.
- Final Dough Check
If the dough feels too soft after chilling, let the shaped cookie dough rest at room temperature for 5-10 minutes. This softens the surface slightly, making rolling and spacing easier while preserving the soft structure.
“Perfect shaping is the bridge between a good cookie dough and an unforgettable pillow-soft cookie.”
By following these steps, we ensure each Pillow Cookie bakes into a tender, puffy delight that delivers on our promise of softness and melt-in-your-mouth satisfaction.
Baking Instructions
Baking Pillow Cookies requires precision in temperature and timing to achieve their signature soft and pillowy texture. Let’s follow these key steps carefully for the best results.
Oven Temperature and Time
Preheat the oven to 350°F (177°C) to ensure even baking without drying out the cookies. Place the baking rack in the center to allow uniform heat circulation.
Bake the Pillow Cookies for exactly 10-12 minutes until the edges look set and the centers remain slightly soft. Avoid overbaking as this leads to less tender cookies and compromises their signature melt-in-your-mouth quality.
| Oven Temperature | Baking Time | Cookie Appearance at Doneness |
|---|---|---|
| 350°F (177°C) | 10-12 minutes | Edges set; centers soft and puffy |
After the time is up, remove the baking sheet from the oven immediately to prevent carryover baking.
Cooling the Cookies
Let the cookies cool on the baking sheet for 5 minutes to allow them to firm up slightly while preserving softness. Then transfer the cookies to a cooling rack to cool completely. This step avoids sogginess and maintains the ideal pillow-like texture.
We recommend cooling the cookies completely before serving or storing. If desired, lightly dust with powdered sugar once cooled for a delicate finishing touch.
“Patience during cooling is key to savoring the full delicate texture of our pillow cookies.“
By following these baking and cooling instructions precisely, we guarantee your Pillow Cookies will be irresistibly soft, chewy, and delicious every time.
Decorating and Serving Suggestions
To truly elevate our Pillow Cookie experience, we can enhance them with simple yet effective decorating and serving ideas. These methods not only add visual appeal but also complement the soft, melt-in-your-mouth texture with contrasting flavors and textures.
Decorating Ideas for Pillow Cookies
- Powdered Sugar Dusting
After baking and cooling, lightly sift powdered sugar over each cookie. This adds a delicate sweetness and a snowy, inviting appearance. For best results, use a fine mesh sifter and apply just before serving.
Tip: Dust again right before serving to maintain the fresh, powdery look.
- Drizzle with Melted Chocolate or Caramel
Warm some semi-sweet chocolate or caramel sauce and gently drizzle over the cookies using a spoon or piping bag. This adds rich flavor and an elegant finish without overpowering the pillow-soft texture.
- Sprinkle with Sea Salt Flakes
For a sophisticated touch, sprinkle a few flaky sea salt crystals over the cookies while the drizzle is still warm. The contrast between sweet and salty enhances flavor complexity.
- Add Mini Chocolate Chips or Nuts
Add a few mini chocolate chips or chopped toasted nuts (such as pecans or almonds) onto the cookie tops immediately after baking. This adds crunch and visual interest while complementing the softness.
Serving Suggestions
- Serve Pillow Cookies slightly warm or at room temperature to showcase their tender texture.
- Pair with freshly brewed coffee, rich hot chocolate, or a cold glass of milk for classic appeal.
- Create an inviting dessert platter by combining Pillow Cookies with fresh berries and small bowls of dipping sauces like chocolate ganache or raspberry coulis.
| Suggestion | Purpose | Serving Tip |
|---|---|---|
| Powdered Sugar Dusting | Adds delicate sweetness | Dust right before serving |
| Chocolate/Caramel Drizzle | Enhances richness | Use warm drizzle over cooled cookies |
| Sea Salt Flakes | Creates sweet-salty contrast | Sprinkle lightly after drizzle |
| Mini Chips or Nuts | Adds crunch and texture | Apply immediately after baking |
| Beverage Pairings | Complements taste | Offer coffee, milk, or hot chocolate |
“The beauty of Pillow Cookies lies not only in their pillowy softness but also in these subtle touches that make them truly irresistible.”
By following these decorating and serving tips, we can make our Pillow Cookies both a feast for the eyes and a delight for the palate every time.
Storage and Shelf Life
Proper storage is essential to maintain the signature softness and pillowy texture of our Pillow Cookies. Follow these guidelines to keep your cookies fresh and flavorful for as long as possible.
Room Temperature Storage
- Allow cookies to cool completely on a cooling rack before storing to prevent condensation and sogginess.
- Store cookies in an airtight container at room temperature.
- Place a slice of bread or a folded paper towel inside the container to absorb moisture and keep cookies soft.
- Cookies stored this way will stay fresh for up to 4 days.
Refrigeration
- If needing longer storage, refrigerate cookies in an airtight container.
- Separate layers with parchment paper or wax paper to prevent sticking.
- Let refrigerated cookies come to room temperature or warm slightly in the microwave (10–15 seconds) before serving to restore softness.
- Refrigerator storage extends freshness to 1–2 weeks.
Freezing for Extended Storage
To preserve Pillow Cookies for weeks or months:
- Cool cookies completely.
- Place in a single layer on a baking sheet and freeze until solid (about 1 hour).
- Transfer frozen cookies to a freezer-safe airtight container or heavy-duty freezer bag.
- Separate layers with parchment to avoid sticking.
- Label with date and contents.
| Storage Method | Container Type | Shelf Life | Notes |
|---|---|---|---|
| Room Temperature | Airtight container | Up to 4 days | Add bread slice for softness |
| Refrigerator | Airtight container | 1–2 weeks | Warm before eating to regain softness |
| Freezer | Airtight freezer-safe | Up to 3 months | Thaw at room temperature before serving |
Tips for Maintaining Pillow Cookie Texture
- Avoid storing cookies in open containers or bags to prevent drying out.
- Do not stack warm cookies when storing as it causes steam and sogginess.
- When thawing from frozen, allow cookies to rest in airtight container at room temperature for 30 minutes to retain moisture.
- For cookies dusted with powdered sugar, refresh lightly after thawing to maintain appearance.
“The secret to keeping our Pillow Cookies irresistibly soft is airtight containment and careful temperature handling.“
By following these steps, we ensure our Pillow Cookies stay as delicate and delicious as the moment they came out of the oven.
Tips for Perfect Pillow Cookies
To master perfect Pillow Cookies every time, these tips focus on maximizing softness, texture, and flavor.
1. Use Room Temperature Ingredients
Using butter and eggs at room temperature helps them blend evenly into the dough. Cold butter can cause uneven texture, while warm eggs incorporate moisture better, resulting in a creamier dough and pillowy texture.
2. Cream Butter and Sugars Thoroughly
For optimal fluffiness, cream the unsalted butter, granulated sugar, and brown sugar for at least 3 to 5 minutes until the mixture turns light and fluffy. This process incorporates air that helps produce a soft crumb.
3. Measure Dry Ingredients Accurately
Weighing or spooning flour correctly prevents dense cookies. Fluff the flour, spoon into the measuring cup, and level with the back of a knife instead of scooping directly.
| Ingredient | Proper Measurement Tip |
|---|---|
| All-purpose flour | Spoon and level with knife |
| Baking powder | Use fresh and level properly |
| Baking soda | Use exact measurement for rise |
| Cornstarch | Sift and level for tenderness |
4. Don’t Overmix After Adding Flour
Mix dry ingredients just until combined. Overmixing develops gluten that can toughen cookies, reducing the soft, melt-in-your-mouth quality.
5. Chill the Dough for Structure and Flavor
Refrigerate the dough for at least 1 hour to firm up the butter. Chilling controls spreading during baking and enhances flavor. We recommend up to overnight for best results.
6. Handle Dough Gently When Shaping
Use a 1.5-tablespoon cookie scoop for uniform balls. Roll dough lightly—avoid compressing it too much to maintain the pillowy softness. Space dough balls about 2 inches apart on the baking sheet to allow proper spreading without merging.
7. Optional Dusting Before Baking
For an extra cozy look and subtle sweetness, lightly dust dough balls with powdered sugar before baking.
8. Bake at the Right Temperature and Time
Preheat the oven to 350°F (177°C). Bake cookies for 10-12 minutes until edges set and centers remain slightly soft. Remove sheets immediately to avoid carryover baking which can harden the cookies.
9. Cool Properly to Lock in Texture
Allow cookies to cool on the baking sheet for 5 minutes before transferring to a rack. This resting period lets cookies set without losing their delicate pillow-like texture.
Quick Overview of Crucial Steps
| Step | Key Point |
|---|---|
| Ingredient temp | Use room temp for butter and eggs |
| Creaming | 3-5 minutes until light & fluffy |
| Dry mix | Mix only until combined |
| Dough chilling | Minimum 1 hour, preferably overnight |
| Dough handling | Lightly roll, 2-inch spacing |
| Baking temp/time | 350°F / 10-12 minutes |
| Cooling | 5 minutes on sheet, then rack |
“The secret to pillow-soft cookies lies in patience—especially with chilling and cooling.“
Following these tips ensures consistently soft, chewy, and irresistible Pillow Cookies that live up to their name.
Conclusion
Pillow Cookies bring a comforting blend of softness and flavor that’s hard to resist. With simple ingredients and a few key techniques, we can create these melt-in-your-mouth treats anytime. Whether for sharing or indulging ourselves, they make every moment a little sweeter.
By paying attention to details like chilling the dough and proper baking, we ensure each batch turns out perfectly tender and chewy. Adding our favorite mix-ins or toppings lets us customize these cookies to our taste.
With the right storage and serving tips, Pillow Cookies stay fresh and delicious longer. Let’s keep baking and enjoying these delightful cookies that truly live up to their name.
Frequently Asked Questions
What exactly are Pillow Cookies?
Pillow Cookies are soft, chewy cookies known for their light, pillowy texture that melts in your mouth. They are perfect for snacking or sharing due to their comforting sweetness.
What ingredients do I need to make Pillow Cookies?
You’ll need all-purpose flour, baking powder, baking soda, salt, cornstarch, unsalted butter, granulated sugar, brown sugar, eggs, vanilla extract, and optional add-ins like mini chocolate chips or nuts.
Why is chilling the dough important?
Chilling the dough helps the cookies keep their shape and enhances their tender, melt-in-your-mouth texture. Refrigerate for at least 1 hour or overnight for best results.
What tools are essential for baking Pillow Cookies?
Key tools include mixing bowls, an electric mixer, measuring cups and spoons, a rubber spatula, cookie scoop, baking sheets, parchment paper or silicone mats, cooling rack, and a sifter.
How do I shape Pillow Cookies properly?
Use a 1.5-tablespoon cookie scoop to portion dough into uniform balls, roll gently without compressing, and space about 2 inches apart on the baking sheet for even spreading.
What is the recommended baking temperature and time?
Preheat your oven to 350°F (177°C) and bake Pillow Cookies for 10-12 minutes until edges look set but centers remain soft.
How should Pillow Cookies be cooled after baking?
Cool cookies on the baking sheet for 5 minutes, then transfer to a cooling rack to preserve their soft, pillowy texture.
Can I add decorations or toppings to Pillow Cookies?
Yes! Dust with powdered sugar, drizzle with melted chocolate or caramel, and sprinkle with sea salt or nuts for extra flavor and appeal.
How do I store Pillow Cookies to maintain softness?
Store in airtight containers at room temperature for up to 3 days. For longer storage, refrigerate or freeze. Adding a slice of bread helps keep moisture in.
What tips improve the softness and texture of Pillow Cookies?
Use room temperature ingredients, cream butter and sugars well, measure flour accurately, avoid overmixing, chill dough, handle gently, bake properly, and cool correctly for best results.