
Pickled sport peppers bring a zesty kick to any dish with their vibrant flavor and satisfying crunch. Originating from New Orleans, these tiny peppers pack a punch and have become a staple in Creole and Cajun cooking. They’re perfect for spicing up sandwiches, salads, or even enjoying straight from the jar.
We love how easy it is to make our own pickled sport peppers at home. With just a few simple ingredients and a quick pickling process, you can capture that tangy heat all year round. This recipe lets us control the spice level and customize the flavor to our liking, making it a versatile addition to our pantry.
Ingredients
To craft our Pickled Sport Peppers with the perfect balance of heat and tang, we start with fresh, quality ingredients. Each component contributes essential flavor and crunch, ensuring our pickled peppers deliver that iconic zesty kick cherished in Creole and Cajun dishes.
Here is the detailed breakdown of ingredients you will need:
| Ingredient | Quantity | Preparation Notes |
|---|---|---|
| Sport peppers | 1 pound | Rinse thoroughly, drain |
| White distilled vinegar | 2 cups | Use for pickling brine |
| Water | 2 cups | Combine with vinegar |
| Granulated sugar | 2 tablespoons | Balances acidity |
| Kosher salt | 1 tablespoon | Enhances flavor, non-iodized |
| Garlic cloves | 3 cloves | Peeled and lightly crushed |
| Black peppercorns | 1 teaspoon | Whole for subtle spice |
| Mustard seeds | 1 teaspoon | Adds mild pungency |
| Dried oregano | 1 teaspoon | Classic Creole herb |
| Bay leaf | 1 leaf | Aromatic depth |
We recommend using fresh sport peppers harvested recently to keep their crunch and herbal zest intact. The vinegar and water ratio forms the base of our brine, while the sugar and salt play crucial roles in balancing sharpness and preserving the peppers perfectly.
Our spices—garlic, peppercorns, mustard seeds, oregano, and bay leaf—are important for achieving that multidimensional flavor profile characteristic of traditional pickled sport peppers.
Remember, precise measurements and prep ensure consistent results every time. Let’s gather these ingredients and move forward with creating a vibrant batch of pickled sport peppers that will elevate your dishes impressively.
Equipment Needed
To create our Pickled Sport Peppers with the perfect balance of heat and tang, having the right equipment is essential. Below is a detailed list of tools and utensils that will make the pickling process smooth and efficient.
Essential Tools for Pickling Sport Peppers
- Canning jars with lids: Use sterilized pint or half-pint jars. These provide a secure seal and preserve freshness.
- Large non-reactive pot: Ideal for boiling the pickling brine safely—choose stainless steel or enamel to avoid metallic flavors.
- Tongs or jar lifter: These help us handle hot jars safely without risking burns.
- Funnel: A wide-mouth jar funnel ensures we transfer peppers and brine into jars without spills.
- Mixing spoon: Use a long-handled non-metal spoon to stir the brine and ingredients thoroughly.
- Cutting board and sharp knife: For trimming stems or slicing peppers if desired.
- Measuring cups and spoons: Accuracy here is key for consistent flavor and preservation.
- Clean kitchen towels: To dry jars and wipe any drips during the process.
Optional but Helpful
- Food thermometer: To check that the brine reaches the appropriate temperature before pouring.
- Labeling tools: Waterproof pens or stickers to note the preparation date and spice level on jars.
| Equipment | Purpose | Notes |
|---|---|---|
| Canning jars & lids | Storage and preservation | Sterilized for safety |
| Large pot | Boiling brine | Stainless steel or enamel used |
| Tongs or jar lifter | Handling hot jars | Prevents burns |
| Wide-mouth funnel | Filling jars | Avoids spills |
| Mixing spoon | Stirring brine and spices | Non-metal preferred |
| Cutting board & knife | Preparing peppers | Essential for trimming |
| Measuring cups/spoons | Measuring ingredients accurately | Precision improves flavor |
| Kitchen towels | Drying and cleaning jars | Keeps workspace clean |
| Food thermometer (opt) | Ensuring proper brine temperature | Not mandatory but useful |
| Labeling tools (opt) | Dating and identifying jars | Helps track freshness |
Equipped with these tools, we ensure every batch of our pickled sport peppers is vibrant, safe, and delicious. Getting the right equipment ready sets us up for success before we jump into the next steps of pickling.
Prep Work
Before we dive into pickling, proper preparation ensures our pickled sport peppers deliver that signature flavor and crunch. This phase sets the foundation for successful pickling and a vibrant final product.
Washing and Preparing the Sport Peppers
We begin by thoroughly washing the fresh sport peppers under cold running water. Removing dirt and any residues is crucial to maintain cleanliness.
- Rinse each pepper individually.
- Pat dry with a clean kitchen towel or paper towels to avoid excess moisture.
- Remove any stems and inspect for blemishes or soft spots; discard damaged peppers.
- To control the heat level, prick the peppers with a fork or make a small slit on each. This step allows the pickling brine to penetrate thoroughly.
Tip: Wearing gloves during handling prevents irritation from the pepper oils.
Sterilizing Jars and Lids
Properly Sterilizing Jars and Lids is essential to preserve our pickled sport peppers safely.
| Equipment | Method | Time Required |
|---|---|---|
| Glass canning jars | Boiling water bath | 10 minutes |
| Metal lids | Simmer in hot water (not boiling) | 5 minutes |
| Alternative | Oven sterilization | 15 minutes at 275°F (135°C) |
Steps to sterilize:
- Wash jars and lids in hot soapy water.
- Rinse thoroughly to remove soap residue.
- Place jars upright in a large pot of boiling water for 10 minutes.
- Simmer lids in hot water for 5 minutes without boiling.
- Use sterilized tongs or jar lifter to remove jars and lids.
- Place sterilized jars on a clean towel to dry before filling.
Following these sterilization steps guarantees our pickled sport peppers remain fresh and safe throughout storage.
Pickling Brine Preparation
To achieve the signature zesty kick and perfect balance of flavors in our pickled sport peppers, preparing the pickling brine is a crucial step. Here’s how we craft the brine that brings out that iconic tang and ensures the peppers remain crisp and vibrant.
Ingredients for the Pickling Brine
We use a blend of vinegar, water, spices, and seasonings that complement the peppers without overpowering their natural heat.
| Ingredient | Quantity | Purpose |
|---|---|---|
| White distilled vinegar | 2 cups (480 ml) | Provides acidity and preserves the peppers |
| Water | 2 cups (480 ml) | Dilutes the vinegar for balanced tartness |
| Granulated sugar | 2 tablespoons | Balances acidity with subtle sweetness |
| Kosher salt | 1 tablespoon | Enhances flavor and aids preservation |
| Garlic cloves, peeled | 3 cloves | Adds pungent aromatic notes |
| Black peppercorns | 1 teaspoon | Adds a warm spice dimension |
| Mustard seeds | 1 teaspoon | Introduces mild, tangy warmth |
| Dried oregano | 1/2 teaspoon | Brings earthy herbal complexity |
| Bay leaf | 1 leaf | Adds depth and subtle bitterness |
Step-by-Step Brine Preparation
- Combine Liquid Ingredients
In a large non-reactive pot, pour 2 cups of white distilled vinegar and 2 cups of water. The equal parts balance sharpness and smoothness ensuring our brine is perfectly tangy but not overpowering.
- Add Sweetness and Salt
Stir in 2 tablespoons of granulated sugar and 1 tablespoon of kosher salt until completely dissolved. This combination preserves the peppers while mellowing vinegar’s acidity.
- Incorporate Whole Spices and Herbs
Add 3 peeled garlic cloves, 1 teaspoon black peppercorns, 1 teaspoon mustard seeds, 1/2 teaspoon dried oregano, and 1 bay leaf directly into the pot. These ingredients infuse the brine with layers of flavor that marry perfectly with the sport peppers’ heat.
- Heat the Brine
Place the pot over medium heat. Bring the mixture to a gentle boil while stirring occasionally. Once boiling, reduce heat and let it simmer for 5 minutes. This process extracts flavors from the spices and melds them into a harmonious blend.
- Cool Slightly Before Use
After simmering, remove the pot from heat and allow the brine to cool for about 10 minutes. Pouring the brine into jars while too hot can soften the peppers excessively. This cooling period helps maintain their crispness and vibrant texture.
“The key to a balanced pickling brine is the harmony between acidity, sweetness, and spices—the secret that transforms ordinary sport peppers into a fiery treat.”
With our pickling brine ready, we are set to proceed with filling the prepared jars containing the sport peppers, ensuring each jar is packed with flavor and ready to develop that signature snap and spicy punch after pickling.
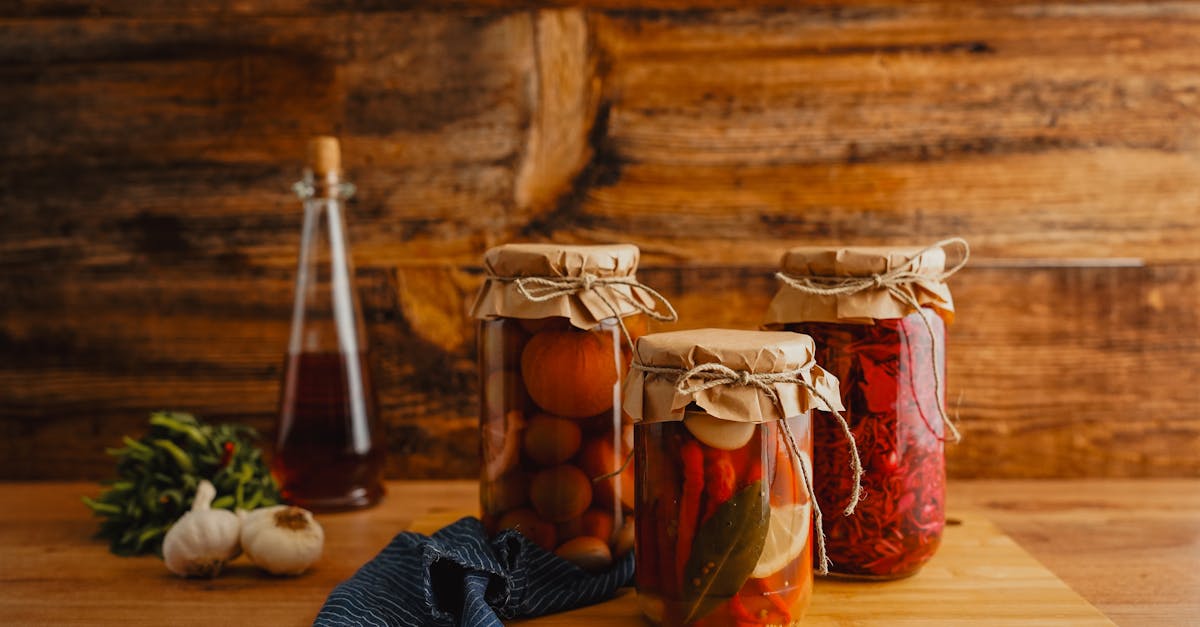
Packing the Jars
Packing the jars correctly is crucial to preserving the fresh snap and vibrant flavor of our pickled sport peppers. Let’s carefully layer the peppers, garlic, and spices to ensure every bite bursts with that iconic zesty crunch.
Adding Peppers and Garlic
Begin by tightly packing the prepared sport peppers into the sterilized jars. Use your fingers or a small utensil to gently press the peppers down, eliminating any air pockets but without bruising them. Next, add the peeled garlic cloves, distributing them evenly among the jars to infuse that pungent, aromatic depth. Remember:
- Pack peppers vertically or horizontally, depending on the jar shape, to maximize use of space.
- Leave about 1/2 inch headspace at the top for brine expansion.
- Keep the peppers snug but avoid forcing them to prevent crushing.
Pouring the Brine
Once the peppers and garlic are snug inside, pour the cooled pickling brine carefully over them. Use a wide-mouth funnel to minimize spills and ensure the liquid surrounds all peppers fully. The brine should cover the peppers completely, leaving that 1/2 inch headspace intact. This step is important because:
- The acidity and seasoning in the brine prevent spoilage and foster proper fermentation.
- Complete submersion avoids exposure to air that might lead to mold or discoloration.
- The right headspace allows for expansion during cooling.
We recommend checking the jars from different angles to confirm no peppers are sticking out of the liquid.
Sealing the Jars
Finally, wipe the rims of the jars clean with a damp cloth to remove any brine residue. Place the sterilized lids and bands securely on top. Tighten the bands just until fingertip-tight—too tight can prevent air from escaping during processing, too loose risks leakage. Seal the jars as follows:
| Step | Detail |
|---|---|
| Wipe rim | Remove residue to ensure proper sealing |
| Place lid | Use fresh sterilized lids for safety |
| Tighten band | Finger-tight, not too tight to prevent cracking |
| Check seal after cooling | Lid should be slightly concave and unmovable |
Once sealed, the jars are ready for the next stage: processing or refrigerating, depending on your storage method.
Properly packed and sealed jars are the foundation to perfect homemade pickled sport peppers that will enliven your dishes with every fiery, crunchy bite.
Pickling Process
Mastering the pickling process is key to capturing the vibrant flavor and signature crunch of our Pickled Sport Peppers. Whether you choose to store your jars in the refrigerator or preserve them long-term with water bath canning, following precise steps ensures safety and flavor excellence.
Refrigeration Method
The refrigeration method is the simplest way to preserve our pickled sport peppers while maintaining their crispness and bold flavor. This method is perfect if we plan to consume the peppers within a few weeks.
Steps for Refrigeration:
- Pack Jars: After layering sport peppers, garlic, and spices in sterilized jars, pour the slightly cooled pickling brine over the contents ensuring complete submersion.
- Seal: Wipe the jar rims clean to remove any residue. Place sterilized lids on the jars and screw the bands securely but without overtightening.
- Cool and Refrigerate: Let the jars cool to room temperature before placing them in the refrigerator.
- Wait for Flavor Development: Allow the pickled sport peppers to marinate for at least 5 days. The flavors deepen with time; for best results, wait up to 2 weeks.
- Storage: Keep refrigerated at all times. The peppers stay fresh and flavorful for up to 1 month.
| Step | Details |
|---|---|
| Submerge peppers | Ensure peppers are completely covered |
| Lid sealing | Secure but not overly tight |
| Flavor development | Minimum 5 days, ideal 2 weeks |
| Storage duration | Up to 1 month in the fridge |
“Refrigeration keeps the peppers crisp and zesty, offering quick satisfaction and vibrant flavor.”
Water Bath Canning Method
For long-term storage and gifting, the water bath canning method provides a safe way to preserve our pickled sport peppers while locking in their signature snap and heat.
Step-by-Step Water Bath Canning:
- Prepare Jars: Follow the same packing process as with refrigeration, ensuring peppers and spices are tightly packed and brine covers everything.
- Seal Jars: Clean jar rims thoroughly, place sterilized lids, and tighten bands firmly to finger-tight.
- Prepare Boiling Water Bath: Fill a large non-reactive pot with enough water to cover jars by at least 1 inch. Heat water to a rolling boil.
- Process Jars: Using tongs or a jar lifter, lower jars into the boiling water bath. Process for 10 minutes (adjust for altitude if necessary).
- Remove and Cool: Carefully lift jars from the water and place them on a clean towel. Avoid drafts and allow them to cool undisturbed for 12-24 hours.
- Check Seals: After cooling, press the center of each lid. It should be concave and not flex when pressed. Any unsealed jars should be refrigerated and consumed promptly.
- Label and Store: Label jars with the date and store in a cool, dark place. Properly sealed jars last up to 1 year.
| Step | Time/Details |
|---|---|
| Boiling water depth | 1 inch over jars |
| Processing duration | 10 minutes* |
| Cooling Time | 12-24 hours |
| Shelf Life | Up to 1 year |
*Adjust processing time if you are above 1,000 feet altitude following USDA guidelines.
By choosing the appropriate pickling process, we ensure our homemade pickled sport peppers deliver that authentic spicy crunch safely and deliciously, whether enjoyed immediately or saved for later.
Serving Suggestions
Pickled Sport Peppers bring a fiery crunch and zesty flavor that can elevate many dishes. Here are our top ways to enjoy these spicy gems:
1. Add to Sandwiches and Po’ Boys
Layer sliced pickled sport peppers onto your favorite sandwiches and classic New Orleans po’ boys. Their bright acidity cuts through rich meats and creamy sauces, adding a bold kick.
- Simply slice peppers thinly.
- Add on top of roast beef, fried shrimp, or turkey sandwiches.
- Pair with mayo, lettuce, and tomato for a perfect balance.
2. Enhance Salads and Slaws
Toss whole or chopped sport peppers into green salads or crunchy cabbage slaws to introduce a tangy heat and vibrant color. This simple addition intensifies flavor without overpowering other ingredients.
- Add to mixed greens with olive oil vinaigrette.
- Mix into coleslaw for a spicy twist.
3. Serve as a Flavorful Condiment
Place a small bowl of pickled sport peppers alongside charcuterie boards, grilled meats, or burgers. They act as a zesty condiment allowing guests to customize heat levels.
- Spoon onto slices of smoked sausage or steak.
- Garnish hot dogs for an authentic Creole experience.
4. Incorporate into Cajun and Creole Dishes
Use pickled sport peppers in your traditional recipes like jambalaya, gumbo, or red beans and rice to boost the signature Creole spice profile.
- Dice and stir in during cooking or sprinkle on top before serving.
- Adjust quantity based on your preferred heat intensity.
Flavor Pairing Table
| Dish Type | Suggested Usage | Flavor Impact |
|---|---|---|
| Sandwiches & Po’ Boys | Sliced or whole on top | Adds acidity, spice, and crunch |
| Salads & Slaws | Chopped mixed into dressings | Introduces tangy heat and texture |
| Condiments | Served alongside meats and cheeses | Provides customizable spice punch |
| Cajun & Creole Dishes | Incorporated into cooking or as garnish | Enhances traditional bold spice flavors |
“Pickled Sport Peppers bring a crunch that jolts your taste buds and a heat that lingers — a must-have punch for authentic Creole flavor.”
Pro Tips for Serving
- Balance the heat: Combine with creamy elements such as aioli or cream cheese to tone down the spice if needed.
- Presentation: Use whole peppers for an eye-catching garnish or sliced for integration throughout the dish.
- Storage: Keep pickled peppers refrigerated after opening to maintain crispness and vibrant flavors.
Storage Tips
To maintain the crisp texture and zesty flavor of our pickled sport peppers, proper storage is essential. Here are the best practices to keep your jars fresh and flavorful:
Short-Term Storage: Refrigeration Method
- After sealing, place the jars in the refrigerator immediately.
- Allow the peppers to develop their flavor for at least 5 days before enjoying.
- Store refrigerated jars for up to 2 months to preserve the optimal crunch and spice.
- Always use a clean utensil when removing peppers to avoid contamination.
Long-Term Storage: Water Bath Canning Method
- Process sealed jars in a boiling water bath as outlined previously.
- Store processed jars in a cool, dark, and dry place, ideally at temperatures between 50°F and 70°F (10°C – 21°C).
- Properly canned jars can be stored unopened for up to 1 year without loss of flavor or texture.
- After opening, refrigerate and consume within 2 months for best results.
Key Storage Considerations
| Storage Method | Temperature Range | Duration | Notes |
|---|---|---|---|
| Refrigeration | 35°F – 40°F (2°C – 4°C) | Up to 2 months | Keeps peppers crisp, ready to eat quickly |
| Water Bath Canning | 50°F – 70°F (10°C – 21°C) | Up to 1 year (unopened) | Requires proper sealing, ideal for pantry storage |
| After Opening (any) | 35°F – 40°F (2°C – 4°C) | Up to 2 months | Use clean utensils, monitor for spoilage |
Pro Tips for Extended Freshness
- Always label jars with pickling date to track freshness.
- Keep jars away from direct sunlight to prevent color fading and flavor loss.
- If you notice any off-odor, discoloration, or mold, discard the jar immediately.
- Avoid shaking jars after storage to prevent brine cloudiness and pepper damage.
As we continue our pickling journey, remember that effective storage preserves the signature snap and spice of our homemade pickled sport peppers, making them a vibrant addition to every meal.
Conclusion
Pickled sport peppers bring a unique burst of flavor and crunch that can transform everyday meals into something extraordinary. Making them at home gives us the freedom to tailor the heat and seasoning exactly to our liking. With the right ingredients, equipment, and techniques, we can create a pantry staple that’s ready to spice up sandwiches, salads, and more.
By mastering the pickling process, we ensure these peppers stay fresh and flavorful for months, making them a reliable go-to condiment. Whether we enjoy them soon after pickling or save them for later, their vibrant taste will always add a delicious kick to our dishes. Let’s embrace the tradition and zest of pickled sport peppers and make them a flavorful part of our kitchen routine.
Frequently Asked Questions
What are pickled sport peppers?
Pickled sport peppers are small, spicy peppers pickled in a flavorful brine. They originate from New Orleans and are known for their crunchy texture and vibrant, zesty flavor, commonly used in Cajun and Creole cooking.
What ingredients are needed to make pickled sport peppers?
You need fresh sport peppers, white distilled vinegar, water, granulated sugar, kosher salt, garlic cloves, black peppercorns, mustard seeds, dried oregano, and a bay leaf for the perfect brine.
What equipment is essential for pickling sport peppers?
Essential tools include sterilized canning jars, a large non-reactive pot, jar lifter or tongs, wide-mouth funnel, mixing spoon, cutting board, measuring cups/spoons, and clean kitchen towels.
How do I prepare sport peppers for pickling?
Rinse and dry the peppers well, remove any blemishes, and prick or slit them slightly to control heat release. Sterilize jars and lids thoroughly before packing.
How is the pickling brine prepared?
The brine is made by boiling vinegar, water, sugar, salt, garlic, black peppercorns, mustard seeds, oregano, and bay leaf, balancing acidity, sweetness, and spices to complement the peppers’ heat.
How should I pack the jars with sport peppers?
Tightly pack cleaned peppers and garlic into sterilized jars, leaving proper headspace. Pour cooled brine over the peppers until fully submerged, then clean rims and seal jars with sterilized lids and bands.
What are the two main methods for pickling sport peppers?
You can use the refrigeration method for short-term crisp, spicy peppers, or the water bath canning method for long-term preservation, ensuring safety and shelf life up to a year.
How long do pickled sport peppers need to develop flavor?
For best flavor, refrigerate the sealed jars and let them sit for at least five days before eating to allow the peppers to absorb the brine fully.
What dishes go well with pickled sport peppers?
They are great in sandwiches, po’ boys, salads, slaws, as a condiment with meats, and in traditional Cajun or Creole recipes for a spicy, crunchy kick.
How should I store pickled sport peppers after opening?
Store them refrigerated with the lid tightly closed and consume within a few weeks. For unopened jars, keep in a cool, dark place to maintain crispness and flavor.