
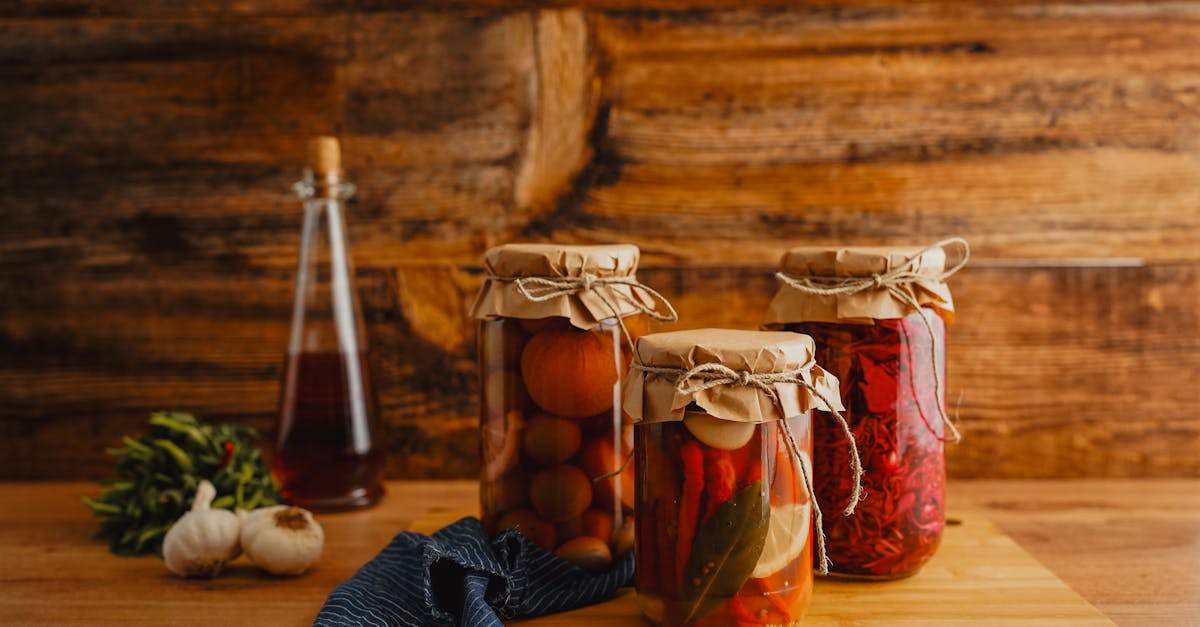
Pickled radishes add a bright tangy crunch that can elevate any meal from ordinary to extraordinary. Canning them not only preserves their fresh flavor but also lets us enjoy this vibrant side year-round. Whether we’re topping salads sandwiches or enjoying them straight from the jar these pickled radishes bring a burst of zest and color to our table.
This recipe guides us through the simple canning process ensuring our pickled radishes stay crisp and flavorful. With just a few basic ingredients and easy steps we can create a pantry staple that’s perfect for quick snacks or enhancing our favorite dishes. Let’s dive into making this delicious pickled radish recipe that’s as practical as it is tasty.
Ingredients
To create our Pickled Radish Recipe for Canning, we need to gather fresh and high-quality ingredients that deliver the perfect balance of tanginess and crunch. Each ingredient plays a vital role in preserving flavor and texture while ensuring safe canning.
Here is the detailed list of ingredients with specific preparation notes:
| Ingredient | Quantity | Preparation Notes |
|---|---|---|
| Fresh radishes | 2 pounds | Washed, trimmed, sliced (1/4-inch) |
| White vinegar | 2 cups | 5% acidity for safe pickling |
| Water | 2 cups | Filtered or distilled |
| Granulated sugar | 1/2 cup | Adjust for desired sweetness |
| Kosher salt | 1 tablespoon | Non-iodized for clarity & safety |
| Garlic cloves | 2-3 cloves | Peeled and lightly crushed |
| Whole black peppercorns | 1 teaspoon | Adds subtle heat |
| Mustard seeds | 1 teaspoon | Optional for extra flavor |
| Red chili flakes | 1/2 teaspoon | Optional for mild spiciness |
| Fresh dill sprigs | 2-3 sprigs | Optional, adds aromatic freshness |
We recommend using radishes that are firm and brightly colored for the best texture. Slicing uniformly ensures even pickling and consistent crunch.
The combination of white vinegar and water creates the essential pickling brine, while sugar and salt balance acidity with sweetness and preserve the radishes safely.
Adding aromatic spices and herbs like garlic, peppercorns, and dill elevates the flavor profile, offering that signature tangy and fresh note found in classic pickled radishes.
By assembling these ingredients precisely, we set the foundation for a successful canning process that locks in flavor and quality for year-round enjoyment.
Equipment and Tools Needed
To ensure our pickled radish recipe canning turns out perfectly, having the right equipment and tools is essential. Below we detail the must-have items that streamline the canning process and guarantee safety and flavor preservation.
Canning Jars and Lids
Using proper Canning Jars and Lids is crucial. We recommend Mason jars made of durable glass designed to withstand the heating process. Each jar should have a new, unused two-piece lid: a flat sealing lid and a screw band. This combo ensures a secure vacuum seal to keep our pickled radishes fresh for months.
| Item | Details | Recommended Size |
|---|---|---|
| Mason Jars | Durable, heat-resistant glass | 16 oz (pint) or 32 oz (quart) |
| Flat Lids | Single use, vacuum sealing, BPA-free coating | Fits chosen jar size |
| Screw Bands | Reusable metal rings, hold lids during processing | Matches jar diameter |
Large Pot and Canning Rack
A large pot is indispensable for sterilizing jars and processing the filled jars in a water bath. We use a pot tall enough to submerge jars fully under boiling water. A canning rack sits inside the pot to prevent the jars from touching the pot’s bottom, protecting them from cracking and allowing even water circulation.
- Pot minimum diameter: 12 inches
- Height: At least 8 inches to cover jars with 1-2 inches of water
- Canning rack material: stainless steel or silicone preferred
Measuring Cups and Spoons
Accuracy is key for our safety and flavor balance. We rely on precise Measuring Cups and Spoons for all liquid and dry ingredients. Use glass or heat-proof measuring cups for hot liquids like the vinegar brine. Standard measuring spoons help measure salt, sugar, and spices consistently.
- Use standard US measurements: 1 cup = 8 fl oz, teaspoons, tablespoons
- Heat-resistant materials for liquids > 120°F (49°C) recommended
Knife and Cutting Board
Uniformly sliced radishes ensure even pickling and texture. A sharp knife provides clean, smooth cuts that enhance the appearance and help flavors penetrate. A sturdy cutting board—preferably non-porous like plastic or treated wood—keeps workspace hygienic and safe.
- Knife type: Chef’s knife or a sharp paring knife works best
- Cutting board: Large enough to hold radishes comfortably and easy to sanitize
Every tool in our canning process plays an integral role in crafting delicious, perfectly preserved pickled radishes for year-round enjoyment.
Preparation
To achieve perfectly pickled radishes through canning, careful preparation is essential. Let’s break down the key steps for prepping the radishes and sterilizing the jars to ensure safety and quality.
Preparing the Radishes
- Select fresh, firm radishes with bright skin free from blemishes or soft spots for the best texture and flavor.
- Rinse the radishes thoroughly under cold running water to remove dirt and impurities.
- Trim the tops and root ends using a sharp knife, discarding any leaves or damaged parts.
- Slice radishes uniformly into 1/8 to 1/4 inch rounds or matchsticks for even pickling and consistent crunch.
- To maintain crispness, soak sliced radishes briefly in ice water for 15 minutes, then drain and pat dry.
- Keep radishes chilled until ready to fill the jars to maintain freshness.
Sterilizing the Jars and Lids
Sterilization prevents harmful bacteria and ensures a safe vacuum seal during canning:
| Step | Details |
|---|---|
| Wash jars and lids | Use warm soapy water, rinse thoroughly |
| Inspect jars | Check for cracks, chips, or defects |
| Boiling water bath method | Place jars upright in boiling water for 10 minutes |
| Heating lids | Submerge lids in hot (not boiling) water to soften sealing compound |
| Keep jars hot | Leave sterilized jars in hot water until ready to fill to prevent cracking |
Tip: We always keep sterilized jars hot until filling to avoid thermal shock that can break glass during filling or processing.
By following these preparation steps we ensure that pickled radish canning results in a safe preserved product with delicious flavor and satisfying crunch.
Making the Pickling Brine
To create the perfect pickling brine for our pickled radish recipe canning, we need to strike the right balance between acidity, sweetness, and seasoning. This brine not only preserves the radishes but also infuses them with vibrant flavors that enhance their natural crunch and tang.
Step 1: Combine the Liquid Ingredients
In a saucepan, mix the following liquid components precisely:
- White vinegar – This provides the crucial acidity to safely preserve the radishes.
- Water – Dilutes the vinegar to temper the sharpness.
- Sugar – Adds a subtle sweetness that balances the tartness.
- Salt – Enhances flavor and contributes to preservation.
| Ingredient | Quantity |
|---|---|
| White vinegar | 2 cups (16 fl oz) |
| Water | 2 cups (16 fl oz) |
| Sugar | 1/2 cup |
| Salt | 2 tablespoons |
Step 2: Heat and Dissolve
Place the mixture over medium heat. Stir continuously until the sugar and salt dissolve completely. Heating the brine helps meld these ingredients into a smooth, well-balanced base. Avoid boiling as it can alter the flavor intensity.
Pro Tip: Maintaining a gentle simmer ensures the brine penetrates the radishes evenly during canning without overpowering their natural flavor.
Step 3: Add Flavor Enhancers
Once the brine is well blended, we add aromatic and flavor-enhancing ingredients to elevate the taste:
- Garlic cloves – 3 to 4 lightly crushed cloves for pungent depth.
- Black peppercorns – 1 teaspoon to add mild spiciness.
- Fresh dill sprigs (optional) – 2 sprigs for a refreshing herbal note.
These add layers of complexity to the brine, complementing the crisp, tangy radishes beautifully.
Step 4: Final Simmer and Cool
Allow the brine with added spices to simmer gently for 5 minutes. This step extracts essential oils and flavors from the spices.
Then remove the brine from heat and let it cool slightly—warm brine fills the jars better without shocking the radishes or jars.
By following this method, our pickling brine will be flavorful, safe for canning, and perfectly balanced to deliver that signature tangy crunch in every bite of our pickled radishes.
Canning Process
The Canning Process is crucial for ensuring our pickled radishes stay fresh, flavorful, and safe for long-term storage. Let’s walk through each key step to preserve that tangy crunch perfectly.
Filling the Jars
We start by carefully filling each sterilized Mason jar with the sliced radishes. Leaving enough headspace (about 1/2 inch) at the top is essential to allow for expansion during processing.
- Pack the radishes firmly but avoid crushing them.
- Pour the hot pickling brine over the radishes, covering them completely.
- Ensure the brine covers all radish slices with no air pockets left.
| Step | Detail |
|---|---|
| Headspace | 1/2 inch (1.27 cm) |
| Jar Size | Use clean sterilized jars |
| Radish Packing | Firm but not crushed |
| Brine Coverage | Fully cover radishes |
Removing Air Bubbles
Next, we need to remove trapped air bubbles. Air inside jars can cause spoilage or uneven preservation.
- Insert a non-metallic spatula or bubble remover along the jar sides.
- Gently press and slide it to release trapped air bubbles.
- Check brine level and adjust if needed to maintain proper headspace.
Tip: Removing air bubbles helps ensure vacuum sealing and even pickling.
Sealing the Jars
Once air bubbles are gone, wipe the jar rims with a clean damp cloth to remove any residue.
- Place new, unused lid on each jar.
- Screw on the metal band until fingertip-tight—do not overtighten.
- The right tightness allows air to escape during processing, creating a proper vacuum seal.
Remember: Using new lids is critical for a safe and secure vacuum seal.
Processing the Jars in a Water Bath
For canning, we process the filled jars in a boiling-water bath to achieve safe preservation.
- Place jars on a canning rack inside a large pot of boiling water.
- Ensure water covers jars by at least 1-2 inches.
- Process for 10 minutes from the moment water returns to a boil (adjusting for altitude if necessary).
| Step | Detail |
|---|---|
| Water Bath Depth | 1-2 inches above jars |
| Processing Time | 10 minutes (at sea level) |
| Equipment | Large pot, rack, heat source |
| Altitude Adjustments | Add time as needed if above 1000 ft |
After processing, we remove jars carefully and place them on a towel to cool undisturbed for 12-24 hours. We listen for the satisfying “pop” sound indicating a secure vacuum seal. Proper canning locks in our pickled radishes’ crisp texture and bright flavors for delicious enjoyment throughout the year.
Cooling and Storing
Proper Cooling and Storing of our pickled radish recipe canning ensures safety, maintains crispness, and preserves flavor for months. Let’s explore the essential steps to cool jars safely and store them for optimal shelf life.
Cooling the Canned Radishes
Once we’ve completed the water bath processing, we must cool the jars carefully to secure a strong vacuum seal and retain texture.
- Remove jars from the hot water bath using a jar lifter and place them upright on a clean towel or cooling rack.
- Allow jars to cool undisturbed at room temperature for 12 to 24 hours. Avoid moving them as shifting may break seals.
- You will hear the satisfying “ping” sound indicating the lids are sealing properly.
- After cooling, check the vacuum seal by pressing the center of each lid. A sealed lid will not flex or pop.
- If any jars did not seal, refrigerate and consume the pickled radishes within a few weeks.
“Cooling jars slowly and steadily is crucial for creating a safe vacuum seal and preserving our radishes’ crunch and bright flavor.”
Storage Tips and Shelf Life
Following proper storage guidelines keeps our pickled radish recipe canning fresh and safe to enjoy over time.
| Storage Condition | Duration | Notes |
|---|---|---|
| Cool, Dark Pantry | Up to 12 months | Ideal storage to preserve flavor and crunch |
| Refrigerated (Opened) | 2 to 3 weeks | Keeps opened jars fresh |
| Refrigerated (Unopened) | Up to 12 months | If pantry is warm, refrigeration extends life |
- Store jars in a cool, dark place like a pantry or cellar to protect the delicate flavors from heat and light.
- Keep jars away from direct sunlight or temperature fluctuations.
- Label jars with the canning date to keep track of freshness.
- Once a jar is opened, refrigerate immediately and consume within 2 to 3 weeks to maintain quality.
- Always inspect jars before use. Discard if lids are bulging, contents are cloudy, or if any off-odor or mold is present.
By following these cooling and storing protocols, we ensure our pickled radishes remain crisp, tangy, and delicious for us to enjoy anytime throughout the year.
Serving Suggestions
Pickled radishes are incredibly versatile and bring a burst of tangy crunch to our meals. Here are some of our favorite ways to enjoy pickled radishes that highlight their bright flavor and texture:
- Salad Toppers
Add sliced or chopped pickled radishes to salads for a zesty, refreshing crunch. They pair beautifully with mixed greens, avocado, and a vinaigrette dressing.
- Sandwich Enhancer
Layer pickled radishes on sandwiches and wraps. Their acidity cuts through rich meats and creamy spreads, elevating flavors in turkey, ham, or veggie sandwiches.
- Snack or Side Dish
Enjoy pickled radishes straight from the jar as a snack. They make a perfect accompaniment to charcuterie boards or pair well with roasted meats and grilled vegetables.
- Taco and Grain Bowl Accent
Use them as a topping for tacos or grain bowls. The tangy crisp balances spicy or savory ingredients like grilled chicken, beans, and roasted corn.
- Garnish for Soups
Sprinkle pickled radish slices on warm soups such as ramen or pho to add a contrasting crunch and mild acidity.
Serving Ideas Table
| Serving Style | Pairing Suggestions | Flavor Benefit |
|---|---|---|
| Salad Topper | Mixed greens, avocado, vinaigrette | Adds refreshing crunch |
| Sandwich Enhancer | Turkey, ham, cheese, creamy spreads | Cuts richness, adds zest |
| Snack or Side Dish | Charcuterie, roasted meats, grilled veggies | Tangy, crisp bite |
| Taco/Grain Bowl Accent | Chicken, beans, corn | Balances savory/spicy |
| Soup Garnish | Ramen, pho | Adds crunch and acidity |
We recommend chilling the pickled radishes before serving to enhance their refreshing crispness. When using as a topping, slice them thinly for better texture and flavor distribution. Store opened jars in the refrigerator and consume within a couple of weeks to enjoy optimal freshness.
Troubleshooting and Tips
Common Issues and Solutions
- Soft or Mushy Radishes
Ensure radishes are firm and fresh before canning. Slice uniformly to promote even pickling. Avoid overcooking during the water bath process. Maintain proper acidity in the brine by using the exact vinegar-water ratio. If radishes turn soft, check if the vinegar used is at least 5% acidity.
- Lid Does Not Seal
Always use new, unused lids for a proper vacuum seal. Check jar rims for any chips or cracks before filling. Remove all air bubbles from jars using a non-metallic spatula before sealing. Process jars in boiling water for the full recommended time. After cooling, press the center of the lid; it should be concave and not flex.
- Cloudy Brine
Cloudiness can result from improper sterilization or minerals in water. Use distilled or filtered water if cloudiness persists. Always wash and sterilize jars and lids properly before use. Avoid using excessive sugar as it may cause fermentation and cloudiness.
Key Tips for Perfect Pickled Radish Canning
- Use Fresh Ingredients
Fresh radishes and quality vinegar ensure vibrant flavor and safety.
- Maintain Consistent Slice Thickness
Uniform slices absorb the brine evenly and retain crunchiness.
- Balance Flavorful Brine
Stick to the recipe’s sugar and salt amounts to keep the tang and texture optimal.
- Process According to Altitude
Adjust boiling time based on your altitude for food safety. Refer to the table below.
| Altitude (feet) | Boiling Time Adjustment (minutes) |
|---|---|
| 0 – 1000 | Standard processing time |
| 1001 – 3000 | Add 5 minutes |
| 3001 – 6000 | Add 10 minutes |
| Above 6000 | Add 15 minutes |
Enhancing Flavor and Texture
- Add garlic cloves and fresh dill for aromatic depth.
- Soak sliced radishes in ice water for 30 minutes before pickling to boost crispness.
- Chill jars after processing for 12 to 24 hours undisturbed to secure vacuum seal and develop flavor.
Safety Reminders
“Never reuse canning lids.” They create a one-time seal crucial for preventing spoilage.
Always label jars with date and inspect before consumption for bulging lids or off odors.
Following these troubleshooting steps and tips will help us consistently create delicious, crunchy, and safe pickled radishes with every canning session.
Conclusion
Canning pickled radishes is a rewarding way to preserve their bright flavor and satisfying crunch all year long. With the right ingredients, equipment, and techniques, we can confidently create a pantry staple that enhances countless dishes.
By paying close attention to preparation, brine balance, and proper sealing, we ensure safety and taste in every jar. Once cooled and stored correctly, our pickled radishes stay fresh and ready to elevate meals whenever we want.
Embracing this process not only saves us trips to the store but also lets us customize flavors to suit our preferences. Let’s keep experimenting and enjoying the tangy goodness of homemade pickled radishes!
Frequently Asked Questions
What are the benefits of pickled radishes?
Pickled radishes add a tangy crunch to meals, enhance flavor, and can be stored long-term through canning. They are versatile toppings and healthy snacks.
What ingredients are needed to make pickled radishes?
You need fresh radishes, white vinegar, water, sugar, salt, garlic, and optional spices like black peppercorns and dill.
Why is uniform slicing important for pickling radishes?
Uniform slices ensure even pickling and consistent texture throughout the batch.
What equipment is essential for canning pickled radishes?
Use sterilized Mason jars with new lids, a large pot with a canning rack for water bath processing, measuring tools, a sharp knife, and a sturdy cutting board.
How do you prepare radishes for pickling?
Select fresh, firm radishes, wash thoroughly, trim ends, slice evenly, and soak in ice water to keep them crisp.
How is the pickling brine made?
Heat white vinegar, water, sugar, and salt until dissolved, then add garlic, peppercorns, and dill. Simmer gently to blend flavors.
What are the key steps in the canning process?
Fill sterilized jars with radishes and brine, remove air bubbles, seal with new lids, and process in a boiling water bath with proper timing and altitude adjustments.
How should canned pickled radishes be cooled and stored?
Let jars cool undisturbed for 12-24 hours, check seals, store in a cool, dark place up to 12 months; refrigerate after opening.
How can pickled radishes be served?
Use as salad toppings, sandwich garnishes, snacks, side dishes, or add to tacos, grain bowls, and soups for extra flavor.
What should I do if my pickled radishes turn out mushy or the brine is cloudy?
Use fresh radishes, keep slice thickness consistent, balance the brine ingredients, ensure proper processing time, and follow safety guidelines.