
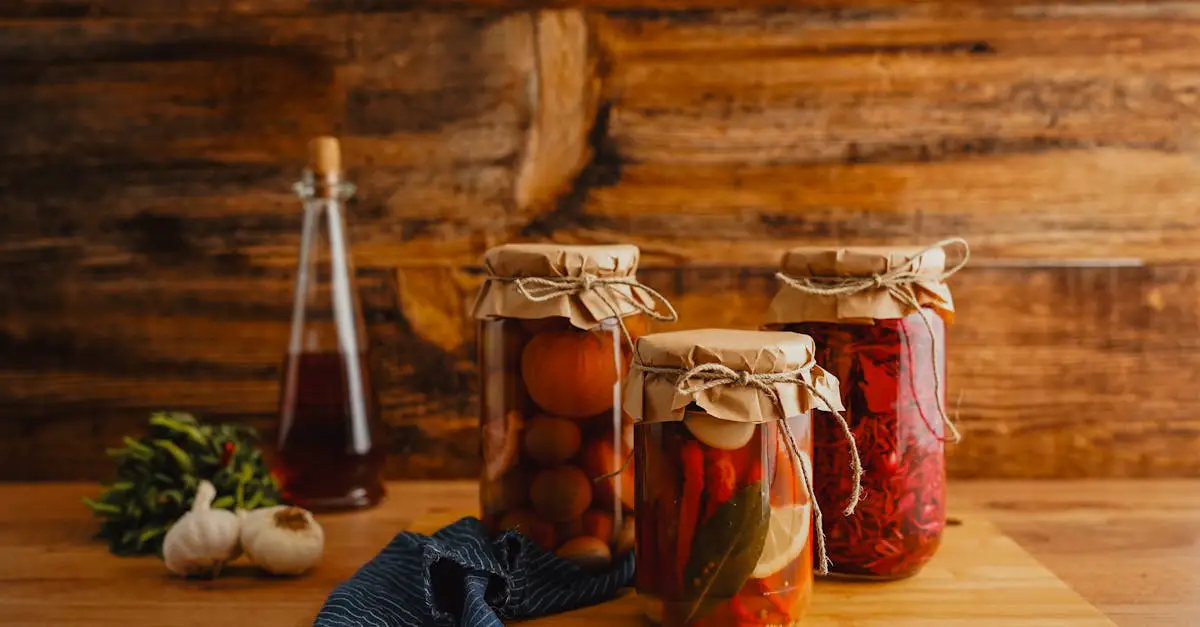
Pickled cherry peppers bring a perfect balance of tangy heat and vibrant flavor to any dish. These little peppers pack a punch with their mild spice and crisp texture, making them a favorite for adding a zesty kick to sandwiches, salads, and antipasto platters.
We love how quick and easy it is to transform fresh cherry peppers into a delicious homemade pickle. With just a few simple ingredients and a bit of patience, you can enjoy these spicy gems all year round. Whether you’re new to pickling or a seasoned pro, this recipe will guide you through creating a flavorful batch that’s sure to impress.
Ingredients
To create the perfect batch of pickled cherry peppers, we need simple yet carefully chosen ingredients that highlight their vibrant flavor and tangy heat. Here’s what we’ll gather:
- Fresh cherry peppers (about 1 pound) — Ideally firm and brightly colored for the best crunch and taste.
- White vinegar (2 cups) — Provides the essential acidity for preservation and zest.
- Water (2 cups) — Balances the vinegar’s sharpness.
- Granulated sugar (2 tablespoons) — Adds a subtle sweetness to counteract the vinegar’s acidity.
- Kosher salt (1 tablespoon) — Enhances flavor and acts as a preservative.
- Garlic cloves (3, peeled and slightly crushed) — Infuses aromatic depth.
- Dried oregano (1 teaspoon) — Brings a classic herbaceous note.
- Black peppercorns (1 teaspoon) — Adds mild spiced warmth.
- Bay leaves (2) — Impart a subtle earthiness to the brine.
For an extra kick or complementary flavor, optionally add:
- Red pepper flakes (½ teaspoon) — To intensify heat.
- Fresh dill sprigs (a few) — For a fresh herbal contrast.
| Ingredient | Quantity | Purpose |
|---|---|---|
| Fresh cherry peppers | 1 pound | Main ingredient, fresh crunch |
| White vinegar | 2 cups | Pickling acid, flavor base |
| Water | 2 cups | Dilutes vinegar, balances taste |
| Granulated sugar | 2 tablespoons | Sweetens brine |
| Kosher salt | 1 tablespoon | Flavor enhancer, preservative |
| Garlic cloves | 3 (crushed) | Adds aroma |
| Dried oregano | 1 teaspoon | Herbaceous flavor |
| Black peppercorns | 1 teaspoon | Spiced warmth |
| Bay leaves | 2 | Earthy depth |
| Red pepper flakes optional | ½ teaspoon | Heat enhancer |
| Fresh dill sprigs optional | few | Herbal freshness |
We recommend measuring these ingredients precisely for a balanced brine that allows the natural brightness and heat of the cherry peppers to shine through. This combination ensures our pickled cherry peppers are flavorful, crisp, and ready to elevate any dish we add them to.
Equipment Needed
To make our Pickled Cherry Peppers Recipe with crisp texture and rich flavor, we must gather the right equipment. Using the proper tools ensures a smooth process from preparation to storage.
Essential Tools for Pickling Cherry Peppers
- Glass jars with airtight lids
We recommend using sterilized pint-sized glass jars. These help keep the peppers fresh and preserve the flavors without imparting unwanted tastes.
- Large saucepan
A heavy-bottomed saucepan allows us to bring the brine mixture of vinegar, water, sugar, and salt to a boil evenly.
- Cutting board and sharp knife
Precise cuts on the cherry peppers are vital. We use a sharp knife to halve or core the peppers without crushing them, preserving the crunch.
- Measuring cups and spoons
Accurate measurements guarantee the perfect balance of sweet and tangy in our pickling brine.
- Tongs or jar lifter
These tools aid in safely placing and removing hot jars from boiling water during the sterilization and sealing process.
- Mixing bowl
Handy to toss peppers with optional spices before packing them into jars.
| Equipment | Purpose | Notes |
|---|---|---|
| Glass jars | Store pickled cherry peppers | Use sterilized pint jars |
| Large saucepan | Heat and boil pickling brine | Heavy-bottomed for even heating |
| Cutting board | Prep cherry peppers | Use a clean, sturdy surface |
| Sharp knife | Slice and core peppers | Sharp to avoid crushing peppers |
| Measuring cups/spoons | Measure brine ingredients | Precision is key |
| Tongs / Jar lifter | Handle hot jars safely | Prevent burns |
| Mixing bowl | Combine peppers and spices before packing | Optional but helpful |
Optional Equipment for Efficiency
- Food processor with slicing attachment
For those preparing larger batches, this tool can speed up slicing but requires gentle handling to avoid pulverizing the peppers.
- Funnel
A wide-mouth glass funnel helps pour brine neatly into jars without spills.
“Using the right equipment is the foundation of perfect pickled cherry peppers. It ensures safety, flavor preservation, and the ideal texture we crave.”
With these tools ready, we can move confidently through the next steps to create vibrant, tangy pickled cherry peppers that enhance every dish.
Prep Work
Before we dive into pickling our cherry peppers, setting up the groundwork correctly ensures a smooth process and the best flavor outcome. Let’s start with prepping the peppers and sterilizing our jars.
Washing and Preparing Cherry Peppers
We begin by rinsing fresh cherry peppers thoroughly under cold running water to remove dirt and any residual pesticides. Gently rub each pepper to clean the surface without bruising them. After washing, place them on a clean kitchen towel to dry completely.
Next, we carefully slice each pepper in half lengthwise or leave them whole if you prefer a spicier result with seeds intact. Removing seeds reduces heat and bitterness, so for a milder pickle, scoop out seeds using a small spoon or knife. Be sure to wear gloves or wash hands promptly afterward to avoid irritation from the capsaicin oils.
| Step | Details |
|---|---|
| Rinse | Cold water, gently rub each pepper |
| Dry | Pat dry with a clean kitchen towel |
| Cut or Leave Whole | Halve for moderate heat, whole for spicy |
| Seed Removal | Optional for milder flavor |
| Safety Tip | Use gloves, wash hands thoroughly |
Sterilizing Jars and Lids
Perfect pickled cherry peppers require sterilized containers to prevent contamination and ensure longevity. We use glass canning jars and their lids, which must be cleaned and sterilized before filling.
- Wash jars and lids in hot soapy water. Rinse well to eliminate soap residue.
- Place jars upright on a baking sheet and heat in an oven at 225°F (107°C) for 15 minutes to sterilize.
- Simmer lids in a small pot of hot water for 10 minutes to soften sealing gaskets and kill bacteria. Avoid boiling lids for long periods to preserve their disinfecting power.
- Use tongs or a jar lifter to transfer jars and lids onto a clean towel. Keep them warm until ready to fill.
“Sterilization of jars and lids is crucial to avoid spoilage and keep our pickled cherry peppers fresh and safe to eat.“
| Sterilization Steps | Temperature/Time | Tools Needed |
|---|---|---|
| Oven Sterilize Jars | 225°F for 15 minutes | Baking sheet, oven |
| Boil Lids | Simmer for 10 minutes | Saucepan, tongs |
| Handling | Use tongs or jar lifter | Gloves (optional) |
By carefully washing and preparing our cherry peppers and ensuring our jars and lids are properly sterilized, we set the stage for creating flavorful, crisp, and safe homemade pickled cherry peppers.
Pickling Brine Preparation
Preparing the pickling brine correctly is essential to achieving the perfect balance of tanginess, sweetness, and heat in our pickled cherry peppers. Follow these steps closely to create a brine that enhances the peppers’ vibrant flavor while preserving their crisp texture.
Step 1: Measure Ingredients Accurately
In a heavy-bottomed saucepan, combine the following ingredients in the order listed. Precise measurements ensure a consistent and balanced brine:
| Ingredient | Quantity | Purpose |
|---|---|---|
| White vinegar | 2 cups (16 fl oz) | Provides acidity and tang |
| Water | 2 cups (16 fl oz) | Dilutes vinegar for balance |
| Granulated sugar | 2 tablespoons | Adds sweetness |
| Kosher salt | 1 tablespoon | Enhances flavor and aids preservation |
| Garlic cloves | 3 cloves, smashed | Infuses aromatic flavor |
| Dried oregano | 1 teaspoon | Adds herbal notes |
| Black peppercorns | 1 teaspoon | Introduces mild spice |
| Bay leaves | 2 leaves | Adds depth and complexity |
| Optional: red pepper flakes | 1/2 teaspoon | For extra heat |
Step 2: Combine and Heat the Brine
- Pour the measured white vinegar and water into the saucepan.
- Add sugar and kosher salt.
- Stir gently over medium heat until the sugar and salt dissolve completely. This usually takes about 3-5 minutes.
- Add the smashed garlic, dried oregano, black peppercorns, bay leaves, and optional red pepper flakes.
- Bring the mixture to a gentle boil. Keep it boiling for 1 minute to allow the flavors to meld.
Step 3: Cool Slightly Before Use
- Remove the saucepan from heat.
- Let the brine cool for 3 to 5 minutes before pouring it over the prepared cherry peppers.
- Cooling slightly prevents the peppers from cooking and maintains their crispness.
Pro Tip: We recommend using white vinegar with 5% acidity for the best tang and safe preservation. Avoid using malt or flavored vinegars which can alter the flavor profile.
Our careful attention to the Pickling Brine Preparation ensures the final product boasts a vibrant, balanced flavor and optimal texture. This step forms the foundation for the successful transformation of fresh cherry peppers into irresistible, tangy pickles.
Instructions
Follow these clear steps to create flavorful and crisp pickled cherry peppers perfect for enhancing any dish.
Making the Pickling Brine
Start by preparing the essential brine that balances tanginess, sweetness, and heat.
- In a heavy-bottomed saucepan, combine the following ingredients:
| Ingredient | Measurement |
|---|---|
| White vinegar | 2 cups |
| Water | 2 cups |
| Granulated sugar | 3 tablespoons |
| Kosher salt | 1 tablespoon |
| Garlic cloves, crushed | 3 cloves |
| Dried oregano | 1 teaspoon |
| Black peppercorns | 1 teaspoon |
| Bay leaves | 2 leaves |
- Bring the mixture to a boil over medium heat, stirring occasionally until the sugar and salt fully dissolve.
- Once boiling, reduce heat and simmer for 5 minutes to infuse flavors.
- Remove from heat and let the brine cool slightly—it should be warm but not hot to preserve the peppers’ crispness.
Pro Tip: For added heat, sprinkle in red pepper flakes during this step.
Packing the Jars with Peppers and Seasonings
Proper jar packing ensures even flavor distribution and safety.
- Use sterilized glass jars for packing.
- Pack the prepared cherry peppers tightly but gently into each jar—whole or sliced according to your preference.
- Add extra flavor by layering in:
- Additional crushed garlic cloves (1–2 per jar)
- A pinch of dried oregano
- A few black peppercorns
- A small sprig of fresh dill (optional)
- Leave about ½ inch of space from the top of the jar to allow room for the brine.
Remember: Packing peppers too loosely can cause spoilage; too tightly may damage their texture.
Pouring Brine Over Peppers
Follow these steps to maximize flavor and maintain texture:
- Using a funnel, slowly pour the warm pickling brine over the peppers until completely submerged.
- Remove air bubbles by gently tapping the jar on the countertop or using a sterilized non-metallic utensil to release trapped air.
- Confirm that the peppers are fully covered with brine, maintaining the ½ inch headspace at the top.
| Step | Key Point |
|---|---|
| Pouring brine | Use warm brine to preserve crispness |
| Removing air bubbles | Prevent spoilage and ensure safety |
| Headspace | Leave ½ inch to accommodate expansion |
Sealing and Cooling Jars
Complete the pickling process with proper sealing and cooling for durability and safety:
- Wipe jar rims clean to ensure a proper seal.
- Place sterilized lids on jars and screw on bands until fingertip tight.
- Allow the jars to cool at room temperature, undisturbed, for 12 to 24 hours.
- Check seals by pressing the center of each lid; it should not flex up or down.
- Store sealed jars in a cool, dark place and refrigerate after opening.
Safety Note: Proper sealing is essential to avoid contamination and extend shelf life.
By diligently following these steps, we ensure every batch of pickled cherry peppers offers bright flavor, perfect crunch, and lasting freshness.
Directions for Pickling Process
Follow these step-by-step instructions to ensure our pickled cherry peppers turn out perfectly crisp, flavorful, and safely preserved. We offer two reliable methods depending on your preference: the Refrigeration Method for quick enjoyment and the Water Bath Canning Method for long-term storage.
Refrigeration Method
This method is ideal for enjoying pickled cherry peppers within a few weeks. It preserves the fresh zip and vibrant color without lengthy processing.
- Fill sterilized jars with your prepared cherry peppers and seasoning mix.
- Pour the cooled pickling brine over the peppers, leaving about 1/2 inch headspace.
- Remove air bubbles by gently tapping the jars or running a non-metallic utensil along the jar sides.
- Wipe the jar rims clean with a damp cloth to ensure a proper seal.
- Seal jars tightly with sterilized lids.
- Cool to room temperature before placing the jars in the refrigerator.
- Let the peppers marinate for at least 48 hours before tasting for optimal flavor.
- Store the jars in the refrigerator and consume within 3 to 4 weeks.
“The refrigeration method keeps the peppers crisp and bright, perfect for those eager to enjoy their pickled cherry peppers fresh and tangy.”
Water Bath Canning Method (Optional)
For long-term pantry storage, this method ensures safety and extends shelf life for up to 12 months. Follow each step carefully to prevent spoilage.
| Step | Action | Details |
|---|---|---|
| 1 | Prepare water bath | Fill canner with water and bring to a gentle boil. |
| 2 | Fill sterilized jars | Pack peppers and seasoning just like refrigeration method. |
| 3 | Add brine | Pour hot brine over peppers with 1/2 inch headspace. |
| 4 | Remove air bubbles | Use a non-metallic utensil to release trapped air. |
| 5 | Wipe rims and seal | Clean rims completely and apply lids and bands finger-tight. |
| 6 | Process jars | Place jars in boiling water bath, ensuring water covers jars by 1-2 inches. Process for 10 minutes. |
| 7 | Cool jars | Remove jars carefully and place on a towel. Let cool undisturbed for 12-24 hours. |
| 8 | Check seals | Press lids to confirm a concave seal. Store sealed jars in a cool, dark place. |
Important: Always maintain the recommended boiling time to ensure the pickled cherry peppers are safe for shelf storage.
By following either the Refrigeration Method or the Water Bath Canning Method, we guarantee that our pickled cherry peppers will deliver that irresistible tangy heat and persistent crunch whenever we reach for them.
Storage and Shelf Life
Proper storage is crucial to maintaining the vibrant flavor and crisp texture of our pickled cherry peppers. Depending on the preservation method we choose, the shelf life and storage conditions vary significantly.
Refrigeration Storage
When using the Refrigeration Method, we store our jars in the fridge. This approach allows us to enjoy our pickled peppers quickly but requires mindful consumption to maintain quality:
- Store jars in the coldest part of the refrigerator.
- Keep jars upright and sealed tightly to prevent contamination.
- Consume within 3 to 4 weeks for the best flavor and crispness.
- Always use clean utensils to remove peppers to avoid introducing bacteria.
Water Bath Canning Storage
For longer preservation, the Water Bath Canning Method provides the safest and most durable storage option:
- Store sealed jars in a cool, dark, and dry place like a pantry.
- Ensure jars are not exposed to direct sunlight or heat sources.
- Properly canned jars can last up to 12 months without losing flavor or safety.
- Once opened, refrigerate and use within 3 to 4 weeks.
Storage and Shelf Life Summary
| Storage Method | Storage Location | Shelf Life | Notes |
|---|---|---|---|
| Refrigeration | Refrigerator (coldest part) | 3 to 4 weeks | Keep sealed, use clean utensils |
| Water Bath Canning | Cool, dark pantry | Up to 12 months | Store unopened jars away from light and heat |
| Opened Jars (any method) | Refrigerator | 3 to 4 weeks | Keep sealed tightly, use sanitized utensils |
Important Tips for Extending Shelf Life
- Always inspect jars for signs of spoilage before use, such as bulging lids, off smells, or mold growth.
- Keep the peppers submerged in the brine to prevent exposure to air.
- Label jars with the date of pickling to track freshness easily.
By following these storage guidelines, we ensure our pickled cherry peppers remain flavorful, crisp, and safe to enjoy throughout their shelf life.
Serving Suggestions
Our Pickled Cherry Peppers add a burst of tangy heat and vibrant flavor to a wide range of dishes. Here are some top serving ideas to elevate your meals with these zesty gems:
Enhance Sandwiches and Burgers
Add whole or sliced pickled cherry peppers to sandwiches and burgers for an extra layer of spicy tang. Their crisp texture complements rich meats and creamy cheeses beautifully. Try them on:
- Italian subs
- Turkey and provolone sandwiches
- Beef burgers with melted cheddar
Brighten Salads and Grain Bowls
Toss chopped or halved pickled cherry peppers into green salads or grain bowls for a surprising burst of acidity and heat that balances fresh vegetables and grains. Excellent pairings include:
- Arugula, goat cheese, and walnut salad
- Quinoa bowls with roasted vegetables
- Mediterranean couscous salad
Create Antipasto Platters
Our pickled cherry peppers shine on antipasto platters alongside olives, cured meats, cheeses, and crusty bread. Their colorful appearance and vibrant flavor make the platter more inviting and balanced. Consider adding:
- Prosciutto or salami slices
- Marinated mozzarella balls
- Roasted artichoke hearts
Spice Up Cheese Boards
Complement your cheese platter with these piquant peppers to balance creamy or mild cheeses. They provide contrast in both flavor and texture, especially with:
- Brie or Camembert
- Havarti or Swiss cheese
- Sharp aged cheddars
Incorporate into Pasta and Pizza
Add sliced pickled cherry peppers to pasta dishes or as a topping for pizzas to infuse these classics with subtle heat and bright acidity. Delicious when paired with:
- Penne with creamy tomato sauce
- Homemade Margherita pizza
- Spicy pepperoni pizza
Serving Ideas Table
| Dish Type | How to Use Pickled Cherry Peppers | Flavor & Texture Benefit |
|---|---|---|
| Sandwiches/Burgers | Slice and layer inside | Adds tangy heat and crunch |
| Salads/Grain Bowls | Chop and toss with other fresh ingredients | Balances freshness with acidity |
| Antipasto Platter | Serve whole or halved with cured meats & cheese | Enhances visual appeal and flavor |
| Cheese Boards | Pair with mild or creamy cheeses | Adds contrast and complex flavor |
| Pasta/Pizza | Scatter slices on top or mix into sauces | Introduces subtle spice & brightness |
By incorporating our Pickled Cherry Peppers into these dishes, we unlock a new level of flavor complexity that brightens each bite with delightful spice and refreshing acidity.
Conclusion
Pickled cherry peppers bring a vibrant punch to any kitchen with their perfect balance of heat and tang. Once you get the hang of the process, making your own batch feels rewarding and opens up endless culinary possibilities. Whether you’re spicing up a sandwich or adding zing to a salad, these pickled gems will quickly become a staple in our pantry.
With the right ingredients, tools, and techniques, preserving their bright flavor and crisp texture is easier than you might think. Let’s keep experimenting and enjoying the bold, fresh taste of homemade pickled cherry peppers all year long.
Frequently Asked Questions
What are pickled cherry peppers?
Pickled cherry peppers are small, round peppers preserved in a tangy, flavorful brine of vinegar, sugar, salt, and spices, offering a crisp, mildly spicy addition to various dishes.
What ingredients do I need to pickle cherry peppers?
You need fresh cherry peppers, white vinegar, water, granulated sugar, kosher salt, garlic, dried oregano, black peppercorns, and bay leaves. Optional ingredients include red pepper flakes and fresh dill.
Do I need any special equipment for pickling?
Essential equipment includes sterilized glass jars, a heavy-bottomed saucepan, a sharp knife, measuring cups and spoons, tongs or a jar lifter, and a mixing bowl. A funnel and food processor are optional.
How do I prepare cherry peppers before pickling?
Rinse cherry peppers under cold water, dry them thoroughly, and decide whether to slice or leave whole based on your desired heat level. Prepare sterilized jars and lids for pickling.
What is the best method for pickling cherry peppers?
Two main methods: Refrigeration Method for quick use (consume within weeks) and Water Bath Canning Method for longer storage (up to 12 months), both preserve flavor and texture well.
How do I make the pickling brine?
Combine white vinegar, water, sugar, salt, and spices in precise measurements. Heat to dissolve ingredients, then cool slightly before pouring over peppers to keep them crisp.
How should I store pickled cherry peppers?
Refrigerate for short-term storage (3–4 weeks) or keep sealed jars in a cool, dark pantry for long-term storage (up to 12 months). Always keep peppers submerged in brine and inspect jars for spoilage.
Can I use pickled cherry peppers in cooking?
Yes, they add tangy heat and vibrant flavor to sandwiches, salads, antipasto platters, cheese boards, pasta, and pizza, balancing richness with acidity and spice.