
These tiny peppers pack a punch with their vibrant color and tangy heat. We can’t get enough of them in our meals. They’re especially popular in Italian cuisine and they’ve found a place in countless kitchens around the world.
Our pickled cherry pepper recipe adds a burst of flavor to salads sandwiches and more. We’ll walk you through the simple steps to preserve these peppers at home so you can enjoy them anytime. They’ll keep their bright taste and irresistible crunch for weeks so let’s get pickling.
What Are Cherry Peppers?
Cherry peppers are small round peppers typically measuring about 1 to 2 inches across. They come in bright red or green shades. They have a mildly spicy and sweet taste. We love their firm texture for pickling because it locks in flavor and preserves a crisp bite. Some people also call them pimiento peppers or hot cherry peppers based on the variety and heat level.
We often find cherry peppers in traditional Italian dishes. They add vibrant color and sharp flavor to anything from pizza to antipasto platters. They are perfect for stuffing with cheese or cured meats due to their hollow interior and thick pepper walls. We sometimes refer to them as “tiny flavor bombs” since they deliver a tangy pop in each bite.
| Pepper Variety | Typical Heat Level | Common Uses |
|---|---|---|
| Cherry Pepper | Mild to Moderate | Pizza toppings, salad garnishes, pickling |
| Jalapeño | Moderate | Salsas, hot sauces, grilling |
| Habanero | Very Hot | Spicy condiments, salsa boosters, intense heat |
Ingredients
We gather everything for our pickled cherry peppers ahead of time. We choose bright peppers with firm flesh for maximum crunch. We also sanitize our jars with boiling water to maintain a clean environment. Here is an overview of the essentials:
| Ingredient | Amount |
|---|---|
| Fresh cherry peppers (stems removed) | 1 pound |
| White vinegar (5% acidity) | 1 cup |
| Water | 1 cup |
| Kosher salt | 1 tablespoon |
| Sugar | 1 tablespoon |
| Garlic cloves (peeled and crushed) | 2 cloves |
| Whole black peppercorns | 1 teaspoon |
| Dried oregano | 1 teaspoon |
| Dried bay leaf (optional) | 1 leaf |
We rely on an equal ratio of vinegar and water for a tangy and balanced brine. We use a small amount of sugar to mellow the acidity. We sprinkle in dried oregano and black peppercorns to add a savory kick. We keep all these items within reach before we start so our pickling process proceeds smoothly.
Tools And Equipment
We gather a few essential items for our Pickled Cherry Pepper process. Each piece ensures safety and accuracy:
- Large pot for sterilizing jars and heating the pickling solution
- Cutting board for slicing off any stems or imperfections
- Chef’s knife for prepping peppers and garlic
- Measuring cups and measuring spoons for precise brine ingredients
- Wide-mouthed funnel for transferring brine into jars without spills
- Ladle or heatproof pitcher for scooping the warm brine
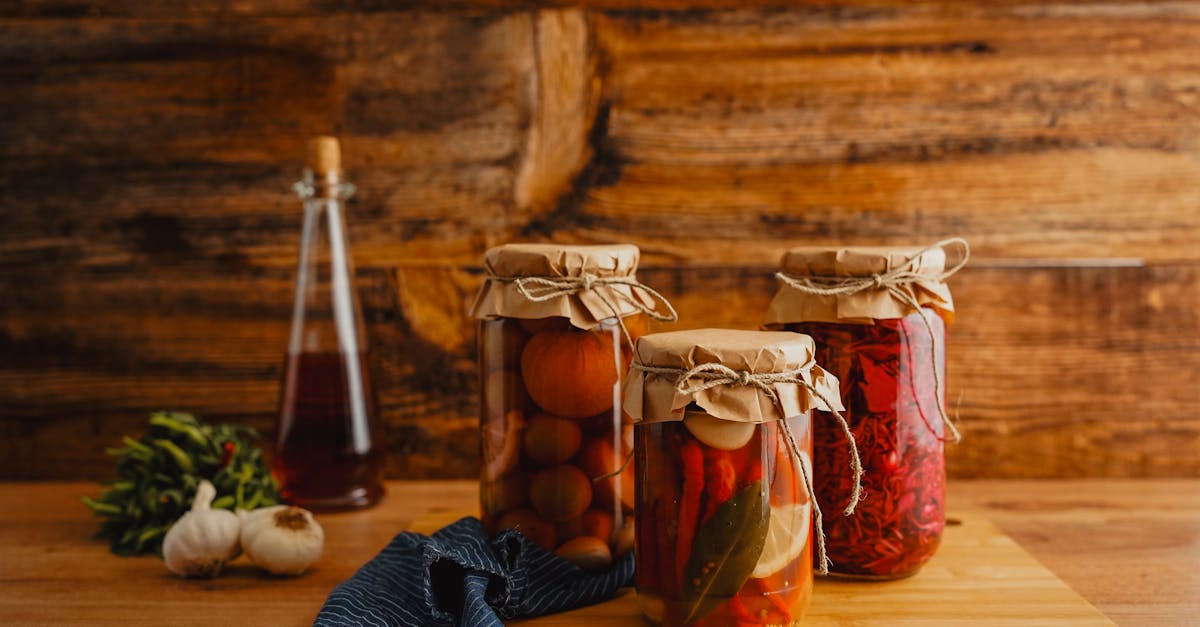
- Sterilized mason jars for preserving freshness and crunch
- Tongs or jar lifter for safe handling of hot jars
Below is a quick reference for popular jar sizes and approximate pepper capacity:
| Jar Size (ounces) | Approximate Pepper Capacity |
|---|---|
| 8 oz jar | 10 to 12 cherry peppers |
| 16 oz jar | 20 to 24 cherry peppers |
We rely on mason jars with tight-fitting lids to lock in the tangy heat. We keep kitchen towels handy to wipe rims and seal jars properly. The right equipment streamlines preparation and ensures our brine delivers the perfect balance of flavor.
Directions
Here is how we transform fresh peppers into tangy Pickled Cherry Peppers. Each step is straightforward so we recommend following them carefully.
| Step | Time |
|---|---|
| Prep Peppers | 5 minutes |
| Make Brine | 10 minutes |
| Fill Jars | 5 minutes |
| Cool Down | 30 minutes |
Prep The Peppers
- Rinse each pepper under cool water. Pat them dry.
- Inspect for bruises or soft spots and discard any damaged peppers.
- Slice off the stems. If you prefer less heat gently remove some seeds.
- Set peppers aside while you prepare the brine.
Make The Pickling Brine
- Combine white vinegar, water, kosher salt, sugar, garlic cloves, whole black peppercorns, dried oregano, and the optional bay leaf in a medium saucepan.
- Bring the mixture to a gentle boil over medium heat. Stir occasionally.
- Watch for a mellow tangy aroma. Once the salt and sugar dissolve remove the saucepan from heat.
Fill The Jars
- Pack peppers tightly into sterilized mason jars. Leave about 1/2 inch of space at the top.
- Transfer the warm brine using a ladle. Ensure peppers are fully submerged.
- Gently tap the jars on the countertop to release trapped air bubbles. If needed top off with more brine.
- Wipe jar rims with a clean cloth. Secure lids.
- Let jars cool at room temperature. Then store them in a cool spot or in the refrigerator.
Storage And Make-Ahead Tips
We recommend storing pickled cherry peppers in airtight jars to retain their tangy bite. Refrigeration helps preserve flavor and texture. The peppers stay fresh and vibrant for about two weeks when chilled at a safe temperature. For a longer shelf life we can use water bath canning. This process ensures a secure seal so the peppers remain shelf-stable for up to six months when kept in a cool dark cabinet. We also prefer waiting at least 24 hours after canning or pickling for the best flavor infusion. Be sure to label jars with the date. Proper labeling reminds us to enjoy the peppers while they are at peak quality.
Below is a quick reference for recommended storage options:
| Method | Duration |
|---|---|
| Refrigerator | Up to 2 weeks |
| Water Bath Canning | Up to 6 months |
We find it helpful to check jars periodically to ensure lids remain sealed. Once opened refrigerate the jar promptly and consume the peppers within one week. Avoid placing jars near direct sunlight because extreme temperature changes may affect the peppers’ crispness. When preparing a large batch ahead of time store any extra jars in a dark pantry. This ensures a brilliant crunch and a tangy taste whenever we decide to serve them.
Serving Ideas
- Pizza topping: We slice the peppers into rings and scatter them over our favorite pizza. The sweet and spicy flavor blends beautifully with melted cheese
- Hearty sub sandwich: We layer peppers onto a sub sandwich for a punch of acidity. The crisp pepper slices elevate the overall texture
- Cheese platter: We arrange peppers alongside assorted cheeses and meats for a fun pop of color on the board. They pair well with creamy cheeses
- Pasta salad mix-in: We toss peppers with cooked pasta veggies and a light dressing for a refreshing side dish. The pepper brine adds extra tang
- Stuffed appetizers: We fill each pepper with goat cheese or prosciutto for a bite-sized appetizer. This option is easy to serve at parties and adds a burst of flavor
Conclusion
We’ve discovered a simple technique that unlocks a burst of flavor in every jar. Once we see how effortless it is we’ll never run out of tasty pickled cherry peppers again.
We love how they deliver a sweet and spicy kick whenever we need an extra punch in our meals. With this recipe in our cooking toolkit we can explore endless possibilities for enjoying these colorful peppers.
Frequently Asked Questions
What makes cherry peppers so appealing in Italian cuisine?
Cherry peppers bring a bright pop of color and a tangy, mildly spicy flavor. Their firm texture works well in a range of Italian dishes, from pizza toppings to antipasto platters. They’re also perfect for pickling, as they retain their crispness and sweetness while adding a delightful kick. Because they’re relatively small, they’re easy to incorporate into mixed dishes or use as a decorative garnish. Their hollow interior is also ideal for stuffing with cheese or cured meats, making them a versatile option in countless culinary creations.
How do I pickle cherry peppers successfully?
First, select fresh, firm cherry peppers with no bruises. Prepare a brine by combining equal parts water and white vinegar, with some sugar, salt, garlic, peppercorns, and dried oregano. After rinsing the peppers, pack them into sterilized jars and pour the hot brine over them. Seal tightly, let them cool, and then refrigerate. For a longer shelf life, use water bath canning. The process highlights their natural sweetness while preserving their spicy kick, ensuring a delightful bite every time.
Which tools and equipment do I need for pickling?
You’ll need a large pot for sterilizing jars, a cutting board, a sharp knife, measuring cups and spoons, a wide-mouthed funnel, a ladle or heatproof pitcher, sterilized jars, and tongs or a jar lifter. Jars with tight-fitting lids are essential for sealing in freshness and crispness. Having all tools ready beforehand streamlines the pickling process, helping ensure safety and precision. The funnel prevents spills when pouring the hot brine, and tongs keep hands clear of high temperatures.
How should I store pickled cherry peppers, and for how long?
Keep your pickled peppers in airtight jars in the refrigerator for up to two weeks. If you use proper water bath canning techniques, they can last up to six months on a pantry shelf. Always label jars with the packing date to track freshness. Let them rest for at least 24 hours after pickling to develop flavor. Regularly check the seal, and discard any jars with signs of spoilage. Proper storage keeps peppers crunchy and flavorful for as long as possible.
Can I eat them right after pickling?
Yes, you can technically eat them right away, but waiting at least 24 hours allows the brine to fully infuse the peppers with flavor. This resting period intensifies their tangy, slightly spicy taste, ensuring a better overall bite. While some prefer the immediate taste, the peppers’ best flavor often develops after a day or two in the refrigerator. Be patient for optimal results, and your pickled cherry peppers will reward you with a delicious, savory punch that complements many dishes.
What are some ways to serve pickled cherry peppers?
They’re excellent sliced on pizza, layered into sub sandwiches, or arranged on cheese boards alongside cured meats. Their bright color and tang make them perfect in pasta salads and antipasto platters. You can also stuff them with goat cheese or prosciutto for a tasty bite-sized appetizer. Because they feature a balance of sweet and spicy, they fit into countless recipes. Whether you’re elevating a casual snack or bringing zing to a gourmet meal, pickled cherry peppers are a simple yet flavorful addition.