
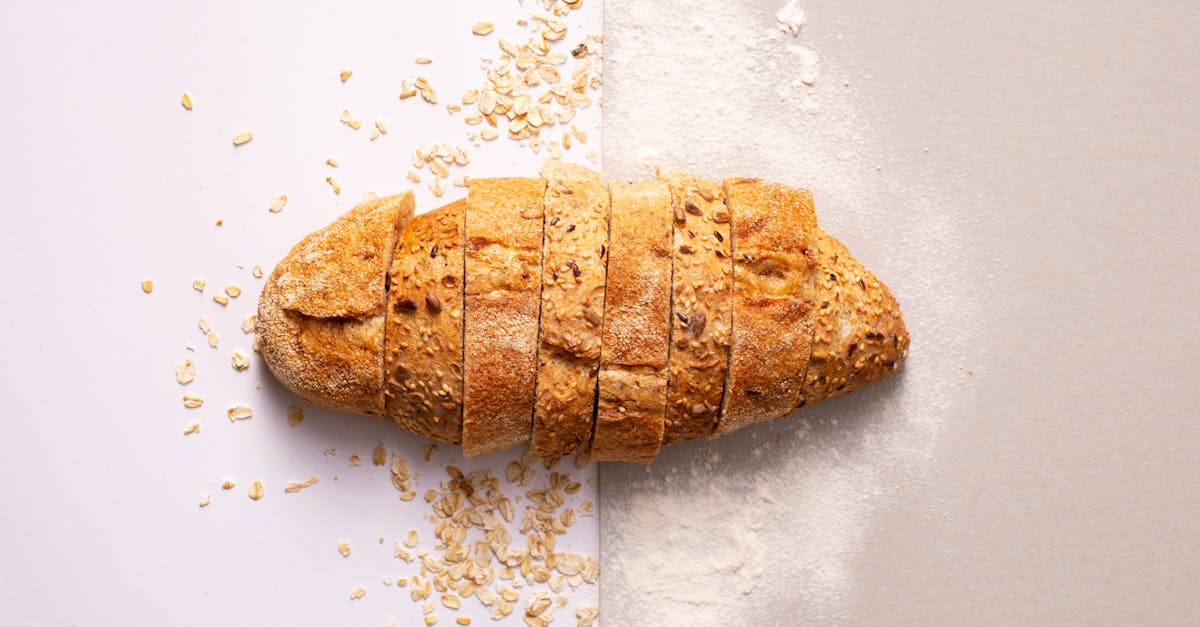
There’s something magical about recreating restaurant favorites at home, and Papa Murphy’s dough is no exception. Known for its soft, chewy texture and perfect balance of flavors, this dough is the foundation of those irresistible take-and-bake pizzas we all love. Why not bring that same deliciousness to our own kitchens?
We love how this recipe lets us channel our inner pizza chefs while customizing toppings to suit everyone’s cravings. Whether it’s a classic pepperoni or a veggie-loaded masterpiece, it all starts with the perfect dough. Plus, making it from scratch not only tastes better but also fills our homes with the comforting aroma of fresh bread.
Papa Murphy’s Dough Recipe
Recreating the Papa Murphy’s dough at home is a rewarding experience. With its soft texture and perfect chewiness, this dough replicates the iconic base used for their beloved take-and-bake pizzas. Follow these simple, step-by-step instructions to achieve that signature flavor and texture in your kitchen.
Ingredients
Here’s what we’ll need to make Papa Murphy’s pizza dough:
- 1 tablespoon active dry yeast
- 1 ¼ cups warm water (110°F)
- 1 tablespoon granulated sugar
- 2 ½ cups all-purpose flour (plus extra for dusting)
- 1 teaspoon salt
- 2 tablespoons olive oil
Equipment Needed
- Large mixing bowl
- Wooden spoon or dough hook (if using a stand mixer)
- Clean kitchen towel
- Rolling pin
- Baking sheet or pizza stone
Step-by-Step Instructions
1. Activate the Yeast
In a large bowl, combine warm water, granulated sugar, and active dry yeast. Stir gently to dissolve. Let the mixture sit for 5-10 minutes, or until it becomes frothy. This step ensures the yeast is activated and ready to work its magic.
Pro Tip: Always ensure your water is around 110°F. If it’s too hot, it can kill the yeast; too cool, and the yeast won’t activate.
2. Combine Dry Ingredients
In a separate bowl, mix the all-purpose flour and salt. Gradually add this mixture into the yeast solution.
3. Knead the Dough
Once combined, knead the dough by hand on a lightly floured surface or in a stand mixer with a dough hook for 8-10 minutes. The dough should feel smooth and elastic.
4. First Rise
Form the dough into a ball and lightly coat it with olive oil to prevent sticking. Place it back into the bowl, cover with a clean kitchen towel, and let it rise in a warm, draft-free area for 1-2 hours, or until it doubles in size.
5. Shape the Dough
Once risen, punch down the dough to release the air. Transfer it to a floured surface and use a rolling pin to shape it into your desired pizza base size. Whether you prefer a thin crust or thick crust, simply adjust the thickness during this step.
Note: Papa Murphy’s dough is traditionally rolled out to about ¼-inch thickness for that perfect balance of chewiness and crispness.
6. Prepare for Toppings
Lightly dust a baking sheet or pizza stone with flour or cornmeal to prevent sticking. Lay the dough on the prepared surface, ready for your favorite toppings and cheese.
Key Tips for Success
| Steps | Tips |
|---|---|
| Yeast Activation | Use fresh yeast for maximum rise and flavor. Check the expiration date before starting. |
| Kneading Process | Aim for a dough that is soft yet slightly tacky but not overly sticky to your hands. |
| Shaping Dough | Work gently with the dough to avoid overhandling, which can affect texture post-baking. |
| Baking Prep | For the best crust, preheat your oven for at least 20 minutes before adding the pizza. |
This Papa Murphy’s Dough Recipe provides the perfect foundation for your favorite toppings, creating a homemade pizza experience that rivals the original.
Ingredients
To recreate the soft, chewy Papa Murphy’s pizza dough, it’s crucial to measure each ingredient precisely. Let’s gather everything we need to make this restaurant-quality dough at home.
Dry Ingredients
- 3 ½ cups all-purpose flour (spooned and leveled for accuracy)
- 2 teaspoons granulated sugar (for a slight hint of sweetness in the dough)
- 1 ½ teaspoons salt (enhances flavor and balances sweetness)
- 2 ¼ teaspoons (or 1 packet) active dry yeast (ensures the perfect rise)
Wet Ingredients
- 1 ¼ cups warm water (approximately 110°F to activate the yeast properly)
- 2 tablespoons olive oil (adds richness and elasticity to the dough)
Tools And Equipment
To replicate the perfectly soft and chewy Papa Murphy’s dough, having the right tools and equipment in our kitchen is essential. Here’s a list of what we need and why each item is important for the process:
Essential Tools
- Mixing Bowls (2-3): One large bowl for combining ingredients and kneading, and one smaller bowl for activating the yeast. Opt for sturdy, non-reactive materials like stainless steel or glass.
- Measuring Cups and Spoons: Precise measurement is key to achieving the ideal dough consistency. Use both dry and liquid measuring tools.
- Digital Kitchen Scale: For accuracy when measuring flour and other dry ingredients.
- Wooden Spoon or Silicone Spatula: Useful for incorporating wet and dry ingredients before kneading.
- Stand Mixer with Dough Hook (Optional): If you prefer a hands-off approach, a stand mixer can handle most of the kneading process. A hand mixer will not suffice as it lacks the strength.
- Kitchen Thermometer: Essential for checking the temperature of the water used to activate the yeast. It should be approximately 110°F for optimal results.
- Plastic Wrap or Damp Kitchen Towel: Covers the dough during rising to retain moisture and prevent crust formation.
- Clean Counter or Pastry Board: Provides sufficient space for kneading and shaping the dough.
- Rolling Pin (Optional): Helps roll the dough evenly if creating a thin crust.
Baking Equipment
- Pizza Stone or Baking Steel: For authentic, crispy pizza bases. Preheating a stone or steel mimics the effect of a professional pizza oven.
- Parchment Paper: Prevents sticking and makes transferring the pizza easier.
- Baking Tray or Pizza Pan: If a pizza stone is unavailable, a heavy-duty baking sheet or pizza pan can work as an alternative.
- Pizza Cutter or Sharp Chef’s Knife: Ensures clean, precise cuts when serving.
Suggested Items for Efficiency
We also recommend these additional items to streamline the process:
| Item | Purpose |
|---|---|
| Bench Scraper | Scrapes dough off surfaces and portions it evenly. |
| Dough Container | Allows the dough to rise without sticking, with measurement markings to monitor progress. |
| Pastry Brush | For brushing olive oil onto the dough or edges for a golden crust. |
| Mesh Sieve | Sifts flour for a lighter dough texture, ensuring there are no lumps. |
| Timer | Keeps track of proofing and baking times to avoid over or under-preparation. |
Final Checklist
Before beginning, ensure all tools are clean and within reach. With our essentials ready, we can bring restaurant-quality Papa Murphy’s dough to life in our own kitchens.
Directions
Let’s walk through the step-by-step process of creating the Papa Murphy’s dough at home. With proper preparation and attention to detail, we’ll achieve the perfect soft and chewy base for our pizzas.
Prep The Ingredients
- Start by gathering all the ingredients listed in the recipe. Proper measurements are crucial for recreating Papa Murphy’s dough texture. Here’s a quick glance:
| Ingredient | Amount |
|---|---|
| Active Dry Yeast | 2 ¼ teaspoons (1 packet) |
| Warm Water (110°F) | 1 ¼ cups |
| Granulated Sugar | 2 teaspoons |
| All-Purpose Flour | 3 ½ cups |
| Salt | 1 ½ teaspoons |
| Olive Oil | 2 tablespoons |
- Ensure the water temperature is accurate (approximately 110°F). If it’s too hot, it can kill the yeast, and if it’s too cold, the yeast won’t activate.
- Measure the dry ingredients using a digital kitchen scale for precision. Sift the flour if needed to avoid lumps.
Mix The Dough
- In a large mixing bowl, combine the warm water, granulated sugar, and active dry yeast. Stir gently using a wooden spoon or silicone spatula, then let it sit for 5-10 minutes until the mixture becomes frothy. This step ensures the yeast is activated and alive.
- Once the yeast mixture is ready, add 2 tablespoons of olive oil.
- Gradually incorporate 1 cup of all-purpose flour at a time into the bowl. Sprinkle the salt in during the mixing process (never add salt directly to the yeast mixture as it can hinder its activity). Mix until the dough begins to come together.
Knead The Dough
- Transfer the formed dough onto a lightly floured surface. Dust your hands as well to prevent sticking.
- Knead the dough for 8-10 minutes until it is smooth, elastic, and slightly tacky. If the dough feels too sticky, sprinkle in small amounts of flour—add sparingly to avoid drying it out.
- Alternatively, if using a stand mixer, attach the dough hook and knead the mixture on medium speed for 6-8 minutes. Be sure to periodically check the consistency of the dough.
“Kneading is key to developing the gluten structure that gives the dough its signature chewiness.”
Let The Dough Rise
- Lightly grease a clean bowl with olive oil. Place the dough inside, turning it once to coat the surface with oil. This prevents it from drying out.
- Cover the bowl with a damp kitchen towel or plastic wrap. Let the dough rise in a warm, draft-free environment for about 1 to 1 ½ hours, or until it doubles in size.
- For best results, we recommend placing the bowl in an oven with the light on or near a slightly heated stovetop.
- You’ll know the dough is ready when you gently press it with your fingers and the indentation remains.
How To Use The Dough
Once our Papa Murphy’s dough has risen and is ready, the fun begins! This versatile dough can be shaped, topped, and baked to recreate that signature restaurant-style pizza. Follow these steps to make the most of the dough:
1. Prepare Your Work Surface
- Lightly flour a clean surface to prevent sticking. You can also use parchment paper for easy transfer.
- Use a rolling pin or your hands to shape the dough. For a thin crust, roll it out to about 1/8 inch thick; for a thicker crust, aim for 1/4 inch.
2. Shaping the Dough
- Divide the dough into portions if making multiple small pizzas or leave it whole for a large pizza.
- Gently stretch or roll the dough outward from the center to maintain an even thickness.
- If you prefer a round pizza, work in circular motions; for rectangular pizzas, shape the dough to match your tray or pan.
3. Preheat the Oven
- Preheat the oven to 475°F (245°C) for the best results. Using a pizza stone or baking steel? Let it heat in the oven for at least 30 minutes for a crispier crust.
4. Add Toppings
- Transfer the shaped dough to a sheet of parchment paper or a lightly oiled pizza pan.
- Begin by spreading your favorite pizza sauce across the surface, leaving about 1/2 inch around the edge for a crust.
- Add your choice of cheeses and toppings, layering for even coverage. Be mindful not to overload, as too many toppings can make the crust soggy.
5. Bake the Pizza
- Slide the pizza (with parchment paper, if using) directly onto the pizza stone or baking steel in the oven. If you’re using a pan, place it on the middle rack.
- Bake for 10–15 minutes, checking periodically. The pizza is done when the crust is golden brown, and the cheese is bubbly and slightly browned.
| Baking Times Overview | Thin Crust | Thick Crust |
|---|---|---|
| Preheated Oven (475°F) | 8–10 minutes | 12–15 minutes |
6. Serving the Pizza
- Remove the pizza carefully using a pizza peel or heatproof mitts.
- Let it cool for a few minutes to set the cheese.
- Slice using a pizza cutter and serve immediately.
7. Optional Freezing Method
Not ready to bake it immediately? You can freeze the shaped dough:
- After shaping, place the dough on a floured parchment sheet. Wrap tightly in plastic wrap.
- Freeze for up to 3 months.
- To use, thaw in the fridge overnight and bring to room temperature for about 30 minutes before adding toppings.
With these steps, Papa Murphy’s dough transforms into a delicious homemade pizza that rivals the original.
Make-Ahead And Storage Tips
Preparing Papa Murphy’s dough ahead of time is a great way to save effort while ensuring fresh, homemade pizza on demand. With a few simple steps, we can store the dough or even partially prepare the pizza for future enjoyment. Here are our Make-Ahead And Storage Tips for ultimate convenience:
Refrigerating the Dough
- Once the dough has risen, we can store it in the refrigerator for up to 3 days.
- Lightly coat the dough with olive oil to prevent it from drying out.
- Place it in an airtight container or wrap it tightly with plastic wrap.
When ready to use, allow the dough to rest at room temperature for about 30 minutes to make it easier to shape and roll.
Freezing the Dough
Freezing is an excellent option for longer storage. Here’s how we can freeze Papa Murphy’s dough:
- After rising, divide the dough into desired portions (e.g., for one pizza or individual servings).
- Shape each portion into a ball, brushing the surface with olive oil to prevent sticking.
- Wrap each dough ball tightly in plastic wrap and then place it inside a resealable freezer bag or airtight container.
- Label the bag with the date; the dough can be frozen for up to 3 months.
When we’re ready to use the frozen dough, transfer it to the refrigerator to thaw overnight. Let it sit at room temperature for 30–60 minutes before shaping.
Storing Pre-Shaped Crusts
If shaping the crusts in advance suits our needs, follow these steps:
- Roll out the dough into pizza bases and place a sheet of parchment paper between each rolled crust to avoid sticking.
- Stack the crusts and wrap them tightly with plastic wrap OR store them in a large freezer bag.
- In the refrigerator, pre-shaped crusts can be stored for 1–3 days, while in the freezer, they last up to 2 months.
Storing Baked Pizza Bases
To save even more time, we can partially bake the crusts:
- Preheat the oven to 450°F (232°C).
- Roll out the dough and bake it for 4–5 minutes, just until it sets but does not brown.
- Let the crusts cool completely before wrapping them in plastic wrap and freezing.
These partially baked bases can be topped and baked directly from frozen or refrigerated storage.
| Storage Method | Refrigerator | Freezer |
|---|---|---|
| Dough Ball | Up to 3 days | Up to 3 months |
| Pre-Shaped Crusts | 1–3 days | Up to 2 months |
| Partially Baked Bases | 1–2 days | Up to 2 months |
Thawing and Re-Using Tips
- For dough balls: Allow them to thaw in the refrigerator overnight and rest at room temperature before shaping.
- For pre-shaped crusts: If frozen, remove from the freezer and allow to thaw in the refrigerator for a few hours before adding toppings.
- For partially baked crusts: Top directly and bake as usual, no need to warm up.
By following these storage methods, we can always have Papa Murphy’s dough ready to create fresh, restaurant-quality pizzas whenever a craving strikes.
Conclusion
Recreating Papa Murphy’s dough at home is a rewarding way to bring the magic of take-and-bake pizza into our kitchens. With the right ingredients, tools, and a little patience, we can achieve that soft, chewy texture we all love. Whether we’re crafting a quick weeknight meal or prepping dough for future use, this recipe offers endless possibilities for delicious, homemade pizzas. Let’s embrace the joy of making pizza from scratch and savor every bite of our creations!
Frequently Asked Questions
What ingredients are needed to make Papa Murphy’s pizza dough at home?
To make Papa Murphy’s pizza dough at home, you’ll need 3 ½ cups of all-purpose flour, 2 teaspoons of granulated sugar, 1 ½ teaspoons of salt, 2 ¼ teaspoons (or 1 packet) of active dry yeast, 1 ¼ cups of warm water (around 110°F), and 2 tablespoons of olive oil.
Why is yeast activation important in the dough-making process?
Activating yeast ensures it grows properly, which helps the dough rise and creates the soft, chewy texture Papa Murphy’s dough is known for. Use warm water (110°F) and sugar to feed the yeast for optimal results.
What tools are essential for making pizza dough?
Essential tools include mixing bowls, measuring cups and spoons, a digital kitchen scale, a kitchen thermometer, and a wooden spoon or silicone spatula. Optional tools like a stand mixer with a dough hook, pizza stone, or rolling pin can enhance the process.
How long should the pizza dough rise?
The dough should rise in a warm environment until it doubles in size, typically 1-2 hours. Proper rising ensures the dough is airy and easy to handle for shaping and baking.
Can I freeze Papa Murphy’s pizza dough?
Yes, you can freeze the dough for up to 3 months. Pre-shape the dough before freezing, and when ready to use, thaw it in the refrigerator overnight and let it come to room temperature before baking.
What is the best way to knead pizza dough?
You can knead the dough by hand or use a stand mixer with a dough hook attachment. Knead until the dough is smooth, elastic, and slightly tacky, which usually takes 8-10 minutes by hand or 5-6 minutes with a mixer.
How can I make my homemade pizza crust crispy?
Use a pizza stone or baking steel preheated in the oven for 20-30 minutes. Baking at a high temperature (usually 475°F-500°F) also helps achieve a crispy crust.
Can I customize the toppings with this dough?
Absolutely! The dough serves as a versatile base, allowing you to add any toppings you like, whether classic options like pepperoni or more creative vegetable-loaded combinations.
How should I store leftover pizza dough?
Refrigerate the dough in an airtight container for up to 3 days. Let it come to room temperature before using. For longer storage, freeze the dough as described earlier.
What is the ideal baking temperature and time for a perfect pizza?
For thin crusts, bake at 475°F-500°F for 10-12 minutes. For thicker crusts, bake for 12-15 minutes. Preheating the oven and monitoring the pizza ensures an evenly baked crust.