
Finding a delicious and nutritious protein bar without nuts can be a challenge, especially for those with allergies or dietary restrictions. That’s why we’ve created this easy nut free protein bar recipe that’s packed with flavor and protein to keep you energized throughout the day.
These bars use wholesome ingredients like seeds, oats, and natural sweeteners to deliver a satisfying texture and taste without compromising on nutrition. Whether you need a quick post-workout snack or a convenient on-the-go option, this recipe fits perfectly into any lifestyle.
Ingredients
To create the perfect nut free protein bar that is both delicious and packed with protein, we carefully selected a blend of dry and wet ingredients. Each component adds texture, flavor, and nutrition to ensure satisfying bars suitable for anyone avoiding nuts.
Dry Ingredients
Our nut free protein bar recipe relies on wholesome dry ingredients that deliver the protein boost and chewy texture we want:
- 1 ½ cups old-fashioned rolled oats (gluten-free if preferred)
- ½ cup sunflower seeds (for crunch and healthy fats)
- ½ cup pumpkin seeds (rich in protein and magnesium)
- ½ cup vanilla or chocolate plant-based protein powder (pea or rice protein works well)
- 2 tablespoons chia seeds (for added fiber and binding)
- 2 tablespoons ground flaxseed (supports texture and nutrition)
- ¼ teaspoon salt (balances sweetness and enhances flavors)
Wet Ingredients
The wet ingredients bind our dry mix into a cohesive bar while naturally sweetening and boosting flavor:
- ½ cup honey or pure maple syrup (for natural sweetness and chewiness)
- ½ cup sunflower seed butter (a creamy nut-free alternative)
- 1 teaspoon pure vanilla extract (for subtle flavor depth)
- 2 tablespoons coconut oil (helps bind and adds moisture)
Optional Add-Ins
Customize the bars to your liking with these tasty nutrient boosts:
| Add-In | Quantity | Flavor & Texture Impact |
|---|---|---|
| Dark chocolate chips | ½ cup | Adds richness and melty texture |
| Dried cranberries | ⅓ cup | Introduces tartness and chewy contrast |
| Hemp seeds | 2 tablespoons | Boosts protein and adds a nutty note |
| Unsweetened shredded coconut | ¼ cup | Contributes mild sweetness and chewiness |
We recommend starting with basic ingredients and experimenting with optional add-ins to tailor bars that suit your taste and nutritional needs perfectly.
Tools and Equipment
To make our Nut Free Protein Bar Recipe perfectly every time, having the right Tools and Equipment is essential. Let’s break down what we need to prepare these delicious, protein-packed bars efficiently.
- Mixing Bowls: Use a large bowl to combine the dry ingredients and a separate bowl for wet ingredients. This helps ensure even mixing and avoids clumping.
- Measuring Cups and Spoons: Accurate measurements matter for both texture and nutrition. We recommend using standard measuring cups and spoons to measure oats, seeds, and liquids precisely.
- Spatula or Wooden Spoon: A sturdy spatula or wooden spoon is perfect for combining the sticky mixture without losing any ingredients. It also helps scrape the sides of the bowl clean.
- 8×8-inch Baking Pan or Dish: Pressing the mixture into a square pan ensures uniform thickness for easy cutting of the bars. Line it with parchment paper to prevent sticking.
- Parchment Paper: Essential for lining the pan to help lift out the bars easily after cooling.
- Knife: Use a sharp knife to cut the bars into evenly sized pieces once set.
- Food Processor or Blender (optional): To chop any optional add-ins finely or to process seeds for a finer texture, if desired.
- Measuring Scale (optional): For precise portion control and nutritional accuracy.
| Equipment | Purpose | Notes |
|---|---|---|
| Mixing Bowls | Separate mixing of wet and dry ingredients | Large size preferred |
| Measuring Cups & Spoons | Accurate ingredient measurement | Use standard sets |
| Spatula/Wooden Spoon | Mixing and scraping | Sturdy and flexible |
| Baking Pan (8×8-inch) | Shaping bars uniformly | Line with parchment paper |
| Parchment Paper | Prevent sticking | Essential |
| Knife | Cutting bars neatly | Sharp blade recommended |
| Food Processor/Blender | Optional seed or add-in processing | Use if you prefer fine texture |
| Measuring Scale | Optional portion control | For precise nutrition facts |
Using the proper tools helps us maintain the balance of flavors and textures that make these bars so satisfying and nut-free. When we prep with these essentials, the process becomes smoother, and our results are consistently excellent.
Instructions
Follow these precise steps to create delicious nut-free protein bars that combine rich flavor with optimal nutrition. We will guide you through preparation, mixing, shaping, and setting for perfect bars every time.
Preparation
- Preheat the oven to 350°F (175°C) if you choose to bake the bars.
- Line an 8×8-inch baking pan with parchment paper, allowing excess to hang over the edges for easy bar removal.
- Gather and measure all dry and wet ingredients accurately using measuring cups and spoons.
- If using optional add-ins such as dark chocolate chips or dried cranberries, chop them finely with a food processor or blender for even texture distribution.
- Prepare a mixing station with separate bowls for dry and wet ingredients to ensure smooth workflow and proper incorporation.
Mixing the Ingredients
- In a large bowl, whisk together the following dry ingredients until evenly combined:
- Old-fashioned rolled oats
- Sunflower seeds
- Pumpkin seeds
- Plant-based protein powder
- Chia seeds
- Ground flaxseed
- Salt
- In a separate bowl, combine wet ingredients:
- Honey or maple syrup
- Sunflower seed butter
- Vanilla extract
- Coconut oil (melted)
- Pour the wet mixture into the dry ingredients and stir vigorously using a spatula or wooden spoon until fully incorporated and sticky. The mixture should have a cohesive consistency, suitable for shaping.
- Fold in any optional add-ins gently to avoid breaking their texture but ensure even distribution.
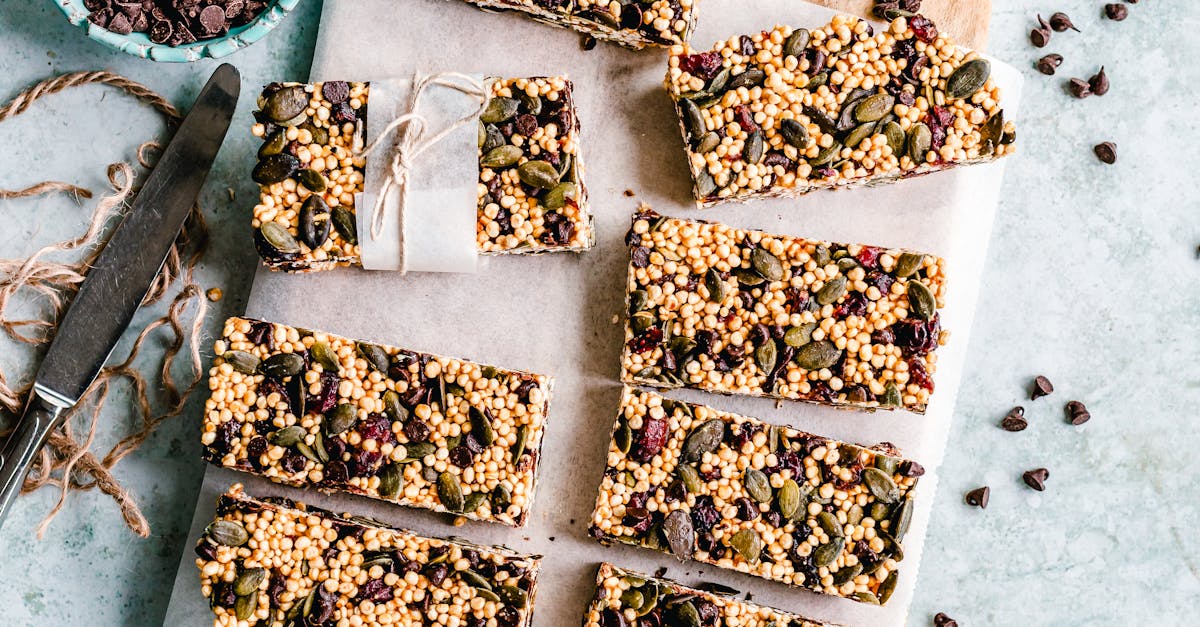
Shaping the Bars
- Transfer the protein mixture into the lined baking pan.
- Use a spatula or your clean hands (dipped in water) to press the mixture firmly and evenly into the pan to create a uniform thickness of about 1/2 inch (1.27 cm).
- Compress the mixture well to avoid crumbly bars after baking or chilling.
- Smooth the top surface for clean edges and a professional finish.
Baking or No-Bake Setting
| Method | Temperature & Time | Final Steps | Notes |
|---|---|---|---|
| Baking | 350°F (175°C) for 15-18 min | Cool completely in pan before cutting | Creates a slightly firmer, chewy texture |
| No-Bake | Refrigerate for at least 2 hrs | Remove from pan using parchment, cut into bars | Yields a softer, chewier bar with natural texture |
- For baking, place the pan in the oven. Remove when the edges turn golden brown but the center remains moist to keep chewiness. Let cool completely.
- For no-bake, cover the pan and refrigerate to allow bars to set firmly. Once chilled, lift the bars out using parchment overhang and cut into even pieces with a sharp knife.
Tip: Use a sharp knife heated under hot water and dried before slicing to achieve clean bars without crumbling.
By mastering these steps, our nut-free protein bars will turn out perfectly balanced between texture and flavor, ready for your active lifestyle or satisfying snack cravings.
Storage Tips
Proper storage is essential to maintain the freshness, texture, and nutritional value of our nut free protein bars. Follow these guidelines to keep your bars delicious and ready for any time you need a healthy boost.
Refrigeration
- Place the protein bars in an airtight container.
- Separate layers with parchment paper to prevent sticking.
- Store them in the refrigerator for up to 1 week.
- This method keeps the bars firm while preserving the chewy texture.
Freezing
- Wrap each bar individually in plastic wrap or wax paper.
- Place the wrapped bars in a freezer-safe airtight container or zip-top bag.
- Freeze for up to 3 months.
- When ready to eat, thaw bars at room temperature or in the refrigerator for 1-2 hours.
Room Temperature Storage
- Use only if planning to consume within 2-3 days.
- Store bars in an airtight container in a cool, dry place away from direct sunlight.
- Note: Bars will soften at room temperature but remain safe to eat.
Key Storage Recommendations at a Glance
| Storage Method | Container Type | Duration | Texture Impact |
|---|---|---|---|
| Refrigeration | Airtight container | Up to 1 week | Maintains firmness |
| Freezing | Wrapped + airtight bag | Up to 3 months | Slight moisture change |
| Room Temperature | Airtight container | 2-3 days | Softer, less firm |
“Storing bars properly extends shelf life and preserves the perfect chewiness and protein content.“
By applying these storage tips, we ensure our nut free protein bars stay fresh and tasty, ready to fuel our day whenever hunger strikes.
Conclusion
Making nut-free protein bars at home is a fantastic way to enjoy a nutritious snack tailored to your dietary needs. With simple ingredients and easy steps, we can whip up bars that fuel our bodies without compromising on taste or texture.
By customizing the add-ins and following proper storage techniques, these bars stay fresh and convenient for whenever we need a quick energy boost. Let’s embrace this recipe as a go-to option that supports our active lifestyles while keeping allergies and preferences in mind.
Frequently Asked Questions
What ingredients are used in nut-free protein bars?
Nut-free protein bars typically include oats, sunflower and pumpkin seeds, plant-based protein powder, chia seeds, ground flaxseed, and natural sweeteners like honey or maple syrup. Wet ingredients such as sunflower seed butter and coconut oil help bind everything together.
Can I customize the recipe with additional ingredients?
Yes, you can add optional ingredients like dark chocolate chips, dried cranberries, hemp seeds, or shredded coconut to tailor the bars to your taste and nutrition preferences.
What tools do I need to make these protein bars?
You’ll need mixing bowls, measuring cups, a spatula, and an 8×8-inch baking pan lined with parchment paper for easy shaping and removal.
How do I prepare the bars—baked or no-bake?
For baked bars, cook at 350°F (175°C) for 15-18 minutes. For no-bake bars, refrigerate the mixture for at least 2 hours until set.
How can I store nut-free protein bars to keep them fresh?
Store bars in an airtight container. They last up to a week refrigerated, up to three months frozen, and 2-3 days at room temperature (though they soften).
Are these protein bars good for post-workout snacks?
Yes, these bars are protein-rich and provide a balanced mix of nutrients, making them an ideal post-workout snack or on-the-go option.
How do I achieve clean cuts when slicing the bars?
Use a sharp knife and, if needed, chill the bars before slicing to create cleaner, neater pieces.