
Who doesn’t love a sweet treat that’s both delicious and functional? Our MMJ hard candy recipe is perfect for anyone looking to enjoy the benefits of cannabis in a fun, discreet, and flavorful way. These candies are easy to make, customizable, and ideal for on-the-go use or sharing with friends. Plus, they’re a great alternative for those who prefer not to smoke or vape.
Mmj Hard Candy Recipe
Unleash your creativity and make your MMJ hard candy effortlessly at home with this step-by-step guide. These candies are sweet, flavorful, and pack a therapeutic punch. Let’s dive into the process!
Ingredients
- 1 cup granulated sugar
- 1/2 cup light corn syrup
- 1/4 cup filtered water
- 2-3 teaspoons cannabis tincture (or dosage of your choice)*
- Food coloring (optional, as per taste or aesthetic preference)
- Food-grade flavored extract (such as mint, cherry, or lemon – about 1 teaspoon)
- Powdered sugar (for coating molds or dusting finished candies)
Tools
- Candy thermometer
- Nonstick saucepan
- Hardened candy molds or silicone mold trays
- A spatula
- Cooking spray or oil (for greasing molds)
Steps
- Prepare your molds: Lightly grease your candy molds using cooking spray or wipe with a small amount of oil. Sprinkle a bit of powdered sugar to prevent candy from sticking, if desired.
- Combine sugar, corn syrup, and water: In a nonstick saucepan, add the granulated sugar, corn syrup, and water. Stir thoroughly until the mixture is smooth and all components dissolve.
- Heat the mixture: Use medium heat to bring the mixture to a soft boil. Stir consistently to avoid burning the bottom. When the liquid becomes clear, place a candy thermometer into the saucepan and allow it to reach 300°F (the “hard-crack” stage).
- Remove from heat: As soon as it hits 300°F, remove the pan from the heat immediately. Timing is crucial here to attain the signature crispy texture of hard candy.
- Infuse cannabis tincture: Stir in your cannabis tincture carefully. Remember to use a spatula and mix consistently to evenly distribute the tincture throughout the candy base. Pro tip: Add tincture during this stage to avoid burning off the cannabinoids.
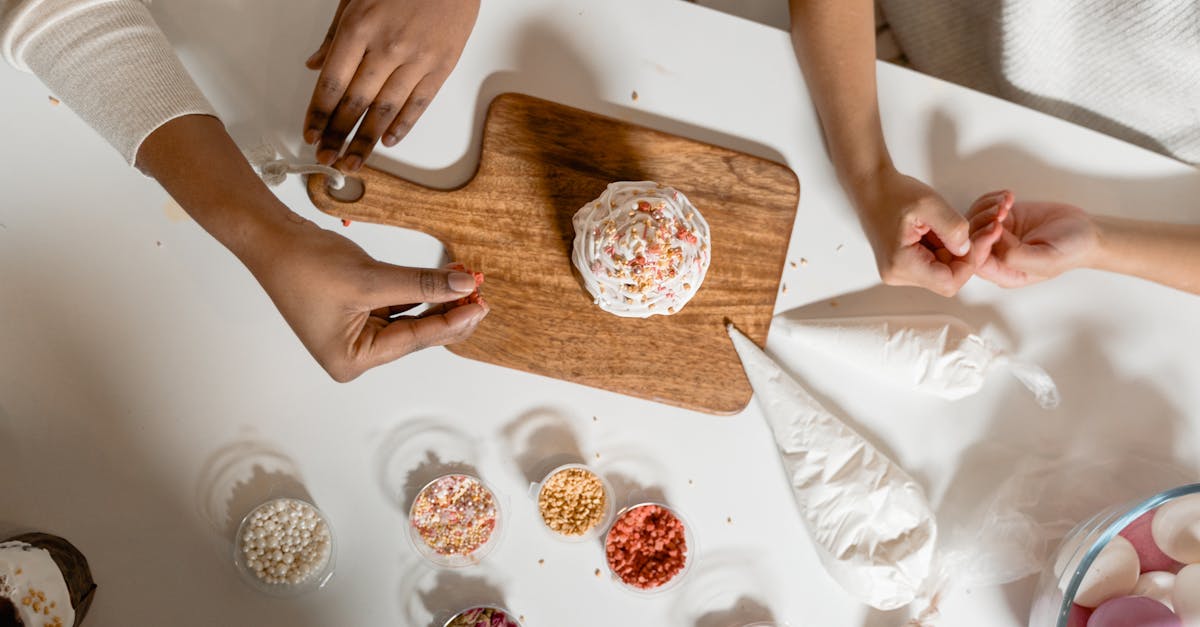
- Add color and flavor: If desired, mix in a few drops of food coloring and your choice of flavored extract. These bring vibrant aesthetics and a pleasant aroma that enhances the candy experience. Stir quickly while the liquid is still pliable.
- Pour into molds: Quickly and carefully pour the hot mixture into your prepared molds. Work efficiently as the candy base can harden rapidly. For smaller portions, use a spoon to control the distribution.
- Set and cool: Allow the MMJ candies to cool at room temperature until fully hardened (approximately 30-40 minutes). Avoid refrigerating as it could affect the candy’s texture.
- Demold and coat: Pop the hardened candies out of the molds gently to avoid breakage. Optionally, dust with powdered sugar for additional texture and to prevent stickiness.
Dosing Tips
When adding cannabis tincture, ensure proper dosing to match your tolerance levels. You can calculate your per-piece dosage with the table below:
| Total Cannabinoid Content | Number of Candies | Dosage Per Candy |
|---|---|---|
| 100mg THC | 20 candies | 5mg per candy |
| 200mg THC | 20 candies | 10mg per candy |
Storage
Store your MMJ hard candies in an airtight container to retain their flavor and texture. Keep them in a cool, dry place away from direct sunlight for up to 2-3 weeks. For longer storage, consider vacuum-sealing or refrigerator storage. Always label clearly to separate from non-MMJ candies.
Ingredients
To make our MMJ hard candies perfectly flavorful and effective, we’ll need a combination of basic ingredients coupled with optional enhancers for added customization. Let’s break it down into essentials and add-ons for clarity.
Main Ingredients
Here’s what we’ll use to craft the base of our cannabis-infused hard candy:
- 2 cups granulated sugar
- 2/3 cup light corn syrup
- 3/4 cup water
- 1–2 teaspoons cannabis tincture (adjust based on desired potency)
- Food coloring (color of choice; 2–3 drops)
- 1 teaspoon flavored extract (e.g., cherry, lemon, or mint)
Optional Add-Ons
These optional add-ins can help customize flavor, texture, or appearance:
- Citric acid (1/4 teaspoon) for a tangy kick.
- Sprinkles or edible glitter for a fun and decorative finish.
- Flavor enhancers (e.g., vanilla or almond extract) for broader taste possibilities.
- CBD tincture for a balanced cannabinoid experience.
Using these ingredients ensures our MMJ hard candy is not only potent but also aligned with our personal preferences.
Tools And Equipment
When preparing MMJ hard candy, the right tools and equipment are essential for precision, efficiency, and safety. Here’s a list of everything we need to successfully make these cannabis-infused treats at home:
Essential Tools:
- Medium-Sized Saucepan: For heating and combining the ingredients. Use a sturdy one to ensure even heat distribution.
- Candy Thermometer: This is crucial for measuring the exact temperature of the candy mixture. We need to hit 300°F (hard crack stage) for the perfect texture.
- Silicone or Hard Candy Molds: These create uniform shapes and make for easy candy removal. Grease the molds lightly to prevent sticking.
- Wooden or Silicone Spatula: For stirring the hot mixture without scratching the saucepan.
- Heat-Resistant Measuring Cups: Use these for measuring and pouring the mixture safely.
- Dropper or Small Pipette: If using cannabis tincture that’s not already mixed into the candy base, this helps with precise dosing.
- Parchment Paper or Baking Mat: If molds aren’t available, pour the mixture onto this surface to cool before breaking it into pieces.
- Gloves: Use food-grade gloves when handling the finished candies, especially if wrapping them individually.
Additional Tools (Optional but Helpful):
- Spray Bottle: Filled with water to dissolve sugar splatters on the pan’s sides, avoiding crystallization.
- Kitchen Scale: For accurately measuring heavier or bulk ingredients like sugar or corn syrup.
- Cooling Rack: To place the molds or candy sheets for even cooling.
- Mixing Bowls: For preparing any additional flavor or color mixtures separately.
Tool Selection Tips:
- Use a high-quality candy thermometer to ensure proper results—the wrong temperature can ruin the candy consistency.
- Silicone molds offer flexibility for easier candy removal and come in a variety of shapes for creativity.
- If experimenting with different flavors, having several measuring tools and bowls dedicated to this recipe will save time and minimize cross-contamination.
Important Reminder: High heat is involved in this recipe, so always handle tools and candy mixture with care. Having these tools ready beforehand simplifies the process and ensures a seamless candy-making experience.
| Tool Name | Purpose |
|---|---|
| Medium-Sized Saucepan | For heating and mixing ingredients evenly |
| Candy Thermometer | Gauge exact temperature to reach hard-crack stage |
| Silicone/Hard Candy Molds | Shape the candies and prevent sticking |
| Wooden/Silicone Spatula | Stir mixture without scratching or melting |
| Gloves | Safely handle finished candies and packaging |
Directions
Follow these simple and precise steps to create MMJ hard candy at home. Each stage is vital to ensuring perfect texture, flavor, and potency in your infused treats.
Prep
- Grease the candy molds with non-stick cooking spray or lightly coat them with cooking oil to prevent sticking.
- Measure all ingredients beforehand and place them near your workspace for efficient preparation:
- (Sugar, corn syrup, water, cannabis tincture, food coloring, and flavoring extracts).
- Organize tools: Place the candy thermometer, saucepan, spatula, and molds within reach for smooth workflow. If you’re using a cooling rack, set it up now.
Make the Candy Mixture
- Combine 1 cup of granulated sugar, ½ cup of corn syrup, and ¼ cup of water in a medium-sized saucepan.
- Turn on the stove to medium heat and gently stir the mixture until the sugar dissolves completely.
- Clip the candy thermometer to the side of the pan, ensuring the tip is submerged without touching the base.
- Increase the heat to medium-high and let the mixture boil. Do not stir during this stage, as it can cause crystallization.
- Watch the temperature closely:
- Boil until the thermometer reads 300°F (hard crack stage) for perfectly firm candy.
| Stage | Temperature | Result |
|---|---|---|
| Hard Crack Stage | 300°F | Candy becomes hard and snaps when broken. |
- Once the target temperature is reached, quickly remove the saucepan from the heat.
Add MMJ to the Candy
- Wait 30 seconds to cool the mixture slightly, then carefully add the cannabis tincture. Use the dosage that matches your desired potency.
- For even distribution, we recommend using ½ teaspoon to 1 teaspoon, depending on your THC preference.
(Tip: Always calculate THC dosage clearly using your tincture’s potency to avoid over- or under-dosing.)
- Stir in the tincture gently but quickly to ensure even incorporation without burning off cannabinoids.
- Add your chosen food coloring and flavored extracts for visual and taste appeal. Mix thoroughly until the color is uniform.
Cool And Shape The Candy
- Carefully pour the hot mixture into the prepared candy molds using a spoon or directly from the saucepan.
(Tip: If the mixture begins to harden, gently reheat it over low heat.) - Let the candies cool at room temperature for 30-45 minutes or until completely set.
Do not attempt to remove them prematurely, as this may cause breakage. - Once hardened, pop the candies out of the molds and optionally dust them with powdered sugar to prevent them from sticking together.
- Store the finished MMJ hard candies in an airtight container in a cool, dry place. (Proper storage keeps them fresh for weeks.)
Tips For Success
Creating MMJ hard candy at home can be a rewarding experience, but attention to detail is key. Here are our tried-and-true tips to ensure your candies turn out perfectly every time:
1. Master the Art of Temperature Control
- The hard crack stage (300°F – 310°F) is crucial for achieving that perfect candy texture. Use a candy thermometer to monitor the temperature closely.
- Avoid multitasking during this step, as even a slight variation can affect the final result.
- If you’re at a higher altitude, adjust the temperature accordingly (subtract 2°F for every 1,000 feet above sea level).
2. Choose the Right Cannabis Tincture
- Use a high-quality cannabis tincture with a measured potency. This is essential for accurate dosing and flavor balance.
- Be mindful of the alcohol or oil base in the tincture, as it can impact the candy’s consistency.
- Stir the tincture thoroughly toward the end of cooking to ensure even distribution in every piece.
3. Prep Tools and Work Area Thoroughly
- Grease your silicone molds lightly with cooking spray to ensure the candies release easily once cooled.
- Keep all tools—like the thermometer, spatula, and molds—within reach to avoid delays during cooking.
- Use parchment paper or a silicone mat beneath molds for an easy cleanup.
4. Timing Is Everything
- Pour the candy mixture into molds quickly but carefully after reaching the desired temperature. It begins to harden almost instantly.
- Avoid touching the mixture with bare hands or tools that aren’t heatproof to prevent burns.
5. Add Flavors and Colors Strategically
- Incorporate food coloring and flavored extracts just before adding the tincture. High heat can degrade flavors if added too early.
- Add a pinch of citric acid for a tangy kick, especially if using fruity extracts.
6. Efficient Cooling and Storage
- Allow at least 30 minutes for candies to cool and harden in the molds before removing.
- Store the finished candies in an airtight container with a layer of parchment paper in between to prevent sticking.
- Keep them in a cool, dark place to preserve both potency and texture.
Common Troubleshooting Tips
| Issue | Cause | Solution |
|---|---|---|
| Candies too soft | Didn’t reach the hard crack stage | Use a thermometer to monitor temperature closely |
| Uneven potency | Tincture not fully blended | Stir well before pouring into molds |
| Sticky or melting candy | Improper storage conditions | Store in airtight containers at cool temperatures |
| Bubbles in candy | Over-stirring the mixture | Stir gently and avoid vigorous agitation |
Storage Instructions
Proper storage is essential for preserving the freshness, potency, and texture of our MMJ hard candies. Follow these precise steps to ensure your candies remain as flavorful and effective as the day you made them:
1. Use Airtight Containers
Store the candies in airtight containers such as mason jars, resealable plastic bags, or food-grade storage boxes. This prevents air exposure, which can cause the candies to become sticky or lose their potency over time.
2. Keep in a Cool, Dark Place
Temperature and light can significantly impact cannabis-infused candies. Select a storage area that’s cool (around 60-70°F) and dark, like a pantry or cupboard. Avoid direct sunlight, which can degrade both the candy and the cannabis compounds.
3. Add Anti-Stick Solutions
To prevent candies from sticking together, layer them with parchment paper or sprinkle a small amount of cornstarch on them before placing them in the container. This step is especially important if you live in a humid area.
4. Option for Long-Term Storage
For extended freshness, use a freezer. Place the candies in freezer-safe bags with the air tightly squeezed out, or use vacuum-sealed packaging. When ready to enjoy, allow the candies to return to room temperature before unsealing to avoid unwanted moisture from condensation.
5. Label Your Containers
Always label your storage containers with information such as:
- Flavor and infusion (e.g., orange with cannabis tincture)
- Dosage per candy (e.g., 5mg THC each)
- Preparation date and expiration date
This helps track potency and ensures responsible consumption. Here’s a quick reference example for labeling:
| Candy Flavor | Type of Tincture | Dosage | Prep Date | Expiration Date |
|---|---|---|---|---|
| Orange | THC | 5mg each | 10/15/2023 | 12/15/2023 |
6. Avoid Storing with Strong-Smelling Foods
MMJ hard candies can absorb odors from other foods. Make sure they’re stored away from strong-smelling items like onions or spices to preserve their intended flavor.
By following these storage best practices, we ensure our MMJ hard candies remain a delicious, discreet, and potent treat every time we reach for them.
Make-Ahead Instructions
When preparing MMJ hard candies, making them ahead of time is practical and ensures you have a ready supply on hand for whenever the need arises. Follow these straightforward guidelines for preparing and preserving your hard candies in advance to maintain their quality, flavor, and potency.
Steps for Making Ahead:
- Prepare Ingredients and Tools:
Before starting, measure out all the ingredients such as granulated sugar, cannabis tincture, and corn syrup, and set up the required tools like the candy thermometer and molds. This ensures a smooth and uninterrupted process.
- Batch Preparation:
Consider creating a larger batch, especially if you plan to share or store for future use. Use a consistent dosing method for your cannabis tincture to maintain even potency across every piece.
- Proper Cooling:
Once the candies are formed, ensure they cool completely in the molds. Rushing this step can lead to uneven texture or candies sticking together.
- Storage Prepping:
After unmolding, lightly dust candies with cornstarch or powdered sugar to prevent sticking while in storage. For added assurance, wrap each candy individually in wax paper.
- Airtight Packaging:
Store candies in an airtight container, as this prevents exposure to moisture and air, which can degrade the candy’s texture or reduce its potency over time. Use separate containers for different flavors to avoid cross-contamination of scents.
Shelf-Life Table
| Storage Method | Shelf-Life Estimate | Recommendations |
|---|---|---|
| Airtight Container | 8-10 weeks | Store in a cool, dark place for best results. |
| Individual Wrapping | Up to 12 weeks | Use wax paper or parchment for wrapping. |
| Vacuum-Sealed Bags | 3-6 months | Ideal for long-term storage; avoid freezing. |
Pro Tips for Making Ahead:
- Label Clearly: Always label your storage containers with details such as flavor, dosage, and preparation date. This is especially important if you’re making multiple flavors or strengths.
- Avoid Freezing: While refrigeration can extend shelf life slightly, freezing is not recommended as it often affects candy texture and may cause condensation when thawed.
- Rotating Stock: Use the first-in, first-out method to ensure older batches are enjoyed first, maintaining maximum freshness and potency.
By following these make-ahead instructions, we can ensure that our MMJ hard candies are always fresh, flavorful, and ready to enjoy whenever needed.
Conclusion
Crafting MMJ hard candy at home combines creativity, precision, and the opportunity to tailor a treat that suits our preferences. These candies offer a discreet and enjoyable way to experience the benefits of cannabis without the need for smoking or vaping.
By following the steps and tips we’ve shared, we can confidently create a batch that’s flavorful, potent, and easy to store. With the right tools and a bit of practice, this recipe can become a go-to for anyone seeking a convenient cannabis-infused treat. Let’s enjoy the process and the results!
Frequently Asked Questions
What is MMJ hard candy?
MMJ hard candy is a cannabis-infused sweet treat made from simple ingredients like sugar, corn syrup, and cannabis tincture. It provides a discreet, smoke-free option for enjoying the benefits of cannabis while offering customizable flavors and dosing.
Can I customize the flavor and potency of MMJ hard candy?
Yes, MMJ hard candies are highly customizable. You can adjust the flavor by adding extracts or food coloring and control the potency by varying the amount of cannabis tincture used in the recipe.
What ingredients are needed to make MMJ hard candy?
The main ingredients include granulated sugar, corn syrup, water, cannabis tincture, food coloring, and flavored extract. Optional add-ons like citric acid, sprinkles, or CBD tincture can enhance flavor, texture, and appearance.
What tools do I need for making MMJ hard candy?
Essential tools include a medium-sized saucepan, candy thermometer, silicone or hard candy molds, and a spatula. Additional tools, like a spray bottle or kitchen scale, can make the process easier.
How do I properly dose cannabis tincture in MMJ candies?
To dose effectively, calculate the desired amount of cannabis per candy and adjust the tincture volume accordingly. Divide the total cannabis dose by the number of candies you plan to make.
Can I make MMJ hard candy ahead of time?
Yes, MMJ hard candies can be prepared in advance. Store them in airtight containers, dusted with cornstarch or powdered sugar, to prevent sticking and maintain freshness.
How should I store MMJ hard candy for maximum freshness?
Store MMJ hard candies in an airtight container placed in a cool, dark area. Use anti-stick measures like powdered sugar and always label containers with flavor, dosage, and preparation date.
How long does MMJ hard candy last?
If stored properly in airtight containers, MMJ hard candies can last up to six months. Keep them away from moisture and heat to preserve potency and texture.
Can I freeze MMJ hard candy for later use?
Freezing is not recommended, as it can impact the texture and flavor of the candy. Instead, use airtight packaging and proper storage techniques to extend the shelf life.
Are MMJ hard candies safe to share with friends?
Yes, MMJ hard candies are safe and ideal for sharing, provided your friends are aware of the cannabis content and dosage. Always inform others about potency and ensure responsible use.