
Mini parfait cups are the perfect bite-sized treat for any occasion. These delightful layers of creamy yogurt, fresh fruit, and crunchy granola come together to create a refreshing and visually appealing snack or dessert. Whether we’re hosting a brunch or looking for a healthy dessert option, mini parfaits offer endless customization to suit every taste.
Ingredients
To craft the perfect Mini Parfait Cups, we focus on fresh, vibrant components that blend texture and flavor beautifully. Below are the essential ingredients broken down for ease of preparation and customization.
Fruits and Toppings
For an enticing burst of color and freshness, choose a variety of ripe, high-quality fruits and crunchy toppings that complement each other perfectly.
- Fresh berries: strawberries (sliced), blueberries, raspberries, or blackberries
- Chopped stone fruits: peaches, nectarines, or mangoes
- Sliced bananas: add creaminess and natural sweetness
- Crunchy toppings: granola, chopped nuts (almonds, walnuts, pecans), or toasted coconut flakes
- Optional extras: mini chocolate chips, chia seeds, or edible flowers for garnish
Base Ingredients
The foundation of our mini parfaits combines creamy and light elements that harmonize with the fresh fruit and crunchy toppings.
| Ingredient | Description | Quantity (for 12 mini cups) |
|---|---|---|
| Greek yogurt | Thick, creamy, plain or vanilla | 2 cups |
| Whipped cream | Lightly sweetened or plain | 1 cup |
| Cottage cheese | Optional for added texture and protein | 1 cup (optional) |
Sweeteners and Mix-Ins
To enhance natural flavors and add a touch of indulgence, we suggest using natural sweeteners and complementary mix-ins.
- Honey or maple syrup: 2–3 tablespoons, drizzled or mixed into yogurt
- Vanilla extract: 1 teaspoon for aroma and subtle sweetness
- Cinnamon or nutmeg: a pinch to add warmth and spice
- Lemon or lime zest: for a fresh, citrusy brightness
Tip: Adjust sweetness and spices according to personal taste, ensuring the balance between creamy, fruity, and crunchy layers shines through.
Equipment Needed
To craft the perfect Mini Parfait Cups, having the right equipment ensures a smooth and enjoyable assembly process. Here is the list of essential tools and utensils we use to create our bite-sized works of art.
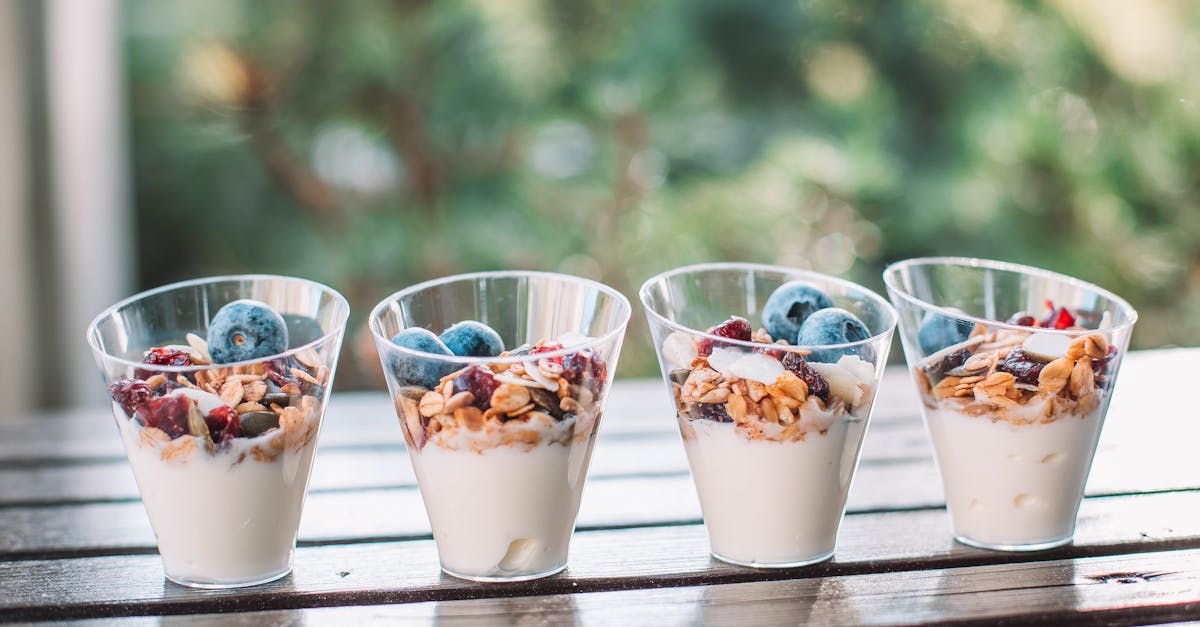
- Mini Parfait Cups or Small Glasses
Choose clear mini cups or shot glasses to beautifully showcase each colorful layer of yogurt, fruit, and granola.
- Small Mixing Bowls
Use separate small bowls for preparing and mixing different layers like yogurt blends, whipped cream, or sweetened cottage cheese.
- Measuring Spoons and Cups
Accurate measuring tools allow us to portion ingredients precisely for consistent flavor and texture.
- Spoon or Small Ladle
A small spoon or ladle helps layer ingredients meticulously without mixing or spilling.
- Spatula
A silicone spatula efficiently scrapes every bit of yogurt or cream out of bowls ensuring no waste.
- Cutting Board and Paring Knife
For chopping fresh fruits into bite-sized pieces, a sharp paring knife and sturdy cutting board are essential.
- Whisk or Electric Mixer
To whip cream or blend smooth yogurt mixtures, a whisk or handheld mixer provides the best texture.
| Equipment | Purpose |
|---|---|
| Mini Parfait Cups | Display and serve parfaits beautifully |
| Small Mixing Bowls | Prepare and mix individual layers |
| Measuring Spoons & Cups | Ensure precise ingredient portions |
| Spoon or Small Ladle | Layer ingredients cleanly |
| Silicone Spatula | Scrape bowls and mix thoroughly |
| Cutting Board & Paring Knife | Cut fresh fruit into perfect bite sizes |
| Whisk or Electric Mixer | Whip cream and blend yogurt smoothly |
By using this equipment we maintain the parfaits’ elegant layered look, balanced texture, and fresh flavors highlighted in every bite of our delightful mini parfait cups.
Prep Work
Before assembling our Mini Parfait Cups, careful prep ensures each layer shines with fresh flavors and perfect texture. Let’s walk through the essential steps for preparing fruits and creating the creamy yogurt base.
Preparing the Fruits
We start by selecting vibrant fresh fruits such as berries, stone fruits, or citrus segments for a burst of natural sweetness and color. Here’s how we prepare them:
- Wash fruits thoroughly under cold running water to remove any impurities.
- Pat dry with paper towels to avoid excess moisture, which can dilute flavors or cause sogginess.
- Hull or pit fruits like strawberries or cherries to make them bite-sized and easy to layer.
- Dice or slice fruits evenly to ensure uniform texture and aesthetic appeal when layered.
- Toss delicate fruits like berries gently to prevent bruising.
| Fruit Type | Preparation Notes | Ideal Cut Size |
|---|---|---|
| Strawberries | Hull and remove green tops | Quartered or sliced |
| Blueberries | Rinse and pat dry | Whole |
| Peaches/Plums | Pit and peel if desired | Diced |
| Kiwi | Peel and slice | Thin rounds or diced |
| Citrus segments | Peel, remove membranes | Sections |
Our goal is to keep fruits fresh, juicy, and visually appealing for layering, enhancing both taste and presentation.
Making the Cream or Yogurt Base
The cream or yogurt layer delivers the signature richness and smooth texture in our mini parfaits. Here’s how we prepare it:
- Use Greek yogurt as a base for a thicker, creamy consistency.
- For extra fluffiness, we gently fold in whipped cream or mix in cottage cheese for texture variation.
- Sweeten naturally with honey or maple syrup to balance tartness without overpowering.
- Add flavor boosts like vanilla extract, citrus zest, or subtle spices such as cinnamon or nutmeg to enhance complexity.
Step-by-step:
- Measure 1 cup Greek yogurt into a mixing bowl.
- Add ½ cup whipped cream or cottage cheese if using.
- Drizzle 1 to 2 tablespoons honey or maple syrup.
- Stir in ½ teaspoon vanilla extract and a pinch of desired spices.
- Whisk with a silicone spatula or electric mixer until smooth and airy.
| Ingredient | Quantity | Purpose |
|---|---|---|
| Greek yogurt | 1 cup | Creamy base |
| Whipped cream | ½ cup (optional) | Adds lightness and fluffiness |
| Honey or maple syrup | 1-2 tbsp | Natural sweetener |
| Vanilla extract | ½ tsp | Flavor enhancer |
| Spices (cinnamon, nutmeg) | Pinch | Adds warmth and depth |
This creamy base is now ready to be layered with our prepared fruits and granola for delicious mini parfait cups that impress with texture and taste.
Instructions
Follow these steps carefully to assemble our Mini Parfait Cups with precision and flair. Each step ensures we capture the perfect balance of texture and flavor in every bite-sized treat.
Layering the Parfait Cups
- Start with the creamy base: Spoon 1-2 tablespoons of the whipped Greek yogurt mixture into the bottom of each clear mini cup. This forms a smooth foundation for the layers.
- Add the fresh fruit: Gently place a layer of chopped or whole fresh fruit (about 1 tablespoon) atop the yogurt base. Use visually contrasting fruits like berries or stone fruit to create an appealing look.
- Sprinkle the crunch: Add 1 teaspoon of granola, nuts, or toasted seeds. This adds a satisfying crunch that complements the creamy and juicy layers.
- Repeat the layers: Continue layering yogurt, fruit, and granola in the same order until the cup is nearly full, making sure the top layer is visually attractive and balanced.
- Finish with a garnish: For a finishing touch, adorn the top layer with a small piece of fruit, a drizzle of honey or maple syrup, and a light dusting of citrus zest or cinnamon.
| Layer Component | Approximate Quantity per Mini Cup | Notes |
|---|---|---|
| Whipped Greek Yogurt | 1-2 tablespoons | Should be fluffy and sweetened |
| Fresh Fruit | 1 tablespoon | Use variety for color contrast |
| Granola or Nuts | 1 teaspoon | Adds crunch and texture |
| Garnish | To taste | Optional – enhances appearance |
Pro tip: Use a small spoon or spoon handle to gently press layers as you go. This helps keep the parfait compact and visually tidy.
Chilling Time
- Place the assembled cups on a tray. This prevents spills and allows easy transport.
- Refrigerate for at least 30 minutes. Chilling allows the flavors to meld and the parfait base to firm slightly, enhancing the texture.
- Serve chilled. The parfaits taste best when cold but let sit for 5 minutes at room temperature before serving if they become too firm.
“Chilling the parfaits not only solidifies the layers but also heightens the delightful contrast between creamy, crunchy, and fresh elements.”
By following these instructions, we ensure our Mini Parfait Cups are as beautiful as they are delicious, perfect for any occasion that calls for a bite-sized burst of flavor.
Serving Suggestions
To elevate our Mini Parfait Cups experience, we can explore various serving ideas that highlight their visual appeal and complement their delicious layers. Here are some thoughtful suggestions to make every bite delightful and memorable.
Presentation Tips
- Serve the parfait cups on a decorative tray or platter to enhance the visual impact.
- Use clear mini cups or glass shot glasses so each layer’s vibrant colors and textures shine through.
- Garnish the top layer with a sprig of fresh mint or a delicate edible flower to add a fresh aroma and pop of color.
- For a festive touch, sprinkle toasted coconut flakes or mini chocolate chips on top.
Pairing Suggestions
Pairing our Mini Parfait Cups with complementary beverages or snacks can create a balanced and enjoyable treat.
| Pairing Type | Recommended Options | Flavor Effect |
|---|---|---|
| Beverage | Freshly brewed herbal tea, iced coffee, or sparkling water with lemon | Balances sweetness, refreshes palate |
| Snack | Almond biscotti, oat crackers, or mixed nuts | Adds crunch and savory contrast |
| Additional Sides | Fresh fruit skewers, small cheese bites | Enhances variety and richness |
Occasion Ideas
Our Mini Parfait Cups suit many settings because they are versatile and easy to enjoy.
- Brunch parties: Serve alongside egg dishes and fresh juices for a well-rounded meal.
- Healthy dessert: Offer as a guilt-free sweet treat after dinner.
- Kids’ lunches: Pack in their lunchbox for a nutritious and visually fun snack.
- Holiday gatherings: Customize with seasonal fruits and spices to match the theme.
Serving Temperature
Ensure the parfait cups are well chilled for optimal texture and taste. Serve them straight from the fridge or after resting 30 minutes post-assembly to let the flavors meld beautifully.
Variations of Mini Parfait Cups Recipes
Exploring variations of mini parfait cups recipes allows us to delight diverse palates and occasions with unique flavor combinations and textures. Below, we detail several creative twists that maintain the classic parfait structure while introducing exciting ingredients.
1. Tropical Mini Parfait Cups
- Ingredients: Greek yogurt, honey, diced mango, pineapple chunks, shredded coconut, chopped macadamia nuts
- Flavor Profile: Sweet tropical fruits paired with creamy yogurt and crunchy nuts create a refreshing tropical escape in every bite.
- Assembly Tips: Layer yogurt sweetened with honey, followed by mango and pineapple, then sprinkle shredded coconut and macadamia nuts for crunch.
2. Chocolate Banana Nut Mini Parfaits
- Ingredients: Vanilla Greek yogurt, cocoa powder, sliced bananas, crushed walnuts, chocolate chips
- Flavor Profile: The rich chocolate blends with creamy banana and crunchy walnuts for a dessert-like parfait without overpowering sweetness.
- Assembly Tips: Mix cocoa powder into yogurt, layer with banana slices, sprinkle walnuts and chocolate chips between layers.
3. Berry Cheesecake Mini Parfaits
- Ingredients: Cream cheese, Greek yogurt, mixed berries (strawberries, blueberries, raspberries), graham cracker crumbs, honey
- Flavor Profile: Creamy cheesecake flavor with tart berries and a crunchy graham cracker base mimics classic cheesecake in mini form.
- Preparation: Whisk cream cheese into the yogurt until smooth and sweeten with honey. Layer with berries and graham cracker crumbs.
4. Spiced Apple Cinnamon Mini Parfaits
- Ingredients: Greek yogurt, sautéed apples with cinnamon and nutmeg, granola, maple syrup
- Flavor Profile: Warm spices and caramelized apples create a comforting fall-inspired parfait perfect for cooler days.
- Assembly Tips: Use warm fruit layers grouped with cool yogurt to balance temperatures and textures.
Comparison of Mini Parfait Variations
| Variation | Yogurt Base | Fruit Component | Crunch Element | Flavor Highlights |
|---|---|---|---|---|
| Tropical Mini Parfait | Greek yogurt + honey | Mango, pineapple | Shredded coconut, nuts | Sweet, tropical, nutty |
| Chocolate Banana Nut | Vanilla Greek yogurt + cocoa | Banana | Walnuts, chocolate | Rich chocolate, creamy, crunchy |
| Berry Cheesecake | Cream cheese + Greek yogurt | Strawberries, blueberries | Graham cracker crumbs | Tart berries, creamy, sweet |
| Spiced Apple Cinnamon | Greek yogurt | Sautéed apples with spices | Granola | Warm spices, caramelized apples |
Tips for Customizing Your Mini Parfait Cups
- Swap yogurt types: Use flavored yogurts, dairy-free options, or thicker skyr depending on dietary preference.
- Season your fruit: Toss fruit with citrus zest or warming spices for a flavor boost.
- Add layers of texture: Incorporate seeds like chia or flax, or use crushed cookies for extra crunch.
- Sweeten mindfully: Adjust honey or syrup amounts to keep parfaits balanced.
Storage and Make-Ahead Tips
To keep our mini parfait cups fresh and flavorful, proper storage is essential. Whether preparing them ahead for a party or storing leftovers, following these guidelines will preserve texture and taste.
Refrigeration Best Practices
- Cover each parfait cup tightly with plastic wrap or use airtight containers to prevent moisture loss and absorption of other odors.
- Store parfaits in the refrigerator at a consistent temperature around 38°F to 40°F (3°C to 4°C).
- Consume parfaits within 24 to 48 hours for the best taste and texture.
Avoiding Sogginess
The key challenge with storing parfaits is preventing granola or crunchy toppings from becoming soggy. To maintain their crunch:
- Store granola or nuts separately and add just before serving.
- If assembling ahead, place the granola layer on top as a garnish right before serving.
- Alternatively, layer crunchy ingredients between thicker yogurt layers to create a moisture barrier.
Make-Ahead Assembly Tips
We can prepare several components in advance to save time:
| Component | Preparation Timing | Storage Method |
|---|---|---|
| Yogurt Mixture | Up to 2 days ahead | Airtight container in fridge |
| Fresh Fruit | Same day or overnight | Covered bowl in fridge |
| Granola or Nuts | Up to 1 week | Airtight dry container |
| Assembled Parfaits | Up to 24 hours ahead | Covered with plastic wrap |
Freezing Considerations
While freezing parfaits can be tempting for longer storage, the texture of fruits and creamy layers may change upon thawing:
- Freeze assembled mini parfait cups in airtight containers for up to 1 month.
- Thaw overnight in the refrigerator.
- Expect slight separation in yogurt; give a gentle stir before serving.
- Granola toppings should still be added fresh after thawing to retain crispness.
Serving After Storage
- Let refrigerated parfaits sit at room temperature for 5 to 10 minutes before serving to enhance flavors and soften the yogurt slightly.
- Add any remaining crunchy toppings or fresh garnishes right before presentation for optimal texture and visual appeal.
Conclusion
Mini parfait cups offer a delightful way to enjoy fresh flavors and satisfying textures in every bite. Their versatility makes them perfect for any occasion, from casual brunches to elegant gatherings. With endless customization options, we can easily tailor these treats to suit our tastes and dietary preferences.
By following simple preparation and storage tips, we ensure each parfait stays fresh and delicious. Whether we stick to classic combinations or experiment with creative twists, mini parfait cups are sure to impress and satisfy. Let’s keep these little delights on our menu for a healthy and visually appealing treat everyone will love.
Frequently Asked Questions
What are mini parfait cups?
Mini parfait cups are bite-sized layered treats typically made with creamy yogurt, fresh fruit, and crunchy granola. They are customizable, healthy, and perfect for occasions like brunch, desserts, or snacks.
What ingredients do I need to make mini parfait cups?
You’ll need Greek yogurt or a creamy base, fresh fruits like berries or stone fruits, granola or nuts for crunch, and optional sweeteners like honey or maple syrup. Spices and citrus zest can be added for flavor.
What equipment is essential for assembling mini parfait cups?
Clear mini cups or shot glasses, small mixing bowls, measuring spoons and cups, a small spoon or ladle, silicone spatula, cutting board, paring knife, and a whisk or electric mixer are recommended.
How do I prepare fruits for mini parfait cups?
Wash, dry, and cut fruits into small, uniform pieces to enhance both their visual appeal and flavor in the parfait layers.
How should I layer the mini parfait cups?
Start with whipped Greek yogurt, add fresh fruit, then sprinkle granola or nuts. Repeat the layers until nearly full, and garnish on top. Keep layers compact and tidy for the best look.
Why is chilling mini parfait cups important?
Chilling for at least 30 minutes helps meld flavors, improve texture, and ensures the parfait is served cold for the best taste.
Can I customize mini parfait cups recipes?
Yes, you can swap yogurt types, adjust sweetness, season fruits, and vary crunch toppings to suit your taste or dietary needs.
How should I store mini parfait cups?
Cover them tightly and refrigerate. Consume within 24 to 48 hours for freshness. Store granola or nuts separately to avoid sogginess and add just before serving.
What are some popular variations of mini parfait cups?
Popular versions include Tropical Mini Parfaits, Chocolate Banana Nut, Berry Cheesecake, and Spiced Apple Cinnamon—all with unique yogurt bases, fruits, and crunch elements.
On what occasions are mini parfait cups ideal to serve?
They’re great for brunch parties, healthy desserts, kids’ lunches, holiday gatherings, or any time you want a light, visually appealing, and tasty treat.