
There’s something special about preserving family recipes in a way that lasts for generations. A laser engraved recipe on a cutting board combines practicality with sentiment, turning a simple kitchen tool into a cherished keepsake. It’s a unique way to keep your favorite dishes close at hand while adding a personal touch to your cooking space.
We love how laser engraving captures every detail of a handwritten recipe or a beloved dish, making it both a functional and decorative piece. Whether it’s a gift for a loved one or a creative addition to your own kitchen, this idea blends tradition with modern craftsmanship beautifully. Let’s explore how you can create a stunning laser engraved recipe cutting board that’s as meaningful as it is useful.
Materials Needed for Laser Engraved Recipe On Cutting Board
To create a stunning laser engraved recipe on a cutting board, having the right materials is essential. We’ll walk through the core components needed to bring tradition and craftsmanship together seamlessly.
Choosing the Right Cutting Board
Selecting the perfect cutting board is the foundation for our project. Consider these key factors:
- Material: Opt for hardwoods like maple, walnut, or bamboo. These woods offer durability and smooth surfaces that engrave beautifully.
- Size & Thickness: Boards should be at least 12 by 18 inches with a minimum thickness of 0.75 inches for optimal engraving depth.
- Finish: Choose boards with a natural or food-safe finish. Avoid plastic or heavily treated surfaces as they do not engrave well and can emit harmful fumes.
| Material | Advantages | Recommended Thickness |
|---|---|---|
| Maple | Durable, light color | 0.75 – 1 inch |
| Walnut | Dark, attractive grain | 0.75 – 1 inch |
| Bamboo | Eco-friendly, hard surface | 0.75 – 1 inch |
Laser Engraving Machine and Tools
Our laser engraving machine is the heart of this craft. Here’s what we need:
- Laser Engraver Type: A CO₂ laser engraver is ideal for wood cutting boards because it provides high precision and clean cuts.
- Power: Aim for a machine with at least 40 watts of power for crisp and deep engraving.
- Software Compatibility: Ensure the machine works with standard design software and supports vector files for the best results.
- Additional Tools: A computer for design work, ventilation system to control smoke, and safety gear such as goggles and gloves.
| Component | Specification |
|---|---|
| Laser Type | CO₂ Laser |
| Power | Minimum 40 Watts |
| Compatible Software | Adobe Illustrator, CorelDRAW, or similar |
| Safety Equipment | Goggles, gloves, ventilation |
Recipe Selection and Design Software
Choosing the recipe and designing the layout are crucial steps that bridge memories with aesthetics.
- Recipe Format: Select a recipe with clear, legible handwriting or a clean typed version. This ensures the laser captures every detail.
- Design Software: Use programs like Adobe Illustrator, CorelDRAW, or free options such as Inkscape to convert recipe images into vector files. Vector designs render sharply on the wood.
- Layout Tips: Keep sufficient margins to prevent engraving too close to edges. Balance text size and spacing for readability and visual appeal.
“The magic of a laser engraved recipe cutting board lies in the precision of design and quality of materials combined.”
By preparing these materials carefully we set the stage for a beautiful, lasting keepsake that celebrates cherished family recipes.
Preparing the Recipe for Engraving
To create a stunning laser engraved recipe cutting board, we must prepare the recipe carefully. Proper preparation ensures the engraving is clear, legible, and visually appealing, transforming your cherished recipe into a timeless keepsake.
Selecting a Clear and Concise Recipe
We start by choosing a recipe that is easy to read and not overly complex. Since the engraving space on a cutting board is limited, the recipe should include only essential ingredients and steps.
- Opt for recipes with simple, straightforward instructions.
- Avoid lengthy paragraphs or unnecessary details.
- Prioritize family favorites or signature dishes to enhance the sentimental value.
“Choose recipes that reflect your family’s heritage and are concise enough to fit beautifully on the board.“
Formatting the Recipe Text and Layout
Once we select the recipe, we format the text to optimize readability and design flow. This step involves organizing content in a clean, balanced layout that will translate well in engraving.
- Use bullet points or numbered lists for ingredients and steps.
- Select a legible font style that matches the cutting board’s aesthetic and engraving clarity.
- Space the text evenly to avoid crowding.
- Include a title or recipe name in a distinctive, decorative font for emphasis.
| Formatting Element | Recommendation |
|---|---|
| Font Style | Simple serif or sans-serif styles |
| Font Size | Minimum 12 pt for readability |
| Line Spacing | 1.2 to 1.5 times font size |
| Text Alignment | Left or center aligned for visual balance |
| Use of Decorative Text | For recipe name or special notes |
Converting the Design for Laser Engraving
Next, we convert the formatted recipe into a file compatible with our laser engraving software. This step demands precise digital preparation to guarantee a crisp final product.
- Create a vector file (.AI, .SVG, or .EPS) from the formatted text and layout.
- Verify all text is converted to outlines to prevent font compatibility issues.
- Adjust contrast and line thickness to enhance engraving depth without losing detail.
- Use engraving software preview to simulate the result and tweak as needed.
“Our goal is a flawless digital design that the laser engraver can reproduce exactly, preserving every word of your precious recipe.“
By meticulously preparing the recipe in these steps, we achieve an exceptional laser engraved recipe cutting board that celebrates tradition with modern craftsmanship.
Preparing the Cutting Board
To ensure a flawless laser engraving of your recipe on the cutting board, proper preparation of the surface is essential. Careful cleaning and positioning maximize both the visual impact and durability of the engraving.
Cleaning and Sanding the Surface
Before engraving, we start by thoroughly cleaning the cutting board. Any dust, oils, or residue will affect the precision of the laser and the final quality of the engraving.
- Wipe the board with a lint-free cloth slightly dampened with warm water.
- Use a mild soap if needed to remove stubborn grease or fingerprints.
- Let the board completely dry before moving on.
Next, sanding the surface gently evens out any imperfections and creates an ideal canvas for the laser. Here’s our step-by-step sanding process:
| Step | Detail | Purpose |
|---|---|---|
| 1. Light Sand | Use 220-grit sandpaper | Smooth minor scratches and dust |
| 2. Fine Sand | Switch to 320-grit or higher sandpaper | Create an even, uniform texture |
| 3. Clean Up | Remove all dust with a tack cloth | Ensure a clean engraving area |
Tip: Always sand in the direction of the wood grain to avoid visible scratches. This careful preparation guarantees that the laser engraving stands out crisply against the board’s surface.
Securing the Board in the Laser Engraver
Properly positioning and securing the cutting board in the laser machine is crucial for precise engraving alignment and safety.
- Place the board flat on the engraving bed.
- Use laser-safe clamps or weights to prevent movement during the process.
- Double-check the board’s alignment with the laser’s origin point to match your design layout.
- Confirm that there is no debris underneath the board that could interfere with engraving depth or focus.
“Stability during engraving ensures consistent depth and sharpness, preventing uneven burns or blurring of the recipe text.“
We recommend running a test engraving on a scrap piece or a less visible area to calibrate the settings perfectly before proceeding with the final recipe engraving.
By meticulously cleaning, sanding, and securing the cutting board, we set the foundation for a beautifully laser engraved family recipe that will remain a cherished kitchen keepsake for years.
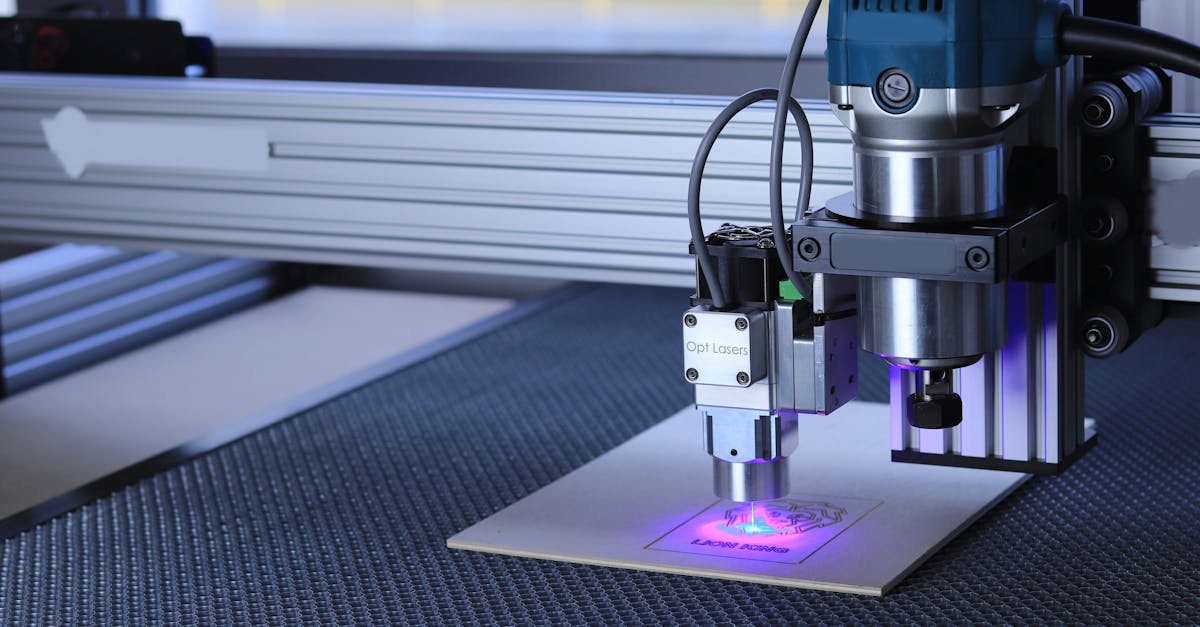
Laser Engraving Process
The laser engraving process is the crucial step where our carefully prepared recipe and cutting board come together. Precision, patience, and proper technique ensure that our family recipe becomes a stunning, permanent keepsake.
Setting Up the Laser Engraver
Before we start engraving, setting up the laser engraver correctly is essential for achieving sharp, clear text and details. We begin by:
- Power and Speed Adjustment: Configure the laser’s power and speed settings based on the cutting board’s material—typically hardwood like maple or walnut. A higher power setting burns deeper while slower speeds enhance engraving detail.
- Focus Calibration: Adjust the laser focus to the exact thickness of the board for optimal precision. Use the laser engraver’s manual focus tool or autofocus if available.
- Positioning: Position the cutting board securely on the engraving bed. We align it using grid markings or alignment software to match the recipe layout exactly.
- Software Setup: Import our vector file of the recipe into the laser software. Check scaling to fit the text within the cutting board’s available engraving area, maintaining enough border for aesthetics.
| Parameter | Typical Setting for Hardwood Cutting Boards |
|---|---|
| Laser Power | 20-30% |
| Engraving Speed | 300-500 mm/min |
| DPI/Resolution | 300-500 dpi |
| Focus Distance | Board Thickness (usually 0.75″ to 1″) |
Testing on Scrap Wood
We never engrave a cherished board without testing first. Testing on scrap wood allows us to:
- Verify the visibility and clarity of the text.
- Adjust power and speed settings for optimal contrast without burning the wood.
- Confirm the engraving depth and detail fine-tuning.
During the test run, we closely inspect the engraved design for legibility. If the letters appear too faint or too dark, we tweak power and speed settings accordingly. This step prevents costly mistakes on the final cutting board and guarantees a perfect result.
Engraving the Recipe on the Cutting Board
Once testing ensures our settings are spot-on, we proceed to engrave the recipe on the cutting board:
- Securely place the cutting board back on the engraver aligned exactly as during testing.
- Double-check the software layout for final positioning.
- Start the engraving process, watching the machine carefully for the first few minutes to catch any misalignments or issues.
- After engraving completes, let the board cool naturally to avoid discoloration.
- Lightly clean the engraved area with a soft cloth to remove any residue or soot.
This precise method engraves the recipe beautifully, capturing every handwritten detail and preserving our family tradition in wood. The final product is both visually striking and tactilely satisfying—ready to be used or gifted.
Finishing Touches
The last steps are crucial to preserve the beauty and durability of our laser engraved recipe cutting board. Let’s focus on how to properly clean and protect the engraved surface to ensure it remains a treasured kitchen centerpiece.
Cleaning the Engraved Surface
Once the engraving is complete, we must remove any residual dust or debris to reveal the crisp details of our design. Follow these steps carefully:
- Use a soft, dry brush or microfiber cloth to gently remove loose particles from the surface.
- For deeper cleaning in the engraved grooves, lightly dampen a cotton swab with water or a mild, food-safe cleaner.
- Avoid soaking the board or using harsh chemical cleaners that can damage the wood or affect food safety.
- After cleaning, dry the board thoroughly with a clean towel to prevent moisture absorption.
“Clean surfaces highlight the precision of our laser engraving and prepare the board for protection.”
Applying Protective Finishes or Sealants
Protecting the cutting board enhances its lifespan and maintains its visual appeal. We recommend these food-safe options:
| Finish Type | Description | Application Tips | Drying Time | Benefits |
|---|---|---|---|---|
| Mineral Oil | Colorless, odorless liquid that penetrates wood | Apply with a soft cloth; allow to soak then wipe excess | 4-6 hours (reapply weekly) | Restores moisture; prevents cracking |
| Beeswax Blend | Combines beeswax with oil for a harder finish | Rub generously and buff after application | 12 hours | Adds water resistance; silky texture |
| Tung Oil | Natural drying oil that penetrates deeply | Multiple thin coats; fully dry between coats | 24 hours per coat | Durable protective layer; enhances grain |
Application Steps:
- Make sure the board is clean and completely dry.
- Choose your protective finish based on desired look and maintenance level.
- Apply the finish evenly following the manufacturer’s instructions.
- Allow sufficient drying time before handling or using the board.
- Reapply periodically as needed to maintain protection.
Important: Always use food-safe sealants when finishing any kitchen cutting board to ensure safety for food contact.
By carefully cleaning and sealing our laser engraved recipe cutting board, we preserve not only the intricate design but also honor the family legacy it represents.
Care and Maintenance of Your Laser Engraved Cutting Board
To keep our laser engraved cutting board looking pristine and to preserve the intricate recipe details, proper care and maintenance are essential. Following clear cleaning protocols and longevity tips will ensure our cherished keepsake remains both beautiful and functional for years.
Cleaning Guidelines
We clean our laser engraved cutting board with care to maintain the integrity of the engraving and the wood surface. Follow these steps:
- Avoid soaking the board in water to prevent wood warping and damage to the laser engraving.
- Use a soft brush or microfiber cloth with warm water and mild dish soap to gently clean the surface.
- For stubborn residues, create a solution of 1 tablespoon white vinegar to 1 cup water for a natural disinfectant without harming the wood.
- After cleaning, pat dry immediately with a clean towel; never leave the board to air dry upside down.
- Avoid harsh chemicals, bleach, or abrasive scrubbing pads, which can erode the engraved design and wood finish.
- Periodically sanitize with food-safe sanitizers approved for wooden kitchenware.
Tips for Longevity
To extend the life and beauty of our laser engraved cutting board, we implement these important practices:
| Tip | Benefit |
|---|---|
| Apply food-grade mineral oil monthly | Prevents wood drying and cracking; enhances engraving visibility |
| Use a beeswax or tung oil finish occasionally | Creates a protective, water-resistant barrier |
| Store board upright in a dry space | Promotes airflow, prevents moisture buildup |
| Avoid extreme temperatures | Protects wood from warping and engraving damage |
| Use separate boards for raw meat and vegetables | Prevents cross-contamination and staining |
| Limit direct cutting on the engraved area | Preserves the delicate recipe engraving |
“Treat your laser engraved cutting board as both a functional item and a heartfelt heirloom, preserving its legacy with mindful care.“
By following these cleaning guidelines and longevity tips, we will ensure that our laser engraved cutting board remains a treasured kitchen centerpiece that celebrates our family recipes for generations.
Creative Ideas and Uses for Laser Engraved Recipe On Cutting Board
Incorporating a laser engraved recipe on cutting board opens a world of creative possibilities beyond just being a functional kitchen tool. Here are several innovative ideas and practical uses that transform these engraved boards into cherished pieces with both sentimental and decorative value:
1. Personalized Gift for Special Occasions
A laser engraved recipe cutting board makes an unforgettable gift that combines functionality with heartfelt memory. We can customize the board with:
- A beloved family recipe in the original handwritten script
- A meaningful quote or dedication alongside the recipe
- Important dates such as anniversaries, birthdays, or milestones
This personalized touch creates a keepsake perfect for weddings, housewarmings, Mother’s Day, or holiday presents.
2. Kitchen Display Piece and Conversation Starter
By featuring an engraved recipe, the cutting board doubles as a decorative kitchen accent. Displaying it on a stand or hanging it prominently lets us:
- Share family traditions visually with guests
- Use the board as a backdrop for cooking demonstrations
- Create a rustic or vintage kitchen ambiance
The tactile texture and engraved typography invite curiosity and storytelling.
3. Functional Cooking Reference
We can utilize the board during meal prep to have easy access to a favorite recipe. The engraved text offers:
- Convenient referencing without extra papers or devices
- A durable surface to chop ingredients without damaging the recipe
- A hygienic, cleanable option that doesn’t wear off over time
This practical aspect reinforces the board as both a tool and keepsake.
4. Customized Catering or Event Memorabilia
For chefs or hosts, laser engraving a signature dish recipe on cutting boards allows for:
- Unique branding opportunities at food events
- Memorable giveaways commemorating special occasions or menus
- A cohesive theme linking food and presentation
Engraving can include logos or personalized messages too.
5. Educational Use for Kids and Cooking Classes
A child-friendly recipe on a wooden board fosters hands-on learning by:
- Encouraging engagement with cooking and family heritage
- Providing a durable visual aid without paper waste
- Making recipes accessible in a tactile format for young learners
We can customize fonts and ingredients to suit age and skill levels.
Ideas Summary Table
| Idea | Description | Ideal For |
|---|---|---|
| Personalized Gift | Engraved with family recipe and dedication | Weddings, holidays, special days |
| Kitchen Display | Decorative and conversational kitchen accent | Home kitchens, showcasing |
| Functional Cooking Reference | Durable engraved recipe surface for meal prep | Everyday use, family cooks |
| Catering/Event Memorabilia | Branded or themed boards for events or giveaways | Chefs, event planners |
| Educational Tool | Engraved learning aid for children or cooking classes | Families, educators |
Tips for Maximizing Use and Appeal
- Select contrasting wood tones such as maple or walnut to enhance text visibility
- Use clear, legible fonts for easy reading under kitchen lighting
- Include decorative elements or borders sparingly to keep focus on the recipe
- Apply a food-safe finish after engraving to protect and showcase the design
By exploring these creative ideas and uses, we elevate the laser engraved recipe on cutting board from a simple kitchen accessory to a meaningful centerpiece that celebrates legacy, creativity, and practical beauty.
Conclusion
Laser engraved recipe cutting boards offer a unique way to honor family traditions while adding charm and functionality to any kitchen. They blend craftsmanship with heartfelt storytelling, turning cherished recipes into lasting memories.
By carefully selecting materials, preparing designs, and maintaining the finished product, we ensure these boards remain beautiful and practical for years to come. Whether gifted or kept for ourselves, they stand as timeless keepsakes that celebrate heritage and creativity in every meal.
Frequently Asked Questions
What types of wood are best for laser engraved recipe cutting boards?
Hardwoods like maple, walnut, and bamboo are ideal due to their durability and quality engraving surface. They provide a smooth texture that captures fine details well.
How do I prepare a recipe for laser engraving on a cutting board?
Choose a clear, concise recipe with essential ingredients and steps. Convert it into a vector design file using design software for crisp engraving results.
What kind of laser engraving machine is needed for this project?
A laser engraver with adjustable power, good resolution, and compatible design software is important. CO2 lasers are commonly used for wood engraving.
How should I prepare the cutting board before engraving?
Clean and sand the board thoroughly to create a smooth, even surface. Proper sanding and securing the board ensure precise engraving and safety.
How do I ensure the engraving is clear and accurate?
Run a test engraving on scrap wood to adjust power, speed, and focus settings. Use legible fonts and high contrast designs for the best clarity.
What finishing touches are necessary after engraving?
Clean the engraved surface with a soft brush and food-safe cleaner. Apply food-safe sealants like mineral oil or beeswax to protect and enhance the wood’s appearance.
How do I care for a laser engraved cutting board?
Avoid soaking the board; clean gently with mild soap and water. Regularly apply food-grade mineral oil and store upright to maintain longevity and engraving quality.
Can laser engraved cutting boards be used as gifts?
Yes, they make thoughtful personalized gifts for weddings, anniversaries, or holidays, combining practicality with sentimental value.
What are some creative uses for laser engraved recipe cutting boards?
Use them as kitchen décor, cooking references, catering memorabilia, or educational tools to celebrate family heritage in unique ways.
Is it safe to use laser engraved boards for food preparation?
Yes, as long as food-safe finishes and sealants are applied after engraving, the boards remain safe for everyday kitchen use.