
Knobby Apple Cake is a delightful twist on classic apple desserts that brings a rustic charm to our kitchen table. This cake stands out with its unique knobby texture and the perfect balance of sweet and tart flavors from fresh apples. It’s a comforting treat that’s ideal for cozy afternoons or festive gatherings.
We love how simple ingredients come together to create a moist and flavorful cake that’s packed with apple goodness in every bite. Whether you’re an experienced baker or just starting out, this recipe is straightforward and rewarding. Let’s dive into making a Knobby Apple Cake that will quickly become a family favorite.
Ingredients
To make our Knobby Apple Cake shine with its distinct texture and flavor, we use straightforward ingredients that deliver both sweetness and tang. Let’s break down what you’ll need to craft this rustic delight.
For the Cake Batter
- 2 cups all-purpose flour – provides the structure for our cake
- 1 teaspoon baking powder – helps the cake rise perfectly
- 1/2 teaspoon baking soda – enhances the texture and lift
- 1/2 teaspoon salt – balances the sweetness
- 1 teaspoon ground cinnamon – adds warm spiced notes essential to the apple flavor
- 1/2 cup unsalted butter, softened – for rich moisture
- 1 cup granulated sugar – sweetens the batter
- 2 large eggs – bind ingredients and add richness
- 1 teaspoon pure vanilla extract – amplifies flavor complexity
- 1 cup sour cream – keeps the cake tender and moist
- 3 cups peeled and chopped apples (about 2 medium apples) – the star ingredient that gives our cake its knobby character
For the Knobby Topping
The signature “knobby” texture comes from this delightful, crumbly topping:
- 1/2 cup all-purpose flour – base for crumbly texture
- 1/4 cup granulated sugar – sweetens topping
- 1/4 cup light brown sugar, packed – adds moisture and caramel notes
- 1 teaspoon ground cinnamon – warms up the topping flavor
- 1/4 teaspoon salt – highlights the spices
- 6 tablespoons unsalted butter, cold and cut into small cubes – creates those characteristic lumps once baked
Optional Garnishes
Elevate your Knobby Apple Cake presentation with these extra touches:
- Powdered sugar, for dusting – adds a delicate, snowy finish
- Chopped walnuts or pecans, toasted – adds crunch and nutty flavor
- Caramel sauce, drizzled – for a luscious, sweet complement
| Ingredient Category | Quantity | Notes |
|---|---|---|
| Cake Flour | 2 cups | Use all-purpose flour |
| Leavening Agents | 1 tsp baking powder | Plus 1/2 tsp baking soda |
| Spices | 1 tsp cinnamon | For batter and topping |
| Sugars | 1 cup granulated | Batter; plus 1/4 cup + 1/4 cup brown for topping |
| Fats | 3/4 cup butter total | 1/2 cup softened for batter; 6 tbsp cold cubed for topping |
| Eggs | 2 large | |
| Dairy | 1 cup sour cream | |
| Main Fruit | 3 cups apples chopped | About 2 medium apples, peeled |
Let’s move forward to bring this recipe to life, combining our ingredients to capture the essence of Knobby Apple Cake.
Equipment Needed
To craft our Knobby Apple Cake to perfection, having the right equipment is essential. Each tool helps ensure the texture and flavors develop beautifully, creating the cake’s signature rustic charm.
Essential Tools for Mixing and Preparing
- Mixing Bowls: Use a large and a medium mixing bowl for combining wet and dry ingredients separately.
- Electric Mixer or Stand Mixer: This helps us cream the butter and sugar smoothly and blend batter evenly without overmixing.
- Measuring Cups and Spoons: Precision in measuring ingredients like flour, sugar, and spices keeps our cake balanced in flavor.
Cake Pan and Baking Accessories
- 9-inch Round Cake Pan: Ideal size for even baking and the classic knobby shape.
- Parchment Paper: Lining the pan prevents sticking and helps with a clean removal.
- Cooling Rack: Vital for allowing air circulation after baking to cool the cake without sogginess.
Specialty Tools for the Knobby Topping
- Pastry Blender or Fork: Needed to cut cold butter into the flour and sugar mixture, forming the knobby, crumbly topping.
- Grater (optional): If we prefer freshly grated cinnamon or zest to boost aroma.
| Equipment | Purpose |
|---|---|
| Mixing Bowls | Separate mixing of wet and dry ingredients |
| Electric or Stand Mixer | Cream butter and sugar, mix batter evenly |
| Measuring Cups & Spoons | Accuracy for dry and wet ingredients |
| 9-inch Round Cake Pan | Proper shape and even baking |
| Parchment Paper | Non-stick surface for clean cake removal |
| Cooling Rack | Proper cooling to preserve texture |
| Pastry Blender or Fork | Create the knobby crumb topping |
| Grater (optional) | Fresh cinnamon zest or other aromatic additions |
Having this equipment ready before we start baking ensures each step flows smoothly. With our tools organized, we can focus on blending the crisp apple flavors and crafting the unique knobby topping that defines this delightful Knobby Apple Cake.
Prep Work
To ensure our Knobby Apple Cake turns out perfectly, we must start with precise and careful preparation. These initial steps set the foundation for the cake’s unique texture and rich flavors.
Preparing the Apples
- Choose fresh, crisp apples for the best balance of sweet and tart flavors.
- Peel the apples to remove any tough skin.
- Core the apples to eliminate seeds and this will prevent bitterness.
- Chop the apples into 1/2-inch cubes to create uniform chewy bites throughout the cake.
- Toss the chopped apples gently with a splash of lemon juice to prevent browning while we prepare the other ingredients.
Preheating the Oven
- Preheat your oven to 350°F (175°C) for consistent baking results.
- Use an oven thermometer if available to ensure the temperature accuracy.
- Allow at least 15 minutes for the oven to fully reach the set temperature before placing the cake inside.
| Temperature Setting | Time to Preheat | Purpose |
|---|---|---|
| 350°F (175°C) | 15 minutes | Optimal baking temperature for even cooking |
Greasing the Baking Pan
- Select a 9-inch round cake pan for the traditional knobby shape.
- Grease the pan thoroughly with butter or non-stick spray to prevent sticking.
- For extra security, lightly dust the pan with flour after greasing to help the cake release easily.
- Place a piece of parchment paper at the bottom for a smooth lift out after baking.
These steps in our prep work ensure our Knobby Apple Cake holds its delicate structure and bakes evenly with the signature knobbly crust.
Directions
Let’s begin crafting our Knobby Apple Cake by carefully following each step to ensure a moist delicate crumb and that signature knobby texture.
Making the Cake Batter
- In a medium bowl, whisk together the following dry ingredients until well combined:
- 2 cups all-purpose flour
- 1 teaspoon baking powder
- ½ teaspoon baking soda
- ½ teaspoon salt
- 1 teaspoon ground cinnamon
- In a large mixing bowl, beat ½ cup unsalted butter (softened) with 1 cup granulated sugar using an electric mixer on medium speed until light and fluffy, about 3 minutes.
- Add 2 large eggs, one at a time, beating well after each addition.
- Mix in 1 teaspoon vanilla extract and ½ cup sour cream until smooth.
- Gradually add the dry ingredient mixture to the wet ingredients, mixing on low speed just until combined. Avoid overmixing to keep the cake tender.
Adding the Apples
- Carefully fold in 2 cups chopped fresh apples that are peeled cored and cut into uniform cubes.
- Sprinkle a splash of lemon juice over the apples before mixing to prevent browning and maintain freshness.
Preparing the Knobby Topping
- In a small bowl combine:
- ½ cup all-purpose flour
- ¼ cup light brown sugar
- 2 tablespoons granulated sugar
- ½ teaspoon ground cinnamon
- ¼ teaspoon salt
- Cut 4 tablespoons cold unsalted butter into small pieces.
- Using a pastry blender or fork, cut the butter into the dry ingredients until the mixture resembles coarse crumbs with some pea-sized knobby bits.
Assembling the Cake
- Preheat the oven to 350°F (175°C) and grease a 9-inch round cake pan with butter or nonstick spray. Line the bottom with parchment paper for easy removal.
- Pour the prepared cake batter into the pan and spread it evenly with a spatula.
- Generously sprinkle the knobby topping mixture evenly over the cake batter creating an inviting rustic texture.
Baking the Cake
- Place the pan on the center rack of the preheated oven.
- Bake for 45 to 50 minutes or until a toothpick inserted in the center comes out clean and the knobby topping turns golden brown.
- To ensure even baking avoid opening the oven frequently during the first 30 minutes.
Cooling and Setting
- Remove the cake pan from the oven and allow the cake to cool in the pan for 15 minutes.
- Carefully run a knife around the edge to loosen the cake.
- Invert the cake onto a wire cooling rack to cool completely before slicing. This step helps the cake set perfectly and maintains the knobby topping’s rustic charm.
| Step | Temperature | Time | Notes |
|---|---|---|---|
| Preheat Oven | 350°F/175°C | – | |
| Bake Cake | 350°F/175°C | 45-50 minutes | Toothpick test for doneness |
| Initial Cooling in Pan | Room temp | 15 minutes | Helps cake set |
| Cooling on Rack | Room temp | Until cool | Ensures topping stays crisp |
Serving Suggestions
To fully enjoy our Knobby Apple Cake we recommend serving it slightly warm or at room temperature. This enhances the flavorful blend of sweet apples and the crispy knobby topping. For an extra indulgence, try these ideas:
- Vanilla Ice Cream: A scoop melts beautifully over warm cake, creating a delightful contrast of temperatures and textures.
- Whipped Cream: Lightly sweetened whipped cream adds a creamy softness that complements the cake’s rustic crunch.
- Caramel Sauce: Drizzle warm caramel sauce for a rich, buttery finish that merges with the cinnamon notes in the cake.
Beverage Pairings
Choosing the right beverage enhances our dessert experience. Consider these perfect companions:
| Beverage | Description | Serving Temperature |
|---|---|---|
| Hot Spiced Cider | Complements the apple flavor with warming spices | Hot |
| Black Coffee | Balances sweet cake with bold bitterness | Hot |
| Chilled Apple Cider | Reinforces fresh apple taste pleasantly | Cold |
| Sweet Dessert Wine | Offers floral and fruity notes that pair well | Slightly chilled |
Presentation Tips
Presentation elevates the charm of our Knobby Apple Cake:
- Slice the cake into even wedges to showcase the knobby texture.
- Lightly dust the top with powdered sugar for a snowy effect.
- Garnish with chopped toasted nuts, such as walnuts or pecans, for added crunch.
- Serve on rustic plates to highlight the farmhouse appeal of the recipe.
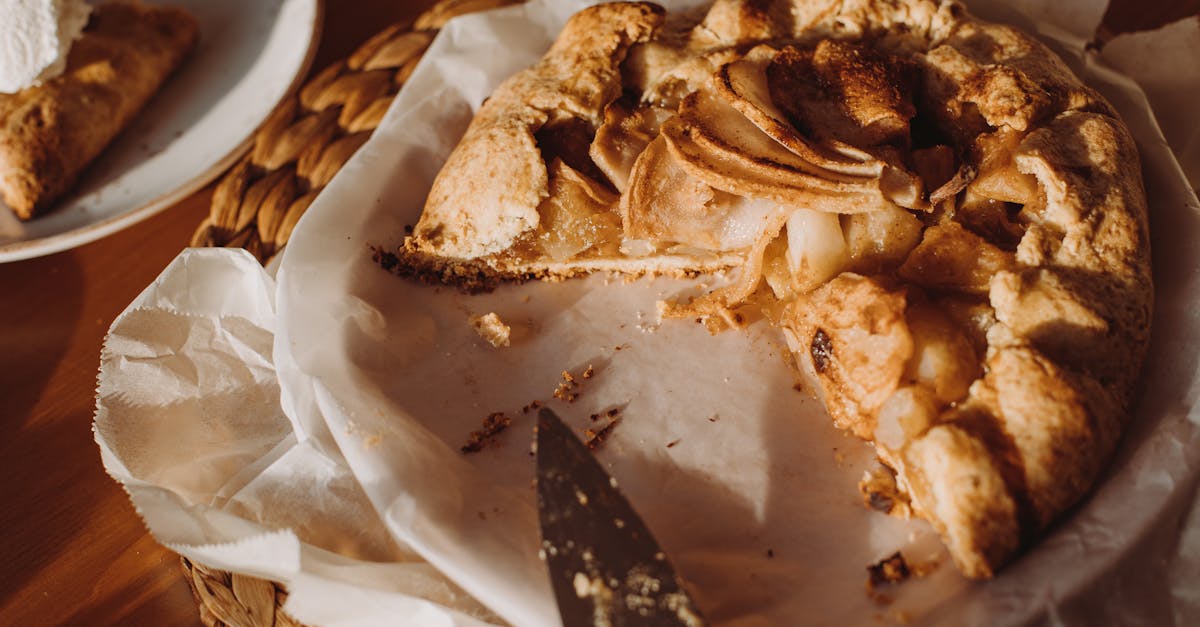
“The knobby topping not only adds a signature crunch but also provides a striking visual that makes this apple cake a centerpiece at any table.”
These serving suggestions will help us savor every bite of our Knobby Apple Cake while impressing guests with complementary flavors and appealing presentation.
Storage Tips
To keep our Knobby Apple Cake fresh and delicious, it’s important to store it properly. Follow these key steps to maintain its moist texture and flavorful profile:
- Cool Completely Before Storing
Let the cake cool completely on a wire rack. Storing a warm cake traps steam and causes sogginess, which affects the cake’s signature knobby texture.
- Wrap Securely for Freshness
Cover the cake tightly with plastic wrap or place it in an airtight container. This prevents air exposure that leads to drying out.
- Refrigeration Guidelines
If we plan to store the cake for more than 2 days, refrigerate it to maintain freshness. Keep it wrapped well to avoid absorbing odors from other foods.
- Freezing for Longer Storage
For storage beyond 5 days, freezing is best. Wrap the cake or individual slices tightly in plastic wrap and then aluminum foil, or use a freezer-safe airtight container. This protects against freezer burn and preserves flavor.
- Thawing Instructions
Thaw frozen cake at room temperature for 2 to 3 hours while still wrapped to retain moisture. Avoid microwaving as it can alter texture and cause uneven heating.
| Storage Method | Duration | Storage Tips |
|---|---|---|
| Room Temperature | Up to 2 days | Store in airtight container, cool completely |
| Refrigerator | Up to 5 days | Wrap tightly to prevent odor absorption |
| Freezer | Up to 3 months | Double-wrap with plastic and foil, thaw wrapped |
“Proper storage preserves our Knobby Apple Cake’s moist crumb and crunchy knobby topping, ensuring every bite tastes as fresh as the first.”
By following these storage tips, we keep the rustic charm and delightful flavor intact for anytime enjoyment.
Conclusion
Knobby Apple Cake is a timeless treat that brings warmth and comfort to any table. Its rustic texture and balanced flavors make it a standout dessert that’s easy to prepare and enjoy. Whether you’re baking for family, friends, or yourself, this cake offers a delightful experience from start to finish.
With straightforward ingredients and simple steps, it’s a recipe that invites creativity and personal touches. We’re confident it will become a favorite in your baking repertoire, perfect for cozy afternoons or festive gatherings. Give it a try and savor every knobby bite!
Frequently Asked Questions
What is Knobby Apple Cake?
Knobby Apple Cake is a rustic dessert featuring a unique knobby topping and fresh apple chunks. It combines sweet and tart flavors, creating a comforting and flavorful treat perfect for various occasions.
What ingredients are needed to make Knobby Apple Cake?
Key ingredients include all-purpose flour, baking powder, baking soda, cinnamon, unsalted butter, sugar, eggs, vanilla extract, sour cream, and chopped fresh apples. The knobby topping requires flour, sugars, cinnamon, salt, and cold butter.
What equipment do I need to bake this cake?
You’ll need mixing bowls, an electric mixer, measuring cups and spoons, a 9-inch round cake pan, parchment paper, a cooling rack, and a pastry blender or fork to prepare the knobby topping.
How do I prepare the apples for the cake?
Use fresh, crisp apples. Peel, core, and chop them into uniform cubes. Toss with a splash of lemon juice to prevent browning before folding them into the batter.
At what temperature and how long should I bake the cake?
Preheat your oven to 350°F (175°C) and bake the cake for about 45-50 minutes, or until a toothpick inserted in the center comes out clean.
Can I add toppings or garnishes to the cake?
Yes, you can dust powdered sugar, sprinkle toasted nuts, or drizzle caramel sauce over the cake to enhance its flavor and presentation.
How should I serve Knobby Apple Cake?
Serve it slightly warm or at room temperature. Pair it with vanilla ice cream, whipped cream, or warm caramel sauce. Hot spiced cider or black coffee also complement it well.
How do I store leftover Knobby Apple Cake?
Let the cake cool completely before wrapping it tightly in plastic wrap or storing it in an airtight container. Refrigerate if keeping for over two days, or freeze for longer storage.
Can beginners try making this cake?
Absolutely! The recipe uses simple ingredients and clear steps, making it accessible for both beginners and experienced bakers alike.
What makes the cake’s topping “knobby”?
The knobby topping is made by cutting cold butter into a cinnamon-sugar-flour mixture, creating small lumps that form a distinctive, crunchy texture after baking.