
Nothing beats the rich, indulgent flavor of a truly killer chocolate cake. We’ve perfected a recipe that’s moist, decadent, and packed with intense cocoa goodness. Whether you’re celebrating a special occasion or just craving a chocolate fix, this cake delivers every time.
We’ve combined simple ingredients with a few expert tips to create a dessert that’s easy to make but tastes like it’s from a gourmet bakery. From the velvety frosting to the tender crumb, each bite melts in your mouth and leaves you wanting more. Let’s dive into this chocolate lover’s dream and make a cake that’s sure to impress everyone at the table.
Ingredients
To craft our Killer Chocolate Cake we rely on a precise balance of rich ingredients. Each component plays a vital role in delivering the ultimate moist texture and intense chocolate flavor. Below we break them down clearly for easy reference.
Dry Ingredients
These pantry staples create the foundation of our cake’s structure and depth of flavor.
- 2 cups all-purpose flour, sifted
- 2 cups granulated sugar
- 3/4 cup unsweetened cocoa powder (preferably Dutch-processed for richer taste)
- 1 1/2 teaspoons baking powder
- 1 1/2 teaspoons baking soda
- 1 teaspoon salt
| Ingredient | Measurement | Note |
|---|---|---|
| All-purpose flour | 2 cups | Sifted to avoid lumps |
| Granulated sugar | 2 cups | For sweetness and moisture |
| Unsweetened cocoa | 3/4 cup | Preferably Dutch-processed |
| Baking powder | 1 1/2 teaspoons | Leavening agent |
| Baking soda | 1 1/2 teaspoons | Leavening agent |
| Salt | 1 teaspoon | Enhances chocolate flavor |
Wet Ingredients
These ingredients add moisture, richness, and that velvety crumb we love.
- 1 cup whole milk, room temperature
- 1/2 cup vegetable oil (neutral flavor)
- 2 large eggs, room temperature
- 2 teaspoons pure vanilla extract
- 1 cup boiling water
Optional Add-Ins and Toppings
Customize our Killer Chocolate Cake to elevate the experience or add delightful textures.
- 1 cup semi-sweet chocolate chips or chunks (fold into batter for extra pockets of melted chocolate)
- 1/2 cup chopped toasted nuts, such as pecans or walnuts
- Fresh berries or edible flowers for garnish
- Creamy chocolate ganache or rich buttercream frosting (recipe follows in next section)
Equipment Needed
To create our Killer Chocolate Cake, having the right equipment ensures smooth preparation and perfect results. Below is a detailed list of essential tools we use to craft this rich, decadent dessert.
- Mixing Bowls: Use a large bowl for dry ingredients and another for wet ingredients. Glass or stainless steel bowls work best to mix thoroughly without reactions.
- Electric Mixer or Stand Mixer: We recommend an electric mixer for efficient and even blending of batter. A stand mixer with paddle attachment is ideal for consistent texture.
- Measuring Cups and Spoons: Precise measurements help maintain balance between sweetness and cocoa intensity.
- Sifter or Fine Mesh Strainer: Sifting dry ingredients like flour and cocoa powder prevents lumps and ensures smooth batter.
- Rubber Spatula: Use for scraping the bowl and folding ingredients gently without deflating the batter.
- Whisk: Useful for combining wet ingredients quickly and evenly.
- Cake Pans (8 or 9-inch): We prefer using two round pans for our layered cake. Grease and flour the pans or line with parchment paper to avoid sticking.
- Cooling Rack: Essential for allowing the cake to cool evenly and avoid sogginess.
- Oven Thermometer: To guarantee an accurate oven temperature for proper cake rise and texture.
- Toothpick or Cake Tester: For checking cake doneness; it should come out with a few moist crumbs but no wet batter.
| Equipment | Purpose |
|---|---|
| Mixing Bowls | Combine dry and wet ingredients separately |
| Electric Mixer | Mix batter thoroughly and efficiently |
| Measuring Cups & Spoons | Measure ingredients precisely |
| Sifter/Fine Mesh Strainer | Remove lumps in dry ingredients |
| Rubber Spatula | Fold and scrape batter without deflating |
| Whisk | Blend wet ingredients |
| Cake Pans | Bake our layers of the cake |
| Cooling Rack | Cool cake evenly without condensation |
| Oven Thermometer | Maintain consistent baking temperature |
| Toothpick/Cake Tester | Test cake doneness |
By gathering this essential equipment before starting, we set ourselves up for success with the Killer Chocolate Cake recipe — ensuring every step is executed with precision and confidence.
Prep Work
Before we dive into mixing, preparing our workspace and ingredients is crucial to ensure a smooth baking process and flawless results with our Killer Chocolate Cake.
Preparing the Baking Pans
To achieve a perfectly baked cake with easy release, we start by preparing our pans strategically:
- Use two 9-inch round cake pans for even baking and consistent thickness.
- Lightly grease the pans using vegetable oil or softened butter.
- Dust the pans with a thin layer of unsweetened cocoa powder instead of flour. This enhances the chocolate flavor without white residue.
- Alternatively, we can use non-stick parchment paper rounds placed at the bottom after greasing for extra non-stick assurance.
- Finally, set the prepared pans aside on a flat surface while we complete ingredient prep.
Measuring Ingredients
Accurate measuring is the backbone of any great recipe, especially for our Killer Chocolate Cake where balance affects texture and taste dramatically.
| Ingredient | Measurement Type | Tips for Accuracy |
|---|---|---|
| All-purpose flour | Dry measure (cups) | Spoon flour into measuring cup and level off with a straight edge |
| Granulated sugar | Dry measure (cups) | Scoop and level for consistent sweetness |
| Unsweetened cocoa powder | Dry measure (cups) | Sift before measuring to avoid lumps |
| Baking powder & baking soda | Dry measure (teaspoons) | Use level teaspoons for correct leavening |
| Salt | Dry measure (teaspoon) | Level teaspoon to avoid over-salting |
| Whole milk | Liquid measure (cups) | Use liquid measuring cup placed on flat surface |
| Vegetable oil | Liquid measure (cups) | Pour carefully to lines for correct moisture balance |
| Eggs | Counted | Use room temperature eggs for even mixing |
| Vanilla extract | Liquid measure (teaspoons) | Use a small measuring spoon for precision |
| Boiling water | Liquid measure (cups) | Measure with heat-safe container |
- Always sift dry ingredients to aerate the mixture and remove clumps, resulting in a tender crumb.
- For liquids, we place the cup on a flat surface and view at eye level to ensure exact volumes.
- Using room temperature eggs helps create a smoother batter by allowing better emulsification.
By meticulously preparing our pans and measuring ingredients, we are setting the foundation for our moist, rich, and perfectly textured Killer Chocolate Cake.
Instructions
Let’s dive into crafting our killer chocolate cake batter, baking it to perfection, and cooling it properly to achieve the best texture and flavor.
Making the Batter
- Preheat oven to 350°F (175°C). Ensure your oven thermometer confirms the temperature for accuracy.
- In a large mixing bowl, sift together the dry ingredients:
- 2 cups all-purpose flour
- 2 cups granulated sugar
- 3/4 cup unsweetened cocoa powder
- 1 1/2 tsp baking powder
- 1 1/2 tsp baking soda
- 1 tsp salt
- In a separate bowl, combine the wet ingredients:
- 1 cup whole milk
- 1/2 cup vegetable oil
- 2 large eggs
- 2 tsp vanilla extract
- Using an electric mixer on medium speed, beat the wet ingredients until fully combined.
- Gradually add the dry ingredients to the wet ingredients, mixing slowly. Take care not to overmix to keep the crumb tender.
- Carefully pour in 1 cup boiling water, mixing on low speed. The batter will thin out—this is expected and essential for a moist cake.
- If desired, gently fold in optional add-ins like 1/2 cup chocolate chips or chopped nuts with a rubber spatula.
“The secret to the killer chocolate cake’s moist texture lies in the hot water addition that blooms the cocoa,” which intensifies flavor and creates a velvety crumb.
Baking the Cake
- Divide the batter evenly between the two prepared 9-inch cake pans, smoothing the tops with a spatula.
- Place the pans on the center rack of the preheated oven to ensure even heat distribution.
- Bake for 30 to 35 minutes or until a toothpick inserted into the center comes out clean.
- Avoid opening the oven door during the first 25 minutes to prevent collapse.
- Once baked, remove pans from the oven and place them on a cooling rack.
| Step | Temperature | Time | Tips |
|---|---|---|---|
| Preheat Oven | 350°F / 175°C | – | Use oven thermometer for accuracy |
| Baking | 350°F / 175°C | 30–35 minutes | Insert toothpick to test doneness |
| Cool in Pans | Room Temp | 10 minutes | Allows cake to set before removing |
Cooling the Cake
- Let the cakes cool in their pans for 10 minutes on a rack to firm up for easy removal.
- Run a thin knife around the edges to loosen them.
- Carefully invert cakes onto the cooling rack, peel off parchment paper.
- Allow cakes to cool completely for at least 1 hour before frosting.
- Cooling fully prevents the frosting from melting and helps maintain structure.
“Patience during cooling is crucial for the killer chocolate cake to hold its shape and deliver the perfect slice every time.”
With these steps, we ensure every bite of our killer chocolate cake is irresistibly moist and rich.
Frosting and Assembly
Now that our Killer Chocolate Cake layers have cooled completely, it’s time to create the luscious frosting and expertly assemble the cake for that perfect finishing touch.
Preparing the Chocolate Frosting
We recommend a rich and velvety chocolate buttercream that complements the deep cocoa notes of the cake. Here’s how to prepare it:
-
Ingredients:
- 1 cup (227g) unsalted butter, softened
- 3 ½ cups (440g) powdered sugar, sifted
- ½ cup (45g) unsweetened cocoa powder, sifted
- ¼ teaspoon salt
- 2 teaspoons pure vanilla extract
- 4-6 tablespoons whole milk, room temperature
-
Instructions:
- Beat the softened butter using an electric mixer on medium speed until creamy and smooth (about 2 minutes).
- Gradually add powdered sugar and cocoa powder alternating with milk. Start and end with powdered sugar to keep the texture balanced.
- Add salt and vanilla extract, then beat on high speed for 3 minutes until the frosting is light, fluffy, and spreadable.
- Adjust consistency by adding more milk for a softer frosting or more powdered sugar to thicken if needed.
“A perfectly whipped frosting should hold its shape but remain easy to spread.“
| Ingredient | Measurement |
|---|---|
| Unsalted butter | 1 cup (227g) |
| Powdered sugar (sifted) | 3 ½ cups (440g) |
| Unsweetened cocoa powder | ½ cup (45g) |
| Salt | ¼ teaspoon |
| Vanilla extract | 2 teaspoons |
| Whole milk | 4-6 tablespoons |
Layering and Frosting the Cake
- Place one cake layer flat-side up on a cake stand or serving plate.
- Spread about 1/3 of the chocolate frosting evenly over the top using an offset spatula. Use smooth, gentle strokes to avoid tearing the cake.
- Carefully position the second cake layer onto the frosted first layer.
- Apply a thin crumb coat of frosting all around the cake. This seals in crumbs for a clean final look.
- Chill the cake in the refrigerator for 20 minutes to set the crumb coat.
- Once chilled, apply the remaining frosting generously across the top and sides. Smooth the surface with a spatula or create decorative swirls as desired.
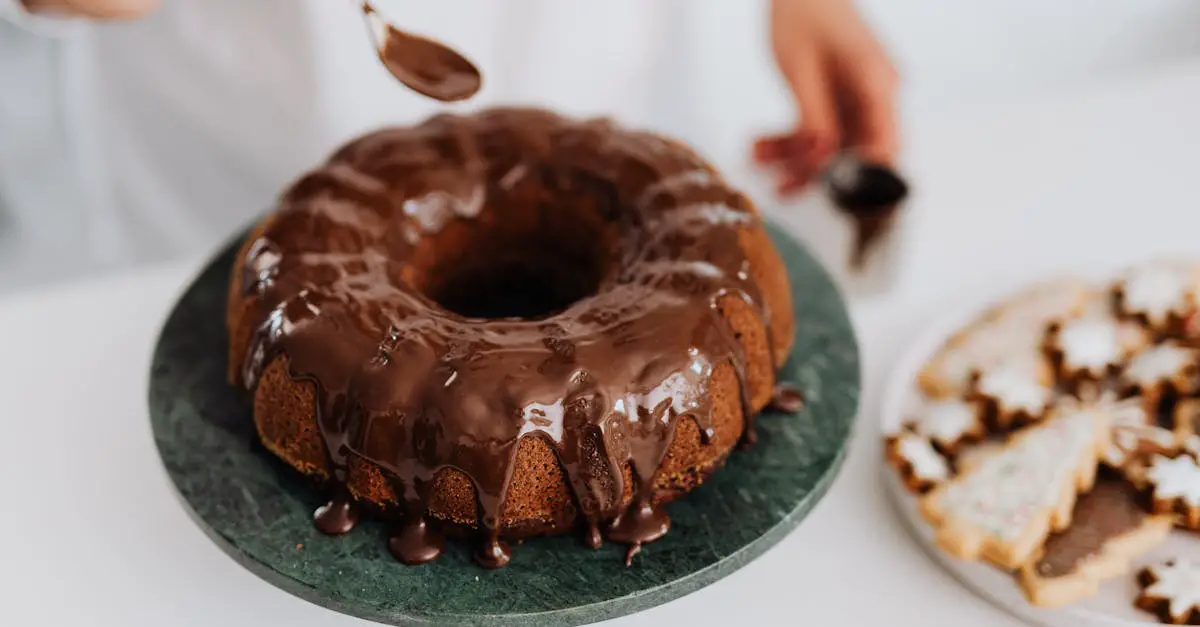
- Optional: garnish with chocolate shavings, chocolate chips, or fresh berries to enhance presentation and flavor.
Serving Suggestions
To elevate our Killer Chocolate Cake experience, thoughtful serving suggestions ensure each slice delights the senses and complements the cake’s rich flavor.
Ideal Temperature for Serving
We recommend serving the cake at slightly below room temperature (68°F to 72°F). This allows the chocolate buttercream frosting to remain smooth and creamy while the cake crumb stays moist and tender.
| Serving Temperature | Texture Outcome |
|---|---|
| 68°F to 72°F | Optimal frosting softness, moist crumb |
| Below 65°F | Firmer frosting, drier crumb |
| Above 75°F | Softer frosting, may lose form |
Beverage Pairings
Pair the Killer Chocolate Cake with beverages that complement or contrast its intense cocoa notes:
- Freshly brewed coffee with rich, bold flavor enhances the chocolate’s depth
- A glass of full-bodied red wine such as Cabernet Sauvignon balances the sweetness
- For a non-alcoholic option, try cold milk or a classic hot chocolate for extra indulgence
Garnishing and plating ideas
Presentation enhances the eating experience. Our favorite finishes include:
- Fresh raspberries or strawberries for a burst of tartness and color
- A dusting of powdered sugar or cocoa powder on the serving plate for an elegant touch
- Chocolate curls or shavings scattered on top to intensify the chocolate theme
- A drizzle of warm caramel or raspberry sauce alongside for extra richness
Serving Sizes and Portioning Tips
For the perfect balance of chocolate richness and portion control, slice the cake into 12 equal pieces using the following method:
- Mark the cake top visually into quarters
- Cut each quarter into thirds for neat serving sizes
- Use a warm knife dipped in hot water and wiped dry between cuts to ensure clean slices
Storing Leftover Slices
To preserve the flavor and texture of leftovers:
- Wrap each slice tightly in plastic wrap
- Store in an airtight container at room temperature for up to 2 days
- For longer storage, refrigerate for up to 5 days or freeze for 1 month, thawing at room temperature before serving
These serving suggestions help showcase every aspect of our Killer Chocolate Cake ensuring a memorable tasting experience.
Storage and Shelf Life
Proper storage is essential to maintain the rich flavor and moist texture of our Killer Chocolate Cake. Here’s how to keep your cake fresh and delicious for as long as possible:
Room Temperature Storage
- Store the cake in an airtight container or cover it tightly with plastic wrap.
- Keep it in a cool, dry place away from direct sunlight and heat sources.
- Ideal shelf life: 2 to 3 days.
- Serving tip: Before serving, let the cake sit at room temperature for 20 minutes if refrigerated prior to enhance softness and flavor.
Refrigeration
- Wrap the cake securely in plastic wrap or place in an airtight cake keeper to prevent drying out and absorbing odors.
- Refrigeration is recommended if your kitchen is warm or if the cake is frosted with perishable ingredients like cream cheese or fresh fruit.
- Ideal shelf life: 5 to 7 days.
- Before serving, allow the cake to warm slightly at room temperature for 30 minutes for optimal texture.
Freezing for Extended Storage
- Freeze individual slices or the entire cake by wrapping tightly in plastic wrap and then in aluminum foil to avoid freezer burn.
- Use a heavy-duty freezer-safe container if possible.
- Label with the date to keep track of freshness.
- Ideal shelf life: Up to 3 months.
- Thaw frozen cake overnight in the refrigerator, then bring to room temperature before serving.
| Storage Method | Recommended Packaging | Temperature | Shelf Life |
|---|---|---|---|
| Room Temperature | Airtight container / plastic wrap | 68°F to 72°F (20°C – 22°C) | 2 to 3 days |
| Refrigeration | Plastic wrap / cake keeper | 36°F to 40°F (2°C – 4°C) | 5 to 7 days |
| Freezing | Plastic wrap + aluminum foil / freezer-safe container | 0°F (-18°C) | Up to 3 months |
Pro tip: We always recommend storing any leftover Killer Chocolate Cake with a layer of parchment paper between slices to prevent sticking and make portioning easier once chilled or frozen.
Following these storage guidelines ensures that every bite of our Killer Chocolate Cake remains as moist, rich, and indulgent as freshly made.
Conclusion
This Killer Chocolate Cake recipe brings together everything we love about rich and moist chocolate desserts. With simple ingredients and clear steps, it’s a recipe that anyone can master and impress with.
Whether it’s for a special occasion or just to satisfy a chocolate craving, this cake delivers every time. We’re confident it’ll become a favorite in your baking repertoire, offering that perfect balance of flavor and texture.
So let’s get baking and enjoy every decadent bite together!
Frequently Asked Questions
What ingredients are needed to make the Killer Chocolate Cake?
You need all-purpose flour, granulated sugar, unsweetened cocoa powder, baking powder, baking soda, salt, whole milk, vegetable oil, eggs, vanilla extract, and boiling water. Optional add-ins include chocolate chips, nuts, and fresh berries.
What equipment do I need to bake this chocolate cake?
Essential tools include mixing bowls, an electric mixer, measuring cups and spoons, a sifter, rubber spatula, whisk, two 9-inch cake pans, a cooling rack, an oven thermometer, and a toothpick or cake tester.
How should I prepare the cake pans?
Grease two 9-inch round pans with vegetable oil or butter, then dust them with cocoa powder. This helps prevent sticking and adds flavor.
What is the best way to measure ingredients accurately?
Use separate measuring tools for dry and liquid ingredients, level off dry ingredients with a straight edge, and pour liquids to eye level for precision.
How do I make the cake batter?
Sift dry ingredients together. Beat wet ingredients with an electric mixer separately, then gradually mix in dry ingredients. Stir in boiling water to create a moist batter.
At what temperature and for how long should I bake the cake?
Preheat your oven to 350°F (175°C) and bake the cake for 30 to 35 minutes until a toothpick inserted in the center comes out clean.
How do I cool the cake properly?
Let the cakes cool in their pans for 10 minutes after baking, then invert onto a cooling rack to cool completely before frosting.
What frosting is recommended for the Killer Chocolate Cake?
A rich chocolate buttercream frosting made with softened butter, powdered sugar, cocoa powder, salt, and vanilla extract complements the cake perfectly.
How do I assemble and frost the cake?
Layer cakes with frosting between, apply a crumb coat, chill it to set, then finish frosting for a smooth, clean look.
What serving tips do you suggest for the cake?
Serve slightly below room temperature (68°F to 72°F). Pair it with coffee, red wine, or hot chocolate. Garnish with berries, powdered sugar, or chocolate curls.
How do I store leftover cake to keep it moist?
Store at room temperature in airtight containers for 2-3 days, refrigerate wrapped for up to 7 days, or freeze wrapped tightly for up to 3 months. Let thaw to room temperature before serving.
Can I customize the cake with add-ins or toppings?
Yes! Chocolate chips, nuts, fresh berries, or different frostings can be added to suit your taste and elevate the cake’s flavor.