
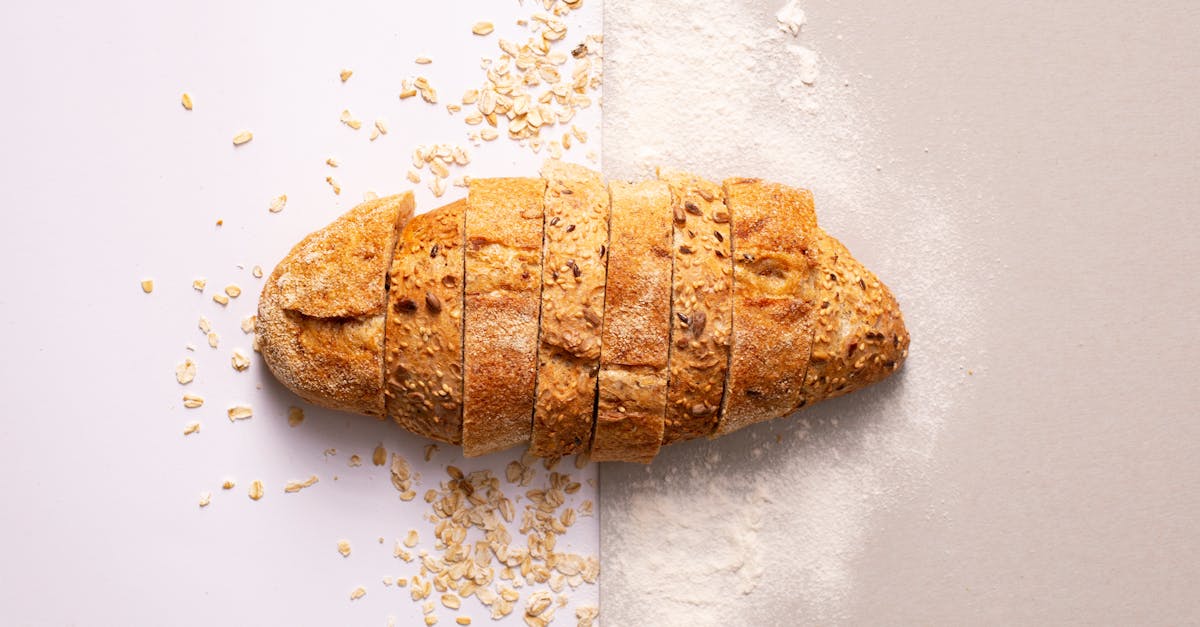
Julekake is a traditional Norwegian Christmas bread that fills our homes with warmth and festive cheer. This sweet, spiced loaf is packed with raisins, candied citrus peel, and cardamom, making it a delightful treat during the holiday season. Using a bread machine simplifies the process, letting us enjoy this classic without the usual fuss.
With our Julekake bread machine recipe, we can effortlessly create soft, flavorful bread that’s perfect for sharing with family and friends. Whether you’re new to Norwegian baking or looking to bring a touch of Scandinavian tradition to your holiday table, this recipe delivers consistent results every time. Let’s dive into making this cozy holiday favorite right in our own kitchen.
Ingredients for Julekake Recipe Bread Machine
To bake authentic Julekake using our bread machine, we need to gather the right ingredients. These components come together to create the traditional, rich, and aromatic Norwegian Christmas bread we all love.
Dry Ingredients
We start by measuring the dry ingredients precisely. These form the foundation of our Julekake dough:
- 3 ½ cups (440 g) all-purpose flour – Provides the structure.
- ½ cup (100 g) granulated sugar – Adds sweetness.
- 1 teaspoon ground cardamom – Gives the bread its distinctive warm and citrusy aroma.
- ½ teaspoon salt – Balances flavors.
- 1 ½ teaspoons active dry yeast – Leavens the bread for a soft texture.
- 1 cup (145 g) raisins – Classic add-in for sweetness and texture.
- ½ cup (75 g) candied citrus peel (chopped) – Brings traditional brightness and flavor contrast.
Wet Ingredients
Next, we combine the wet ingredients to hydrate and enrich the dough with flavor and moisture:
- 1 cup (240 ml) whole milk, warmed to about 110°F (43°C) — Activates yeast and softens the dough.
- 4 tablespoons (56 g) unsalted butter, melted and cooled — Adds richness and tenderness.
- 1 large egg — Enhances the crumb and color.
Optional Add-Ins and Toppings
To customize our Julekake, consider these optional extras that enhance both taste and appearance:
| Ingredient | Purpose |
|---|---|
| ½ cup chopped almonds | Adds crunch and nutty flavor |
| 2 tablespoons pearl sugar | Creates a crisp, decorative topping |
| 1 teaspoon vanilla extract | Deepens aromatic complexity |
Tip: If you prefer, soak the raisins in warm water or rum for 15 minutes before adding to the dough to make them plumper and juicier.
With these ingredients at hand, we’re ready to move on to the mixing and baking stages to create the perfect Julekake loaf from our bread machine.
Equipment Needed
To achieve that perfect Julekake texture and flavor using our bread machine, we need to ensure we have the right equipment ready. Having the proper tools not only simplifies the process but guarantees consistent, delicious results every time.
Bread Machine Specifications
Choosing the right bread machine is crucial for baking Julekake successfully. Here are the key specifications to look for:
| Specification | Recommendation |
|---|---|
| Capacity | 2 to 2.5 pounds (900g to 1130g) loaf size |
| Program Settings | Basic or Sweet Bread program with Dough option |
| Kneading Paddles | Single or dual paddles for thorough mixing |
| Add-in Signal | Audible beep to add raisins and candied peel |
| Heating Element | Top and bottom for even baking |
| Delay Timer | Optional but useful for scheduling |
| Non-stick Pan | Removable for easy loaf release and cleaning |
Note: A bread machine with a fruit and nut dispenser is ideal for the raisins and candied citrus peel, but manual addition at the beep works perfectly well too.
Additional Kitchen Tools
Beyond the bread machine, we recommend having these tools on hand to streamline the process and ensure quality:
- Measuring cups and spoons — precise measurements matter for this delicate bread.
- Small bowl — for soaking raisins to enhance juiciness.
- Rubber spatula — to scrape the wet ingredients into the bread pan without waste.
- Wire cooling rack — to cool the loaf evenly preventing sogginess.
- Pastry brush — for lightly brushing butter on the hot loaf, improving crust softness and sheen.
- Kitchen timer — if your bread machine lacks a delay timer feature.
- Sharp serrated knife — for slicing your finished Julekake without squashing the loaf.
With this equipment prepped and ready, we set ourselves up for a smooth baking experience, bringing authentic Julekake Recipe Bread Machine tradition into our kitchen with confidence.
Preparation Steps
To achieve the perfect texture and flavor in our Julekake Recipe Bread Machine loaf, careful preparation of the ingredients is essential. We follow a methodical approach starting with the dry components and then moving on to the wet ones.
Preparing the Dry Ingredients
We begin by combining all the dry ingredients in a large mixing bowl or directly in the bread machine pan if it supports layering. It is crucial to measure each ingredient precisely to maintain balance in flavor and texture.
- Flour: Use all-purpose flour as the base. We measure exactly 3 ½ cups (420 grams).
- Granulated Sugar: Add ½ cup (100 grams) for sweetness.
- Ground Cardamom: Incorporate 2 teaspoons to infuse the bread with its signature spice.
- Salt: Use 1 teaspoon to enhance the overall flavor.
- Active Dry Yeast: Add 2 ¼ teaspoons to ensure proper rising.
- Raisins: We prefer 1 cup, soaked and drained for juiciness.
- Candied Citrus Peel: ½ cup to add a bright, festive note.
Pro Tip: Soaking raisins in warm water or rum for 15-20 minutes before adding them prevents dryness and adds moisture.
| Dry Ingredient | Measurement | Notes |
|---|---|---|
| All-purpose flour | 3 ½ cups (420 grams) | Level with a spoon |
| Granulated sugar | ½ cup (100 grams) | |
| Ground cardamom | 2 teaspoons | Freshly ground preferred |
| Salt | 1 teaspoon | |
| Active dry yeast | 2 ¼ teaspoons | Ensure freshness |
| Raisins | 1 cup | Soaked and drained |
| Candied citrus peel | ½ cup | Chopped if large pieces |
Preparing the Wet Ingredients
Next, we prepare the wet ingredients which contribute to the soft crumb and rich taste of the Julekake.
- Whole Milk: Warm 1 cup (240 ml) to about 110°F (43°C) — warm, not hot, to activate the yeast effectively.
- Unsalted Butter: Melt 4 tablespoons (about 56 grams) and let it cool slightly; it should be warm but not hot.
- Large Egg: Beat lightly before adding to ensure even incorporation.
For optional flavor enhancers, we sometimes add:
- Vanilla Extract: 1 teaspoon for aromatic depth.
- Chopped Almonds: ½ cup for crunch and texture.
| Wet Ingredient | Measurement | Preparation |
|---|---|---|
| Whole milk | 1 cup (240 ml) | Warmed to 110°F (43°C) |
| Unsalted butter | 4 tbsp (56 grams) | Melted and slightly cooled |
| Large egg | 1 | Lightly beaten |
| Vanilla extract | 1 tsp (optional) | |
| Chopped almonds | ½ cup (optional) |
Reminder: Add wet ingredients gently over the dry layer in your bread machine to prevent activating the yeast prematurely.
By meticulously preparing our dry and wet ingredients, we set a strong foundation for the Julekake Recipe Bread Machine process, ensuring a soft, flavorful, and beautifully textured Christmas bread.
Instructions for the Bread Machine
To bake the perfect Julekake using a bread machine, we follow a methodical process that guarantees a soft, flavorful loaf with traditional holiday charm. Below are the essential steps for loading ingredients, selecting settings, and fine-tuning baking preferences.
Loading Ingredients into the Bread Machine
Begin by adding ingredients in the order recommended by your bread machine manufacturer to ensure proper mixing and rising. For our Julekake recipe, we suggest the following layering:
- Wet ingredients first:
- Warmed whole milk
- Melted unsalted butter
- Beaten egg
- Dry ingredients second:
- All-purpose flour
- Granulated sugar
- Ground cardamom
- Salt
- Yeast:
- Sprinkle active dry yeast on top of the flour layer, avoiding contact with wet ingredients initially to protect yeast viability.
- Add-ins:
- Evenly distribute soaked raisins
- Candied citrus peel
- Optional: chopped almonds or pearl sugar
Pro Tip: Always add the wet ingredients gently over the dry mix to prevent premature activation of the yeast.
Selecting the Proper Bread Machine Setting
Use the Bread Machine’s “Sweet” or “Basic” bread program with a medium loaf size (typically 1.5 to 2 pounds) and a soft crust preference when available.
| Setting | Description | Why It Works for Julekake |
|---|---|---|
| Sweet Bread | Designed for bread with added sugar & fruit | Balances kneading and rising time for enriched dough |
| Basic Bread | Uses standard kneading and rising cycles | Ideal if “Sweet” option is unavailable |
| Crust: Soft | Shorter baking or lower temperature | Preserves a tender crust synonymous with Julekake |
Select the “light” or “soft” crust option if your machine offers it, as this keeps the bread’s delicate texture intact without excessive browning.
Adjusting Baking Time and Crust Color
Monitoring the baking time and crust color is key to a perfect Julekake loaf.
- Standard baking time: 3 to 4 hours depending on your machine’s program.
- If crust is too dark, reduce baking time by 5–10 minutes or select a lighter crust setting.
- If crust is too light, extend baking time slightly or choose a medium crust choice.
Some bread machines offer an “Add-in” signal during the kneading cycle — use this to add nuts or other optional ingredients at the ideal moment without interrupting the bread-making process.
“Patience and control over settings are our best allies for achieving the authentic texture and aroma of Norwegian Julekake.”
Using these tailored settings and steps maximizes the machine’s capabilities and brings the festive, spiced sweetness of Julekake right into our kitchen with minimal effort.
Baking and Cooling
Baking Julekake in a bread machine requires careful attention to settings and timing to ensure the loaf develops its distinctive soft texture and rich flavor. Proper cooling is equally essential to preserve its moist crumb and enhance slicing.
Bread Machine Baking Process
We begin baking our traditional Julekake by using the Sweet or Basic bread program on the machine, selecting a medium loaf size with a soft crust setting. These options activate ideal kneading, rising, and baking times to develop the dough perfectly.
- Ensure the ingredients are loaded in the correct order: wet ingredients first, then dry, with yeast sprinkled on top to keep it from activating prematurely.
- The dough will undergo multiple knead and rise cycles within the bread machine. During this time, the spices, raisins, and candied citrus peel infuse the dough with classic holiday aroma and flavor.
- About halfway through baking, some machines beep, allowing us to add optional ingredients like chopped almonds or pearl sugar on the dough surface to enhance texture.
- The total baking time usually ranges between 3 to 4 hours, depending on your bread machine model and program specifics.
- Adjust crust color if your machine allows—aim for golden, not overly dark.
| Step | Action | Notes |
|---|---|---|
| Load Ingredients | Wet ingredients first, then dry | Sprinkle yeast on top last |
| Program Selection | Sweet or Basic, medium loaf, soft crust | Promotes gentle crumb structure |
| Bake Time | 180 to 240 minutes | Check based on machine capabilities |
| Optional Add-ins | Add nuts or sugar at beep signal | Enhances texture and finish |
| Crust Setting | Medium to soft | Avoid overly hard or dark crust |
Cooling and Removing the Bread
Once the baking cycle completes, Julekake looks golden and smells intensely fragrant. Here’s how we handle the cooling and removal for best results:
- Immediately remove the bread pan from the machine using oven mitts to avoid burns.
- Gently invert the pan to release the loaf onto a wire cooling rack. If necessary, use a rubber spatula to loosen edges without damaging the crust.
- Cooling on a wire rack allows air to circulate freely, which prevents moisture buildup and sogginess at the bottom.
- Let the bread cool at room temperature for at least 1 hour before slicing. This resting period completes the crumb setting and enhances flavor.
- When slicing, use a sharp serrated knife to maintain the loaf’s structure and avoid squashing the soft interior.
Following these steps ensures our Julekake Bread Machine creation is perfectly baked with a tender crumb and festive aromas intact.
Serving Suggestions
Enjoying our Julekake Recipe Bread Machine bread is a festive experience. Here are some classic and practical ways to serve and store this delightful Norway-inspired treat.
Traditional Ways to Serve Julekake
Our Julekake shines best when served in traditional Scandinavian style. Warm slices reveal a soft crumb speckled with raisins and candied citrus, making each bite aromatic and flavorful. Here are some serving ideas to elevate your holiday table:
- Butter Richly: Spread a generous layer of unsalted butter on warm slices. The butter melts slowly into the bread enhancing its sweetness and moist texture.
- Accompany with Cheese: A slice of Jarlsberg or Gouda complements the subtle cardamom spice and candied fruit beautifully.
- Pair with Coffee or Tea: Serve alongside a hot cup of brewed coffee or a spiced black tea for a cozy Nordic breakfast or afternoon snack.
- Use as French Toast: Day-old slices make perfect French toast. Soak briefly in egg mixture and fry for a crisp exterior and soft inside.
“The subtle sweet and spice notes of Julekake make it incredibly versatile and enjoyable for various festive occasions.”
Storage Tips for Freshness
Preserving the softness and flavor of our Julekake Recipe Bread Machine loaf requires proper storage techniques. Follow these tips to keep it fresh for longer:
| Storage Method | Instructions | Duration |
|---|---|---|
| Room Temperature | Wrap the cooled loaf tightly in plastic wrap or store in an airtight container. Keep in a cool, dry place away from direct sunlight. | 2 to 3 days |
| Refrigeration | Recommended only if you plan to keep it longer. Wrap tightly to prevent drying. | Up to 1 week |
| Freezing | Slice the cooled bread; wrap individual slices in plastic wrap then place in a freezer bag. Thaw at room temperature before serving. | Up to 3 months |
To revive slightly stale slices, warm them briefly in a toaster or oven at 300°F (150°C) for 5 to 7 minutes. This refreshes the bread’s softness and aroma perfectly.
Using these tips ensures our homemade Julekake remains a stellar centerpiece for any festive gathering.
Make-Ahead Tips for Julekake
Planning ahead can make enjoying our Julekake even more convenient. Here are essential tips on freezing, reheating, and preparing the dough in advance to preserve its delightful flavor and texture.
Freezing and Reheating Instructions
To keep your Julekake fresh and flavorful for later enjoyment, freezing is an excellent option. Follow these steps for best results:
- Wrap the loaf tightly in plastic wrap to prevent freezer burn.
- Enclose it in an airtight freezer bag or container for added protection.
- Label with the date to track freshness.
- Freeze up to 3 months for optimal taste.
When ready to enjoy:
- Remove the loaf from the freezer.
- Let it thaw at room temperature for 3 to 4 hours while still wrapped, preserving moisture.
- For a fresh-baked feel, heat the bread at 350°F (175°C) for 10–15 minutes, uncovered.
- Optionally, lightly brush the crust with melted butter after warming for added richness and shine.
| Step | Action | Notes |
|---|---|---|
| Wrapping | Plastic wrap and airtight container | Prevents freezer burn |
| Freezing duration | Up to 3 months | Maintain flavor and texture |
| Thawing | 3-4 hours at room temperature | Keep wrapped to retain moisture |
| Reheating temperature | 350°F (175°C) for 10-15 minutes | Optional butter brush after |
“Proper freezing and reheating keep the soft crumb and spiced aroma of our Julekake intact.”
Preparing Dough in Advance
Making the dough ahead of time is a smart strategy when planning for a busy holiday. Here’s how we recommend prepping the dough in advance:
- After mixing all ingredients in the bread machine (or by hand), let the dough complete its first rise.
- Punch down the risen dough gently to release trapped air.
- Place the dough in a lightly greased bowl and cover it tightly with plastic wrap.
- Refrigerate the dough for up to 24 hours. This slow fermentation enhances flavor complexity.
- When ready to bake, remove the dough from the fridge and let it come to room temperature for 1 hour.
- Shape into a loaf, place it in the bread machine pan or baking pan, and allow it to rise again until doubled (~1 hour).
- Proceed with baking using the regular bread machine or oven settings.
| Dough Preparation Step | Details | Timing/Temperature |
|---|---|---|
| First rise | Complete in bread machine or bowl | Until doubled in size |
| Refrigeration | Covered in greased bowl | Up to 24 hours at 38°F (4°C) |
| Warm-up before baking | Bring to room temperature | 1 hour |
| Second rise | After shaping | About 1 hour until doubled |
Troubleshooting Common Issues
When baking Julekake with a bread machine, some common issues may arise. Let’s address these to ensure a perfect festive bread every time.
Dense Bread Solutions
If your Julekake turns out dense rather than soft and fluffy, try these fixes:
- Check Flour Measurement:
Too much flour can make the bread heavy. Use a kitchen scale for accuracy or spoon and level the flour before measuring.
- Adjust Liquid Amounts:
A dry dough results in denser bread. Ensure the milk is warmed to about 100°F to 110°F (38°C to 43°C) to activate yeast well and keep liquids measured precisely.
- Verify Yeast Freshness:
Expired or inactive yeast reduces rise. We recommend testing yeast by proofing it in warm water with a pinch of sugar before use.
- Reduce Add-ins Temporarily:
Large quantities of raisins or candied citrus peel can weigh down the dough. Try reducing add-ins by 1/4 cup to maintain dough structure.
- Ensure Proper Kneading:
Insufficient kneading gives dense texture. Confirm the bread machine’s kneading paddle is engaged and effective.
- Use Correct Settings:
Use the “Sweet” or “Basic” bread program with a soft crust setting to prevent tough bread.
| Problem | Cause | Solution |
|---|---|---|
| Dense texture | Excess flour | Measure flour accurately |
| Dry dough | Too little liquid | Warm milk and measure precisely |
| Poor yeast activity | Old yeast | Proof yeast before use |
| Heavy batter | Too many add-ins | Reduce raisins/citrus peel slightly |
| Improper kneading | Paddle malfunction | Check bread machine kneading function |
Bread Not Rising Properly
When your Julekake loaf fails to rise as expected, consider these factors:
- Correct Ingredient Order:
Always add wet ingredients first, then dry, and finally sprinkle yeast on top of the flour. This keeps yeast dry and viable until kneading starts.
- Temperature Control:
The liquid temperature should be between 100°F and 110°F. Too hot kills yeast; too cold slows fermentation.
- Check Yeast Type and Quantity:
Use active dry yeast as specified, and measure accurately (usually around 2 1/4 teaspoons per loaf).
- Bread Machine Environment:
A cold kitchen or drafts may slow dough rising. Place the bread machine in a warm spot away from vents or windows.
- Avoid Salt Contacting Yeast:
Salt can inhibit yeast activity. Add salt on the opposite side of the pan from yeast placement to avoid early contact.
| Issue | Potential Cause | Recommended Action |
|---|---|---|
| No or minimal rise | Yeast killed by hot liquid | Keep liquid 100°F–110°F |
| Yeast inactive | Old or improper yeast | Use fresh active dry yeast |
| Dough too cold | Cold kitchen environment | Warm the room or bread machine location |
| Salt contacting yeast | Early salt/yeast contact | Separate yeast and salt when loading |
“When troubleshooting Julekake in a bread machine, patience and precision with ingredient handling and machine settings make all the difference.” Let’s ensure every loaf brings the delightful taste and texture of Norwegian Christmas tradition.
Conclusion
Baking Julekake with a bread machine brings the warmth of Norwegian tradition right into our kitchens with ease and reliability. By following the right steps and using quality ingredients, we can enjoy a soft, flavorful bread that enhances any holiday celebration.
This recipe not only simplifies the process but also opens the door to experimenting with festive flavors and textures. Whether shared with family or gifted to friends, our homemade Julekake is sure to become a cherished part of the season.
Frequently Asked Questions
What is Julekake?
Julekake is a traditional Norwegian Christmas bread flavored with raisins, candied citrus peel, and cardamom. It is sweet, spiced, and often enjoyed during holiday celebrations.
Can I use a bread machine to make Julekake?
Yes, a bread machine simplifies making Julekake by handling mixing, kneading, and baking. It’s perfect for beginners or those looking for convenience.
What ingredients are needed for Julekake?
Key ingredients include all-purpose flour, sugar, cardamom, yeast, raisins, candied citrus peel, milk, butter, and eggs. Optional add-ins are almonds, vanilla, and pearl sugar.
How do I prepare raisins for Julekake?
Soak raisins in warm water or juice before adding to the dough. This makes them juicier and prevents them from drying out during baking.
What settings should I use on my bread machine?
Use the “Sweet” or “Basic” bread program with medium loaf size and soft crust settings for best results with Julekake.
How long does it take to bake Julekake in a bread machine?
The baking cycle usually takes 3 to 4 hours, including kneading, rising, and baking.
How do I store Julekake to keep it fresh?
Store at room temperature in an airtight container for up to 3 days, refrigerate up to a week, or freeze for longer storage. Reheat slices before serving.
Can I make Julekake dough in advance?
Yes, you can prepare dough ahead by refrigerating it for slow fermentation. Let it rise at room temperature before baking.
What should I do if my Julekake is too dense?
Check ingredient measurements, ensure yeast is fresh, adjust liquid amounts, and verify proper kneading for a lighter bread.
How should I serve Julekake?
Serve with butter, cheese, or alongside coffee or tea. Day-old bread makes excellent French toast.