
Jellied eels have long been a beloved traditional dish in East London, dating back to the 18th century when eels were abundant in the Thames. This unique recipe combines simple ingredients with a rich history, offering a taste of authentic British street food that’s both nostalgic and flavorful.
We love how jellied eels showcase the beauty of humble ingredients transformed into something truly special. The dish features tender eel pieces set in a savory, spiced jelly that’s perfect for anyone looking to explore classic British cuisine. Whether you’re a curious foodie or a seasoned cook, this recipe brings a bit of London’s culinary heritage right to your kitchen.
Ingredients
To make authentic Jellied Eels that honor its traditional East London roots, we need to gather simple yet specific ingredients that create that distinctive savory jelly and tender eel texture.
Here is what we’ll use to prepare our classic dish:
- Fresh Eels – 2 pounds, cut into 2-inch pieces (ask your fishmonger for eel suitable for cooking)
- Water – 6 cups, to boil the eels and extract natural gelatin
- Vinegar – ¼ cup, traditionally malt vinegar, adds tang and helps with setting the jelly
- Salt – 1 tablespoon, for seasoning the cooking liquid
- Black Peppercorns – 1 teaspoon, whole, to infuse subtle spice during boiling
- Bay Leaves – 2 leaves, for earthy aroma and depth of flavor
- Onion – 1 small, peeled and halved, optional but classic for flavor enhancement
| Ingredient | Quantity | Purpose |
|---|---|---|
| Fresh Eels | 2 pounds | Main protein |
| Water | 6 cups | Cooking liquid and gelatin base |
| Vinegar (malt preferred) | ¼ cup | Tartness and jelly setting |
| Salt | 1 tablespoon | Seasoning |
| Black Peppercorns | 1 teaspoon | Aromatic spice |
| Bay Leaves | 2 leaves | Herbal flavor |
| Onion (optional) | 1 small | Flavor enhancer |
By selecting fresh eels and combining these ingredients accurately we ensure the jelly forms perfectly and the flavors balance authentically. This straightforward ingredient list reflects the classic charm of the dish and sets us up for success in preparing real Jellied Eels.
Equipment Needed
To prepare authentic jellied eels, having the right equipment ensures a seamless cooking process and perfect results. Below is the list of essential tools we use:
- Large heavy-bottomed pot
Crucial for evenly cooking the eels and creating the flavorful jelly.
- Sharp knife
For cutting eels into uniform pieces, which helps them cook evenly.
- Cutting board
A stable surface for safely slicing the eels.
- Slotted spoon
Ideal for removing eels from the cooking liquid without excess broth.
- Fine sieve or cheesecloth
To strain the cooking liquid and clarify it before setting the jelly.
- Mixing bowl
For combining the strained jelly with the cooked eel pieces as they cool.
- Measuring cups and spoons
Precision matters, so we rely on these to measure water, vinegar, salt, and spices.
- Storage container or mold
To cool the jellied eels and allow the gelatin to set firmly.
| Equipment | Purpose |
|---|---|
| Large heavy-bottomed pot | Even cooking and jelly formation |
| Sharp knife | Slicing eels into uniform pieces |
| Cutting board | Safe and stable cutting surface |
| Slotted spoon | Removing eels from broth effectively |
| Fine sieve/cheesecloth | Straining and clarifying cooking liquid |
| Mixing bowl | Combining ingredients as jelly sets |
| Measuring tools | Accurate ingredient portions |
| Storage container/mold | Forming and setting the jelly |
“Using the right equipment is key to achieving the traditional silky texture of jellied eels and the perfect clarity of the jelly.”
By preparing these tools beforehand, we streamline the process and focus on capturing the dish’s authentic and nostalgic flavors.
Prep Work
Before we start cooking, proper prep work ensures our jellied eels turn out perfectly tender with a flavorful, clear jelly. Let’s focus on cleaning the eels thoroughly and assembling our seasonings and stock.
Cleaning and Preparing the Eels
- Rinse the fresh eels under cold running water to remove any surface dirt or slime.
- Place the eel on a cutting board and using a sharp knife, cut them into approximately 2-inch segments for even cooking.
- To ensure tenderness and flavor, remove the head and tail if preferred, although traditional recipes often use whole eel segments.
- Use kitchen paper towels to pat the eel pieces dry; this prevents excess moisture interfering with the jelly’s set.
- Inspect each piece for any residual bones or viscera and remove as necessary to enhance texture and eating experience.
Preparing the Seasonings and Stock
- Measure out 4 cups of water, then add the following to a heavy-bottomed pot:
- 1/4 cup malt vinegar for acidity and preservation
- 1 tablespoon salt to enhance natural eel flavors
- 1 teaspoon black peppercorns for mild spiciness
- 2 bay leaves for aromatic depth
- (Optional) 1 small onion, quartered for sweetness
- Bring this mixture to a gentle simmer to combine the flavors and mellow the vinegar’s sharpness before introducing the eels.
| Ingredient | Quantity | Purpose |
|---|---|---|
| Water | 4 cups | Cooking liquid base |
| Malt Vinegar | 1/4 cup | Acidity, flavor, preservation |
| Salt | 1 tablespoon | Enhances eel flavor |
| Black Peppercorns | 1 teaspoon | Mild spice |
| Bay Leaves | 2 | Aromatic notes |
| Onion (optional) | 1 small, quartered | Adds subtle sweetness |
By preparing the eels and seasonings this way, we set the foundation for authentic jellied eels with that characteristic tender texture and rich jelly.
Cooking Instructions
Follow these precise steps to create authentic Jellied Eels with a tender texture and rich, flavorful jelly. Each stage is essential for preserving the traditional taste and silky consistency that make this dish unique.
Boiling the Eels
- Place the cleaned and segmented eels into a large heavy-bottomed pot.
- Add enough cold water to fully cover the eel pieces—approximately 1.5 liters for every 2 pounds of eels.
- Bring the water to a gentle boil over medium heat.
- Once boiling, reduce the heat to low and simmer the eels for 20 to 25 minutes.
- During simmering, skim off any foam or impurities that rise to the surface using a slotted spoon.
- The eels should become tender but not fall apart—test by gently pressing a piece with a fork.
- Carefully remove the eels from the pot with the slotted spoon and set them aside, keeping the cooking liquid.
Making the Jelly Stock
- To the remaining cooking liquid, add malt vinegar, salt, black peppercorns, bay leaves, and optionally sliced onion for deeper flavor.
- Simmer this mixture uncovered over low heat for 15 to 20 minutes to allow flavors to concentrate and the stock to reduce slightly.
- Remove and discard the bay leaves, peppercorns, and onion pieces.
- Strain the stock through a fine sieve or cheesecloth into a clean bowl to achieve a clear jelly base.
- While still warm, taste and adjust seasoning with additional salt or malt vinegar if needed—the balance of acidity and saltiness is key.
- Let the stock cool slightly until warm but not cold before combining it with the eel pieces.
Combining Eels and Jelly
- Gently transfer the boiled eel pieces into a mold or a storage container.
- Pour the warm jelly stock over the eels, ensuring they are fully submerged.
- Allow the mixture to cool at room temperature for 30 minutes.
- Transfer the container to the refrigerator and chill for at least 4 hours or overnight.
- The jelly will set firmly around the eels, creating the signature translucent gel that defines Jellied Eels.
- Serve chilled, optionally accompanied by malt vinegar or fresh parsley for a traditional presentation.
| Step | Time | Temperature | Key Actions |
|---|---|---|---|
| Boiling Eels | 20–25 minutes | Simmer (low heat) | Skim foam, tender test |
| Simmering Stock | 15–20 minutes | Low heat | Reduce, strain |
| Cooling & Setting Jelly | 30 minutes + 4 hours | Room temp → fridge | Pour jelly, refrigerate |
By adhering to each step precisely, we ensure our Jellied Eels honor both tradition and flavor in every bite.
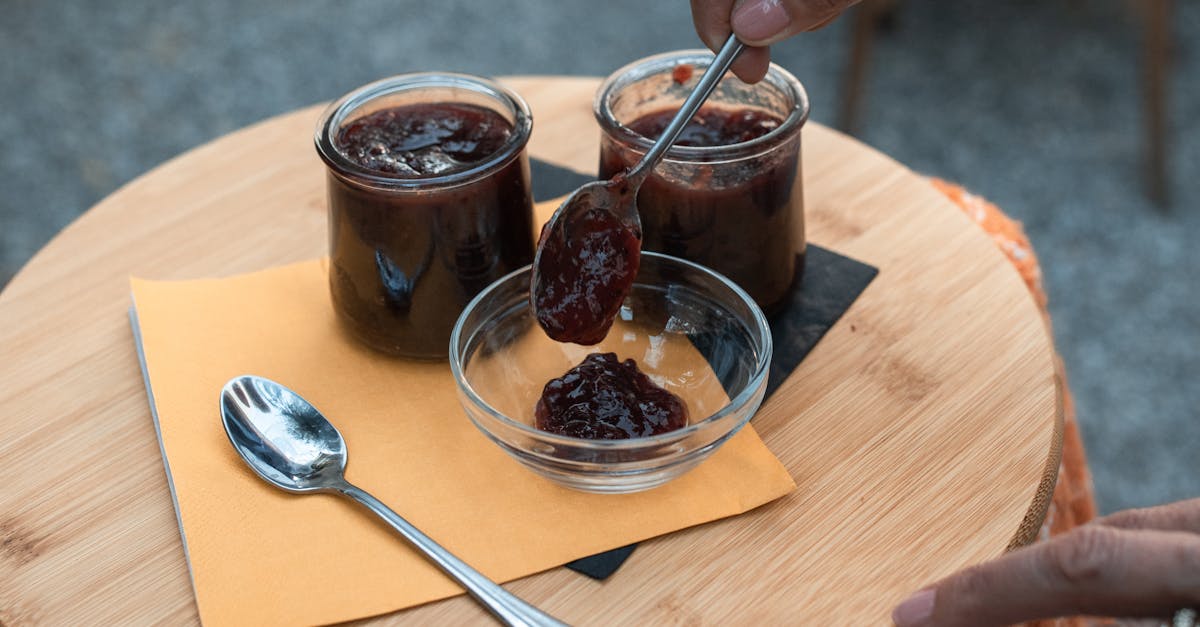
Assembly and Setting
Once the eels are cooked and the jelly stock is ready, the crucial step is to combine them carefully to preserve the delicate flavors and texture. Proper assembly and chilling ensure the classic silky jelly that defines jellied eels.
Pouring the Jelly over the Eels
After the eel pieces have been gently removed from the pot using a slotted spoon, place them evenly in a clean mold or storage container. To maintain the traditional appearance and texture, pour the hot jelly stock slowly over the eels so that each piece is fully submerged. This allows the rich flavors to infuse uniformly as the jelly sets.
Key Tips for Pouring the Jelly:
- Ensure the jelly stock is strained through a fine sieve or cheesecloth to achieve clear, impurity-free jelly.
- Pour the jelly while still warm but not boiling to prevent overcooking the eel or breaking the jelly’s structure.
- Arrange eel pieces flat for an even set and appealing presentation.
- Leave a small headspace in the container to allow for expansion as the jelly cools.
Chilling and Setting Time
To develop the signature firm, yet tender jelly that holds the eel pieces together, proper chilling is essential. Place the assembled container in the refrigerator and allow it to set undisturbed.
| Step | Details |
|---|---|
| Temperature | Refrigerate at 35-40°F (2-4°C) |
| Minimum Time | 4 to 6 hours |
| Optimal Time | Overnight (8-12 hours) |
| Texture | Firm jelly with clear translucency |
We recommend covering the container loosely with plastic wrap to protect the jelly from absorbing any odors while it sets. Once fully chilled, the jelly will have solidified around the tender eel pieces, delivering the nostalgic flavor and texture that characterize authentic jellied eels.
Serving Suggestions
To fully appreciate the distinctive flavor and texture of jellied eels, proper serving techniques enhance the experience. Here are our expert recommendations for presenting this traditional East London delicacy:
- Serve jellied eels chilled straight from the refrigerator. The jelly should be firm but tender, allowing slices to hold their shape without crumbling.
- Accompany the dish with malt vinegar for an authentic tangy contrast. Drizzle lightly over the eels just before eating to preserve the jelly’s texture.
- Add a sprinkle of freshly chopped parsley or chopped spring onions to introduce color and a mild herbal note that complements the savory jelly and tender eel flesh.
- Present the dish on a simple white plate or a shallow bowl that emphasizes the clear jelly and glossy eel pieces.
- Traditionally, jellied eels are eaten with crisp white bread or crusty bread rolls to balance the rich, gelatinous texture with a satisfying crunch.
- For a complete snack or light meal, serve alongside pickled cucumbers or pickled onions which add zesty acidity and crunch.
| Serving Element | Purpose | Optional Flavor Notes |
|---|---|---|
| Malt Vinegar | Enhances tanginess | Sharp, acidic contrast |
| Fresh Parsley | Adds freshness and color | Mild herbal note |
| Crusty White Bread | Balances texture | Neutral, soft texture |
| Pickled Cucumbers/Onions | Adds crunch and acidity | Bright, tangy |
“The key to enjoying jellied eels lies in balancing its rich, gelatinous body with crisp, acidic accompaniments,” highlighting the interplay of flavors in every bite.
By keeping these serving suggestions in mind, we ensure that the traditional jellied eels recipe delivers a memorable, authentic taste experience that honors its historic roots.
Storage Tips
Proper storage of jellied eels is essential to retain their delicate texture and rich flavor. Follow these steps to ensure your dish stays fresh and delicious:
Refrigeration:
Place the jellied eels in an airtight container to prevent absorption of unwanted odors. Store the container in the coldest part of the refrigerator at 34°F to 40°F (1°C to 4°C). This temperature range maintains the jelly’s consistency and preserves the eel’s freshness. Consume within 3 days for optimal taste and safety.
Freezing:
While freezing is possible, it may affect the jelly’s texture. To freeze, wrap the container tightly with plastic wrap or aluminum foil in addition to the lid. Label the package with the date and freeze at 0°F (-18°C) or lower. For best quality, consume within 1 month. Thaw slowly in the refrigerator overnight before serving—do not thaw at room temperature to avoid bacterial growth.
| Storage Method | Temperature Range | Storage Duration | Notes |
|---|---|---|---|
| Refrigeration | 34°F to 40°F (1-4°C) | Up to 3 days | Keep airtight; maintain jelly texture |
| Freezing | 0°F (-18°C) or lower | Up to 1 month | May alter jelly texture; thaw in fridge |
Avoiding Contamination:
Use a clean utensil every time you serve to prevent introducing bacteria. Never leave jellied eels at room temperature for more than 2 hours as this promotes spoilage.
Reheating Tips:
Jellied eels are traditionally served cold or at room temperature. If you prefer them warmed, gently heat only the eel pieces (not the jelly) on low heat to avoid melting the jelly completely. Serve immediately after warming to maintain the authentic texture.
Conclusion
Jellied eels offer a unique culinary experience that connects us with London’s rich food heritage. By mastering the recipe and technique, we can enjoy this traditional dish with its distinctive texture and flavor right at home. Whether you’re serving it as a nostalgic treat or introducing it to new palates, jellied eels showcase the beauty of simple ingredients transformed by skill and tradition.
With the right preparation, equipment, and care in storage, we ensure every bite honors the authentic taste that has delighted generations. It’s a rewarding dish that invites us to embrace history through food and share a truly classic British delicacy.
Frequently Asked Questions
What are jellied eels?
Jellied eels are a traditional East London dish made by boiling fresh eel pieces and allowing the cooking liquid to set into a savory jelly. The dish dates back to the 18th century and is known for its nostalgic flavor and unique texture.
What ingredients are needed to make authentic jellied eels?
Authentic jellied eels require fresh eels, water, malt vinegar, salt, black peppercorns, bay leaves, and optionally onion. These simple ingredients combine to create the distinctive jelly and tender eel texture.
What equipment do I need to prepare jellied eels?
You’ll need a large heavy-bottomed pot, a sharp knife, cutting board, slotted spoon, fine sieve or cheesecloth, mixing bowl, measuring cups and spoons, and a storage container or mold for setting the jelly.
How should I clean and prep the eels?
Rinse the eels thoroughly, cut them into uniform segments, and remove any remaining bones or viscera. Proper cleaning ensures tenderness and a clean flavor in the finished dish.
How do I cook jellied eels?
Simmer the eel pieces gently in seasoned water with malt vinegar, peppercorns, bay leaves, and optional onion until tender. Strain the stock and pour it while warm over the eel pieces to set the jelly.
How long does it take for the jelly to set?
The jelly should be refrigerated for at least 4 to 6 hours to firm up, but overnight chilling is ideal for the best texture and flavor.
How should jellied eels be served?
Serve chilled with malt vinegar and garnish with fresh parsley or spring onions. They pair well with crusty bread or pickled vegetables for a balanced flavor experience.
How do I store jellied eels properly?
Store jellied eels in an airtight container in the refrigerator at 34°F to 40°F (1°C to 4°C) and consume within three days. Freezing is possible but may change the jelly’s texture.
Can jellied eels be reheated?
Yes, they can be gently reheated, but care should be taken to maintain the jelly’s texture by heating slowly and not to high temperatures.
Why are jellied eels considered a classic British street food?
Jellied eels originated in 18th-century East London when eels were abundant in the Thames. Their simple ingredients and distinctive texture made them a popular, affordable snack for working-class Londoners.