
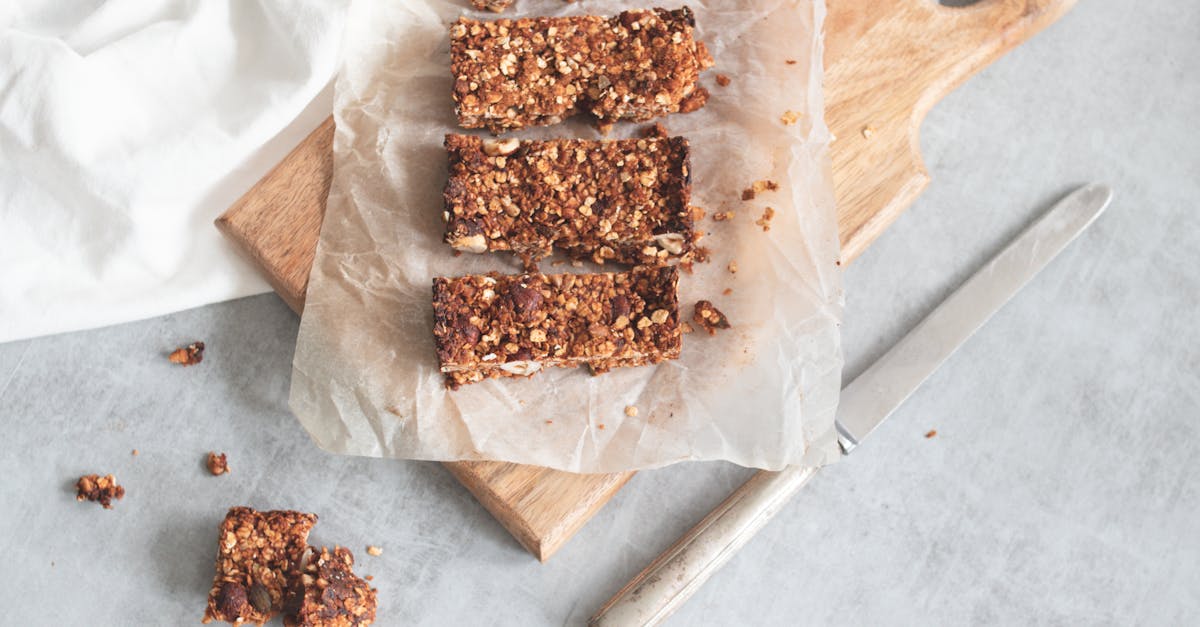
Who can resist the sweet, comforting flavor of a honey bun? We’ve taken that classic treat and transformed it into bite-sized perfection with our Honey Bun Cookies recipe. These cookies combine the warm spices, buttery richness, and subtle sweetness of honey buns, all wrapped up in a soft, chewy cookie.
Honey Bun Cookies Recipe
Let’s dive into crafting these soft, chewy, and rich Honey Bun Cookies. Follow our step-by-step instructions for a perfect blend of buttery warmth and subtle sweetness.
Ingredients
- 2 ½ cups all-purpose flour
- 1 tsp baking soda
- 1 tsp baking powder
- ½ tsp ground cinnamon
- ¼ tsp ground nutmeg
- ¾ cup unsalted butter softened
- 1 cup light brown sugar
- ¼ cup honey
- 1 large egg room temperature
- 2 tsp vanilla extract
For the Glaze
- 1 cup powdered sugar
- 2–3 tbsp milk
- ½ tsp vanilla extract
Instructions
Preparing the Dough
- In a medium bowl, whisk together flour, baking soda, baking powder, cinnamon, and nutmeg. Set aside.
- Using a hand or stand mixer, cream softened butter and brown sugar on medium speed until fluffy, about 2–3 minutes.
- Add honey, egg, and vanilla extract. Mix until fully combined.
- Gradually add the dry ingredients to the wet mixture. Mix on low speed until just combined. Avoid overmixing for a tender texture.
- Cover the cookie dough and chill it in the refrigerator for at least 1 hour or up to overnight.
Shaping and Baking
- Preheat the oven to 350°F and line baking sheets with parchment paper.
- Scoop 1 ½ tablespoon of dough and roll it into balls. Place them 2 inches apart on the prepared baking sheets.
- Bake in the preheated oven for 8–10 minutes, or until the edges are lightly golden. The centers should look slightly underbaked for a soft cookie texture.
- Let the cookies cool on the baking sheet for 5 minutes, then transfer them to a wire rack to cool completely.
Glazing the Cookies
- In a small bowl, whisk together powdered sugar, milk, and vanilla extract until smooth. The glaze should be pourable but not too runny. Add more milk if needed.
- Drizzle the glaze over the cooled cookies using a spoon or piping bag for a polished look.
- Let the glaze set for about 15 minutes before serving.
Baking Tips
| Tip | Details |
|---|---|
| Use room-temperature ingredients | Ensures even mixing for a smooth dough. |
| Chill the dough | Prevents spreading and ensures the cookies remain soft and chewy. |
| Do not overbake | Soft centers make these cookies irresistible. |
There you have it! Every bite of these Honey Bun Cookies is a nostalgic treat, balanced with the perfect amount of sweetness and spice.
Ingredients
Let’s gather the freshest ingredients for these soft and chewy Honey Bun Cookies. Each ingredient plays a crucial role in creating their warm, spiced perfection. Be sure to measure accurately for the best results. Here’s everything you’ll need:
Dry Ingredients:
- 2 ½ cups all-purpose flour, sifted for a smoother texture
- 1 teaspoon baking soda, to help the cookies rise
- 1 teaspoon ground cinnamon, for that classic honey bun warmth
- ¼ teaspoon ground nutmeg, optional but enhances the spice profile
- ½ teaspoon salt, to balance the sweetness
Wet Ingredients:
- ¾ cup unsalted butter, softened to room temperature for a creamy consistency
- 1 cup packed light brown sugar, for a rich molasses flavor
- ¼ cup granulated sugar, for balanced sweetness
- 2 large eggs, at room temperature for easy incorporation
- ⅓ cup honey, the star ingredient for a natural sweetness boost
- 2 teaspoons vanilla extract, for a deeper flavor
Glaze Ingredients:
For that signature honey bun finish, we’ll create a simple vanilla glaze:
- 1 cup powdered sugar, sifted to remove lumps
- 2 tablespoons milk, for a smooth consistency
- 1 teaspoon vanilla extract, to complement the cookies’ flavor
Tools And Equipment
To craft the perfect Honey Bun Cookies with ease, assembling the right tools and equipment is crucial. Here’s a breakdown of what we need to ensure seamless preparation, accurate measurements, and flawless baking:
Essential Baking Tools
- Mixing Bowls: Use a large bowl for the wet ingredients and a medium one for the dry ingredients. Opt for sturdy bowls that won’t tip over.
- Electric Hand Mixer or Stand Mixer: Required for creaming the butter and sugars to a smooth, fluffy consistency.
- Rubber Spatula: For folding and scraping every bit of dough or glaze out of the bowl.
- Measuring Cups and Spoons: Precise measurements are key in baking; make sure to have both dry and liquid measurement sets.
- Fine-Mesh Sifter: Essential for aerating the flour and evenly distributing the dry ingredients, especially to avoid lumps.
Baking Equipment
- Baking Sheets: Use sturdy, flat baking sheets to ensure even heat distribution. Line them with parchment paper or a silicone baking mat to prevent sticking.
- Cookie Scoop: To consistently portion cookie dough for uniform sizes, look for a medium-sized scoop (about 1.5 tablespoons).
- Wire Cooling Racks: Help cool the cookies evenly after baking, preserving their texture and preventing sogginess.
- Pastry Brush: For applying optional glaze evenly, ensuring each cookie has a flawless finish.
Glazing Tools
For the final touch of vanilla glaze, you’ll need:
- Small Whisk or Fork: Perfect for combining powdered sugar, milk, and vanilla extract into a smooth glaze.
- Small Bowl: Ideally one with a rounded bottom to whisk glaze without any lumps.
Quick Reference Table
| Tool/Equipment | Purpose |
|---|---|
| Mixing Bowls | Combining wet and dry ingredients. |
| Electric Hand Mixer | Creaming butter and sugars smoothly. |
| Rubber Spatula | Scraping bowls and folding mixtures. |
| Measuring Cups/Spoons | Ensuring accurate measurements. |
| Sifter | Aerating and mixing dry ingredients. |
| Baking Sheets | Even heat distribution for baking. |
| Cookie Scoop | Uniform cookie sizing. |
| Cooling Racks | Even cooling to preserve texture. |
| Pastry Brush | Applying glaze evenly. |
| Small Whisk/Fork | Mixing glaze without lumps. |
| Small Bowl | Holding glaze for smooth preparation. |
The right tools, paired with our precise recipe steps, ensure your Honey Bun Cookies come out every bit as delightful and nostalgic as promised.
Directions
Let’s dive into the step-by-step process of making Honey Bun Cookies. Follow these precise instructions to create perfectly soft, chewy, and flavorful cookies every time.
Prep
- Gather all the ingredients and tools listed in the previous sections.
- Preheat the oven to 350°F (175°C). Line sturdy baking sheets with parchment paper or silicone baking mats to prevent sticking.
- Set the unsalted butter on the counter to soften at room temperature for 30 minutes. Ensure the eggs are also at room temperature to allow for smooth mixing.
- Sift together all the dry ingredients—flour, baking soda, cinnamon, nutmeg (if using), and salt—into a bowl. Set it aside for later use.
Dough Preparation
- In a spacious mixing bowl, use an electric mixer on medium speed to cream together the softened unsalted butter, light brown sugar, and granulated sugar until pale and fluffy, about 2–3 minutes.
- Add the room-temperature eggs, one at a time, ensuring each is fully incorporated before adding the next. This step prevents curdling. Mix in the honey and vanilla extract until combined.
- Reduce the mixer speed to low. Gradually add the sifted dry ingredients into the wet mixture, mixing just until the dough comes together. Avoid overmixing, as this could make the cookies tough.
Assembling The Cookies
- Use a cookie scoop or tablespoon to portion the dough into even scoops, approximately 1 ½ tablespoons each.
- Roll each scoop between your palms to form smooth balls. Arrange them on the prepared baking sheets, spacing them about 2 inches apart to allow for spreading.
- To achieve a signature honey bun swirl effect, lightly press the top of each dough ball with a fork or spoon to create gentle indentations resembling a swirl pattern.
Baking
| Step | Details |
|---|---|
| Baking Temperature | 350°F (175°C) |
| Baking Time | 10–12 minutes or until edges turn golden brown |
| Cookie Doneness | Centers should appear slightly underbaked |
- Place the baking sheets into the preheated oven, baking one sheet at a time for even results.
- Watch closely after the 10-minute mark. The cookies should have golden brown edges and a soft center, as they will continue baking on the tray after removal.
Cooling
- Remove the baking sheets from the oven and let the cookies rest on the tray for 5 minutes to firm up slightly.
- Carefully transfer the cookies to wire cooling racks using a spatula to prevent breakage.
- Once the cookies have completely cooled, drizzle or brush them with the prepared vanilla glaze for that classic Honey Bun sweetness. Let the glaze set for 10–15 minutes before serving.
Tips For Perfect Honey Bun Cookies
Making perfect Honey Bun Cookies is all about precision, patience, and the right techniques. Follow these tips to elevate your baking game and ensure your cookies turn out beautifully every time.
1. Use Room-Temperature Ingredients
Room-temperature butter and eggs are essential for achieving the right consistency in your dough. Softened butter mixes seamlessly with sugar, creating that creamy texture necessary for a tender cookie. Cold ingredients can lead to uneven mixing, which disrupts the dough texture.
2. Measure Ingredients Accurately
Use measuring cups for dry ingredients and a liquid measuring cup for wet ingredients to maintain accurate proportions. Baking is as much a science as it is an art, so precision matters here. Level off the flour with a straight edge to avoid overpacking it, which could make the cookies dense.
3. Chill the Dough
Chilling the cookie dough for at least 30 minutes to an hour is crucial for a few reasons. It prevents over-spreading during baking and develops the flavor for that authentic honey bun taste. Cover the dough with plastic wrap to keep it from drying out.
4. Don’t Overmix the Dough
Once you’ve combined the dry and wet ingredients, stir gently until just incorporated. Overmixing can lead to tough cookies, as it activates gluten in the flour excessively. A few streaks of flour left in the bowl are fine—they’ll incorporate as you portion the dough.
5. Create That Signature Swirl
For the classic honey bun-inspired look, roll each portioned dough ball slightly and gently create a swirl using the back of a spoon or a small offset spatula. It’s an extra detail that makes these cookies stand out visually and feel like an authentic treat.
6. Avoid Overbaking
Bake at 350°F (175°C) for 10–12 minutes, and keep a close eye on the cookies in the last 1–2 minutes. Look for edges that are slightly golden but centers that remain soft. The residual heat will continue to bake the cookies on the tray after removing them from the oven.
7. Perfect the Vanilla Glaze
The vanilla glaze atop these cookies is what ties all the flavors together. Ensure your glaze has a smooth, pourable consistency by sifting the powdered sugar before mixing it with milk and vanilla extract. If it’s too thick, add milk one teaspoon at a time until it reaches the right texture.
8. Use the Proper Baking Tools
The right tools can make a big difference in the baking process. Here’s a quick reference table:
| Tool | Purpose |
|---|---|
| Cookie scoop | Ensures uniform cookie size and even baking |
| Sturdy baking sheets | Prevents burning and allows even heat distribution |
| Wire cooling racks | Cools cookies efficiently while preventing soggy bottoms |
| Fine-mesh sifter | Removes lumps from dry ingredients and glaze for smoothness |
9. Store Correctly
To keep your Honey Bun Cookies fresh and chewy, store them in an airtight container. Place a sheet of wax paper or parchment paper between layers to prevent the glaze from sticking. For longer storage, freeze unglazed cookies for up to 3 months and glaze them after thawing.
By following these tips, we can recreate that perfectly soft, spiced, and glazed essence of a honey bun in every single cookie.
Make-Ahead And Storage Instructions
When it comes to Honey Bun Cookies, proper planning and storage ensure they remain soft, chewy, and flavorful even after baking. Here’s how we can make these treats ahead of time and keep them fresh for days to come.
Make-Ahead Prep
- Dough Preparation: The cookie dough can be prepared up to 2 days in advance. After mixing the dough, wrap it tightly in plastic wrap and store it in the refrigerator. Chilling the dough not only makes it easier to handle but also enhances the cookies’ flavor and texture.
- Freezing the Dough: If you want to make the cookies even further in advance, roll the dough into balls, arrange them on a baking sheet lined with parchment paper, and freeze for about 1 hour until firm. Once firm, transfer the dough balls into an airtight freezer-safe bag or container. These can be frozen for up to 3 months.
- Baking from Frozen: When ready to bake, place the frozen cookie dough balls directly onto a baking sheet and bake at 350°F (175°C). Add an additional 2–3 minutes to the baking time compared to fresh dough.
Storage After Baking
- Room Temperature: Store completely cooled cookies in an airtight container at room temperature. For the best texture, place a sheet of parchment or wax paper between layers to prevent sticking. These cookies stay fresh and soft for up to 4 days on the counter.
- Refrigeration: While it’s not necessary, you can refrigerate the cookies to preserve their freshness for up to 1 week. Place them in an airtight container and, when ready to enjoy, bring them to room temperature or gently warm them in the microwave for a few seconds.
- Freezing Baked Cookies: If you’d like to store the baked cookies for an extended time, freeze them. Layer the cooled, glazed cookies with parchment paper between layers in a freezer-safe container. They can be frozen for up to 3 months.
Tips for Glazing Make-Ahead Cookies
- If glazing immediately after baking: Allow the cookies to cool completely before applying the vanilla glaze to ensure the glaze sets smoothly.
- For frozen cookies: Thaw them overnight in the refrigerator or for a few hours at room temperature before glazing.
- Reapplying glaze: If the glaze hardens during storage, whisk in a drop of milk and drizzle over the cookies before serving for a fresh look and taste.
Quick Reference Table for Storage Timeframes
| Storage Method | Timeframe | Notes |
|---|---|---|
| Refrigerated Dough | Up to 2 days | Wrap tightly in plastic wrap to prevent drying. |
| Frozen Dough | Up to 3 months | Freeze dough balls; bake directly from frozen with extended time. |
| Room-Temperature Cookies | Up to 4 days | Store in an airtight container with parchment paper in between. |
| Refrigerated Cookies | Up to 1 week | Warm before serving for the best flavor and texture. |
| Frozen Baked Cookies | Up to 3 months | Place parchment between layers; glaze after thawing if desired. |
By following these make-ahead and storage tips, we can enjoy Honey Bun Cookies fresh anytime while preserving their delightful balance of spice, sweetness, and buttery texture.
Variations And Substitutions
When it comes to Honey Bun Cookies, the versatility of this recipe allows us to tweak and adapt it for different tastes and dietary needs. Here are some delicious variations and thoughtful substitutions to make these cookies truly your own:
1. Sweeteners
- Swap honey with maple syrup: For a subtle, woodsy flavor, maple syrup works wonderfully. Use an equal amount in place of honey.
- Try agave nectar: If you prefer a vegan-friendly alternative, sub honey with agave nectar in a 1:1 ratio.
2. Spices
- Add nutmeg: Elevate the warm spice profile by adding 1/4 teaspoon of freshly grated nutmeg along with cinnamon. This adds depth to the flavor.
- Use pumpkin spice blend: For a seasonal twist, replace cinnamon with an equal measure of pumpkin spice mix.
3. Flours
- Whole wheat flour option: Substitute half of the all-purpose flour with whole wheat flour for a heartier, nuttier texture.
- Gluten-free alternative: Use a 1:1 gluten-free baking flour to cater to dietary restrictions, ensuring fluffy and chewy cookies.
4. Dairy
- Vegan alternatives: Replace the unsalted butter with vegan butter sticks and the milk for the glaze with any plant-based milk like almond milk or oat milk.
5. Glaze
- Replace the vanilla extract in the glaze with almond extract for a nutty sweetness.
- Add a pinch of cinnamon or mix in 1 teaspoon of orange zest for a citrusy kick.
Customizable Add-Ins
Get creative with some mix-ins! Below is a quick reference for optional additions and their recommended quantities.
| Add-In | Recommended Amount | Notes |
|---|---|---|
| Chopped pecans | 1/2 cup | Adds a nutty crunch to the cookies. |
| Mini chocolate chips | 1/3 cup | A fun twist for chocolate lovers. |
| Dried cranberries | 1/3 cup | Offers a tart, chewy contrast to sweetness. |
| Toasted coconut flakes | 1/4 cup | Adds texture and tropical notes. |
Dietary Adjustments
- Sugar-free option: Use a sugar substitute like erythritol or monk fruit sweetener in an equal measure to replace granulated and brown sugar. Ensure the substitute pairs well with honey for a balanced flavor.
- Low-fat option: Replace half the butter with unsweetened applesauce. This reduces fat content while keeping the cookies moist.
With these Variations And Substitutions, transforming this classic recipe into a personalized treat has never been easier. From dietary preferences to bold flavor profiles, these options open up a world of possibility for us all when crafting that perfect batch of Honey Bun Cookies.
Conclusion
Honey Bun Cookies bring together the comforting flavors of a classic treat in a delightful, chewy form that’s easy to make and customize. With the right tools, precise techniques, and a touch of creativity, we can enjoy cookies that are perfectly spiced, beautifully glazed, and irresistibly soft. Whether we stick to the original recipe or explore fun variations, these cookies are sure to become a favorite for any occasion. Let’s embrace the joy of baking and savor every sweet, buttery bite!
Frequently Asked Questions
What are Honey Bun Cookies?
Honey Bun Cookies are soft, chewy cookies inspired by the classic honey bun treat. They combine warm spices, buttery richness, and subtle sweetness, topped with a simple vanilla glaze for a nostalgic flavor.
Can I substitute honey in the recipe?
Yes, you can substitute honey with maple syrup, agave nectar, or a similar liquid sweetener in equal amounts. Keep in mind that this may slightly alter the flavor.
Do I need to chill the cookie dough?
Yes, chilling the dough is highly recommended. It helps the cookies maintain their shape, improves texture, and enhances the flavor.
How long should I bake Honey Bun Cookies?
Bake the cookies at 350°F (175°C) for 10–12 minutes. They should be set around the edges but remain slightly soft in the center.
How do I achieve the signature swirl on the cookies?
To create the swirl, use a toothpick or a skewer to gently swirl the surface of the rolled cookie dough balls before baking.
Can I make the cookie dough ahead of time?
Yes! The dough can be prepared and stored in the fridge for up to 2 days or frozen for up to 3 months. Let it soften slightly before baking.
How do I store Honey Bun Cookies?
Store baked cookies in an airtight container at room temperature for up to 4 days, in the refrigerator for up to 1 week, or freeze them for up to 3 months.
What are some variations I can try?
You can customize the cookies with add-ins like chopped pecans, mini chocolate chips, or coconut flakes. For dietary needs, use sugar substitutes, low-fat options, or whole wheat flour.
What tools do I need to make these cookies?
Essential tools include mixing bowls, an electric mixer, measuring cups and spoons, a cookie scoop, baking sheets, wire cooling racks, and a pastry brush for glazing.
How do I make the glaze for the cookies?
The glaze is made with powdered sugar, milk, and vanilla extract. Mix until smooth and drizzle over cooled cookies for added sweetness.