
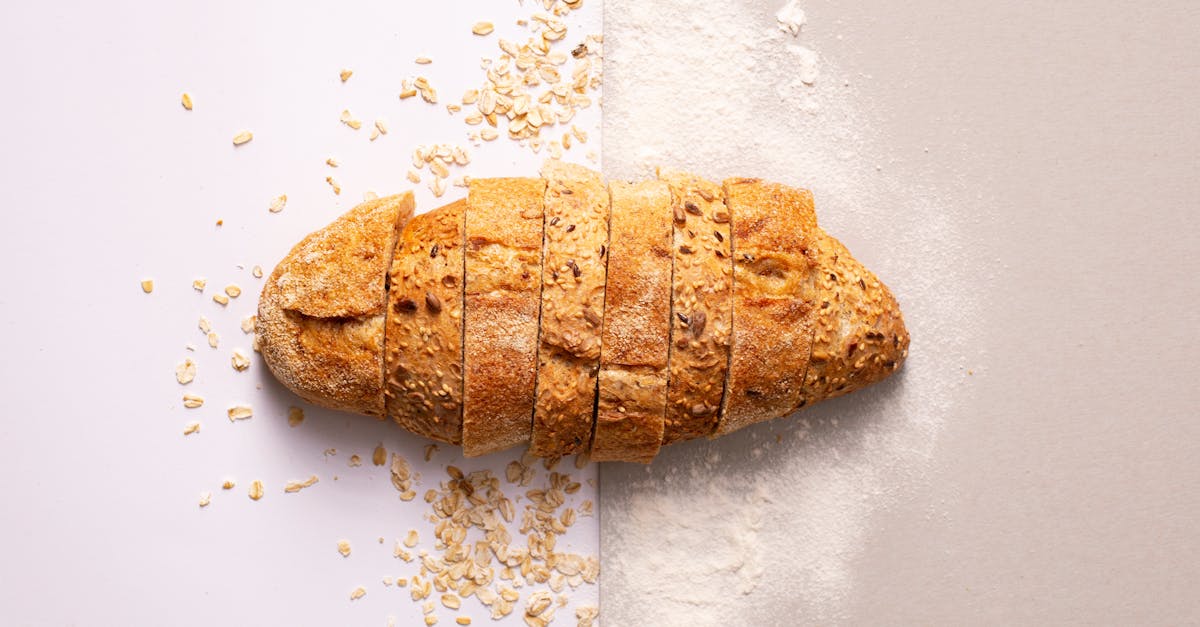
Hawaiian sourdough bread is a delightful twist on traditional sourdough that brings a touch of the islands to your kitchen. Known for its slightly sweet flavor and soft, chewy texture, this bread has become a beloved staple in Hawaiian households. It’s perfect for everything from sandwiches to toast with a bit of butter and jam.
Ingredients
To make our Hawaiian Sourdough Bread, we start with a lively sourdough starter and then prepare the distinctive Hawaiian dough. Below are all the essential ingredients, including optional add-ins to enhance flavor and texture.
For the Sourdough Starter
We use this starter to give our bread its characteristic tang and rise. It must be active and bubbly for best results.
- 100g whole wheat flour
- 100g unbleached all-purpose flour
- 200g filtered water (room temperature)
- 50g mature sourdough starter (fed and active)
Tip: Feed your starter at least 4-6 hours before mixing the dough to ensure peak activity.
For the Hawaiian Dough
This dough combines the tang of sourdough with subtle Hawaiian sweetness and a soft chew.
| Ingredient | Amount | Preparation Notes |
|---|---|---|
| Unbleached all-purpose flour | 500g | Sifted |
| Active sourdough starter | 150g | From above starter mixture |
| Cane sugar or brown sugar | 80g | Adds gentle sweetness |
| Whole milk | 220ml | Warm (about 80°F) |
| Unsalted butter | 60g | Softened |
| Sea salt | 10g | Fine grind |
| Large eggs | 2 | Room temperature |
Optional Add-ins
To personalize our Hawaiian Sourdough Bread, we often like to incorporate subtle additions that complement its flavor profile.
- Macadamia nuts (chopped, ¼ cup) for crunch
- Dried pineapple bits (2 tbsp) for tropical sweetness
- Toasted coconut flakes (2 tbsp) for extra texture
- Vanilla extract (1 tsp) to enhance aroma
We recommend folding these add-ins gently into the dough after the first rise to maintain even distribution.
Equipment Needed
To bake our Hawaiian Sourdough Bread perfectly, having the right equipment is essential. Each tool plays a key role in ensuring the dough develops the ideal texture, rise, and flavor. Here’s what we need:
- Mixing Bowls: Use at least two large bowls for combining and fermenting the dough.
- Measuring Cups and Spoons: Precise measurement of flour, sugar, and liquids is crucial.
- Kitchen Scale (optional but recommended): For the most accurate ingredient amounts.
- Bench Scraper: Helps to handle the sticky sourdough and fold in any add-ins like macadamia nuts or coconut flakes.
- Proofing Basket or Bowl: We use this to give the dough structure during its final rise.
- Clean Kitchen Towel or Plastic Wrap: To cover the dough during fermentation and prevent drying.
- Dutch Oven or Baking Stone: We recommend a Dutch oven for the best crust development. If unavailable, a baking stone combined with a water pan works well.
- Oven Mitts: For safely handling hot equipment.
- Cooling Rack: Critical to let the bread cool evenly so it keeps its soft crumb and crust texture.
- Loaf Pan (optional): If you prefer standard bread shapes rather than freeform loaves.
- Sharp Bread Knife: For slicing our finished Hawaiian sourdough with precision.
| Equipment | Purpose | Notes |
|---|---|---|
| Mixing Bowls | Combine and ferment ingredients | Use non-reactive bowls |
| Measuring Cups/Spoons | Measure ingredients | Use for dry and liquid measures |
| Kitchen Scale | Accurate measurement | Enhances recipe consistency |
| Bench Scraper | Shape and handle dough | Essential for folding and mix-ins |
| Proofing Basket/Bowl | Support dough rise | Use floured banneton for best results |
| Cover (Towel/Plastic) | Maintain dough moisture | Keep dough protected during proof |
| Dutch Oven/Baking Stone | Bake loaf with ideal crust | Trap steam for crisp exterior |
| Oven Mitts | Safety equipment | Protect hands |
| Cooling Rack | Proper cooling | Prevents soggy crust |
| Loaf Pan (optional) | Shape loaf | Makes sandwich-ready loaves |
| Bread Knife | Slice bread | Serrated for clean cuts |
By assembling this equipment before we start, we set ourselves up for smooth preparation and baking of the Hawaiian sourdough. This ensures our bread achieves its signature soft crumb and slightly sweet flavor with the ideal crust.
Preparing the Sourdough Starter
To achieve the distinct tang and perfect rise in our Hawaiian sourdough bread, a well-fed and active sourdough starter is essential. Let’s dive into how we feed, activate, and know when our starter is ready for baking.
Feeding and Activating the Starter
Our sourdough starter is a living culture that requires regular feeding to stay healthy and vigorous. We start by discarding about half of the starter to maintain balance, then feeding it with fresh flour and water. For this recipe, we recommend using:
- 50 grams (about ¼ cup) unbleached all-purpose flour
- 50 grams (about ¼ cup) lukewarm water (75°F or 24°C)
Mix thoroughly until smooth and no dry flour remains. This ratio maintains the right hydration for our starter, ensuring it stays lively.
We let the mixture sit at room temperature (70°F to 75°F or 21°C to 24°C) for 4 to 6 hours. During this period, natural wild yeast and bacteria consume the flour’s sugars, producing bubbles and a slightly tangy aroma — signs our starter is becoming active and ready for baking.
Timing and Readiness Check
Knowing exactly when your sourdough starter is ready is key. Here are three essential indicators we rely on before incorporating it into our Hawaiian sourdough dough:
| Indicator | Description |
|---|---|
| Bubbly Texture | The starter should be full of small bubbles, signaling yeast activity. |
| Volume Rise | It should at least double in size within 4 to 6 hours after feeding. |
| Float Test | Drop a spoonful of starter into a bowl of water. If it floats, it’s aerated and ready. |
We find the float test to be a reliable, final check. A floating starter means our wild yeast is trapping enough gas for a strong rise, which contributes to the soft, chewy texture characteristic of Hawaiian sourdough bread.
Remember to feed your starter regularly if you plan to bake frequently. Keeping it active ensures consistent results every time we bake together.
Making the Hawaiian Dough
To create the signature Hawaiian sourdough bread, we focus on combining the right ingredients and techniques that develop its unique soft texture and subtle sweetness. Let’s break down the process step-by-step, starting with the mixing of ingredients.
Mixing Ingredients
We begin by combining our key components to create the base dough. Precise measurements ensure consistent results every time.
- Active sourdough starter (200g) — gives the dough its natural rise and tang
- Unbleached all-purpose flour (450g) — forms the structure and chewiness
- Whole milk (250ml, lukewarm) — adds moisture and richness
- Cane sugar or brown sugar (50g) — imparts the characteristic lightly sweet flavor
- Unsalted butter (60g, softened) — contributes to tenderness and softness
- Large eggs (2, room temperature) — bind ingredients and enrich dough
- Sea salt (10g) — balances sweetness and enhances flavor
We recommend mixing wet ingredients first: whisk the milk, active sourdough starter, eggs, and sugar in a large bowl. Gradually add the flour and salt, combining to form a shaggy dough. Finally, incorporate the softened butter, kneading it until fully absorbed.
Kneading the Dough
Kneading develops gluten which gives the dough elasticity and structure. Use the following techniques for optimal results:
| Step | Action | Duration/Notes |
|---|---|---|
| Initial knead | Fold dough over itself and press down | 5 minutes by hand or mixer speed 2 |
| Rest | Cover with a damp cloth | 20 minutes (autolyse phase) |
| Final knead | Resume kneading to develop smooth, elastic dough | 5–7 minutes |
We look for a dough that feels soft but slightly tacky, with a smooth surface that springs back when pressed lightly.
Adding Pineapple and Sweetness
To evoke Hawaiian flavors, we fold in special additions after the first rise, ensuring even distribution without damaging the dough’s gluten network.
- Dried pineapple bits (60g, finely chopped) — deliver fruity bursts
- Optional: toasted coconut flakes (30g) — add texture and aroma
- Optional: vanilla extract (1 tsp) — enhances sweetness and depth
Once the dough has doubled in size, gently stretch it out on a clean surface and sprinkle pineapple and coconut flakes. Fold the dough over and knead lightly just enough to distribute these mix-ins evenly.
Pro tip: Adding sweet ingredients after the initial ferment retains the dough’s rise while infusing flavor without disrupting the sourdough fermentation.
By following these steps, we set the stage for the next phase—proofing and baking our Hawaiian sourdough bread with its signature tender crumb and tropical sweetness.
First Rise (Bulk Fermentation)
The first rise, also known as bulk fermentation, is a crucial stage where our Hawaiian sourdough bread dough develops flavor, texture, and strength. During this time, natural yeast activity transforms the dough, creating those signature airy bubbles and subtle sweetness.
Ideal Conditions
To achieve the perfect bulk fermentation, we need to maintain an environment that promotes steady yeast activity and gluten development:
- Temperature: Keep the dough at 75°F to 80°F (24°C to 27°C). This encourages balanced fermentation without overproofing.
- Time: Plan for about 4 to 6 hours, depending on the ambient temperature and starter activity.
- Humidity: Moderate humidity helps prevent the dough crust from drying. Cover the dough with a clean, damp kitchen towel or plastic wrap.
- Container: Use a large, lightly oiled mixing bowl to allow the dough room to expand without sticking.
| Condition | Recommendation | Purpose |
|---|---|---|
| Temperature | 75°F to 80°F (24–27°C) | Optimal yeast fermentation rate |
| Time | 4 to 6 hours | Adequate flavor and gas buildup |
| Humidity | Moderate | Prevents crust formation |
| Container | Lightly oiled bowl | Allows dough expansion |
Signs of Proper Fermentation
Knowing when the bulk fermentation is done is essential. We look for clear indicators that the dough is ready for the next step, ensuring the right balance of flavor and structure:
- Volume Increase: The dough should expand to about 1.5 to 2 times its original size.
- Surface Texture: Look for a slightly domed and smooth surface with small bubbles forming under the dough skin.
- Poke Test: Gently press your finger about half an inch into the dough. It should slowly spring back but leave a slight indentation.
- Aromatic Scent: The dough emits a pleasant tangy aroma with subtle hints of sweetness, characteristic of Hawaiian sourdough.
“The bulk fermentation is where magic happens — the yeast wakes up, sugars convert, and our dough begins its tropical transformation.”
By monitoring these signs, we ensure our dough has fermented correctly and is ready to be shaped and enhanced with our tropical add-ins for that unique Hawaiian flavor.
Shaping the Dough
Shaping is a crucial step in our Hawaiian sourdough bread recipe. It sets the foundation for the final loaf’s structure, texture, and appearance. Let’s carefully shape the dough while preserving the delicate gluten network we’ve developed.
Forming the Loaf
- Prepare your work surface by lightly dusting it with flour. This prevents sticking without drying out the dough.
- Turn the dough onto the surface gently. Avoid deflating it too much to maintain the airy bubbles created during the first rise.
- Fold the dough edges inward toward the center. Use your fingertips to create surface tension by gently pulling the dough taut.
- Cup your hands around the dough and use a bench scraper to lift and rotate the dough in a circular motion, tightening it into a smooth, round shape.
- Pinch the seam on the bottom securely to hold the loaf’s form.
- Place the shaped dough seam-side up in a lightly floured proofing basket or bowl lined with a floured towel for the second rise.
We want a tight outer surface for good oven spring and a soft, pillowy crumb inside.
Incorporating Traditional Hawaiian Elements
To embrace the flavors unique to Hawaiian sourdough, we fold in the special add-ins at this stage:
| Ingredient | Quantity | Preparation |
|---|---|---|
| Dried pineapple bits | ½ cup | Chopped finely |
| Toasted coconut flakes | ⅓ cup | Lightly toasted until golden |
| Macadamia nuts | ¼ cup | Coarsely chopped |
| Vanilla extract | 1 tsp | Added directly to the dough |
How to incorporate:
- Gently flatten the dough after the first rise.
- Sprinkle the dried pineapple, coconut, and macadamia nuts evenly over the surface.
- Drizzle vanilla extract uniformly.
- Fold the dough over itself in thirds like a letter.
- Fold and stretch lightly to distribute the ingredients without tearing the dough.
- Let the dough rest for 10 minutes before proceeding with shaping as described above.
“Folding in the tropical add-ins this way protects the dough’s gluten network while infusing classic Hawaiian flavors throughout.”
This step ensures every slice bursts with the iconic taste and texture of Hawaiian sourdough bread.
Second Rise (Proofing)
The second rise, also known as proofing, is a critical step where the shaped Hawaiian sourdough dough relaxes and gains volume before baking. This stage ensures our bread develops its signature soft crumb and light texture.
Proofing Tips
- Maintain a Warm, Humid Environment: Keep the dough at 75°F to 80°F in a draft-free area. Cover it lightly with a damp cloth or plastic wrap to prevent drying.
- Use a Proofing Basket or Bowl: Place the shaped dough into a lightly floured proofing basket or a bowl lined with a floured kitchen towel to support its shape.
- Timing Is Key: The second rise usually takes between 1.5 to 2.5 hours but depends on room temperature and dough activity.
- Check for Visual Indicators: Look for a noticeable puffiness and slight increase in volume; the dough should feel slightly springy when gently poked.
- Avoid Over-proofing: If proofed too long, the dough will collapse, resulting in a dense loaf with poor oven spring.
“Proofing is where patience rewards us with the perfect Hawaiian sourdough texture and rise.“
| Proofing Factor | Ideal Condition | Notes |
|---|---|---|
| Temperature | 75°F – 80°F | Use a proofing box or a warm spot |
| Humidity | Moderate (cover dough) | Prevents skin from drying out |
| Duration | 1.5 – 2.5 hours | Varies with ambient conditions |
| Dough Appearance | Slightly puffed, springy | Avoid over-expansion and collapse |
When to Bake
- Perform the Poke Test: Gently press your finger about half an inch into the dough. If it springs back slowly and leaves a small indentation, it’s proofed correctly.
- Under-proofed dough will bounce back quickly, indicating it needs more time.
- Over-proofed dough will not spring back and might deflate easily.
- Preheat the Oven Thoroughly: Aim for a temperature of 425°F, and if using a Dutch oven, preheat it inside for optimal crust development.
- Score the Loaf: Right before baking, use a sharp knife or blade to slash the top. This allows controlled expansion and creates the Hawaiian sourdough’s classic crust.
- Bake Immediately: Transfer the proofed dough carefully to your baking surface or Dutch oven without delay for ideal oven spring and crust formation.
Baking the Bread
Baking Hawaiian Sourdough Bread requires precise control of oven settings and timing to develop its characteristic soft crumb and slightly sweet crust. Here we focus on the optimal temperature, baking duration, and methods that bring out the best in our loaf.
Oven Settings and Temperature
For Hawaiian Sourdough Bread, preheating your oven to 425°F ensures a strong initial oven spring and a golden crust. We highly recommend the following setup for consistent results:
- Use a Dutch oven or baking stone to simulate steam and retain heat.
- Place the Dutch oven or baking stone in the oven while preheating to reach uniform temperature.
- Scoring the dough before placing it in the oven influences controlled expansion.
“Proper oven temperature and setup are vital to lock in moisture and achieve that iconic soft yet chewy texture.”
| Step | Details |
|---|---|
| Oven Temperature | 425°F |
| Oven Equipment | Dutch oven or baking stone |
| Preheat Time | At least 30 minutes before baking |
| Scoring | Single long slash or traditional cross shape |
Baking Time and Techniques
Baking time influences both crumb texture and crust color. Follow this method for perfectly baked Hawaiian Sourdough Bread:
- Initial Bake (With Lid): Bake covered for the first 20 minutes to trap steam and promote oven spring.
- Uncover and Brown: Remove the lid and bake an additional 15 to 20 minutes until the crust turns a rich golden brown.
- Internal Temperature: Aim for an internal temperature of 205°F to 210°F to ensure the bread is fully baked.
Pro Tip: Use oven mitts to handle the Dutch oven safely and avoid sudden cooling of the baking environment — crucial for a crisp crust and chewy interior.
| Baking Phase | Duration | Description |
|---|---|---|
| Covered Bake | 20 minutes | Retain steam to maximize oven spring |
| Uncovered Bake | 15-20 minutes | Develop crust color and texture |
| Internal Temp Target | 205°F – 210°F | Ensures fully baked loaf |
Cooling and Storage
After baking, proper cooling and storage preserve the delicate balance of softness and moisture:
- Remove the loaf from the pan and place it on a cooling rack to allow air circulation.
- Cool completely at room temperature for at least 1 hour before slicing to set the crumb structure.
- Store in a cotton bread bag or loosely wrapped in parchment paper to maintain softness without trapping moisture.
- For longer storage, slice and freeze bread in an airtight bag; thaw at room temperature for best results.
| Cooling & Storage Step | Time / Method |
|---|---|
| Cooling | 1 hour on a wire rack at room temp |
| Short-Term Storage | Cotton bread bag or parchment wrap |
| Long-Term Storage | Freeze sliced in airtight bag |
Serving Suggestions
Serving Hawaiian sourdough bread in the best way enhances its unique flavor and soft, chewy texture. Here are some carefully crafted ideas to elevate your experience:
Classic Toast with Tropical Flair
- Slice the bread about ¾ inch thick for a perfect balance of texture and softness.
- Lightly toast until the edges brown slightly while the center retains softness.
- Spread with unsalted butter or coconut butter to complement the subtle sweetness.
- Add a drizzle of passion fruit jam or guava preserves for an extra burst of island flavor.
Savory Sandwiches with a Sweet Twist
- Use slices to build hearty sandwiches featuring ham, pineapple slices, and Swiss cheese for a Hawaiian-inspired grilled cheese.
- For a lighter option, layer avocado, smoked turkey, and fresh greens with a spread of mayonnaise infused with lime zest.
- Toast the assembled sandwich on a skillet over medium heat until golden on both sides and the cheese melts perfectly.
Sweet Treats and Desserts
- Transform the bread into tropical French toast by soaking slices in a mixture of eggs, whole milk, vanilla extract, and a pinch of cinnamon.
- Cook on a griddle until golden brown, then serve topped with toasted coconut flakes, fresh pineapple chunks, and a dusting of powdered sugar.
- Pair with a dollop of macadamia nut cream or a scoop of vanilla bean ice cream for an indulgent dessert.
Accompaniments to Enhance Every Bite
| Accompaniment | Suggested Use |
|---|---|
| Macadamia nuts | Add crunch in salads or sprinkle over toast |
| Hawaiian sea salt | Finish sandwiches or toast for a subtle salty contrast |
| Toasted coconut flakes | Garnish to amplify tropical flavors |
| Fresh pineapple slices | Serve on the side or incorporate into sandwiches |
| Vanilla bean honey | Drizzle for sweetness on buttered bread |
“The slightly sweet crust and soft crumb of our Hawaiian sourdough bread pair beautifully with both sweet and savory flavors, making it a versatile choice for any meal.”
Tips for Serving
- Always allow fresh loaves to cool completely on a wire rack before slicing to preserve texture.
- For best results, serve within 24 hours of baking or store properly to maintain softness.
- Reheat gently in a toaster oven or wrapped in foil at 300°F for 10 minutes to refresh by restoring softness and warmth.
By embracing these Serving Suggestions, we ensure every bite of our Hawaiian sourdough bread delights the senses with tropical sweetness, creamy richness, and a satisfying chew.
Conclusion
Baking Hawaiian sourdough bread brings a delightful blend of tangy and sweet flavors right into our kitchens. With the right starter, ingredients, and techniques, we can create a loaf that’s soft, chewy, and full of tropical charm. Whether enjoyed fresh or toasted, this bread adds a unique twist to everyday meals.
By following the steps carefully and embracing the Hawaiian-inspired add-ins, we ensure every bite captures the essence of the islands. It’s a rewarding baking experience that’s worth every moment spent nurturing the dough. Let’s keep exploring and sharing the joy of homemade Hawaiian sourdough bread.
Frequently Asked Questions
What makes Hawaiian sourdough bread different from traditional sourdough?
Hawaiian sourdough has a slightly sweet flavor and a soft, chewy texture due to ingredients like cane sugar, whole milk, and sometimes tropical add-ins like pineapple and coconut. This sets it apart from the tangier, denser traditional sourdough.
What are the essential ingredients for Hawaiian sourdough bread?
Key ingredients include an active sourdough starter, unbleached all-purpose flour, cane or brown sugar, whole milk, unsalted butter, sea salt, and large eggs. Optional add-ins are macadamia nuts, dried pineapple, toasted coconut, and vanilla extract.
How do I know when my sourdough starter is ready to use?
Your starter is ready when it’s bubbly, has doubled in size, and passes the float test (a small spoonful floats in water). This indicates it’s well aerated and active for baking.
What equipment do I need to bake Hawaiian sourdough bread?
Basic tools include mixing bowls, measuring cups and spoons, a kitchen scale, bench scraper, proofing basket or bowl, Dutch oven or baking stone, oven mitts, cooling rack, and a sharp bread knife.
How long should the first rise (bulk fermentation) last?
The first rise typically takes 4 to 6 hours at 75°F to 80°F until the dough doubles in volume, becomes bubbly, and passes the poke test by springing back gently.
When should I add tropical flavors like pineapple and coconut to the dough?
Fold in add-ins like dried pineapple, toasted coconut flakes, or vanilla extract after the first rise to evenly distribute flavors without weakening the gluten structure.
What is the ideal temperature and bake time for Hawaiian sourdough bread?
Preheat the oven to 425°F. Bake covered (in a Dutch oven) for 20 minutes to capture steam, then uncovered for 15 to 20 minutes until golden brown. The internal temperature should reach 205°F to 210°F.
How should I cool and store Hawaiian sourdough bread?
Cool the loaf on a wire rack for at least one hour before slicing. Store in a cotton bread bag or loosely in parchment paper for short term. For longer storage, slice and freeze in an airtight bag.
Can Hawaiian sourdough bread be used for sandwiches?
Yes, its soft crumb and slight sweetness make it perfect for savory and sweet sandwiches, adding a tropical twist to your favorite fillings.
What are some serving suggestions for Hawaiian sourdough bread?
Try it toasted with butter and jam, as a base for tropical French toast, or paired with macadamia nuts, Hawaiian sea salt, or fresh pineapple for a delicious treat.