
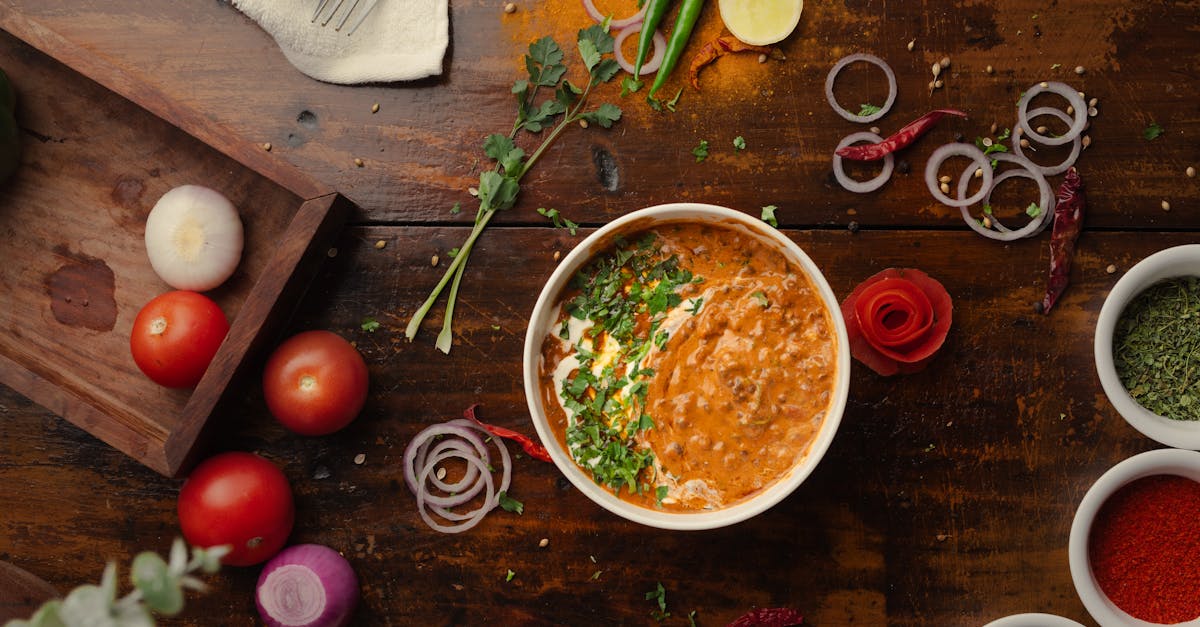
There’s something truly comforting about a hearty bowl of chili, and our Gunsmoke Chili Recipe takes that comfort to a whole new level. Inspired by the rugged spirit of the Old West, this chili packs bold smoky flavors with just the right amount of heat. It’s the perfect dish for cozy nights or gatherings where you want to impress without fuss.
We’ve crafted this recipe to balance smoky spices, tender meat, and rich beans, creating a chili that’s both satisfying and packed with character. Whether you’re a chili veteran or trying it for the first time, this Gunsmoke Chili will quickly become a favorite in your recipe collection. Let’s dive into making a chili that’s as bold and unforgettable as the name suggests.
Ingredients
To craft the bold and smoky Gunsmoke Chili, we carefully select each ingredient for maximum flavor and balance. Here’s everything we need to bring this hearty chili to life.
Meat and Protein
- 1 ½ pounds ground beef (preferably chuck for rich flavor)
- 1 pound smoked sausage, sliced (adds a robust smoky depth)
- 4 oz bacon, chopped (for a crispy, savory boost)
Vegetables and Aromatics
- 1 large onion, finely chopped
- 3 cloves garlic, minced
- 1 green bell pepper, diced
- 1 red bell pepper, diced
- 2 jalapeños, seeded and chopped (optional, for heat)
Beans and Legumes
- 2 cans (15 oz each) kidney beans, drained and rinsed
- 1 can (15 oz) pinto beans, drained and rinsed
Spices and Seasonings
| Spice | Quantity | Purpose |
|---|---|---|
| Chili powder | 3 tablespoons | Base chili flavor |
| Smoked paprika | 2 teaspoons | Enhance smoky aroma |
| Ground cumin | 2 teaspoons | Earthy warmth |
| Dried oregano | 1 teaspoon | Herbal brightness |
| Cayenne pepper | ½ teaspoon | Adds heat |
| Salt | 1 ½ teaspoons | Balances and enhances flavors |
| Black pepper | 1 teaspoon | Depth and subtle heat |
Liquids and Broths
- 1 can (14.5 oz) diced tomatoes, with juices
- 1 cup beef broth (preferably low sodium)
- 2 tablespoons tomato paste (for rich thickness)
- 2 teaspoons Worcestershire sauce (boosts umami)
Each ingredient plays an important role in building the complex Gunsmoke Chili profile we love—smoky, hearty, and perfectly spiced. Let’s move next to the step-by-step preparation.
Equipment Needed
To prepare the Gunsmoke Chili Recipe perfectly, having the right equipment ready is essential. This ensures smooth cooking and helps develop the bold smoky flavors we aim for.
Essential Cookware and Tools
- Large Dutch Oven or Heavy-Bottomed Pot
Ideal for even heat distribution and slow simmering the chili to meld all the flavors.
- Chef’s Knife
For dicing onions, bell peppers, and chopping garlic finely.
- Cutting Board
A sturdy surface to prep all vegetables and meats safely.
- Wooden Spoon or Heat-Resistant Spatula
To stir the chili consistently without scratching the pot.
Additional Useful Equipment
- Measuring Cups and Spoons
Precision is key to balance spices like chili powder and smoked paprika.
- Colander
To rinse kidney and pinto beans before adding them to the pot.
- Can Opener
For accessing the diced tomatoes and other canned ingredients quickly.
- Ladle
For serving the chili with ease.
| Equipment | Purpose |
|---|---|
| Dutch oven or heavy pot | Main cooking vessel for chili |
| Chef’s knife | Vegetable and meat preparation |
| Cutting board | Safe prep surface |
| Wooden spoon | Stirring the chili without damage |
| Measuring cups/spoons | Accurate spice and liquid portions |
| Colander | Rinsing beans |
| Can opener | Opening canned ingredients |
| Ladle | Serving the finished chili |
With this setup, we ensure every stage of making our Gunsmoke Chili goes as smoothly as expected, helping us develop its hearty smoky profile deeply and thoroughly.
Prep Work
Before we start simmering our Gunsmoke Chili, preparing the ingredients properly ensures the flavors meld perfectly and the cooking process flows smoothly.
Preparing the Meat
We begin by handling the proteins that form the base of our Gunsmoke Chili—ground beef, smoked sausage, and bacon. Here’s how to prep them:
- Ground Beef: Use 1 ½ pounds of ground beef. Pat it dry with paper towels if needed to reduce moisture for better browning.
- Smoked Sausage: Slice into ½-inch thick rounds to release smoky flavor quickly.
- Bacon: Chop the bacon into small pieces, about ¼ inch, to render evenly and infuse the chili with smoky richness.
Handling the meat in this way sets the foundation for the chili’s bold, smoky taste we aim to achieve.
Chopping Vegetables
Next, we prepare the aromatic vegetables that build depth in the chili:
- Onions: Dice medium-sized onion finely for even caramelization.
- Garlic: Mince 3–4 cloves to release their pungent aroma.
- Bell Peppers: Chop 1 each of red and green bell pepper into small cubes about ¼ inch wide.
Uniform chopping ensures that the vegetables cook evenly and blend harmoniously, enhancing the texture and flavor of our Gunsmoke Chili.
Measuring Spices
Precision in measuring spices is crucial to balance the smoky intensity without overwhelming the dish. We recommend the following blend for our recipe:
| Spice | Amount |
|---|---|
| Chili Powder | 2 tablespoons |
| Smoked Paprika | 1 tablespoon |
| Ground Cumin | 1 teaspoon |
| Dried Oregano | 1 teaspoon |
| Cayenne Pepper | ½ teaspoon |
| Salt | 1 ½ teaspoons |
| Black Pepper | 1 teaspoon |
Quotes to remember:
“The perfect spice blend is the heart of any great chili.” Measuring spices before cooking lets us adjust flavors carefully, keeping our Gunsmoke Chili bold but balanced.
By completing these prep steps thoughtfully, we’re ready to build the distinctive, smoky layers that make our chili unforgettable.
Cooking Instructions
Follow these precise steps to bring out the bold smoky flavors and hearty richness of our Gunsmoke Chili Recipe. Each phase builds flavor and texture, resulting in a chili that’s deeply satisfying.
Browning the Meat
- Heat 2 tablespoons of oil in a large Dutch oven over medium-high heat.
- Add 1 ½ pounds of ground beef, breaking it apart with a wooden spoon.
- Cook until meat is well browned and no longer pink, about 7-8 minutes. This step seals in flavor and creates a rich, caramelized base.
- Remove the browned beef with a slotted spoon and set aside.
- In the same pot, add chopped smoked sausage and bacon. Cook until browned and fragrant, about 5 minutes.
- Drain excess fat if the pot becomes too greasy, leaving just enough to sauté vegetables.
Sautéing Vegetables
- Add 1 diced onion, 2 minced garlic cloves, and 1 diced bell pepper to the pot.
- Sauté over medium heat until vegetables soften and become translucent, about 5-6 minutes.
- Stir frequently with a heat-resistant spatula to prevent sticking and to build a smoky foundation.
Adding Spices and Simmering
- Sprinkle in the spice mix evenly over the vegetables and meat. Use the following blend:
| Spice | Amount |
|---|---|
| Chili Powder | 3 tablespoons |
| Smoked Paprika | 2 teaspoons |
| Ground Cumin | 1 teaspoon |
| Dried Oregano | 1 teaspoon |
| Cayenne Pepper | ¼ teaspoon |
| Salt | 1 teaspoon |
| Black Pepper | ½ teaspoon |
- Stir well to coat all ingredients, releasing the aromas.
- Cook the spices with the mixture for 2 minutes to bloom and intensify flavors.
Incorporating Beans and Liquids
- Return the browned ground beef, smoked sausage, and bacon to the pot.
- Add 1 can (15 oz) diced tomatoes with juice, 1 can (15 oz) kidney beans, and 1 can (15 oz) pinto beans—rinsed and drained.
- Pour in 2 cups of beef broth to create a rich cooking liquid.
- Stir thoroughly to combine all elements.
Slow Cooking for Flavor Development
- Bring the chili to a gentle boil.
- Reduce heat to low, cover with a lid slightly ajar to allow steam escape.
- Simmer gently for 1 ½ to 2 hours, stirring occasionally to prevent sticking.
- This slow simmer melds smoky, spicy, and savory notes into a deeply flavorful chili.
“Slow cooking is the secret to making our Gunsmoke Chili so tender and richly aromatic.”
By following these cooking instructions carefully, we ensure every spoonful delivers smoky warmth and hearty satisfaction.
Serving Suggestions
To fully enjoy our Gunsmoke Chili Recipe, pairing it with the right sides and toppings enhances its smoky richness and hearty texture. Here are our favorite ways to serve this bold classic.
Traditional Accompaniments
We recommend complementing the Gunsmoke Chili with these classic sides to balance its deep smoky flavors and add contrasting textures:
- Cornbread: Warm, buttery cornbread soaks up every bit of chili juice, adding a slightly sweet contrast.
- Tortilla Chips: Crisp and salty chips offer a satisfying crunch and a perfect scoop for chili bites.
- Steamed White Rice: Mild and fluffy rice tames the bold spices while adding fullness to the meal.
- Coleslaw: A cool, crisp coleslaw provides refreshing textural balance and a subtle tang.
- Pickled Jalapeños: For those who like heat, these introduce a vinegary bite that cuts through the richness.
| Accompaniment | Flavor Profile | Purpose |
|---|---|---|
| Cornbread | Sweet, buttery | Soaks chili juices |
| Tortilla Chips | Salty, crunchy | Scooping and crunch contrast |
| Steamed White Rice | Mild, fluffy | Balances heat and spice |
| Coleslaw | Crisp, tangy | Refreshes palate |
| Pickled Jalapeños | Spicy, vinegary | Adds heat and sharp acidity |
Optional Toppings
Toppings turn our Gunsmoke Chili into a personalized feast of textures and flavors. We suggest these to elevate each bowl:
- Shredded Cheddar Cheese: Melts into the chili for gooey richness and a sharp flavor pop.
- Sour Cream: Adds creamy coolness that tempers the smoky heat and spices.
- Chopped Green Onions: Deliver fresh, crisp notes and a mild onion bite.
- Fresh Cilantro: Offers an herbaceous brightness that lifts the deep flavors.
- Diced Avocado: Adds buttery smoothness and a cooling effect.
- Hot Sauce: Perfect for those who want extra kick and complexity.
“A well-chosen topping can transform every bite of our Gunsmoke Chili into a new experience.“
We encourage mixing and matching these accompaniments and toppings to tailor the chili experience to your taste buds and occasion.
Make-Ahead Tips
Preparing the Gunsmoke Chili in advance not only saves time but also allows the bold smoky flavors to intensify. Here are our top make-ahead strategies to ensure your chili tastes even better the next day.
Refrigeration
After cooking, allow the chili to cool slightly. Transfer it to an airtight container and refrigerate for up to 3 days. This resting period lets the spices meld deeply, enriching the smoky profile.
| Step | Instruction | Timeframe |
|---|---|---|
| Cool chili | Let it reach room temperature | 20-30 mins |
| Store | Use airtight container in fridge | Up to 3 days |
| Reheat | Warm on stovetop or microwave | 5-10 mins |
“Chili flavors improve with time; chilling it overnight is the secret behind the complex taste of our Gunsmoke Chili.”
Freezing
For longer storage, portion the chili into freezer-safe containers or heavy-duty freezer bags. Label with the date to keep track. The chili freezes well for up to 3 months without losing its smoky character.
| Step | Instruction | Timeframe |
|---|---|---|
| Cool chili | Completely cool before freezing | 1 hour |
| Package | Use freezer-safe containers or bags | Up to 3 months |
| Thaw | Overnight in refrigerator | 12-24 hours |
| Reheat | Simmer gently on stovetop | 10-15 minutes |
Tips for Reheating
- Reheat over medium-low heat, stirring occasionally to prevent sticking.
- Add a splash of beef broth if chili thickens too much.
- For a fresh taste boost, add a pinch of smoked paprika or fresh toppings after reheating.
Prepping Ingredients Ahead
To streamline your cooking day, chop onions, garlic, and bell peppers in advance, storing them in separate airtight containers for up to 24 hours in the fridge.
Summary Table of Make-Ahead Storage
| Storage Method | Maximum Storage Time | Best Practice |
|---|---|---|
| Refrigeration | 3 days | Airtight container, cool before storing |
| Freezing | 3 months | Portion before freezing, thaw overnight |
| Prepped Vegetables | 24 hours | Store in airtight containers |
By following these Make-Ahead Tips, we ensure our Gunsmoke Chili remains rich, smoky, and ready to warm up any evening with minimal effort.
Storing and Reheating Leftovers
Proper storing and reheating of our Gunsmoke Chili leftovers ensures we preserve its bold smoky flavors and hearty texture for future meals. Follow these clear steps to keep our chili tasting just as good as when first served.
Cooling and Storing
- Allow the chili to cool completely at room temperature, but no longer than 2 hours to prevent bacterial growth.
- Transfer the chili into airtight containers or heavy-duty freezer bags for optimal freshness.
- Label containers with the date to keep track of storage time.
| Storage Method | Temperature | Duration |
|---|---|---|
| Refrigerator | 35°F to 40°F (2°C to 4°C) | Up to 3 days |
| Freezer | 0°F (-18°C) | Up to 3 months |
Reheating Instructions
To maintain the Gunsmoke Chili’s deep smoky richness and hearty consistency, reheat carefully:
- Stovetop Reheating:
- Place the chili in a saucepan.
- Reheat over medium-low heat, stirring frequently.
- Add a splash of beef broth or water if the chili looks too thick.
- Heat until simmering and thoroughly warmed, about 5–10 minutes.
- Microwave Reheating:
- Transfer a portion to a microwave-safe bowl.
- Cover loosely to avoid splatters.
- Heat on medium power in 1-minute increments.
- Stir after each interval until heated evenly.
Pro Tip: Avoid overheating which can dry out the chili and dull its flavors. Reheat just until steaming hot for the best experience.
Freezing Tips for Long-Term Storage
- Portion the chili into single or family-sized servings before freezing to make reheating easier.
- Use vacuum-sealed bags or remove as much air as possible to minimize freezer burn.
- Freeze flat to save space and promote quick thawing.
Thawing Guidelines
- Transfer frozen chili to the refrigerator and allow to thaw overnight.
- For faster thawing, place the sealed bag in a bowl of cold water, changing water every 30 minutes until thawed.
- Avoid thawing at room temperature to maintain food safety.
By following these steps for storing and reheating our Gunsmoke Chili, we ensure every serving delivers that authentic taste and warmth reminiscent of the Old West each time we enjoy it.
Conclusion
The Gunsmoke Chili Recipe brings together bold smoky flavors and hearty ingredients that make every bite memorable. Whether you’re cooking for a cozy night in or a lively gathering, this chili stands out with its rich, satisfying taste.
With the right prep, cooking techniques, and serving ideas, this recipe promises to become a staple in our kitchens. It’s not just a meal—it’s an experience that captures the spirit of the Old West in every spoonful. Let’s enjoy the warmth and depth of this classic chili any time we crave something truly comforting.
Frequently Asked Questions
What is the Gunsmoke Chili recipe inspired by?
The Gunsmoke Chili recipe is inspired by the bold, smoky flavors and comforting qualities of the Old West, designed to deliver a hearty, satisfying meal.
What are the main protein ingredients in Gunsmoke Chili?
It includes ground beef, smoked sausage, and bacon to create a rich, smoky, and filling base.
Which vegetables are used in this chili recipe?
Onions, garlic, and bell peppers are used for aroma and flavor balance.
What spices are essential for the Gunsmoke Chili?
A blend of chili powder, smoked paprika, cumin, oregano, cayenne pepper, salt, and black pepper creates the signature smoky taste.
What equipment do I need to cook this chili?
Essential tools include a large Dutch oven, chef’s knife, cutting board, wooden spoon or spatula, measuring cups/spoons, colander, can opener, and ladle.
How long should I cook the chili for the best flavor?
Simmer the chili slowly for 1 ½ to 2 hours to allow flavors to meld perfectly.
What are some recommended sides to serve with Gunsmoke Chili?
Cornbread, tortilla chips, steamed white rice, coleslaw, and pickled jalapeños complement the chili well.
Can I add toppings to enhance the chili?
Yes! Popular toppings include shredded cheddar, sour cream, green onions, cilantro, avocado, and hot sauce.
Is it possible to make Gunsmoke Chili ahead of time?
Yes, it tastes even better when made ahead. You can refrigerate for up to 3 days or freeze for up to 3 months.
How should leftovers be stored and reheated?
Store leftovers in airtight containers. Reheat on the stovetop or microwave, thawing frozen chili safely before warming.
What prep work is important for this chili?
Uniformly chop vegetables, properly cook proteins for smoky flavor, and measure spices accurately for balanced seasoning.