
Ginger beer has been a beloved refreshing drink for centuries, known for its bold spicy kick and natural fizz. Making our own ginger beer lets us control the flavors and sweetness while enjoying a homemade beverage that’s perfect for gatherings or everyday refreshment.
This recipe is designed to produce 20 liters of ginger beer, making it ideal for parties or stocking up for the warmer months. With just a few simple ingredients and some patience, we can create a deliciously fizzy drink that rivals store-bought versions.
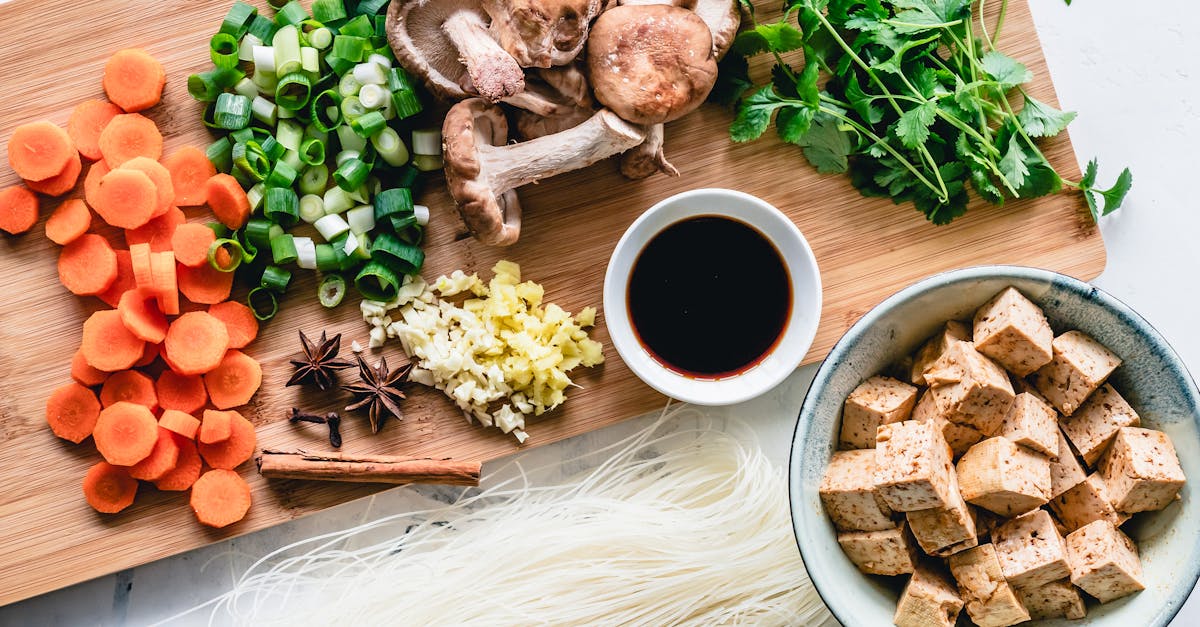
Ingredients for Ginger Beer Recipe 20 Litres
To craft the perfect batch of ginger beer yielding 20 liters of vibrant and zesty refreshment, we carefully select ingredients that balance natural spice, sweetness, and carbonation. Each element plays a crucial role in developing the signature bold ginger flavor and natural fizz.
Here is the detailed list of ingredients with precise measurements and preparation notes to ensure consistent results:
| Ingredient | Quantity | Preparation Notes |
|---|---|---|
| Fresh ginger root | 400 grams | Peeled and finely grated |
| Granulated sugar | 3 kilograms | Provides sweetness and fermentation fuel |
| Lemon juice | 500 milliliters | Freshly squeezed for acidity |
| Water | 20 liters | Filtered or boiled and cooled |
| Active dry yeast | 5 grams | To initiate natural fermentation |
| Cream of tartar (optional) | 2 teaspoons | Helps control fermentation, optional |
Key points:
- We always use fresh ginger root for an authentic spicy kick that defines our ginger beer.
- The large quantity of granulated sugar not only sweetens but also feeds the yeast during fermentation, creating the natural fizz.
- Lemon juice balances sweetness with a bright acidic note, enhancing the overall flavor profile.
- Using filtered or boiled water ensures purity and optimal fermentation environment.
- A small amount of active dry yeast kickstarts the carbonation process; cleanliness and accuracy in measuring yeast are essential.
- Cream of tartar stabilizes carbonation but is optional depending on your preference for fermentation control.
Keep these ingredients ready and measured well in advance so the brewing process flows smoothly. Our precise balance ensures a robust ginger beer with crisp bubbles and lasting zing, perfect for sharing or storing.
Equipment Needed
To craft our 20 liters of homemade ginger beer, having the right equipment ensures a smooth and successful fermentation process. Below we detail the essential tools for creating the perfect spicy and fizzy brew.
Fermentation Vessel
We need a large food-grade fermentation vessel that can comfortably hold at least 25 liters to allow for expansion during fermentation. A wide-mouth plastic or glass fermenter with an airtight lid is ideal. This vessel will house our mixture as it transforms into sparkling ginger beer. It’s important the fermenter is non-reactive to prevent any off-flavors or contamination.
Bottles and Caps
For storing and carbonating the ginger beer, we require durable bottles designed for pressure, such as:
- Plastic PET bottles (recyclable and less prone to bursting)
- Glass bottles with crown caps or swing-top seals
Using strong bottles can withstand the pressure generated by natural fermentation. We recommend bottles with a capacity of 500ml to 1 liter for easy handling and serving. Properly sealing the bottles is crucial to trap the fizz.
| Bottle Type | Pros | Cons |
|---|---|---|
| Plastic PET | Lightweight, safe, reusable | Can slightly soften under heat |
| Glass (Crown Cap) | Preserves flavor, reusable | Fragile, heavier |
| Swing-top Glass | Easy to open, reusable | More expensive |
Measuring Tools
Precision is key in brewing quality ginger beer. We suggest the following measuring tools:
- Kitchen scale for weighing ginger root and sugar (accurate to grams)
- Measuring jug or graduated cylinder for liquids like lemon juice and water (measures in milliliters)
- Teaspoon and tablespoon sets for small quantity ingredients such as yeast and cream of tartar
Accurate measurements help maintain the balance of flavors and ensure consistent carbonation.
Sanitizing Supplies
Sanitization prevents unwanted bacteria from spoiling our brew. We rely on:
- Food-safe sanitizer (e.g., Star San or a diluted bleach solution)
- Clean cloths or brushes for scrubbing equipment
- Gloves to keep hands clean during preparation
We always sanitize every piece of equipment in contact with the ingredients before starting to guarantee a clean fermentation environment and a crisp final product.
Preparation Steps
Following the recipe precisely ensures our ginger beer develops the perfect balance of spice, sweetness, and fizz. Let’s dive into each step carefully to create a refreshing 20-liter batch.
Preparing the Ginger Base
- Peel and finely grate 400 grams of fresh ginger root. The finer the grate the more ginger essence we extract.
- Place the grated ginger in a large non-reactive container suitable for 20 liters.
- Add 3 kilograms of granulated sugar directly onto the ginger.
- Pour in 500 milliliters of freshly squeezed lemon juice to brighten the flavor and balance the sweetness.
- Stir the mixture to combine the ginger, sugar, and lemon juice thoroughly.
The ginger base is the heart of our recipe; its bold character shapes the final taste profile.
Boiling the Mixture
- Bring 20 liters of filtered or boiled water to a rolling boil in a large pot or kettle.
- Carefully pour the hot water over the ginger-sugar-lemon base in the fermentation vessel.
- If using, add 2 teaspoons of cream of tartar now. This will help stabilize the carbonation during fermentation.
- Stir the entire mixture thoroughly to dissolve the sugar and release the essential oils from the ginger.
| Step | Ingredient | Amount | Purpose |
|---|---|---|---|
| Initial dissolve | Granulated sugar | 3 kg | Sweetness and fermentation fuel |
| Flavor balance | Lemon juice (fresh) | 500 ml | Acidity and brightness |
| Carbonation control | Cream of tartar (optional) | 2 teaspoons | Stabilizes carbonation |
| Main solvent | Filtered or boiled water | 20 liters | Dilutes and creates the liquid base |
Cooling and Adding Yeast
- Allow the hot mixture to cool to a temperature between 25°C to 30°C (77°F to 86°F). This is critical to avoid killing the yeast.
- Once cooled, add 5 grams of active dry yeast evenly over the surface.
- Stir gently to incorporate the yeast but avoid vigorous mixing which can introduce unwanted oxygen.
- Seal the fermentation vessel loosely to allow gases to escape yet prevent contaminants from entering.
“Proper cooling and yeast addition are key to achieving lively fermentation and the desired natural fizz.”
By carefully managing temperature and introducing yeast correctly, we set the stage for a robust fermentation that transforms our ginger beer recipe for 20 liters into a sparkling, flavorful treat.
Brewing Process
To craft our 20 liters of ginger beer, we must keenly follow each step to ensure a perfect balance of flavor and natural carbonation. The brewing process centers around controlled fermentation to develop that classic spicy fizz we all enjoy.
Primary Fermentation
We begin by pouring our ginger, sugar, lemon juice, and cream of tartar mixture into a large, sanitized fermentation vessel. Next, we add the 20 liters of boiled and cooled water, ensuring the temperature is between 20°C to 25°C (68°F to 77°F). This range is critical to prevent killing the yeast or slowing fermentation excessively.
Once the mixture cools to this ideal temperature, we sprinkle 5 grams of active dry yeast evenly over the surface. We do not stir at this point to allow yeast to activate naturally. After about 10 minutes, when the yeast starts to foam lightly at the top, we gently stir to incorporate it throughout the liquid. Then, we seal the vessel with an airlock or loose lid to allow gas escape but prevent contamination.
This stage takes 24 to 48 hours depending on room temperature and yeast activity. During this time, yeast consumes sugar producing alcohol and carbon dioxide, creating natural carbonation and the distinctive tangy flavor.
| Step | Details |
|---|---|
| Temperature | 20°C to 25°C (68°F to 77°F) |
| Yeast | 5 grams active dry yeast |
| Fermentation Duration | 24 to 48 hours |
| Vessel | Large, sanitized, airlock fitted |
Monitoring Fermentation
During primary fermentation, it’s essential to monitor the bubbling activity through the airlock or lid. Vigorous bubbling indicates active yeast at work. When the bubbling slows significantly or stops, fermentation is near completion.
We also check the mixture daily for aroma and clarity. A faint yeasty, gingery aroma signals healthy fermentation, while off-smells may indicate contamination and require discarding the batch.
After 48 hours or when activity ceases, we prepare to transfer the ginger beer into bottles. This step must be done carefully to avoid introducing oxygen, which can spoil the flavor.
Our careful control during the Brewing Process ensures our 20 liters of ginger beer attain bright, crisp bubbles with a perfectly balanced spicy taste.
Bottling Instructions
Bottling our homemade ginger beer carefully is essential to preserve its natural fizz and vibrant spicy flavor. Let’s ensure every step creates a crisp and refreshing beverage ready to enjoy.
Preparing Bottles
Before we bottle, we must use properly sanitized bottles designed to withstand pressure such as PET plastic bottles or glass bottles with crown caps or swing-top seals. Here’s how to prepare them:
- Clean thoroughly with warm water and mild detergent.
- Rinse well to remove any residues.
- Sanitize by soaking in a solution of 1 tablespoon of unscented bleach per gallon of water or using a food-safe sanitizer for at least 10 minutes.
- Air dry on a clean rack, avoiding contact with contaminants.
| Bottle Type | Recommended Capacity | Suitable for Pressure | Reusability |
|---|---|---|---|
| PET Plastic Bottles | 500 ml to 2 L | Yes | Multiple uses |
| Glass Bottles with Caps | 330 ml to 1 L | Yes | Multiple uses (check seals) |
| Swing-Top Glass Bottles | 500 ml to 1 L | Yes | Multiple uses |
Safety Tip: Never reuse damaged bottles or caps to avoid breakage or leakage under pressure.
Transferring Ginger Beer to Bottles
Once our fermentation completes within 24 to 48 hours with the perfect balance of fizz and flavor, we gently transfer the ginger beer:
- Prepare a clean workspace and sanitize all tools including funnels and siphons.
- Use a siphon or ladle to transfer the liquid carefully to avoid disturbing sediment.
- Leave approximately 2-3 cm (1 inch) of headspace at the top of each bottle to allow for carbonation expansion.
- Avoid splashing or introducing air that could impact taste or carbonation.
“Slow and steady transfer preserves the essence of our ginger beer’s spicy kick and sparkle.”
Sealing and Storing
After filling, sealing our bottles correctly is critical to retain carbonation and prevent contamination:
- For crown caps or swing-tops, ensure a tight seal by pressing firmly or snapping the cap securely.
- For PET bottles, screw caps on snugly but not overly tight, allowing for pressure build-up.
Store bottles in a cool dark place between 18°C and 22°C (64°F to 72°F) to gently carbonate further.
| Storage Condition | Purpose | Duration |
|---|---|---|
| Cool, dark environment | Prevent heat damage and maintain flavor | 24 to 48 hours for secondary carbonation |
| Refrigeration | Stop fermentation and extend shelf life | After carbonation completes |
Reminder: Refrigerate bottles once desired carbonation is reached to slow fermentation and avoid over-pressurization.
By following these Bottling Instructions carefully, our 20-liter batch of ginger beer will maintain its crisp bubbles and balanced spicy flavors for a delightful drink every time.
Carbonation and Maturation
Achieving the perfect carbonation and allowing proper maturation are crucial steps in crafting our 20-liter batch of homemade ginger beer. This phase ensures our beverage holds that signature spicy fizz and fully developed flavor profile.
Checking Carbonation Levels
We carefully monitor carbonation by observing the pressure buildup within our bottles. Because carbonation results from carbon dioxide produced by yeast during fermentation, the key indicators include:
- Bottle firmness: Gently squeeze plastic bottles; they should feel firm but not overly hard.
- Fizz test: Open a bottle cautiously after 24-48 hours to check for a satisfying pop and effervescent bubbles.
- Visual cues: Look for lively bubbles rising in the liquid once poured.
It is vital to avoid excessive pressure buildup. Below is a guide to approximate carbonation expectations based on fermentation duration and temperature:
| Fermentation Duration (hours) | Temperature (°C) | Expected Carbonation Level |
|---|---|---|
| 24 | 20-22 | Mild fizz; light carbonation |
| 36 | 22-24 | Medium fizz; balanced carbonation |
| 48 | 24-25 | Full fizz; strong carbonation |
If carbonation seems low, allow more maturation time; if excessive pressure is detected, refrigerate immediately to slow yeast activity and prevent bottle bursting.
Ideal Maturation Time
Maturation allows flavors to mellow and carbonation to stabilize. We recommend the following timeline under ideal conditions:
- Primary Maturation: 24 to 48 hours at 20°C to 25°C (68°F to 77°F).
- Secondary Maturation: After bottling, store bottles in a cool, dark place (around 15°C or 59°F) for an additional 3 to 5 days.
- Refrigeration: Chill bottles at or below 4°C (39°F) once desired carbonation is reached to halt fermentation.
This controlled maturation process ensures our ginger beer achieves:
- Enhanced depth of spicy ginger flavor.
- Crisp, persistent carbonation that invigorates every sip.
- A balanced profile without overly sharp yeast or alcohol notes.
Serving Suggestions
Enjoying our homemade ginger beer at its best means pairing it thoughtfully and serving it with care. Here are some top serving suggestions to elevate your experience with this refreshing, spicy drink.
1. Serve Ice-Cold for Maximum Refreshment
Always chill the ginger beer thoroughly before serving. Pour it over plenty of ice cubes to enhance the crisp and invigorating sensation. The cold temperature sharpens the zesty ginger flavor and lively carbonation.
2. Garnish with Fresh Ingredients
Add visual appeal and extra aroma with simple garnishes. Consider these options:
- Thin slices of fresh lemon or lime
- A sprig of fresh mint or rosemary
- Thinly sliced fresh ginger for an extra zing
These touches complement the natural citrus and spicy tones in the ginger beer.
3. Pair with Bold, Spicy Foods
Our ginger beer’s robust flavor stands up beautifully to spicy cuisine such as:
- Grilled jerk chicken
- Spicy tacos or burritos
- Asian dishes with chili or curry
This pairing balances heat with sweetness and fizz making meals more memorable.
4. Use as a Mixer for Cocktails
Take advantage of the natural fizz and ginger kick by using your homemade ginger beer in classic cocktails or mocktails. Great options include:
| Cocktail Name | Ingredients Summary | Notes |
|---|---|---|
| Moscow Mule | Vodka, lime juice, ginger beer | Served in copper mugs |
| Dark ‘n’ Stormy | Dark rum, lime juice, ginger beer | Bold and refreshing |
| Ginger Beer Lemonade | Ginger beer, fresh lemon juice, mint | Non-alcoholic summer cooler |
5. Offer in Decorative Glassware
Presentation matters. Serve ginger beer in tall glasses or mason jars for an inviting look. Adding a reusable straw enhances the drinking experience.
Quick Table: Optimal Serving Temperature & Garnish Ideas
| Serving Tip | Description |
|---|---|
| Temperature | 4°–7°C (39°–45°F), served cold |
| Ice | Plenty to preserve chill and fizz |
| Garnish Options | Lemon, lime, fresh ginger slices, mint, rosemary |
| Glassware | Tall glasses, mason jars, copper mugs for cocktails |
By following these Serving Suggestions we ensure each glass of our homemade ginger beer delivers that perfect blend of spice, sparkle, and refreshment every time.
Storage and Shelf Life
Proper storage is essential to maintain the vibrant flavors and natural carbonation of our homemade ginger beer when preparing a large 20-liter batch. Here are the key steps and guidelines to ensure the best quality and longest shelf life for our refreshing drink.
Ideal Storage Conditions
- Store bottles in a cool, dark place with a stable temperature between 10°C to 15°C (50°F to 59°F). This temperature range slows down fermentation and prevents spoilage.
- Avoid exposure to direct sunlight or heat sources as these can degrade flavors and cause excessive pressure build-up.
- Once desired carbonation is reached, refrigerate bottles at 4°C (39°F) to effectively halt fermentation and preserve freshness.
Recommended Storage Duration
The shelf life of our 20 liters ginger beer depends on storage conditions and bottling precision. Below is a guideline for maintaining optimal quality:
| Storage Condition | Estimated Shelf Life | Notes |
|---|---|---|
| Cool, Dark Place (10-15°C) | 2 to 3 weeks | Carbonation remains stable, flavors evolve well |
| Refrigerated (4°C) | Up to 6 weeks | Fermentation slows, preserves sharp fizz |
| Warm or Sunlit Environment | Less than 1 week | Risk of overfermentation and off-flavors |
“Proper storage not only extends shelf life but enhances the depth of spice and brightness of carbonation in our homemade ginger beer.”
Handling to Maintain Quality
- Always gently handle bottles to avoid agitation which can prematurely release carbonation.
- Open bottles slowly over a sink to prevent excessive foaming and loss of fizz.
- Inspect bottles periodically for signs of bulging or leakage which indicate overcarbonation or contamination. In such cases, refrigerate immediately or consume promptly.
Signs of Spoilage to Watch For
- Cloudy appearance or unexpected sediment development beyond normal natural settling.
- Off-putting sour or alcoholic odors indicating overfermentation.
- Loss of expected fizz and drastic taste changes signaling bacterial contamination.
By adhering closely to these Storage and Shelf Life guidelines, we ensure that our ginger beer recipe 20 liters produces consistently fresh, lively, and delicious batches that thrill with each sip.
Troubleshooting Tips for Ginger Beer Recipe 20 Litres
When crafting our 20-liter batch of homemade ginger beer, certain challenges can arise. Below are common issues we might encounter, alongside precise solutions to ensure every batch meets our expectations for flavor and fizz.
Issue 1: No or Low Carbonation
- Cause: Yeast inactivity or temperature outside optimal range (20°C to 25°C).
- Solution:
- Confirm yeast freshness before adding.
- Maintain fermentation temperature within the ideal range.
- Avoid over-chilling the mix before adding yeast.
- After 24 hours, gently agitate bottles to redistribute yeast, promoting carbonation.
“Always sanitize any tools used for agitation to avoid contamination.“
Issue 2: Overcarbonation and Excessive Bottle Pressure
- Cause: Extended fermentation or high temperatures accelerating yeast activity.
- Solution:
- Perform regular pressure checks by squeezing plastic bottles.
- Refrigerate bottles as soon as optimal carbonation is reached to slow fermentation.
- Use bottles designed for pressure to minimize risk.
- To release pressure safely, open bottles briefly in a sink and reseal.
| Symptom | Action | Preventive Measure |
|---|---|---|
| Bottles extremely firm | Refrigerate immediately | Monitor fermentation closely |
| Bottles swollen or bulging | Vent cautiously in safe environment | Use pressure-rated bottles only |
Issue 3: Off or Unpleasant Flavors
- Cause: Over-fermentation leading to alcohol taste or contamination.
- Solution:
- Stop fermentation by refrigerating once desired taste and fizz are reached.
- Ensure all equipment is sanitized thoroughly.
- Use fresh, high-quality ingredients such as ginger and lemon juice.
- Avoid introducing external bacteria by minimizing air exposure after yeast addition.
Issue 4: Sediment in Bottles
- Cause: Natural yeast and ginger particles settling.
- Solution:
- Transfer ginger beer carefully during bottling, leaving sediment behind.
- Store bottles upright to keep sediment at the bottom.
- Pour gently to avoid disturbing sediment when serving.
Issue 5: Lack of Spicy Ginger Flavor
- Cause: Insufficient ginger quantity or extraction.
- Solution:
- Use fresh ginger grated finely to maximize flavor release.
- Increase ginger to 450 grams for a stronger kick in future batches.
- Allow ginger mixture to steep longer before fermentation to extract robust flavors.
Quick Reference Troubleshooting Table
| Problem | Likely Cause | Immediate Fix | Prevention |
|---|---|---|---|
| No carbonation | Yeast inactive or cold temp | Check yeast, adjust temp, agitate | Maintain 20-25°C fermentation temp |
| Overcarbonation | Extended fermentation | Refrigerate, vent bottles carefully | Monitor pressure, use sturdy bottles |
| Off flavors | Contamination or over-fermentation | Refrigerate, sanitize equipment | Use clean utensils, stop fermentation timely |
| Sediment in bottles | Natural settling | Pour gently, leave sediment behind | Store bottles upright |
| Weak ginger flavor | Low ginger quantity or steeping | Increase ginger, steep longer | Use fresh grated ginger |
By following these troubleshooting tips diligently, we ensure our homemade ginger beer bursts with that signature spicy fizz, ready to be enjoyed in every refreshing sip.
Conclusion
Making 20 liters of ginger beer at home lets us enjoy a refreshing, naturally fizzy drink tailored to our taste. With simple ingredients and careful fermentation, we can create a batch that’s perfect for gatherings or keeping chilled for warm days.
By following the right steps and paying attention to details like sanitation and bottling, we ensure a flavorful and crisp beverage every time. Homemade ginger beer not only saves money but also gives us full control over sweetness and spice levels.
Let’s raise a glass to the satisfaction of crafting our own ginger beer, knowing each sip delivers the perfect balance of zing and sparkle.
Frequently Asked Questions
What are the key ingredients for homemade ginger beer?
The essential ingredients are fresh ginger root (400 grams), granulated sugar (3 kilograms), freshly squeezed lemon juice (500 ml), filtered or boiled water (20 liters), and active dry yeast (5 grams). Cream of tartar (2 teaspoons) is optional to help control carbonation.
What equipment do I need to make 20 liters of ginger beer?
You’ll need a large food-grade fermentation vessel (at least 25 liters), durable pressure-resistant bottles (plastic PET or glass with crown caps/swing-top seals), a kitchen scale, measuring jugs, and sanitizing supplies to keep everything clean.
How long does fermentation take for ginger beer?
Primary fermentation usually takes 24 to 48 hours at a temperature between 20°C and 25°C (68°F to 77°F). During this time, yeast converts sugar into alcohol and carbon dioxide for natural carbonation.
How do I ensure my ginger beer has good carbonation?
Use fresh yeast and sugar, maintain the correct fermentation temperature, avoid disturbing the sediment during bottling, and leave enough headspace in bottles for gas expansion. Optionally, add cream of tartar to help stabilize carbonation.
What is the best way to store homemade ginger beer?
Store bottles in a cool, dark place with temperatures between 10°C and 15°C (50°F to 59°F) for 2 to 3 weeks, or refrigerate for up to 6 weeks. Handle bottles gently to preserve carbonation and flavor.
How can I fix low carbonation in my ginger beer?
Low carbonation often results from too low fermentation temperatures, inactive yeast, or inadequate sugar. Ensure the yeast is fresh, maintain temperature at 20°C–25°C, and verify the sugar amount as per the recipe.
What causes overcarbonation and how do I prevent it?
Overcarbonation is caused by fermentation lasting too long or too high temperatures, producing excess gas. Monitor fermentation closely, use proper quantities of yeast and sugar, and refrigerate bottles once desired carbonation is reached.
What are some tips for serving homemade ginger beer?
Serve ginger beer ice-cold, garnish with lemon slices or fresh mint, and pair it with bold, spicy dishes. It also makes an excellent cocktail mixer, served in decorative glassware for better presentation.
Why is sanitizing equipment important in making ginger beer?
Sanitizing prevents unwanted bacteria and wild yeast from contaminating the ferment, which could cause off flavors and spoilage. Clean preparation ensures a crisp, flavorful final product.
How can I improve the ginger flavor in my homemade ginger beer?
Use fresh ginger root and grate it finely to release more flavor. Let the ginger steep adequately in the sugar-lemon mixture before fermentation to develop a robust spicy kick.