
Garlic Ahi is a flavorful twist on the classic seared tuna dish that’s perfect for any occasion. Combining the rich, meaty texture of ahi tuna with the bold punch of garlic creates a mouthwatering experience that’s both simple and impressive. Whether you’re cooking for a weeknight dinner or a special gathering this recipe delivers restaurant-quality results right at home.
We love how quickly this dish comes together making it ideal for busy schedules without sacrificing taste. The garlic adds a savory depth that complements the natural flavor of the tuna while keeping the dish light and healthy. With just a few ingredients and easy steps you’ll have a delicious meal that’s packed with protein and perfect for seafood lovers.
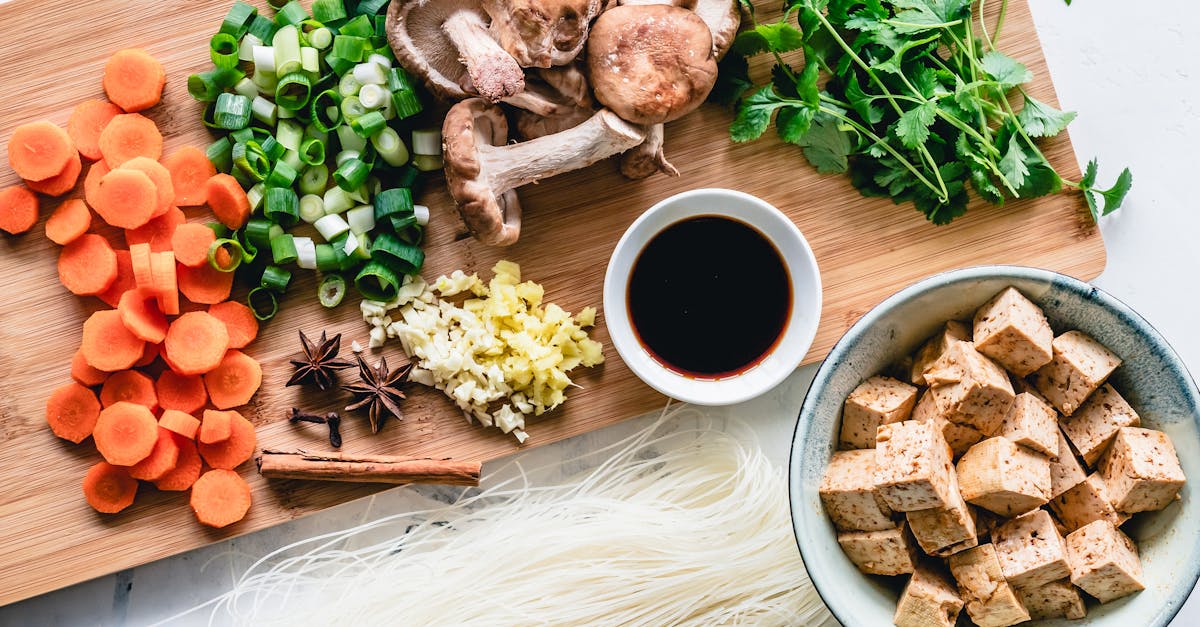
Ingredients
To craft the perfect Garlic Ahi, we need fresh ingredients that bring out the bold flavors and tender texture. Below is a detailed list organized by its purpose in the recipe.
For the Garlic Ahi
- 1 pound fresh ahi tuna steak, cut into 1-inch thick slices
- 4 cloves garlic, finely minced
- 2 tablespoons olive oil or sesame oil for searing
- Salt to taste
- Freshly ground black pepper to taste
For the Marinade
Our marinade infuses the ahi with a savory, slightly tangy flavor that complements the garlic perfectly.
| Ingredient | Quantity | Notes |
|---|---|---|
| Low-sodium soy sauce | 1/4 cup | Adds umami depth |
| Fresh lime juice | 2 tablespoons | Brightens and tenderizes fish |
| Honey | 1 tablespoon | Balances acidity with sweetness |
| Grated ginger | 1 teaspoon | Adds warmth and spice |
| Red pepper flakes | 1/4 teaspoon | For a subtle kick of heat |
Optional Garnishes
These garnishes add texture, color, and an extra layer of flavor to our Garlic Ahi.
- Thinly sliced green onions
- Toasted sesame seeds
- Fresh cilantro leaves
- Thin wedges of lime for serving
With these ingredients prepared, we can move forward confidently to sear our ahi tuna to perfection, allowing the rich garlic and marinade flavors to shine through.
Equipment Needed
To make the perfect Garlic Ahi, having the right equipment is essential. Each tool ensures precise cooking and helps highlight the tuna’s fresh flavors and the bold garlic marinade.
Essential Tools for Garlic Ahi
- Heavy-Bottomed Skillet or Cast Iron Pan
We use this to achieve an even sear on the ahi tuna. The heavy base distributes heat uniformly, giving the fish a beautiful crust without overcooking the interior.
- Sharp Chef’s Knife
A very sharp knife allows us to slice the ahi tuna cleanly into even portions. This is key for a professional presentation and ensures tenderness in every bite.
- Mixing Bowl
Perfect for whisking together the garlic marinade ingredients. Use a medium-sized bowl to avoid spills and to allow thorough mixing.
- Tongs or Spatula
We recommend heat-resistant tongs or a spatula for flipping the tuna gently during searing, ensuring the garlic crust remains intact.
- Measuring Spoons and Cups
Accurate measurements are critical to balancing the marinade’s flavor. Use standard measuring spoons and cups for ingredients like soy sauce, oil, honey, and lime juice.
- Cutting Board
Use a clean, sturdy cutting board to prep your ahi tuna and chop garlic finely. A non-porous board is preferable for easy cleaning.
- Paper Towels
Essential for patting the tuna dry before seasoning, which helps the marinade adhere better and improves the sear.
Optional but Helpful Equipment
- Meat Thermometer
To monitor the internal temperature, especially if you prefer your ahi tuna cooked to a specific doneness. Aim for 115°F–125°F for medium-rare.
- Garlic Press
Speeds up garlic preparation and ensures a fine mince for maximum flavor release.
Equipment Overview Table
| Equipment | Purpose | Importance |
|---|---|---|
| Heavy-Bottomed Skillet | Even high-heat searing of ahi tuna | Essential |
| Sharp Chef’s Knife | Precise slicing of tuna | Essential |
| Mixing Bowl | Combining garlic marinade ingredients | Essential |
| Tongs or Spatula | Flipping tuna without breaking crust | Essential |
| Measuring Spoons and Cups | Accurate ingredient measurements | Essential |
| Cutting Board | Sushi-grade prep and garlic chopping | Essential |
| Paper Towels | Drying fish for better sear | Essential |
| Meat Thermometer | Checking internal temperature (optional) | Helpful |
| Garlic Press | Faster garlic mincing (optional) | Helpful |
“Using the right equipment helps us unlock the best flavor and texture in our Garlic Ahi. The tools we choose in the kitchen directly affect the success of the dish.”
By gathering these essential tools beforehand, we streamline the cooking process and ensure our seared garlic ahi tuna is perfectly cooked every time.
Preparation
To create the perfect Garlic Ahi dish, careful preparation of the ahi tuna and garlic marinade is essential. We will guide you through each step to maximize flavor and texture.
Preparing the Ahi Tuna
- Begin with fresh ahi tuna steaks, about 6 ounces each, ideally 1 to 1.5 inches thick for optimal searing.
- Pat the tuna dry with paper towels to remove excess moisture. This step is crucial for achieving a proper sear.
- Using a sharp chef’s knife, trim off any excess fat or sinew.
- Season both sides lightly with salt and freshly ground black pepper to enhance natural flavors.
- Set the tuna aside on a clean plate while we prepare the marinade.
Making the Garlic Marinade
- Mince 4 cloves of fresh garlic finely or use a garlic press for a more intense flavor.
- In a mixing bowl, combine the following marinade ingredients:
| Ingredient | Measurement | Purpose |
|---|---|---|
| Low-sodium soy sauce | 3 tablespoons | Provides umami depth |
| Fresh lime juice | 2 tablespoons | Adds bright acidity |
| Honey | 1 tablespoon | Balances acidity with sweetness |
| Grated fresh ginger | 1 teaspoon | Adds warm spice notes |
| Red pepper flakes | 1/4 teaspoon | Introduces gentle heat |
| Minced garlic | 4 cloves | Infuses boldgarlic flavor |
| Olive or sesame oil | 2 tablespoons | Helps distribute flavors and promotes browning |
- Whisk the marinade thoroughly until honey dissolves.
- Place the tuna steaks in the marinade, ensuring all sides are coated.
- Cover and refrigerate for 15 to 20 minutes; avoid longer marinating to preserve texture and prevent overpowering the fish.
- Remove the tuna from the marinade and pat dry lightly before searing to avoid excess liquid in the pan.
This careful preparation of the ahi tuna and our signature garlic marinade is key to crafting a tender, flavorful Garlic Ahi dish that delights every time.
Cooking Instructions
Follow these detailed steps to achieve perfectly seared garlic ahi with a flavorful crust and tender interior. Precise timing and heat control are key to locking in flavors and maintaining the ahi tuna’s delicate texture.
Searing the Garlic Ahi
- Preheat your skillet over medium-high heat until it is hot but not smoking. Use a heavy-bottomed skillet or cast iron pan for even heat distribution.
- While the pan heats, remove the ahi tuna from the marinade and gently pat it dry with paper towels. This step is crucial for forming a good sear.
- Add 1 to 2 tablespoons of olive or sesame oil to the skillet and swirl to coat.
- Carefully lay the tuna steaks in the pan—avoid crowding—to sear each side evenly.
- Sear each side for 1.5 to 2 minutes depending on tuna thickness (1 to 1.5 inches) for rare to medium-rare. Adjust by 30-second increments if you prefer different doneness.
- Gently flip the tuna only once using tongs or a spatula to maintain the crust formed by the garlic marinade.
- The garlic and spices should create a golden-brown crust without burning. If needed reduce heat slightly to avoid scorching garlic.
- After searing all sides, remove tuna immediately from the pan to prevent overcooking.
| Step | Time (minutes) | Heat Level | Notes |
|---|---|---|---|
| Preheat Skillet | 3 – 5 | Medium-high | Pan must be hot before cooking |
| First Side Sear | 1.5 – 2 | Medium-high | Creates crust without burning |
| Flip & Sear Second Side | 1.5 – 2 | Medium-high | Sear evenly for rare inside |
| Optional Sear Edges | 0.5 – 1 | Medium-high | For even cooking through edges |
Resting the Tuna
- Place the seared ahi tuna steaks on a clean plate or cutting board.
- Tent loosely with foil and let rest for 3 to 5 minutes. This allows residual heat to finish cooking the tuna gently while keeping juices locked in.
- Resting equilibrates the internal temperature and enhances tenderness and flavor.
- Once rested, slice the tuna against the grain into 1/4-inch thick slices using a sharp chef’s knife.
- Arrange sliced tuna on a serving platter and garnish with toasted sesame seeds, chopped green onions, cilantro, and lime wedges as desired.
- Serve immediately to enjoy the full flavor and texture of your garlic ahi.
“Resting is as essential as searing when it comes to perfecting our garlic ahi tuna.“
By mastering these cooking instructions we transform fresh ahi tuna with vibrant garlic and savory marinade into a restaurant-quality dish that impresses both in taste and presentation.
Serving Suggestions
To fully enjoy the vibrant flavors of our Garlic Ahi, thoughtful presentation and pairing with complementary sides are essential. Let’s explore the best ways to plate and serve this exquisite dish for maximum appeal and taste satisfaction.
Plating the Garlic Ahi
When plating the Garlic Ahi, start by slicing the tuna steaks into even, half-inch thick slices. Arrange the slices fanned out on a chilled plate to showcase the perfectly seared edges contrasted with the tender, rare interior. Garnish boldly with the recommended toppings, such as:
- Toasted sesame seeds sprinkled evenly for a nutty crunch
- Chopped green onions for a fresh, vibrant pop of color
- A few cilantro leaves for an herbal brightness
- Lime wedges placed on the side for a zesty finish
For added visual appeal, consider drizzling a small amount of reserved garlic marinade or a light soy-lime glaze artistically around the plate. Maintain a clean and minimalist style to emphasize the ahi’s natural beauty and rich color.
Recommended Side Dishes
We recommend pairing the bold Garlic Ahi with sides that balance freshness, texture, and mild flavors. Here are our top side dish suggestions:
| Side Dish | Description | Why It Works With Garlic Ahi |
|---|---|---|
| Steamed Jasmine Rice | Light, fluffy, and subtly aromatic rice | Absorbs flavorful juices, complements the tuna’s texture |
| Wasabi Mashed Potatoes | Creamy potatoes with a hint of wasabi heat | Adds a smooth, slightly spicy contrast |
| Asian Slaw | Crisp cabbage slaw with ginger, sesame, and vinegar | Provides crunch and refreshing acidity |
| Grilled Asparagus | Tender charred spears drizzled with lemon | Bright and earthy notes to balance garlic richness |
| Pickled Ginger | Thin slices of zesty pickled ginger | Cleanses the palate and accentuates flavors |
“We find that combining mild starch bases like jasmine rice or mashed potatoes with crisp or tangy vegetables creates a well-rounded and satisfying plate when serving our Garlic Ahi.”
Pro tip: Serve everything warm or slightly chilled to retain texture and enhance the overall sensory experience.
Tips and Variations
To perfect our Garlic Ahi Recipe, we focus on key tips that enhance freshness and explore exciting variations in cooking methods. These adjustments help us tailor the dish to our preferences while preserving the bold garlic flavor and tender ahi texture.
How to Choose Fresh Ahi Tuna
Selecting high-quality ahi tuna is critical for the best tasting Garlic Ahi. Here’s what we look for when buying:
| Criteria | What to Look For |
|---|---|
| Color | Vibrant deep red or pink with a translucent sheen. |
| Smell | Clean ocean scent; no fishy or ammonia odor. |
| Texture | Firm to the touch, springing back when pressed gently. |
| Moisture | Slightly moist but not slimy or overly wet. |
| Source | Sushi-grade or sashimi-grade labeled for safe raw use. |
Pro Tip: Always purchase ahi from a trusted fishmonger or reputable market to ensure freshness and safety, since our recipe highlights the natural flavor and texture of raw or lightly seared tuna.
Alternative Cooking Methods
While the classic searing technique yields the signature contrast of crust and rare center, we can also explore these methods for diverse textures and flavors.
| Cooking Method | Description | Cooking Time & Temperature | Result |
|---|---|---|---|
| Sous Vide | Vacuum-seal ahi with garlic marinade; cook gently. | 120°F (49°C) for 30-45 min | Ultra-tender, evenly cooked tuna |
| Grilling | Grill ahi steaks over medium-high heat with marinade. | 2-3 min per side | Smoky flavor, firm exterior |
| Broiling | Broil tuna with garlic oil coating. | 1.5-2 min per side, close to heat source | Quick caramelization, slightly crisp edges |
| Poaching | Gently simmer ahi in seasoned broth or citrus water. | 3-5 min | Delicate, moist texture without crust |
We recommend patting the tuna dry before any cooking method to ensure the garlic crust adheres well and the flavor remains pronounced.
Make-Ahead Instructions
Preparing our Garlic Ahi in advance makes serving effortless while preserving the vibrant flavors and tender texture. Follow these make-ahead tips to ensure your dish tastes fresh and delicious even when prepared ahead.
Marinate the Ahi Tuna in Advance
- Combine the garlic marinade ingredients (minced garlic, low-sodium soy sauce, fresh lime juice, honey, grated ginger, red pepper flakes, and olive or sesame oil) in a bowl.
- Coat the ahi tuna steaks evenly with the marinade.
- Cover the bowl tightly with plastic wrap or transfer the marinated tuna to an airtight container.
- Refrigerate for 30 minutes up to 2 hours. Marinating longer can intensify flavor but may alter texture if left overnight.
Prepping Garlic and Garnishes Ahead
- Mince fresh garlic and store it in an airtight container in the fridge for up to 24 hours to maintain pungency without bitterness.
- Prepare garnishes like sliced green onions, toasted sesame seeds, and chopped cilantro. Place each in separate containers and refrigerate.
- Slice lime wedges and store in a small bowl covered with plastic wrap to keep fresh.
Storing and Timing for Best Results
| Step | Storage Method | Maximum Time | Notes |
|---|---|---|---|
| Marinated Ahi Tuna | Airtight container | 2 hours | Avoid over-marinating to maintain texture |
| Minced Garlic | Airtight, refrigerated | 24 hours | Use fresh garlic to avoid bitterness |
| Prepared Garnishes | Covered containers | 24 hours | Keeps garnishes crisp |
| Sliced Lime Wedges | Covered bowl | 12 hours | Prevents drying out |
“By managing these components ahead, we reduce last-minute prep and preserve the Garlic Ahi’s signature bold, fresh flavors.”
Searing Just Before Serving
- Remove the ahi tuna from the refrigerator 10 minutes before cooking to take the chill off and promote even searing.
- Heat the skillet while the tuna rests to ensure it reaches the perfect temperature for that savory crust.
- Sear the tuna as directed when ready to serve for best results—quick, high heat preserves the tender interior.
These make-ahead steps allow us to enjoy this elegant, protein-packed meal with minimal hassle while maximizing its garlic-infused flavor and mouthwatering texture.
Conclusion
Garlic Ahi offers a perfect balance of bold flavors and tender texture that suits any occasion. With just a few simple ingredients and the right techniques, we can create a dish that’s both impressive and easy to prepare. Whether we’re cooking for a quick weeknight meal or a special dinner, this recipe delivers a healthy, protein-packed option that never disappoints.
By experimenting with different cooking methods and garnishes, we can keep this classic fresh and exciting. It’s a versatile recipe that invites creativity while celebrating the natural taste of ahi tuna enhanced by garlic’s rich aroma. Let’s keep this flavorful favorite in our culinary rotation and enjoy every delicious bite.
Frequently Asked Questions
What is Garlic Ahi?
Garlic Ahi is a flavorful seared tuna dish that pairs fresh ahi tuna with a bold garlic marinade, creating a light, healthy, and protein-rich meal perfect for any occasion.
What ingredients are needed for Garlic Ahi?
You need fresh ahi tuna, garlic, olive or sesame oil, low-sodium soy sauce, fresh lime juice, honey, grated ginger, red pepper flakes, salt, pepper, and optional garnishes like green onions and toasted sesame seeds.
How do I prepare the marinade for Garlic Ahi?
Whisk together minced garlic, low-sodium soy sauce, fresh lime juice, honey, grated ginger, red pepper flakes, and olive or sesame oil to create a savory and tangy marinade.
What’s the best way to cook Garlic Ahi?
Sear the tuna in a preheated heavy-bottomed skillet or cast iron pan with oil, cooking each side for 1.5 to 2 minutes until a flavorful crust forms but the center remains tender.
Can I make Garlic Ahi in advance?
Yes, you can marinate the tuna and prep garnishes ahead, but sear the tuna just before serving for the best texture and flavor.
What side dishes go well with Garlic Ahi?
Complement Garlic Ahi with steamed jasmine rice, wasabi mashed potatoes, Asian slaw, grilled asparagus, or pickled ginger for a balanced meal.
How do I choose fresh ahi tuna?
Look for ahi tuna that has a vibrant color, firm texture, a clean, ocean-like smell, and slight moisture without sliminess, ideally from a trusted source.
Are there alternative cooking methods for Garlic Ahi?
Yes, besides searing, you can try grilling, broiling, sous vide, or poaching to suit your taste, each offering different textures while preserving garlic flavor.
What tools do I need to make Garlic Ahi?
A heavy skillet or cast iron pan, sharp chef’s knife, mixing bowl, measuring spoons and cups, tongs or spatula, cutting board, and paper towels are essential for best results.
How long should the tuna rest after cooking?
Let the seared tuna rest for 3 to 5 minutes before slicing to allow flavors and juices to distribute evenly, enhancing tenderness and taste.