
Frozen yogurt tarts are the perfect refreshing dessert for warm days when you want something light yet satisfying. Combining the creamy tang of yogurt with a crisp, buttery crust creates a delightful balance that’s both delicious and easy to make. This recipe brings together simple ingredients to craft a treat that feels indulgent without weighing you down.
We love how versatile frozen yogurt tarts are—they can be customized with your favorite fruits or toppings to suit any occasion. Whether you’re hosting a summer gathering or just craving a cool sweet bite, this tart delivers on flavor and texture. Let’s dive into making a frozen yogurt tart that’s sure to become a favorite in your dessert rotation.
Ingredients
To create the perfect Frozen Yogurt Tart, we need a balance of crisp crust, creamy frozen yogurt filling, and vibrant toppings. Below are the essential ingredients categorized for each component.
Crust Ingredients
Our crust combines buttery richness and a hint of sweetness to provide the ideal base for the tart. Here’s what we use:
- 1 ½ cups all-purpose flour (for structure and crispness)
- ⅓ cup granulated sugar (adds sweetness and texture)
- ½ teaspoon salt (balances the flavors)
- ½ cup (1 stick) unsalted butter, cold and cubed (provides richness and flakiness)
- 1 large egg yolk (helps bind the dough)
- 2 tablespoons ice water (to bring the dough together without melting butter)
Frozen Yogurt Filling Ingredients
The heart of our tart is the smooth and tangy frozen yogurt filling. We keep it simple and fresh to let the yogurt’s natural flavor shine through.
| Ingredient | Quantity | Purpose |
|---|---|---|
| 2 cups Greek yogurt (full fat) | Creamy base, tangy flavor | |
| ½ cup honey | Natural sweetener, gentle sweetness | |
| 1 teaspoon vanilla extract | Enhances overall flavor | |
| ½ teaspoon lemon zest | Brightens the flavor |
Topping Ingredients
Toppings add texture, pop of color, and bursts of fresh flavor. Use seasonal fruits and a few special extras for a visually stunning tart.
- 1 cup assorted fresh berries (blueberries, strawberries, raspberries)
- 2 tablespoons toasted sliced almonds (adds crunch and nuttiness)
- 1 tablespoon fresh mint leaves, finely chopped (for a refreshing aroma)
- Optional: drizzle of natural fruit coulis or honey for extra sweetness
We encourage customizing your toppings to suit your taste or occasion while keeping the base ingredients consistent for the best frozen yogurt tart experience.
Equipment Needed
To craft a perfect Frozen Yogurt Tart, having the right equipment on hand streamlines the process and ensures consistent results. Here’s what we recommend:
- Tart Pan
Use a 9-inch removable bottom tart pan. This allows for easy removal of the tart without damaging the delicate crust.
- Mixing Bowls
Prepare at least two medium-sized bowls: one for combining the crust ingredients and another for mixing the frozen yogurt filling. Glass or stainless steel bowls work best for even mixing.
- Food Processor or Pastry Cutter
To create the buttery crust, a food processor makes combining flour, sugar, and butter effortless. Alternatively, a pastry cutter or two forks can work for manually cutting butter into the dry ingredients.
- Spatula
Use a rubber or silicone spatula for folding ingredients, especially when mixing the yogurt filling gently to retain its light texture.
- Measuring Cups and Spoons
Accurate measurements are crucial. Ensure you have standard measuring cups and spoons for dry and liquid ingredients.
- Whisk
A whisk helps blend honey, vanilla extract, and lemon zest into the Greek yogurt smoothly.
- Plastic Wrap
To chill the crust dough and cover the tart during freezing, plastic wrap keeps everything fresh and prevents freezer burns.
- Freezer-Safe Container or Plate
For final freezing after assembly, use a container or plate that fits comfortably in your freezer and supports the tart’s shape.
- Knife and Cutting Board
For preparing fresh fruit toppings like berries or slicing toasted almonds, a sharp knife and clean cutting board are essential.
| Equipment | Purpose | Notes |
|---|---|---|
| 9-inch Tart Pan | Baking and shaping the crust | Removable bottom recommended |
| Food Processor/Pastry Cutter | Combining crust ingredients | Food processor speeds prep |
| Mixing Bowls | Mixing crust dough and filling | Glass or stainless steel |
| Measuring Cups & Spoons | Accurate ingredient measurements | Dry and liquid sets |
| Whisk | Blending filling ingredients smoothly | Stainless steel preferred |
| Spatula | Folding ingredients gently | Rubber or silicone |
| Plastic Wrap | Covering and chilling | Prevents freezer burn |
| Freezer-Safe Container | Freezing assembled tart | Supports shape and freshness |
| Knife & Cutting Board | Preparing fresh toppings | Essential for neat presentation |
Equipping ourselves with these tools makes preparing the Frozen Yogurt Tart straightforward and enjoyable, ensuring every step from crust to colorful toppings is handled with ease.
Prep Work
Before diving into assembling our Frozen Yogurt Tart, thorough preparation guarantees a smooth cooking process and excellent results. Let’s get everything ready step-by-step.
Preparing the Crust
To create the perfect buttery base for our tart, we start with these precise actions:
- Chill the butter: Cut the cold butter into small cubes. Keeping it chilled ensures a flaky crust.
- Mix dry ingredients: Combine all-purpose flour, sugar, and a pinch of salt in a large mixing bowl.
- Cut in butter: Use a food processor or pastry cutter to blend butter with dry ingredients until the mixture resembles coarse crumbs.
- Add wet ingredients: Lightly beat the egg yolk with ice water. Add gradually to the flour mixture, mixing just until dough begins to hold.
- Form and chill dough: Shape dough into a disc, wrap in plastic wrap, and refrigerate for at least 30 minutes to firm up.
This chilling step is crucial to prevent shrinking and maintain crust structure during baking.
Preparing the Yogurt Filling
Our luscious Frozen Yogurt Filling needs careful blending for a smooth texture and balanced flavor:
- Strain Greek yogurt: Place 2 cups of Greek yogurt in a fine mesh sieve over a bowl to remove excess whey. Let drain for 1-2 hours for creaminess.
- Mix ingredients: In a bowl, whisk drained yogurt with 1/3 cup honey, 1 teaspoon vanilla extract, and the zest of 1 lemon. These ingredients balance tanginess and sweetness.
- Taste and adjust: Sample the filling; add a bit more honey if a sweeter profile is desired.
- Chill mixture: Cover and refrigerate filling to keep it cold until ready to fill the crust.
| Ingredient | Measurement | Prep Notes |
|---|---|---|
| Greek yogurt | 2 cups | Strain 1-2 hours prior |
| Honey | 1/3 cup | Adjust to taste |
| Vanilla extract | 1 teaspoon | Use pure for best flavor |
| Lemon zest | From 1 lemon | Adds bright citrus notes |
By following these prep steps carefully, we set the foundation for a refreshing and perfectly textured Frozen Yogurt Tart that shines in every bite.
Directions
Follow these clear, step-by-step instructions to create our Frozen Yogurt Tart that boasts a perfect balance of crisp crust and creamy filling.
Making the Crust
- Chill the Butter: Cut 1/2 cup (115g) cold unsalted butter into small cubes. Place in the refrigerator until firm.
- Combine Dry Ingredients: In a large bowl, whisk together 1 1/4 cups (155g) all-purpose flour, 2 tablespoons granulated sugar, and 1/4 teaspoon salt.
- Cut in Butter: Using a food processor or pastry cutter, blend the chilled butter into the dry mixture until coarse crumbs form with pea-sized pieces.
- Add Wet Ingredients: Lightly beat 1 egg yolk with 1 tablespoon ice water. Gradually add this to the crumb mixture, stirring gently with a spatula until the dough just comes together.
- Form and Chill Dough: Shape the dough into a flat disk. Wrap tightly in plastic wrap and refrigerate for at least 30 minutes to prevent shrinking during baking.
- Preheat Oven: Set to 350°F (175°C) while dough chills.
- Bake Crust: Roll out chilled dough on a lightly floured surface to fit a 9-inch removable bottom tart pan. Press dough evenly into the pan. Prick the bottom with a fork to prevent bubbling. Bake for 18-20 minutes, or until the crust is golden brown. Let cool completely.
Preparing the Frozen Yogurt Filling
- Strain the Greek Yogurt: Place 2 cups (480g) full-fat Greek yogurt into a fine mesh sieve lined with cheesecloth. Suspend over a bowl. Refrigerate for 2 hours to drain excess whey, yielding a thick, creamy base.
- Mix Ingredients: Transfer strained yogurt to a medium bowl. Stir in 1/4 cup honey, 1 teaspoon vanilla extract, and 1 teaspoon lemon zest.
- Adjust Sweetness: Taste the mixture. Add extra honey if desired for balanced sweetness.
- Keep Cold: Cover and chill the filling in the refrigerator until the crust is ready.
Assembling the Tart
- Fill the Crust: Pour the cold frozen yogurt mixture into the baked tart shell. Smooth the surface evenly with a spatula.
- Freeze the Tart: Cover the tart loosely with plastic wrap. Place in the freezer for at least 4 hours or until firm.
- Prepare Toppings: Just before serving, slice fresh fruits such as berries or kiwi, and toast almonds lightly in a dry pan for 3 minutes until golden.
- Decorate: Arrange fresh fruit and toasted almonds on top of the frozen yogurt tart. Garnish with fresh mint leaves for a pop of color and aroma.
- Serve: Use a sharp knife warmed under hot water for clean slices. Enjoy immediately.
| Step | Ingredient/Action | Notes |
|---|---|---|
| Chilling Butter | 1/2 cup cold unsalted butter | Cuts smoothly into flour |
| Dry Mix | 1 1/4 cups flour, sugar, salt | Ensures balanced crust flavor |
| Straining Yogurt | 2 cups Greek yogurt | Achieves creamy consistency |
| Filling Mix | Honey, vanilla extract, lemon zest | Sweet and aromatic base |
| Bake Temps & Time | 350°F for 18-20 minutes | Golden crust with crisp texture |
| Freeze Tart | Minimum 4 hours | Solid and scoopable texture |
Pro Tip: Chilling the crust dough and filling ensures the perfect texture contrast — crisp base with velvety frozen yogurt.
Freezing and Setting Time
To achieve the perfect texture for our Frozen Yogurt Tart, proper freezing and setting time is crucial. This step ensures that the creamy yogurt filling becomes firm enough to slice cleanly, while the buttery crust stays crisp and holds its shape.
Step-by-Step Freezing Instructions
- Initial Freeze After Filling
Once we spread the smooth yogurt filling evenly into the baked and cooled crust, we immediately place the tart in the freezer. This initial freeze allows the filling to solidify gradually and prevents it from becoming icy or grainy.
- Optimal Freezing Duration
We recommend freezing the tart for at least 4 to 6 hours to guarantee a firm set. For the best results, freezing overnight (about 8 hours) enhances the texture, making the filling silky and perfectly sliceable.
- Covering the Tart
To avoid freezer burn and to maintain freshness, we cover the tart loosely with plastic wrap or aluminum foil before placing it in the freezer. This also helps prevent any unwanted flavors from seeping into the tart.
- Serving Preparation
Before serving, allow the tart to sit at room temperature for about 10 to 15 minutes. This short thawing softens the edges slightly, ensuring clean slices without crumbling the crust or melting the filling.
Freezing and Setting Times Table
| Stage | Time Required | Notes |
|---|---|---|
| Initial Freeze | Immediately after filling | Prevents filling separation |
| Firm Set Freeze | 4 to 6 hours | Filling becomes sliceable |
| Optimal Freeze | 8 hours (overnight) | Best texture and flavor integration |
| Thaw Before Serving | 10 to 15 minutes | Softens edges for clean slicing |
“Proper freezing is essential to balance the whipped creaminess of the yogurt filling and the crisp, buttery crust, delivering the ultimate frozen yogurt tart experience.”
Following these freezing and setting times ensures our Frozen Yogurt Tart serves up fresh and visually appealing slices every time.
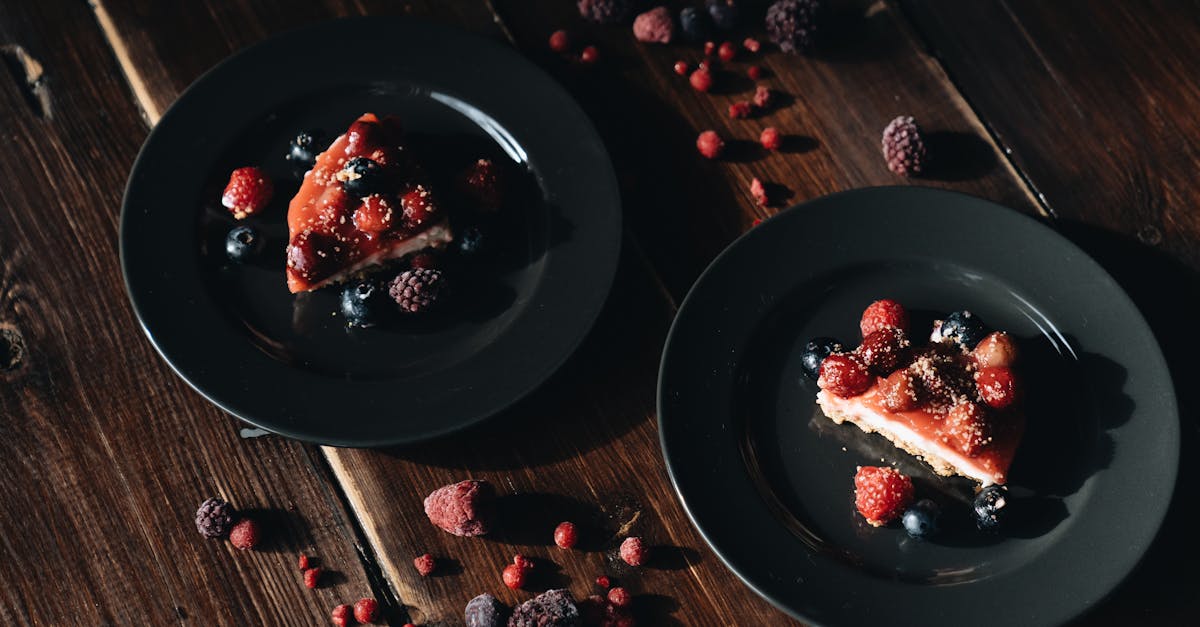
Serving Suggestions
To enjoy our Frozen Yogurt Tart at its best, follow these serving guidelines that highlight its refreshing texture and vibrant flavors.
Perfect Slice and Presentation
- Let the tart sit at room temperature for 10 to 15 minutes before slicing. This softens the frozen filling slightly, ensuring clean cuts without breaking the crust or melting the yogurt.
- Use a sharp knife dipped in warm water and wiped dry between slices for smooth edges.
- Serve on chilled plates to help maintain the tart’s cool temperature during serving.
Complementary Garnishes
Enhance the flavor and appearance with:
- Fresh berries such as blueberries, raspberries, or sliced strawberries for bursts of color and natural sweetness.
- Toasted almonds for a crunchy contrast that elevates the buttery crust.
- Fresh mint leaves to add a fragrant hint of herbal freshness.
Pairing Beverages
The subtle tang of the frozen yogurt pairs wonderfully with:
| Beverage Type | Recommendation | Notes |
|---|---|---|
| Tea | Iced green tea or chamomile | Light and refreshing |
| Coffee | Cold brew or lightly sweetened latte | Complements tart’s creamy texture |
| Sparkling Wine | Prosecco or Champagne | Adds celebratory elegance |
Occasion Tips
- For summer gatherings, serve the frozen yogurt tart in individual tartlet pans for easy portion control and a charming presentation.
- At brunch events, accompany the tart with a dollop of honey or fruit compote on the side.
- For dinner parties, place a small scoop of sorbet alongside to elevate your dessert course.
By following these serving suggestions, we ensure every bite of our Frozen Yogurt Tart is enjoyed perfectly balanced in texture, taste, and visual appeal.
Storage Instructions
To keep our Frozen Yogurt Tart fresh and delicious, proper storage is essential. Follow these steps to maintain the tart’s texture and flavor:
- Wrap loosely with plastic wrap or aluminum foil to protect the tart from freezer burn while allowing slight airflow.
- Place the tart in a freezer-safe container or cover the tart pan with an airtight lid if available. This helps preserve moisture and prevents absorption of other freezer odors.
- Store the tart flat, ideally on the middle shelf of the freezer where the temperature is most consistent.
- Freeze the tart for up to 3 weeks for optimal freshness. Beyond this period, flavor and texture may decline.
Thawing and Serving
To enjoy the best experience when serving:
| Step | Details |
|---|---|
| Remove from freezer | Take the tart out about 10 to 15 minutes before serving |
| Cover and sit at room temperature | Let it sit covered to prevent drying or freezer smell absorption |
| Use a sharp knife | Dip knife in warm water for clean and smooth slices |
“Allowing the tart to soften slightly before slicing guarantees clean cuts without crumbling the crust or melting the creamy frozen yogurt filling.”
Following these Storage Instructions ensures our Frozen Yogurt Tart tastes as fresh and delightful as the moment we first made it.
Conclusion
Creating a frozen yogurt tart is a fantastic way to enjoy a light yet satisfying dessert that’s perfect for warmer days. With its crisp crust and creamy, tangy filling, it’s a treat that never gets old.
We love how easy it is to customize this tart with your favorite fruits and toppings, making it a versatile dessert for any occasion. By following the right preparation and freezing steps, you’ll consistently get a refreshing tart that looks as good as it tastes.
Give this recipe a try and discover how simple it is to impress your guests or treat yourself to a cool, delicious dessert anytime.
Frequently Asked Questions
What ingredients are needed for a frozen yogurt tart crust?
A frozen yogurt tart crust requires all-purpose flour, sugar, salt, cold butter, egg yolk, and ice water. These create a buttery and crisp base that’s easy to prepare.
How do you make the frozen yogurt filling?
The filling is made by straining Greek yogurt for creaminess, then mixing it with honey, vanilla extract, and lemon zest. Adjust sweetness as desired before chilling.
What equipment is essential for making frozen yogurt tarts?
Key equipment includes a 9-inch removable bottom tart pan, mixing bowls, a food processor or pastry cutter, measuring tools, a whisk, spatula, plastic wrap, freezer-safe container, knife, and cutting board.
How long should the tart be frozen before serving?
Freeze the tart for at least 4 to 6 hours for a firm set, with overnight freezing recommended for best texture and flavor.
How can I prevent freezer burn on my frozen yogurt tart?
Wrap the tart loosely with plastic wrap or foil and place it in a freezer-safe container to protect it while allowing some airflow.
What toppings work best on frozen yogurt tarts?
Fresh berries, toasted almonds, and mint leaves are great toppings, but you can customize with your favorite fruits and nuts.
How should the tart be served for best texture?
Let the tart sit at room temperature for 10 to 15 minutes before slicing for clean cuts, using a sharp knife dipped in warm water.
Can the tart be made in smaller portions?
Yes, individual tartlets are perfect for summer gatherings and make serving easier for parties.
How long can I store the frozen yogurt tart in the freezer?
Store the tart for up to three weeks to maintain flavor and texture quality.
What beverages pair well with frozen yogurt tarts?
Iced green tea, cold brew coffee, and sparkling wine complement the creamy and refreshing tart nicely.