
Brining fish is a simple technique that transforms ordinary fillets into flavorful, tender delights. By soaking fish in a carefully crafted brine, we lock in moisture and enhance its natural taste, making every bite juicy and delicious. Whether you’re grilling, baking, or pan-searing, a good brine sets the foundation for a perfect dish.
Fish brine recipes vary widely, from classic salt-and-sugar blends to those infused with herbs, citrus, and spices. Each combination brings out unique flavors while keeping the fish moist and flaky. With our easy-to-follow recipes, you’ll discover how a quick brine can elevate your seafood dishes and impress your family and friends every time.
Ingredients for Fish Brine Recipes
To craft the perfect fish brine, understanding the key ingredients is essential. These components work together to enhance texture, flavor, and moisture retention, setting the foundation for a delicious seafood dish.
Basic Brine Ingredients
Every successful fish brine begins with a core set of ingredients. These basics create the essential salty environment that firmly locks in moisture and season the fish evenly.
- Water: Acts as the brine’s base, dissolving salts and other ingredients.
- Salt: The vital component for curing and flavor infusion. Use non-iodized salts such as kosher or sea salt for pure taste.
- Sugar: Balances saltiness and supports caramelization during cooking. Commonly white or brown sugar.
Here is a simple measurement guideline for a classic fish brine:
| Ingredient | Quantity | Purpose |
|---|---|---|
| Water | 4 cups (1 quart) | Brine solvent |
| Kosher salt | 1/4 cup | Seasoning and moisture lock |
| Sugar | 2 tbsp | Flavor balance and caramelization support |
Flavor Variations and Add-Ins
To elevate our fish brine recipes, incorporating herbs, spices, and aromatics introduces layers of complexity and freshness. These additions customize the flavor profile and complement the type of fish we use.
- Herbs: Fresh dill, thyme, rosemary, or bay leaves offer herbal aroma.
- Citrus: Lemon, lime, or orange zest/peel add brightness and acidity.
- Spices: Whole peppercorns, coriander seeds, and crushed red pepper enhance warmth.
- Aromatics: Garlic cloves or sliced shallots contribute depth and subtle sharpness.
Selecting these thoughtfully enhances the fish’s natural flavor without overpowering it.
Types of Salt and Liquids Used
The choice of salt and liquid in our brine impacts taste and texture significantly. Below is a breakdown of common salts and brine bases preferred in fish brining:
| Salt Type | Characteristics | Ideal Use |
|---|---|---|
| Kosher Salt | Large flaky crystals, pure salty taste | Most versatile, classic |
| Sea Salt | Varies in mineral content & flavor | Adds subtle complexity |
| Table Salt | Fine granules, often iodized | Less ideal, can taste harsh |
| Liquid Base | Flavor Profile | When to Use |
|---|---|---|
| Water | Neutral, standard | Everyday brining |
| Beer | Adds mild maltiness and depth | Richer flavor profiles |
| Apple Cider | Slight sweetness and acidity | Perfect for delicate fish |
| White Wine | Aromatic, subtle acidity | For gourmet brines |
Combining the right salt with carefully chosen liquids and flavor enhancers ensures our fish brine recipes yield moist tender and perfectly seasoned fish every time.
Tools and Equipment Needed
To create the perfect fish brine, having the right tools and equipment ensures a smooth and effective process. Below, we outline the essential items that support accurate measurements, safe handling, and even flavor infusion.
Essential Tools
- Large Non-Reactive Container
Use a glass, ceramic, or food-grade plastic container to hold the brine and fish. Avoid metal containers as they react with salt and can impart off-flavors. We recommend at least a 2-quart capacity to ensure the fish is fully submerged.
- Measuring Cups and Spoons
Precisely measuring salt, sugar, and liquids is crucial. Accurate quantities create consistent brine strength and taste. Use standard measuring cups and spoons for reliable results.
- Kitchen Scale
For best accuracy, especially with dry ingredients like salt and sugar, a digital kitchen scale calibrated to grams ensures we keep precise ratios every time.
- Stirring Utensil
A long-handled spoon or whisk helps dissolve the salt and sugar thoroughly. A whisk speeds up the dissolving process and ensures a uniform brine solution.
- Plastic or Silicone Lid / Wrap
Cover the container with a lid or plastic wrap to prevent contamination and odors from other foods when refrigerating during the brining period.
Optional But Helpful
- Thermometer
Keep a food thermometer close to ensure the brine stays at a safe temperature (typically below 40°F/4°C) during the brining process. This prevents bacterial growth while soaking.
- Fine Mesh Strainer
Useful for rinsing fish after brining to remove excess salt or herbs before cooking.
Summary Table of Tools
| Tool | Purpose | Recommended Material | Notes |
|---|---|---|---|
| Large Non-Reactive Container | Hold brine and fish | Glass, ceramic, plastic | Avoid metal to prevent flavor alteration |
| Measuring Cups and Spoons | Accurate ingredient measurement | Plastic or stainless steel | Ensure precise brine ratios |
| Digital Kitchen Scale | Precise dry ingredient measurement | Digital | Ideal for salt and sugar |
| Stirring Utensil | Dissolve and mix brine ingredients | Wood, silicone, metal | Whisk preferred for speedy dissolving |
| Plastic or Silicone Lid/Wrap | Cover and protect brine | Plastic wrap or lid | Keeps brine clean during refrigeration |
| Food Thermometer (optional) | Monitor safe brining temperature | Digital or dial | Keeps fish safe during soaking |
| Fine Mesh Strainer (optional) | Rinse fish after brining | Stainless steel | Removes excess salt and herbs |
Having this set of tools prepared before we start ensures the fish brine process is efficient and reliable. Each item plays a key role in maximizing flavor and maintaining the quality of our fish.
Preparations Before Brining
Before we dive into the brining process, it’s crucial to prepare thoroughly. Proper Preparations Before Brining ensure the best texture and flavor absorption in our fish.
Selecting the Right Fish
Choosing the right type of fish sets the foundation for successful brining. We want to focus on fresh, high-quality fish with firm, moist flesh. Fish varieties that benefit most from brining include:
- Salmon
- Trout
- Cod
- Halibut
- Sea bass
When selecting fish, look for these key qualities:
| Quality | Description |
|---|---|
| Freshness | Clear eyes, shiny skin, and a fresh ocean scent indicate freshness |
| Firm texture | Flesh should spring back when gently pressed |
| Skin intact (if present) | Skin helps retain moisture during brining and cooking |
| Thickness | Thicker cuts absorb brine evenly and maintain tenderness |
“Freshness is the heart of a perfect brined fish,” as we often say in our kitchen.
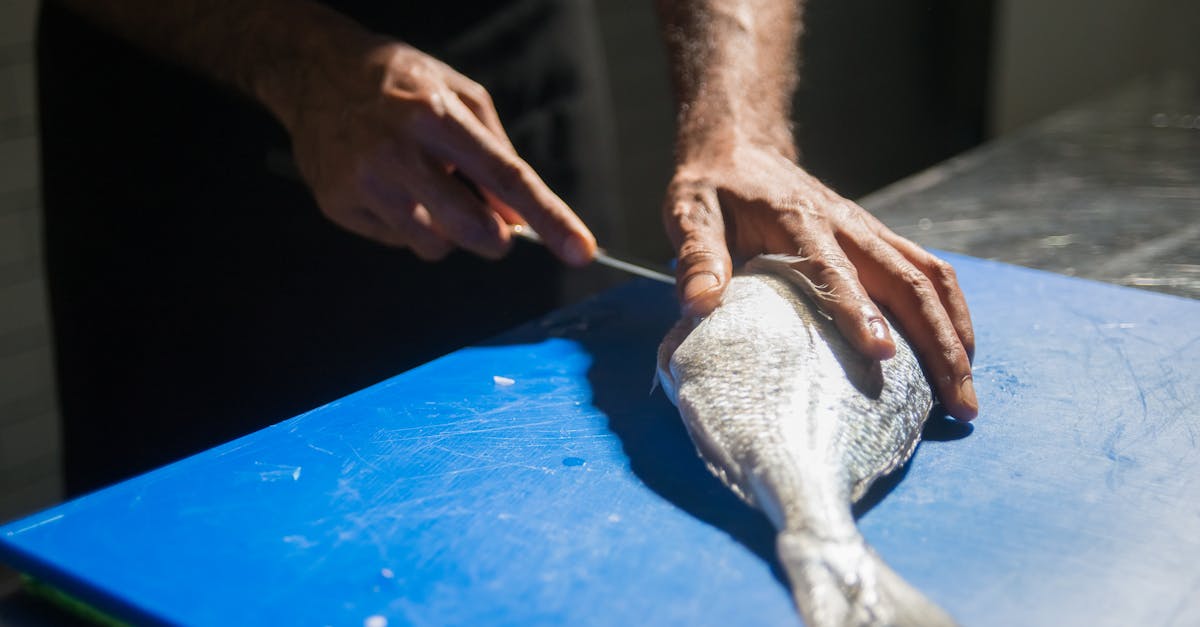
Cleaning and Preparing the Fish
Once we have our fish, we must clean and prep it properly to ensure the brine penetrates evenly.
- Rinse the fish under cold running water to remove any residual scales or contaminants.
- Pat dry with paper towels to remove excess moisture, helping the brine adhere better.
- Remove any bones using tweezers for a smoother texture.
- Trim any dark meat or discolored spots to avoid bitterness in the final dish.
- Score the skin lightly if the fish has skin—this allows deeper brine penetration and more even seasoning.
Following these steps guarantees our fish is primed to soak in the rich brine flavors and emerge tender and flavorful.
How to Make Fish Brine
Creating a perfect fish brine begins with carefully mixing the brine solution and adjusting its concentration to suit your fish type and recipe. Let’s walk through these crucial steps that guarantee moist, flavorful, and tender fish every time.
Mixing the Brine Solution
To start, combine your brine ingredients in a non-reactive container—glass, plastic, or stainless steel work best to preserve flavor integrity. Use the following classic ratio as a base:
| Ingredient | Measurement | Role |
|---|---|---|
| Water | 4 cups (1 quart) | Hydrates fish, dissolves salt and sugar |
| Non-iodized salt | 1/4 cup (60 g) | Enhances flavor, firms flesh |
| Sugar | 2 tablespoons (25 g) | Balances saltiness, aids browning |
Steps to mix the brine solution:
- Warm about half of the water in a saucepan, but avoid boiling.
- Stir in salt and sugar until fully dissolved.
- Add remaining cold water to bring the brine back to room temperature.
- Incorporate optional flavorings like fresh herbs, citrus slices, or spices. For enhanced taste, steep ingredients such as dill, garlic, lemon zest, or peppercorns.
- Cool the brine completely before submerging the fish to prevent cooking or texture damage.
This precise mixing ensures the salt and sugar fully dissolve, spreading evenly throughout the brine for optimal absorption.
Adjusting Brine Concentration
The strength of the brine solution affects how much moisture and flavor the fish will absorb. Adjusting salinity depends on fish type, thickness, and brining time:
| Fish Type | Brine Concentration (Salt % by weight) | Suggested Brining Time |
|---|---|---|
| Thin fish (trout, sole) | 4-5% | 15 to 30 minutes |
| Medium fish (salmon, cod) | 6-7% | 30 to 60 minutes |
| Thick fish (halibut, sea bass) | 8-10% | 1 to 2 hours |
Tip: For longer brining times, lower the salt concentration to prevent over-salting and firming the fish excessively.
To calculate salt concentration accurately:
- Salt concentration (%) = (Weight of salt ÷ Weight of total brine) × 100
Adjust the amount of salt accordingly to keep the brine balanced.
“A well-balanced brine is the foundation for perfectly seasoned and juicy fish, regardless of how you plan to cook it.”
By mastering these steps, we control the key variables that deliver consistent fish brining results, setting the stage for delightful seafood dishes.
Brining Techniques
Mastering the right brining techniques ensures our fish absorbs optimal flavor and achieves perfect texture. Let’s explore the key methods and considerations for effective fish brining.
Cold Brining Method
Cold brining involves soaking the fish in a chilled brine solution, typically kept in the refrigerator at below 40°F (4°C). This slow process allows the salt and sugar to penetrate evenly, enhancing moisture retention and flavor without cooking the fish.
Steps for cold brining:
- Prepare the brine with water, non-iodized salt, sugar, and optional aromatics.
- Submerge the cleaned fish completely in the brine in a large non-reactive container.
- Cover and refrigerate for the recommended time based on fish thickness (see Quick Brine vs. Long Soak).
- Remove fish, rinse lightly if needed, then pat dry before cooking.
Cold brining preserves fish firmness and boosts juiciness while maintaining safety by keeping the fish below danger zone temperatures. It is ideal for delicate, flaky fish like cod and trout.
Hot Brining Method
Hot brining uses a warm or hot brine to speed up salt absorption and add complexity by dissolving spices and herbs deeply into the solution.
How to hot brine fish:
- Heat water and dissolve salt, sugar, and other flavorings completely.
- Let the brine cool fully to room temperature or below to avoid pre-cooking the fish.
- Submerge the fish in the cooled brine and refrigerate during soaking.
- Follow time guidelines based on thickness and fish type.
Hot brining intensifies flavor infusion quickly and works well for thicker or firm-textured fish like salmon and halibut. However, it requires careful temperature control to avoid texture changes.
Quick Brine vs. Long Soak
The choice between a quick brine and a long soak depends on fish thickness, desired flavor intensity, and texture preferences.
| Brine Type | Duration | Best For | Texture Outcome | Salt % in Brine |
|---|---|---|---|---|
| Quick Brine | 15-30 minutes | Thin fillets, delicate fish | Lightly seasoned, moist | 4-6% |
| Long Soak | 1-4 hours (up to overnight)* | Thick cuts, firm fish like salmon | Deeply flavored, tender but firm | 6-8% |
*Overnight brining applies mainly to very thick fillets or whole fish.
Remember: Exceeding recommended times risks overly salty or mushy fish. We recommend starting with the lower duration and adjusting in future brining sessions.
“Brining is a balance between time and salt concentration. Mastering this ratio lets us create consistently flavorful and perfectly textured fish every time.”
By choosing the right brining technique for our fish type and dish plan, we optimize flavor, moisture, and texture while maximizing the benefits of each brine recipe.
Brine Flavor Variations
Exploring brine flavor variations allows us to customize our fish to suit any culinary preference. By integrating diverse herbs, spices, and aromatics, we can create unique profiles that elevate our seafood dishes beyond the ordinary.
Citrus and Herb Brine
Combining fresh citrus with aromatic herbs infuses fish with a bright, zesty, and fragrant character. This variation enhances the natural flavor of the fish while delivering refreshing notes perfect for lighter dishes.
Ingredients for Citrus and Herb Brine:
- 4 cups cold water
- 1/4 cup kosher salt
- 2 tablespoons sugar
- Zest and juice of 1 lemon
- Zest and juice of 1 orange
- 3 sprigs fresh thyme
- 2 sprigs fresh rosemary
- 3 smashed garlic cloves
- 1 teaspoon black peppercorns
Preparation steps:
- Mix water, salt, and sugar until fully dissolved.
- Add citrus zest and juice to the brine.
- Toss in herbs, garlic, and peppercorns.
- Stir well and chill before submerging the fish.
This citrus and herb brine brightens the palate with tangy citrus while herbs contribute clean, earthy aromas that meld seamlessly with the fish’s texture.
Spicy and Smoky Brine
For a bold twist, a Spicy and Smoky Brine introduces warmth and complexity, perfect for grilling or smoking fish. These flavors add depth and richness without overwhelming the delicate fish flesh.
Ingredients for Spicy and Smoky Brine:
| Ingredient | Quantity |
|---|---|
| Water | 4 cups |
| Kosher salt | 1/4 cup |
| Brown sugar | 2 tablespoons |
| Smoked paprika | 1 tablespoon |
| Crushed red pepper | 1 teaspoon |
| Smoked sea salt | 1 teaspoon |
| 2 cloves garlic | smashed |
| 1 small chipotle pepper | chopped (optional) |
Preparation steps:
- Dissolve kosher salt and brown sugar in water.
- Add smoked paprika, crushed red pepper, and smoked sea salt.
- Stir in garlic and chipotle pepper for extra heat.
- Chill thoroughly before use.
The combination of smoked paprika and chipotle creates a fragrant smoky layer, while the heat enhances the fish’s natural flavors with a subtle kick.
Sweet and Savory Brine
Balancing savory elements with subtle sweetness produces a sweet and savory brine that adds complexity and richness. This version works exceptionally well for fattier fish like salmon, providing a caramelized, golden crust upon cooking.
Ingredients for Sweet and Savory Brine:
- 4 cups cold water
- 1/4 cup sea salt
- 3 tablespoons brown sugar
- 1 tablespoon soy sauce
- 1 teaspoon crushed black peppercorns
- 2 sprigs fresh sage
- 1 cinnamon stick
- 3 slices fresh ginger
Preparation steps:
- Combine water, salt, and brown sugar until dissolved.
- Add soy sauce, peppercorns, sage, cinnamon, and ginger.
- Stir well and refrigerate before brining.
The brown sugar and soy sauce lend a deep umami sweetness balancing the herbs and spices, creating a rich flavor that penetrates deeply into the fish.
Brining with these flavor variations tailors our fish to different dishes and preferences, unlocking diverse taste dimensions that make seafood dishes truly memorable.
Directions for Brining Fish
Knowing how to properly brine fish is essential for achieving tender, flavorful results every time. Let’s follow precise steps and timing guidelines to maximize the benefits of your chosen fish brine recipes.
Step-by-Step Brining Process
- Prepare the brine solution: In a non-reactive container, combine water with your measured non-iodized salt and sugar. Stir until completely dissolved. Add any additional flavorings like herbs, citrus, or spices from your chosen recipe.
- Submerge the fish: Place your cleaned and prepared fish fillets or whole fish into the brine. Make sure the fish is fully immersed to allow uniform absorption.
- Refrigerate during brining: Cover the container and place it in the refrigerator to keep the fish at a safe temperature below 40°F (4°C). This prevents bacterial growth.
- Monitor brining time: Follow the recommended timing based on fish type and thickness. Avoid over-brining to prevent overly salty or mushy texture.
- Rinse and dry: After brining, gently rinse the fish under cold water to remove excess salt. Pat dry with paper towels to prepare for your cooking method.
- Cook as desired: Your fish is now ready to be grilled, baked, smoked, or seared, with enhanced moisture and infused flavors.
Timing Guidelines for Different Fish
Brining time depends on the fish’s thickness and fat content. Use the table below for quick reference:
| Fish Type | Thickness | Brining Time | Salt Concentration* | Notes |
|---|---|---|---|---|
| Salmon | 1 inch (2.5 cm) | 20 to 30 minutes | 6-8% | Fattier fish, shorter brine time recommended |
| Cod, Halibut | 1 inch (2.5 cm) | 30 to 45 minutes | 6-8% | Firmer fish, moderate soaking times |
| Trout, Sea Bass | 1 inch (2.5 cm) | 25 to 35 minutes | 6-8% | Delicate yet firm for medium brining |
| Whole Fish | 2 inches (5 cm) | 1 to 2 hours | 5-6% | Reduce salt to avoid over-brining |
*Salt Concentration refers to the percentage of salt relative to the total weight of the water used.
Important: Always adjust brining times upward or downward based on thickness and desired flavor intensity. For thinner fillets, reduce brining time to prevent a salty taste. For thicker cuts or whole fish, longer brining ensures deep flavor infusion and moisture retention.
By following these clear brining steps and timing standards, we consistently achieve fish that is juicy, tender, and bursting with well-balanced flavor.
Post-Brining Instructions
After the brining process, following the correct post-brining steps is essential to ensure our fish retains its enhanced flavor and perfect texture. These instructions help us prepare the fish for cooking while preserving the benefits of brining.
Rinsing and Drying the Fish
Once the fish has soaked for the recommended time, we should:
- Remove the fish from the brine immediately to prevent over-brining.
- Rinse the fish under cold running water to wash off excess salt and any brining residues.
- Use a fine mesh strainer or colander for easier handling.
- Pat the fish dry thoroughly with paper towels or a clean kitchen cloth. This step is crucial to:
- Avoid steaming instead of searing when cooking.
- Help achieve a crispier skin or a better surface texture.
- If desired, air-dry the fish on a rack in the refrigerator for 15-30 minutes to further dry the surface before cooking.
“Proper rinsing and drying help balance the flavor and prepare the fish for cooking methods that demand a dry surface, such as grilling or pan-searing.“
Cooking Methods After Brining
Brined fish pairs well with various cooking methods, each benefiting from the moisture-locking and flavor-enhancing effects of the brine. Here’s how we approach different techniques:
| Cooking Method | Key Benefits After Brining | Tips for Best Results |
|---|---|---|
| Grilling | Seals in moisture; prevents drying out. | Use medium-high heat; oil grates to prevent sticking. |
| Pan-Searing | Enhances crust formation and browning. | Preheat pan until hot; use oil with high smoke point. |
| Baking | Retains juiciness; infuses flavor evenly. | Bake at 375°F (190°C); cover loosely for moist texture. |
| Poaching | Preserves tenderness and delicate flavors. | Use flavorful poaching liquid; avoid boiling temperature. |
| Smoking | Adds depth with smoky notes; brine enhances seasoning. | Use indirect heat; maintain low, consistent temperature. |
“With the fish well-prepared post-brining, our cooking becomes more predictable and delicious with every technique.”
Adhering to these steps after brining ensures our fish retains its moist, tender texture and perfectly balanced seasoning, making every seafood dish a memorable experience.
Storage Tips for Brined Fish
Proper storage of brined fish is essential to maintain its enhanced flavor, texture, and safety. Follow these key steps to preserve the quality of our perfectly brined fish:
1. Cool Immediately After Brining
Once fish completes the brining process and is rinsed and patted dry, place it in the refrigerator without delay. Keeping the fish cold at temperatures between 32°F and 38°F (0°C to 3°C) prevents bacterial growth and maintains freshness.
2. Use Airtight Containers or Wrap Tightly
Store brined fish in a non-reactive airtight container or tightly wrap it in plastic wrap or aluminum foil. This reduces exposure to air, which can dry the fish out or lead to off-flavors.
| Storage Method | Benefits |
|---|---|
| Airtight Container | Maintains moisture, prevents odor transfer |
| Plastic Wrap | Protects from air exposure, easy for single portions |
| Aluminum Foil | Blocks light, preserves flavor |
3. Label and Date Storage
To prevent confusion, label the container or wrapped fish with the date it was brined. Generally, brined fish should be used within 2 days if kept refrigerated.
4. Avoid Freezing Immediately
While freezing is an option for extended storage, it can alter the texture slightly if done immediately after brining. If freezing is necessary, pat fish extremely dry beforehand and place it in a vacuum-sealed bag to reduce freezer burn.
| Storage Type | Recommended Duration | Tips |
|---|---|---|
| Refrigeration | 1-2 days | Keep at 32°F to 38°F, airtight wrap |
| Freezing | Up to 3 months | Vacuum seal, thaw slowly in refrigerator |
5. Thawing Frozen Brined Fish
When ready to use frozen brined fish, thaw it slowly in the refrigerator for 12 to 24 hours. Avoid thawing at room temperature or under warm water, which can cause bacterial growth and texture loss.
Quick Reminder:
“To enjoy the full benefits of brining, always prioritize freshness and proper cold storage.”
By carefully following these Storage Tips for Brined Fish, we ensure our seafood maintains its moist texture, balanced seasoning, and vibrant flavors until cooking time.
Conclusion
Mastering fish brine recipes opens up a world of flavor and texture possibilities for our seafood dishes. With the right ingredients, techniques, and timing, we can consistently create moist, tender, and perfectly seasoned fish that elevates any meal.
Experimenting with different brine variations lets us tailor flavors to suit every palate, making each dish uniquely satisfying. By following proper preparation and storage practices, we ensure the quality and safety of our brined fish from start to finish.
Brining isn’t just a step in cooking—it’s a game-changer that transforms ordinary fish into something extraordinary. Let’s embrace this technique and bring out the best in every seafood experience.
Frequently Asked Questions
What is the purpose of brining fish?
Brining fish enhances flavor and tenderness by soaking fillets in a salt-and-sugar solution. It locks in moisture, improves texture, and ensures a juicy, well-seasoned final dish, regardless of the cooking method.
What are the essential ingredients in a basic fish brine?
A basic fish brine includes water, non-iodized salt (like kosher or sea salt), and sugar. These ingredients work together to improve the fish’s texture and flavor during soaking.
Can I customize the flavor of my fish brine?
Yes, you can add herbs, citrus, spices, and aromatics like garlic or peppercorns to customize the brine, enhancing the fish with unique flavor profiles such as citrus-herb or spicy-smoky variations.
How long should I brine fish?
Brining time depends on the fish type and thickness. Generally, thin fillets need 15-30 minutes, while thicker cuts may require 1-2 hours. Over-brining can lead to overly salty or mushy fish.
What type of container should I use for brining?
Use a large non-reactive container, such as glass, ceramic, or food-safe plastic. Avoid metal containers as they can react with the brine and alter the fish’s flavor.
How should I prepare the fish before brining?
Rinse fish under cold water, pat it dry, remove any bones, trim dark meat, and score the skin if needed. This preparation helps the brine penetrate evenly for better flavor and texture.
Can I brine fish with liquids other than water?
Yes, you can use beer, apple cider, or white wine as part of the brining liquid to add complexity and complementary flavors to your fish.
What is the difference between cold brining and hot brining?
Cold brining involves soaking fish in a chilled brine for several hours, while hot brining uses warm or heated brine for a quicker process. Choice depends on the fish type and desired cooking method.
How should I store fish after brining?
After brining, cool the fish immediately, store it in airtight containers or wrapped tightly, and refrigerate. Use within 1-2 days or freeze with vacuum sealing for longer storage.
Do I need to rinse fish after brining?
Yes, rinse the fish briefly under cold water to remove excess salt, then pat it dry. This helps prevent overly salty taste and prepares the fish for cooking methods needing a dry surface.