
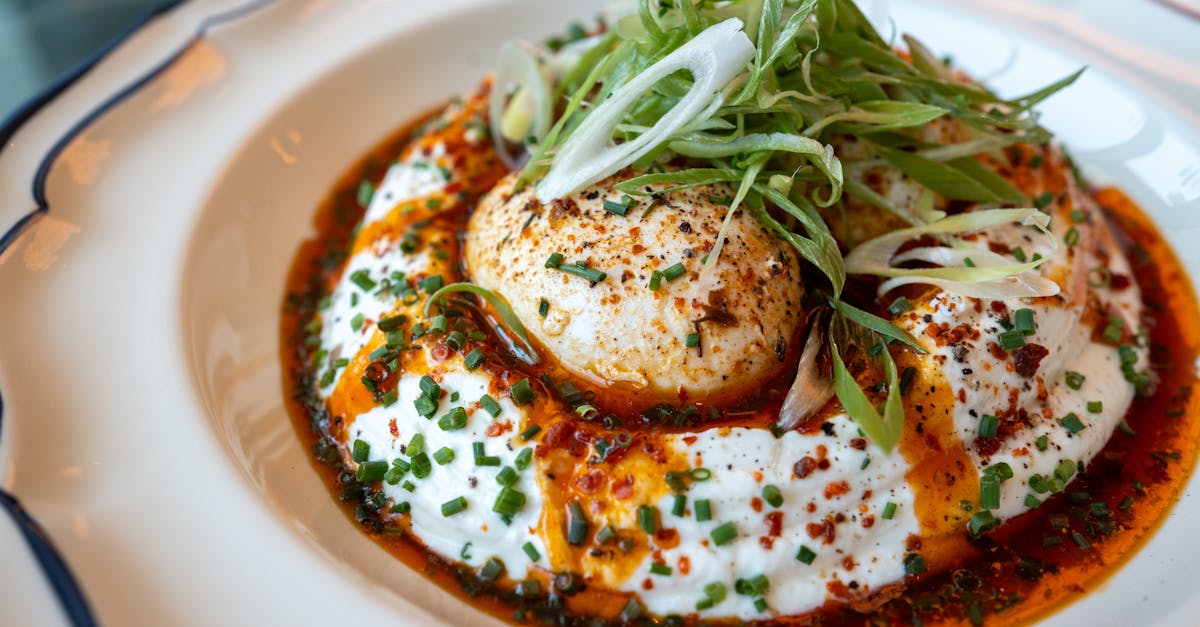
Escondidinho is a beloved Brazilian comfort dish that brings together creamy mashed cassava and savory fillings in a warm, baked casserole. Its name means “hidden” in Portuguese, perfectly describing how the flavorful meat or vegetable filling hides beneath a smooth layer of mashed cassava or potatoes. This dish is a staple in Brazilian homes and offers a delicious way to enjoy simple ingredients with rich, satisfying flavors.
We love how versatile Escondidinho is—you can customize it with beef, chicken, shrimp, or even a vegetarian option. It’s perfect for family dinners or special occasions when you want something hearty yet elegant. Let’s dive into this easy recipe that will have you savoring every bite of Brazil’s hidden gem.
Ingredients
To create an authentic Escondidinho that captures the rich flavors and comforting textures we love, we need fresh, high-quality ingredients. Below are the essentials for each component of this classic Brazilian dish.
For the Mashed Cassava (Mandioca)
- 3 pounds fresh cassava (mandioca), peeled and cut into chunks
- 4 cups water (for boiling)
- 1 cup whole milk (or substitute with cream for extra richness)
- 3 tablespoons unsalted butter
- Salt to taste
- 1/4 teaspoon ground nutmeg (optional, for subtle warmth)
For the Meat Filling
- 1 pound ground beef (or substitute with shredded chicken, shrimp, or vegetables for variety)
- 1 medium onion, finely chopped
- 3 cloves garlic, minced
- 2 medium tomatoes, diced
- 1/4 cup tomato paste
- 1/2 cup beef broth (or vegetable broth for vegetarian options)
- 2 tablespoons olive oil
- 1/2 teaspoon ground black pepper
- 1 teaspoon smoked paprika
- 1/2 teaspoon cumin
- Salt to taste
- 1/4 cup chopped fresh parsley or cilantro
Additional Ingredients
| Ingredient | Quantity | Purpose |
|---|---|---|
| Grated mozzarella cheese | 1 1/2 cups | For topping, adds creamy melt |
| Parmesan cheese, grated | 1/2 cup | For topping, adds sharp flavor |
| Chopped green olives | 1/4 cup | Optional, adds briny contrast |
| Fresh parsley or cilantro | For garnish | Adds freshness and color |
Our carefully selected ingredients ensure a creamy, savory Escondidinho that beautifully balances the rich mashed cassava with the spiced meat filling.
Equipment Needed
To prepare an authentic Escondidinho, having the right equipment is essential for achieving the perfect texture and flavor layers. Below is a detailed list of the tools we recommend using to simplify the preparation process and ensure optimal results.
Essential Kitchen Tools
- Large Pot
For boiling the fresh cassava until tender and ready for mashing.
- Colander or Strainer
To drain the cassava after boiling thoroughly.
- Mixing Bowls
To combine ingredients for the mashed cassava and to mix the meat filling components.
- Frying Pan or Skillet
Ideal for sautéing the ground beef, onions, garlic, and spices until flavorful and well-cooked.
- Wooden Spoon or Silicone Spatula
Useful for stirring the meat filling and mashing cassava without scratching cookware.
- Potato Masher or Food Mill
To create the creamy, smooth texture of the mashed cassava — a critical step for the signature topping.
- Measuring Cups and Spoons
Accuracy is key for dairy, spices, and seasoning to balance flavors perfectly.
- Baking Dish or Casserole Pan (around 9 x 13 inches)
For layering the mashed cassava and meat filling uniformly, then baking to golden perfection.
- Oven Mitts
To safely remove the hot Escondidinho from the oven once baked.
Optional But Helpful
- Grater
To shred mozzarella and Parmesan cheeses evenly for topping.
- Food Processor
For quicker mashing of cassava if you prefer smooth and lump-free texture.
- Aluminum Foil
To cover the dish during baking to prevent excessive browning.
Equipment Summary Table
| Equipment | Purpose |
|---|---|
| Large Pot | Boil fresh cassava |
| Colander/Strainer | Drain boiled cassava |
| Mixing Bowls | Combine mashed cassava and meat filling |
| Frying Pan/Skillet | Sauté meat and spices |
| Wooden Spoon/Spatula | Stir and mash without damaging cookware |
| Potato Masher/Food Mill | Achieve creamy mashed cassava texture |
| Measuring Cups/Spoons | Measure ingredients accurately |
| Baking Dish | Assemble and bake Escondidinho |
| Oven Mitts | Handle hot cookware safely |
| Grater (optional) | Shred cheese for topping |
| Food Processor (optional) | Ease cassava mashing |
| Aluminum Foil (optional) | Protect top when baking |
With these tools in our kitchen arsenal, we can seamlessly prepare every layer of Escondidinho, balancing creamy cassava and savory filling with ease and precision.
Prep Work
Before we begin assembling our Escondidinho, thorough Prep Work ensures each component achieves its full flavor and texture potential. Let’s focus on preparing the cassava and the meat filling with precision.
Preparing the Cassava
- Peel the Cassava: Start by cutting the fresh cassava into manageable sections. Using a sharp knife or vegetable peeler, carefully remove the thick brown skin and the pinkish layer underneath until only the white flesh remains.
- Cut into Chunks: Chop the peeled cassava into roughly 2-inch cubes. This size helps it cook evenly and softens faster.
- Boil the Cassava: Place the cassava chunks in a large pot and cover with cold water. Add a pinch of salt. Bring to a boil over medium-high heat, then reduce to a simmer. Cook until cassava is tender when pierced with a fork, about 20–25 minutes.
- Drain and Dry: Drain the cassava thoroughly using a colander. Return it to the pot and place over low heat for 2–3 minutes to evaporate excess moisture. This step helps in achieving a creamy but firm mash.
- Mash the Cassava: Using a potato masher or food mill, mash the cassava until smooth. Add butter (2 tablespoons) and warm milk (½ cup) gradually, stirring to create a creamy consistency. Season with a pinch of nutmeg if desired to enhance the flavor.
| Step | Action | Key Tips | Time |
|---|---|---|---|
| Peel and cut | Remove outer layers, cube | Use sharp knife, 2-inch chunks | 5-7 minutes |
| Boil | Cook in salted water | Tender when pierced with fork | 20-25 minutes |
| Drain & dry | Remove water, dry on low heat | Evaporate moisture for creamy mash | 2-3 minutes |
| Mash & season | Mash with butter, milk, nutmeg | Gradually add liquids | 3-5 minutes |
Preparing the Meat Filling
- Sauté Aromatics: Heat 2 tablespoons of oil in a frying pan over medium heat. Add finely chopped onions (1 large) and minced garlic (3 cloves). Sauté until the onions turn translucent and fragrant, about 4–5 minutes.
- Cook the Meat: Add 1 pound of ground beef (or chicken/shrimp for variations) to the pan. Break it apart with a wooden spoon, cooking until browned and no longer pink, approximately 6–8 minutes.
- Add Tomatoes and Seasoning: Stir in 2 chopped tomatoes, 2 tablespoons of tomato paste, and ½ cup of beef broth. Sprinkle with salt (1 tsp), black pepper (½ tsp), and paprika (1 tsp) to build a rich flavor.
- Simmer to Reduce: Lower the heat and let the mixture simmer until liquid reduces and blends well with the meat, about 10 minutes. The filling should be thick and savory, perfectly complementing the cassava topping.
- Optional Add-ins: Incorporate sliced green olives (¼ cup) or fresh herbs like parsley for extra complexity.
| Ingredient | Quantity | Purpose |
|---|---|---|
| Onions | 1 large, chopped | Base aromatics |
| Garlic | 3 cloves, minced | Flavor enhancer |
| Ground beef | 1 pound | Protein filling |
| Tomatoes | 2, chopped | Moisture and freshness |
| Tomato paste | 2 tablespoons | Deepens tomato flavor |
| Beef broth | ½ cup | Adds richness and moisture |
| Salt | 1 teaspoon | Seasoning |
| Black pepper | ½ teaspoon | Seasoning |
| Paprika | 1 teaspoon | Adds smoky warmth |
| Green olives | ¼ cup (optional) | Adds briny contrast |
We now have both the rich, creamy cassava mash and the savory, well-seasoned meat filling perfectly prepped for layering in our Escondidinho.
Instructions
Follow these detailed steps to create an authentic Escondidinho with creamy mashed cassava and a rich, savory filling. We will guide you through each stage to guarantee perfect layers and flavors.
Making the Mashed Cassava
- Peel and cut 2 pounds of fresh cassava into 2-inch pieces.
- Place cassava pieces in a large pot and cover with cold water. Add a pinch of salt.
- Bring to a boil over medium-high heat. Reduce heat and simmer for 20 to 25 minutes or until cassava is tender and easily pierced with a fork.
- Drain the cassava using a colander and let it cool slightly.
- Remove the fibrous core from the center of each piece for a smoother mash.
- Transfer cassava to a mixing bowl. Add 1 cup milk (warm), 3 tablespoons butter, and a pinch of nutmeg (optional).
- Mash vigorously using a potato masher or pass through a food mill until you achieve a smooth, creamy texture.
- Season with salt to taste and set aside while preparing the filling.
Cooking the Meat Filling
- Heat 2 tablespoons olive oil in a large frying pan over medium heat.
- Add 1 finely chopped onion and sauté for 3-4 minutes until translucent.
- Stir in 3 minced garlic cloves and cook for an additional minute until fragrant.
- Add 1 pound ground beef (or your choice of protein) and cook, stirring frequently until browned evenly.
- Mix in 2 chopped tomatoes, 2 tablespoons tomato paste, and 1/2 cup beef broth.
- Season with 1 teaspoon paprika, 1/2 teaspoon black pepper, 1 teaspoon salt, and 1/2 teaspoon dried oregano.
- Reduce heat to low and simmer uncovered for 10-15 minutes, stirring occasionally, until mixture thickens and flavors meld.
- Optional: Stir in sliced green olives for extra depth.
Assembling the Escondidinho
- Preheat your oven to 350°F (175°C).
- Lightly grease a 9×13 inch baking dish with butter or cooking spray.
- Spread half of the mashed cassava layer evenly on the bottom of the dish.
- Spoon the entire meat filling over the cassava, spreading it out evenly.
- Cover the filling with the remaining mashed cassava layer, smoothing the surface.
- Sprinkle 1 cup shredded mozzarella cheese and 1/4 cup grated Parmesan evenly over the top for a delicious cheesy crust.
Baking the Escondidinho
- Place the assembled dish in the preheated oven.
- Bake uncovered for 25-30 minutes until the top is golden brown and bubbling.
- Optional: In the last 5 minutes, broil on high for a more intense golden crust—watch carefully to prevent burning.
- Remove from oven and let rest for 5-10 minutes before serving to allow flavors to settle.
| Step | Time | Temperature | Notes |
|---|---|---|---|
| Boil cassava | 20-25 minutes | Medium-high heat | Cook until tender |
| Simmer meat filling | 10-15 minutes | Low heat | Thicken sauce and meld flavors |
| Bake Escondidinho | 25-30 minutes | 350°F (175°C) | Bake until golden and bubbly |
| Optional broil | 5 minutes | High | For golden crust, watch carefully |
Following these instructions ensures our Escondidinho recipe delivers the perfect balance of creamy cassava and savory filling in every wholesome bite.
Serving Suggestions
To enjoy our Escondidinho at its best, consider these serving ideas that complement the rich layers of creamy cassava and savory filling.
Pairing with Side Dishes
- Serve Escondidinho alongside a fresh, crisp salad to balance its hearty texture. A simple arugula salad with cherry tomatoes, olive oil, and a splash of lemon juice works beautifully.
- For a traditional Brazilian touch, add vinaigrette salsa made from diced tomatoes, onions, bell peppers, and vinegar as a vibrant side.
- Roasted vegetables like carrots, zucchini, or bell peppers also pair perfectly, adding color and nutrition.
Accompanying Beverages
- A chilled glass of white wine, such as Sauvignon Blanc or Chardonnay, complements the creamy and savory flavors.
- For non-alcoholic options, we suggest fresh limeade or coconut water to keep things fresh and light.
Garnishes and Toppings
- Sprinkle chopped fresh cilantro or parsley on top right before serving for added freshness and a pop of color.
- Add a dollop of sour cream or Greek yogurt on each serving for an extra creamy touch.
- For spice lovers, a few slices of fresh jalapeños or a drizzle of hot sauce add a pleasant kick.
Presentation Tips
- Serve Escondidinho straight from the baking dish for a rustic, comforting effect.
- Use individual ramekins for elegant single servings during dinner parties.
- Offer a cheese grater at the table for guests to add extra Parmesan or mozzarella as they like.
| Serving Idea | Description | Why it Works |
|---|---|---|
| Fresh Arugula Salad | Peppery leaves with tangy dressing | Cuts richness of cassava & meat layers |
| Vinaigrette Salsa | Diced veggies in vinegar dressing | Adds acidity & crunch |
| Roasted Vegetables | Oven-roasted seasonal vegetables | Provides warmth and nutritional balance |
| White Wine | Crisp, cold Sauvignon Blanc or Chardonnay | Enhances flavor, refreshes palate |
| Limeade or Coconut Water | Cold, natural non-alcoholic drinks | Offers light, sweet contrast |
Make-Ahead Tips
To enjoy our Escondidinho Recipe with minimal stress on serving day, strategic make-ahead preparation is key. Here’s how we can streamline the process while preserving the flavors and textures of this classic Brazilian comfort food.
Prepare and Store Components Separately
- Make the mashed cassava up to 2 days in advance. Once mashed with milk, butter, and nutmeg, transfer it to an airtight container. Chill it in the refrigerator. Before assembling, gently reheat to soften for easy spreading.
- Cook the meat filling fully the day before. Allow it to cool completely and store it covered in the fridge. This lets the flavors deepen overnight, enhancing taste.
- If using cheese toppings like mozzarella and Parmesan, grate and store them separately in the fridge to maintain freshness.
Tips for Reheating and Assembling
- When ready to assemble, remove the mashed cassava from the fridge and reheat it slowly in a saucepan over low heat, stirring frequently. Add a splash of milk if it thickens too much.
- Warm the meat filling slightly in a skillet or microwave to ensure it spreads smoothly.
- Assemble the Escondidinho layers as usual and bake immediately to achieve that signature bubbling and golden crust.
Freezing for Longer Storage
If we want to extend the preparation:
| Component | Freezing Duration | Preparation for Reheating |
|---|---|---|
| Mashed cassava | Up to 1 month | Thaw overnight in the fridge, reheat gently on stove with milk |
| Meat filling | Up to 3 months | Thaw overnight, reheat in skillet |
| Fully assembled Escondidinho (uncooked) | Up to 1 month | Thaw overnight in fridge, bake as directed |
Pro Tip: Wrap components tightly with plastic wrap and foil to prevent freezer burn and preserve moisture.
Day-Of Assembly Efficiency
- Assemble directly in the baking dish to reduce cleanup.
- Pre-grate cheese and have toppings ready to save time.
- Consider using an oven-safe dish with a tight-fitting lid or covering with aluminum foil during baking to keep moisture locked in.
By following these Make-Ahead Tips we ensure that preparing our Escondidinho is both convenient and yields a deliciously rich and satisfying dish every time.
Conclusion
Escondidinho offers a comforting blend of creamy cassava and flavorful fillings that’s sure to become a favorite in our kitchens. Its versatility means we can easily adapt it to suit any taste or occasion, making it a truly crowd-pleasing dish.
With the right ingredients, tools, and preparation tips, creating this Brazilian classic is straightforward and rewarding. Whether we’re cooking for a family dinner or a special gathering, Escondidinho brings warmth and satisfaction to every bite.
Frequently Asked Questions
What is Escondidinho?
Escondidinho is a traditional Brazilian comfort food featuring creamy mashed cassava layered over savory meat or vegetable fillings. Its name means “hidden” in Portuguese, referring to the filling concealed beneath the mashed cassava.
What ingredients are needed to make Escondidinho?
Key ingredients include fresh cassava, milk, butter, ground beef or alternatives, onions, garlic, tomatoes, tomato paste, broth, spices, and cheeses like mozzarella and Parmesan. Optional extras can be green olives and nutmeg.
What kitchen tools do I need for Escondidinho?
You’ll need a large pot, colander, mixing bowls, frying pan, potato masher or food mill, measuring cups, baking dish, grater, and aluminum foil (optional) to prepare and bake Escondidinho.
How do I prepare cassava for Escondidinho?
Peel, cut, and boil cassava until soft, then drain and mash with milk and butter until creamy. This forms the smooth top and bottom layers of the dish.
Can I use different fillings for Escondidinho?
Yes! Escondidinho is versatile; you can use ground beef, chicken, shrimp, or a vegetarian filling to suit your taste or dietary needs.
What is the best way to assemble Escondidinho?
Layer half the mashed cassava in a greased baking dish, spread the meat filling evenly, then cover with the remaining mash. Top with cheese and bake until golden and bubbly.
How long does it take to cook Escondidinho?
Boiling cassava takes about 20-30 minutes, simmering the meat filling around 15-20 minutes, and baking the assembled dish about 20-30 minutes at 350°F (175°C).
How should I serve Escondidinho?
Serve Escondidinho warm, paired with fresh arugula salad, vinaigrette salsa, roasted vegetables, and drinks like white wine or limeade. Garnish with fresh herbs or sour cream for extra flavor.
Can I prepare Escondidinho in advance?
Yes. Mash and meat filling can be made ahead and stored in the fridge for 1-2 days. You can also freeze components or the assembled dish for longer storage.
How do I reheat leftover Escondidinho?
Reheat leftovers in the oven at 350°F (175°C) until warmed through and the cheese is bubbly. Cover with foil to keep moisture, removing it toward the end to crisp the top.