
Baking cookies is always a joy but adding a touch of artistry makes it even more special. Embossing rolling pins transform simple cookie dough into beautifully patterned treats that impress at any gathering. These pins come with intricate designs that press directly into the dough creating stunning textures without extra effort.
Ingredients
To create perfectly patterned cookies using our Embossing Rolling Pin, we need to carefully prepare the dough with the right balance of ingredients. Each component plays a key role in ensuring the patterns hold beautifully and the cookies bake evenly.
Dry Ingredients
We start with the dry ingredients, which provide structure and texture to our cookie dough:
- 2 ½ cups all-purpose flour, sifted for smoothness
- 1 teaspoon baking powder to help with slight rise
- ½ teaspoon salt to enhance flavor
- 1 cup powdered sugar for a fine texture that blends well with embossing
Wet Ingredients
Next, we combine the wet ingredients, which add moisture and richness needed to form a pliable dough:
- 1 cup (2 sticks) unsalted butter, softened at room temperature
- 1 large egg for binding
- 2 teaspoons pure vanilla extract for aroma and flavor
Optional Add-ins and Decorations
To customize our cookies, we can incorporate these optional elements without compromising the embossing effect:
- ½ teaspoon almond extract for a unique flavor twist
- Edible pearls or sprinkles, to add decorative accents after embossing
- Food coloring gel to tint the dough lightly, making embossed patterns pop visually
| Ingredient Category | Key Ingredients | Purpose |
|---|---|---|
| Dry Ingredients | Flour, Baking powder, Salt, Powdered sugar | Structure, texture, flavor |
| Wet Ingredients | Butter, Egg, Vanilla extract | Moisture, binding, aroma |
| Optional Add-ins | Almond extract, Sprinkles, Food coloring | Flavor, visual appeal, decoration |
With these ingredients ready, we’ll have a dough that rolls out smoothly and perfectly captures the delicate details of our embossing rolling pin every time.
Equipment Needed
To achieve perfect Embossing Rolling Pin Cookies, having the right tools is essential. Let’s review the primary equipment that will ensure smooth dough handling and stunning embossed patterns.
Embossing Rolling Pin
An embossing rolling pin is the centerpiece of this recipe. It allows us to imprint intricate designs directly onto the cookie dough with ease. Look for these features when choosing one:
| Feature | Description |
|---|---|
| Material | Wood or food-grade silicone for durability and ease of cleaning |
| Design | Clear, detailed patterns suitable for cookie size |
| Size | Standard rolling pin length (~12-15 inches) |
| Handle Comfort | Ergonomic grips for consistent pressure |
Using this rolling pin, we press the desired patterns into the dough before baking, creating visually striking cookies that impress without extra decorating effort.
Mixing Bowls and Utensils
To prepare our cookie dough perfectly, we need:
- Mixing Bowls: At least two sizes — a large bowl for combining dry ingredients and a medium bowl for creaming wet ingredients.
- Whisk and Spatula: The whisk helps blend dry ingredients evenly while the silicone spatula folds wet and dry mixtures gently, preserving texture.
- Hand Mixer or Stand Mixer: For thoroughly creaming butter and sugar to achieve the ideal dough consistency.
- Measuring Cups and Spoons: Accurate measurements ensure the dough holds embossing patterns without cracking or spreading excessively.
Proper tools keep our process precise and dough consistent, crucial for capturing every embossed detail.
Baking Sheets and Parchment Paper
For baking, we rely on:
- Baking Sheets: Heavy-gauge, rimmed baking sheets prevent warping and allow even heat distribution, which keeps embossing patterns crisp.
- Parchment Paper: Non-stick parchment liners help cookies bake evenly, prevent sticking, and protect embossed designs while transferring.
We recommend preparing multiple baking sheets in advance for batch baking to maintain shape and detailed patterns.
Prep Work
Before we begin shaping our Embossing Rolling Pin Cookies, prepping the dough properly is essential to achieve crisp, detailed patterns that stand out. Careful steps in dough preparation and chilling ensure the best imprint and texture.
Preparing the Dough
We start by cream the unsalted butter and powdered sugar together until light and fluffy using a stand or hand mixer. This process incorporates air into the dough, giving our cookies a delicate texture. Next, we add the egg and vanilla extract, mixing thoroughly to combine. If we choose to use almond extract or food coloring, we add them now for extra flavor and color customization without affecting the embossing quality.
In a separate bowl, we sift together the all-purpose flour, baking powder, and salt for even distribution. Gradually, we add the dry ingredients to the wet mix, mixing at low speed until the dough begins to form a cohesive ball. The dough should feel soft but not sticky—just right for rolling.
| Ingredient | Measurement | Preparation Notes |
|---|---|---|
| Unsalted butter | 1 cup (2 sticks) | Softened |
| Powdered sugar | 3/4 cup | Sifted |
| Egg | 1 large | Room temperature |
| Vanilla extract | 1 teaspoon | Pure vanilla preferred |
| Almond extract (opt.) | 1/4 teaspoon | Optional |
| Food coloring (opt.) | As needed | Gel or liquid, a few drops |
| All-purpose flour | 2 1/2 cups | Sifted |
| Baking powder | 1/2 teaspoon | Fresh for best rise |
| Salt | 1/4 teaspoon | Fine salt preferred |
Chilling the Dough
We wrap the dough tightly in plastic wrap and chill it in the refrigerator for at least 1 hour. Chilling solidifies the butter helping the dough hold its shape during rolling and baking. Properly chilled dough also prevents the embossed patterns from smudging or spreading.
If pressed for time, we can chill the dough in the freezer for 20 to 30 minutes but never skip this crucial step. Once chilled, we gently roll out the dough on a floured surface to prevent sticking, ready for embossing with our rolling pin.
Rolling and Embossing the Cookies
Achieving the perfect Embossing Rolling Pin Cookie requires precise rolling and careful embossing. Let’s explore how to roll out the dough evenly and use the embossing rolling pin to create stunning patterns.
Rolling Out the Dough Evenly
Before embossing, we must roll the dough to a consistent thickness to ensure uniform baking and clear pattern impressions. Follow these steps for an even dough:
- Lightly flour your clean work surface and rolling pin to prevent sticking without drying the dough.
- Place the chilled dough on the floured surface and flatten it gently with your hand.
- Roll the dough outward from the center applying even pressure.
- To maintain an exact thickness, use rolling pin guides or place two wooden dowels of equal size on either side of the dough.
- Roll until the dough is about 1/4 inch (6 mm) thick — the ideal thickness for embossing.
“Uniform thickness ensures both flawless baking and sharp embossed designs.“
| Step | Action | Tip |
|---|---|---|
| 1 | Flour surface and rolling pin | Use minimal flour |
| 2 | Flatten dough by hand | Avoid tearing |
| 3 | Roll from the center evenly | Rotate dough 90° frequently |
| 4 | Use thickness guides | Ensures uniformity |
| 5 | Stop at 1/4 inch thickness | Ideal for crisp embossing |
Using the Embossing Rolling Pin
With the dough evenly rolled, here is how to work with the embossing rolling pin to imprint the exquisite patterns:
- Lightly dust the dough with flour or powdered sugar to help release the dough from the embossed grooves.
- Hold the rolling pin firmly and roll it over the dough with steady, even pressure away from you.
- Do not press too hard; moderate pressure captures intricate details while preventing dough from sticking or tearing.
- Roll the embossing pin once or twice over each section—avoid over-rolling which can blur patterns.
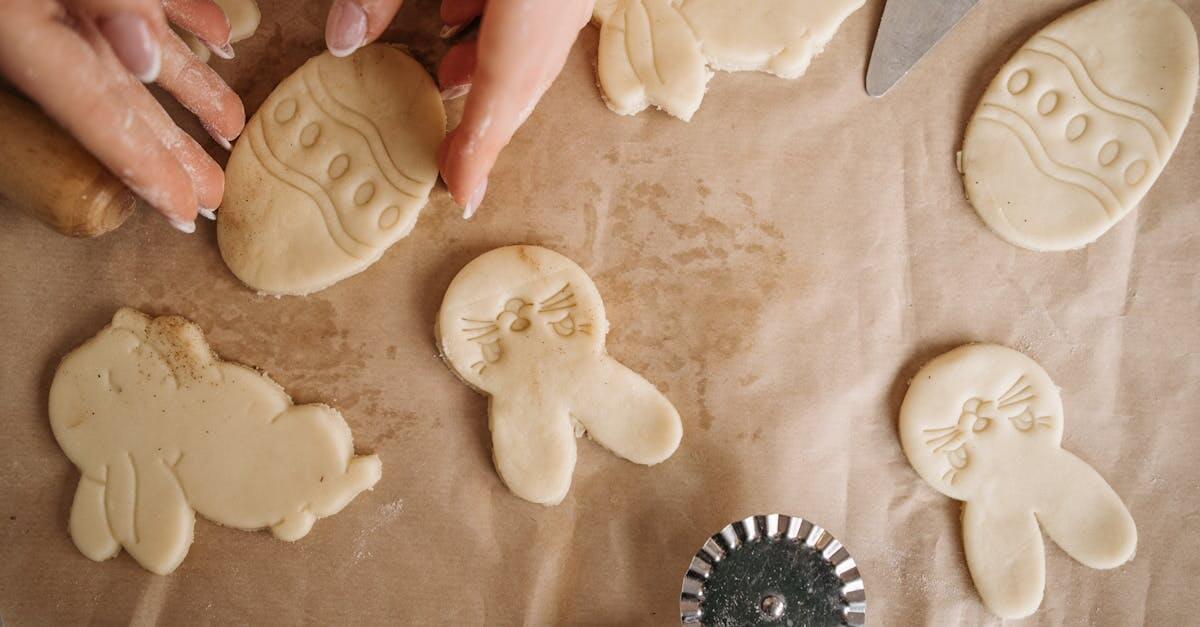
- Once embossed, use a sharp cookie cutter to cut shapes precisely around the patterns.
- Transfer cookies carefully to a parchment-lined baking sheet to preserve the embossing.
| Embossing Step | Description | Pro Tip |
|---|---|---|
| Dust dough lightly | Flour or powdered sugar sprinkled | Prevents sticking |
| Roll pin evenly | Smooth forward motion | Avoid rocking or dragging |
| Control pressure | Moderate to medium | Detailed patterns need finesse |
| Limit rolling passes | 1-2 passes per section | Keeps design sharp |
| Cut and transfer cookies | Use sharp cutters and gentle touch | Use spatula for safe transfer |
Cutting and Shaping the Cookies
Once our dough is perfectly embossed, the next crucial step is Cutting and Shaping the Cookies to preserve those intricate patterns and prepare them for baking. Proper technique here ensures that our Embossing Rolling Pin Cookie Recipe results in stunning, detailed cookies every time.
Choosing Cookie Shapes
When selecting shapes for our embossed cookies, it’s essential to pick designs that complement the rolling pin’s intricate patterns. Simple shapes with smooth edges such as circles, squares, or rectangles tend to highlight the embossing best. Avoid overly detailed cutters since fine edges may interfere with or distort the delicate patterns.
We recommend using sharp-edged cookie cutters to achieve clean cuts without squashing the embossed designs. Here’s a quick reference for ideal shapes:
| Shape | Benefit | Recommendation |
|---|---|---|
| Circle | Uniform, smooth edges | Classic and versatile |
| Square | Frames detailed embossing | Adds a modern appearance |
| Rectangle | Maximizes embossing visibility | Great for larger dough slabs |
Always press the cutter straight down without twisting to maintain the integrity of the embossing. Twisting can blur or distort the beautiful patterns we’ve worked hard to achieve.
Transferring Cookies to Baking Sheet
After cutting, transferring the cookies carefully is vital to protect the embossed design from damage. We use a thin, wide spatula for the best results.
- Gently slide the spatula underneath each cookie to lift it without bending.
- Transfer the cookie onto a parchment-lined baking sheet placed nearby.
- Space cookies about 1 to 2 inches apart to allow room for slight expansion without overlapping.
Pro Tip: If the dough feels too soft or sticky during transfer, chill the cut shapes in the refrigerator for 10-15 minutes before moving them. This firms the dough and helps preserve the embossing details.
By handling the cookies with care during both cutting and transferring, we ensure our embossed cookies bake evenly and beautifully display every delicate pattern.
Baking Instructions
To achieve perfectly embossed and beautifully baked cookies, precise control of baking time and temperature is essential. Follow these instructions carefully to ensure our Embossing Rolling Pin Cookies come out crisp with clear, detailed patterns every time.
Oven Temperature and Time
Set your oven to 350°F (175°C). This temperature allows the cookies to bake evenly without spreading too much, thus preserving the intricate embossing details.
- Arrange the cookies on a parchment-lined baking sheet, spaced about 2 inches apart.
- Bake for 10 to 12 minutes, checking at the 10-minute mark to prevent overbaking.
- Look for edges that are just lightly golden while the center remains slightly soft—this ensures crispness after cooling.
| Oven Temp (°F) | Oven Temp (°C) | Baking Time (minutes) | Visual Cue |
|---|---|---|---|
| 350 | 175 | 10 – 12 | Lightly golden edges, soft center |
If your oven runs hot or cookies are browning too quickly, reduce the temperature by 10-15 degrees and extend the baking time slightly.
Tips for Even Baking
- Use a heavy-gauge baking sheet to distribute heat evenly and minimize hot spots that can burn or underbake areas.
- Always preheat the oven fully before baking to maintain consistent temperature.
- Rotate the baking sheet halfway through baking for uniform color and texture.
- Avoid overcrowding the tray to allow hot air circulation around each cookie.
- For best embossing results, place the cookies only on parchment paper or a silicone baking mat to prevent sticking and preserve crisp bottoms.
- If the embossing appears to fade during baking, chill the cut cookies again for 10 to 15 minutes before placing them in the oven. This extra chill helps the dough hold firm and retain detailed patterns.
“Consistent temperature and attentive timing are key to baking embossed cookies that look as stunning as they taste.”
By following these baking instructions, our cookies will showcase the beautiful patterns from the embossing rolling pin with crisp edges and a tender inside.
Cooling and Decorating
After baking our Embossing Rolling Pin Cookies, cooling and decorating are vital steps to highlight the intricate designs and enhance their flavor and appearance.
Cooling the Cookies Properly
Proper cooling preserves the delicate embossed patterns while ensuring the cookies maintain their ideal texture. Once the cookies come out of the oven at 350°F (175°C) after 10 to 12 minutes baking:
- Transfer the baking sheet onto a wire rack immediately.
- Let the cookies cool on the baking sheet for 5 minutes to firm up slightly.
- Use a thin, wide spatula to carefully lift each cookie and place it flat on the wire rack.
- Allow complete cooling for at least 20 to 30 minutes, ensuring the cookies harden perfectly and the embossing details remain crisp.
| Cooling Stage | Duration | Purpose |
|---|---|---|
| On baking sheet | 5 minutes | Firming up cookies |
| On wire rack | 20-30 minutes | Cooling thoroughly and crisping |
Avoid stacking or packing the cookies while still warm as this can cause smudging or distortion of the embossed designs.
Optional Icing and Decorations
To further enhance our Embossed Rolling Pin Cookies, we can add light decorations that complement the detailed patterns without overwhelming them:
- Royal Icing: Use a thin consistency to fill embossed grooves gently. Coloring can be subtle pastel shades to emphasize patterns.
- Edible Pearls or Sprinkles: Place strategically on raised areas immediately after icing to add dimension.
- Food Coloring Accents: Apply lightly with a fine brush for shading or outlining details.
Follow these decoration tips to keep embossing visible and vibrant:
- Allow cookies to cool completely before icing.
- Use a piping bag with a small round tip for precision.
- Avoid heavy layers; keep icing thin to preserve texture.
- Let icing dry fully (1–2 hours) before stacking or storing to prevent smudging.
“Delicate decoration highlights the beauty of embossing rather than masking it, creating cookies that are as visually stunning as they are delicious.“
By paying attention to proper cooling and tasteful decoration, we ensure our Embossing Rolling Pin Cookie Recipe results in cookies that captivate both the eye and the palate.
Storage Tips
Proper storage of our Embossing Rolling Pin Cookies is essential to preserve their beautiful patterns and maintain their fresh, crisp texture for as long as possible.
How to Store Embossed Cookies
To keep our embossed cookies looking and tasting their best, follow these storage guidelines:
- Cool Completely before storing to avoid condensation that softens the embossed details.
- Use an airtight container to protect the cookies from air and moisture.
- Store layers of cookies separated by parchment paper to prevent sticking and damaging the embossed designs.
- Keep cookies at room temperature away from direct sunlight and heat sources.
- For longer storage, wrap cookies individually in plastic wrap and freeze for up to 2 months.
| Storage Method | Container Type | Temperature | Max Storage Time |
|---|---|---|---|
| Room temperature | Airtight container | 68–72°F (20–22°C) | Up to 1 week |
| Freezing | Wrapped tightly | 0°F (-18°C) | Up to 2 months |
Best Practices for Maintaining Texture and Freshness
To maintain the crisp texture and intricate detail of our embossed cookies, we recommend these best practices:
- Avoid stacking warm cookies to prevent embossing from distorting.
- Do not refrigerate cookies as cold moisture can cause softening.
- When freezing, allow cookies to return to room temperature before unwrapping to avoid condensation.
- If cookies soften over time, briefly re-crisp them in a preheated oven at 300°F (150°C) for 5 minutes.
- Use silica gel packets inside storage containers (non-edible) to control moisture if available.
“The key to preserving embossing detail lies in gentle, airtight storage and avoiding temperature fluctuations.”
By following these storage tips carefully, our Embossing Rolling Pin Cookies will remain stunning and fresh, delighting every bite with their perfect design and texture.
Conclusion
Embossing rolling pin cookies bring a unique charm to any baking project, turning simple dough into edible works of art. With the right recipe, tools, and techniques, we can create beautifully patterned cookies that impress both in appearance and taste. Taking care during every step—from mixing and chilling the dough to rolling, cutting, and baking—ensures the delicate designs stay sharp and the texture remains perfect.
By mastering these details, we not only elevate our baking skills but also add a personal touch to our treats. Whether for special occasions or everyday enjoyment, these embossed cookies make every bite a delightful experience worth sharing.
Frequently Asked Questions
What is an embossing rolling pin?
An embossing rolling pin is a baking tool with raised designs that imprint patterns onto cookie dough, creating beautifully textured cookies with minimal effort.
Which ingredients are essential for embossing rolling pin cookies?
Key ingredients include all-purpose flour, baking powder, salt, powdered sugar, unsalted butter, egg, and vanilla extract. Optional add-ins like almond extract and edible pearls can customize flavor and appearance.
Why is chilling the dough important?
Chilling solidifies the butter, firms the dough, and helps maintain crisp, detailed embossed patterns during rolling and baking.
How thick should the dough be rolled for embossing?
For best results, roll the dough to about 1/4 inch (6 mm) thickness to capture the embossing details clearly without tearing.
What type of cookie cutters work best?
Simple shapes with sharp edges, such as circles, squares, or rectangles, work best to preserve the embossed patterns after cutting.
How do I prevent embossing from fading during baking?
Chill cut cookies again before baking and bake at 350°F (175°C) for 10–12 minutes, avoiding overcrowding and rotating the baking sheet halfway.
How should embossed cookies be cooled?
Transfer cookies to a wire rack and let them cool for 20–30 minutes without stacking to prevent distortion of the embossed designs.
What are good decoration options that preserve embossing details?
Thin layers of royal icing, edible pearls, and food coloring accents can enhance cookies without covering or damaging the embossed patterns.
How should I store embossed cookies to keep them fresh and crisp?
Store completely cooled cookies in an airtight container with parchment paper between layers. Avoid stacking warm cookies or refrigerating; freeze individually for longer storage.
Can I re-crisp softened embossed cookies?
Yes, re-crisp softened cookies by warming them in a preheated oven for a few minutes to restore their texture and pattern sharpness.