
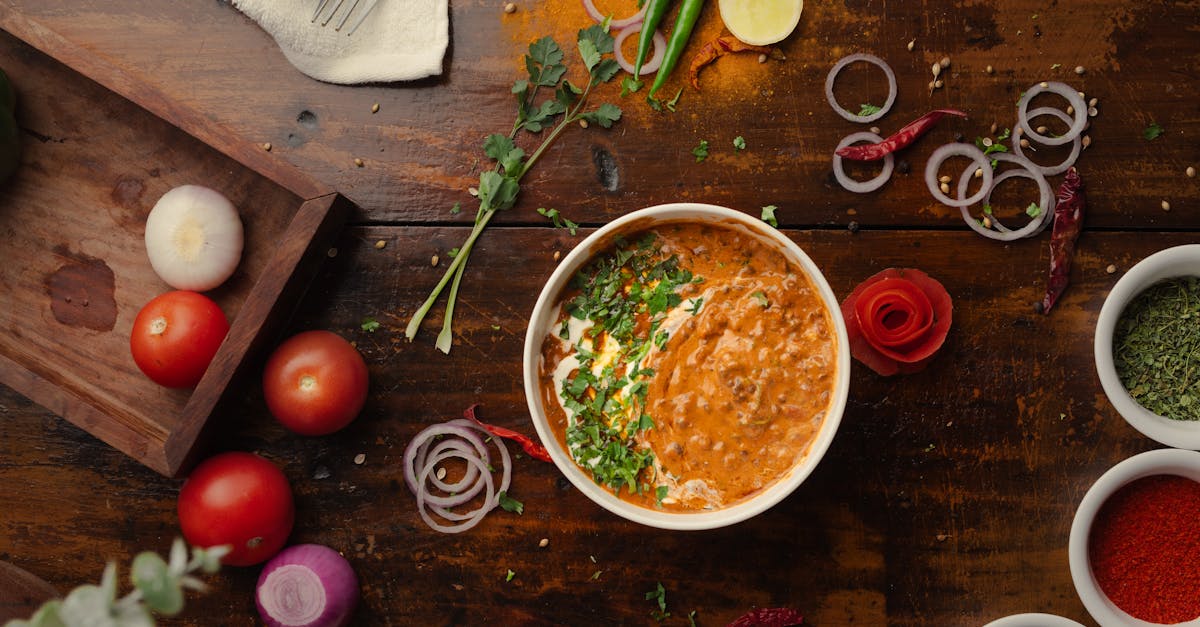
El Cid Chili is a bold and flavorful dish that brings a taste of Southwestern tradition right to our kitchen. Known for its rich blend of spices and hearty ingredients this chili stands out with its smoky depth and satisfying warmth. Whether we’re cooking for a cozy night in or a lively gathering El Cid Chili never fails to impress.
This recipe combines simple pantry staples with a few special touches to create a chili that’s both comforting and exciting. It’s perfect for those who love a little heat balanced with rich savory notes. Let’s dive into making our own pot of El Cid Chili and enjoy a dish that’s as vibrant as its name suggests.
Ingredients
To craft the authentic El Cid Chili, we gather a vibrant mix of ingredients that build layers of flavor. Each component plays a crucial role in achieving the perfect balance of heat, smokiness, and heartiness.
Meat and Protein
Our El Cid Chili centers around robust proteins that provide a rich, satisfying base:
- 1 lb ground beef (preferably 80% lean for optimal juiciness)
- 1/2 lb ground pork (adds depth and a subtle sweetness)
- 1 cup cooked pinto beans (for traditional Southwest texture and fiber)
Vegetables and Herbs
Fresh vegetables and fragrant herbs infuse the chili with brightness and complexity:
- 1 large yellow onion, finely chopped
- 3 cloves garlic, minced
- 1 cup diced green bell pepper
- 1 cup diced red bell pepper
- 1-2 jalapeño peppers, seeded and finely chopped (adjust for heat preference)
- 1/4 cup fresh cilantro, chopped (for garnish and flavor lift)
Spices and Seasonings
Bold spices define the smoky warmth of our chili blend, essential to the authentic taste:
| Spice | Quantity | Purpose |
|---|---|---|
| Ground cumin | 2 tablespoons | Earthy base flavor |
| Smoked paprika | 1 tablespoon | Adds smoky richness |
| Chili powder | 2 tablespoons | Core chili flavor and heat |
| Oregano (dried) | 1 teaspoon | Herbaceous undertone |
| Cayenne pepper | 1/2 teaspoon | Extra kick (optional) |
| Salt | 1 1/2 teaspoons | Enhances all flavors |
| Black pepper | 1 teaspoon | Mild heat and complexity |
Liquids and Broth
These liquids bring everything together into a luscious, hearty chili:
- 1 can (14.5 oz) diced tomatoes, with juices (adds acidity and texture)
- 1 cup beef broth (rich base and moisture)
- 1 cup tomato sauce (deepens color and body)
- 2 tablespoons Worcestershire sauce (for umami depth)
“The combination of these liquids ensures our chili has just the right balance between saucy richness and meaty thickness.”
This collection of ingredients embodies the spirit of El Cid Chili, delivering the flavor complexity and warmth that make it a Southwestern favorite.
Equipment Needed
To master the art of El Cid Chili, having the right equipment is crucial. Each tool helps us achieve the perfect balance between texture, flavor, and presentation. Here’s a detailed list of what we need to prepare this iconic Southwestern dish efficiently and expertly.
Essential Cookware and Tools
- Large Dutch Oven or Heavy-Bottomed Pot
This is our main cooking vessel. It ensures even heat distribution for browning the meat and simmering the chili to develop deep flavors.
- Wooden Spoon or Silicone Spatula
Perfect for stirring the chili without scratching the pot and for scraping up the flavorful bits from the bottom.
- Chef’s Knife
A sharp, sturdy chef’s knife is essential for finely chopping onions, bell peppers, garlic, and jalapeños with precision.
- Cutting Board
Use a large, clean cutting board to prep all fresh vegetables and herbs safely and efficiently.
- Measuring Spoons and Cups
Accurate measurement of spices like cumin, smoked paprika, and chili powder is key to replicating the authentic taste of El Cid Chili.
- Can Opener
For easily opening canned diced tomatoes and pinto beans.
- Colander
To rinse and drain the pinto beans before adding them to the chili, ensuring a clean and fresh flavor.
- Ladle
For serving the chili neatly into bowls without mess.
Optional But Useful Extras
- Immersion Blender
If we want a slightly thicker chili, an immersion blender helps puree a portion of the beans and tomatoes right in the pot for a creamier texture.
- Slow Cooker
Ideal for hands-off cooking, letting the chili simmer low and slow to deepen flavors over hours if time permits.
| Equipment | Purpose |
|---|---|
| Large Dutch Oven | Brown meat, simmer chili evenly |
| Wooden Spoon / Spatula | Stirring without damaging cookware |
| Chef’s Knife | Chopping fresh vegetables |
| Cutting Board | Safe vegetable and herb prep |
| Measuring Spoons & Cups | Accurate spice and liquid measurements |
| Can Opener | Opening canned ingredients |
| Colander | Rinsing and draining beans |
| Ladle | Serving chili |
| Immersion Blender (optional) | Creating thicker chili texture |
| Slow Cooker (optional) | Slow simmer for intensified flavor |
Having these tools on hand streamlines our cooking process and ensures our El Cid Chili Recipe comes out flawlessly every time.
Prep Work
Getting the prep work right sets the foundation for our El Cid Chili’s bold and hearty flavor. Let’s break down the essential steps for preparing meat, chopping vegetables, and measuring spices to ensure every element shines.
Preparing Meat
For El Cid Chili to achieve its rich depth, we start by handling our proteins properly:
- Use 1 pound ground beef and 1 pound ground pork to get the traditional meat blend.
- Pat the meat dry with paper towels to remove excess moisture. This helps brown the meat evenly and deeply.
- Heat your Dutch oven over medium-high heat, add a dash of oil, and carefully brown the meat in batches. Avoid overcrowding the pan to ensure a proper sear.
- Season lightly with salt and pepper during browning to build seasoning from the start.
This step creates the meaty base where flavors will build through caramelization and Maillard reactions.
Chopping Vegetables
Fresh vegetables bring brightness and texture to our El Cid Chili. Precise chopping ensures even cooking and flavor distribution:
| Vegetable | Prep Instruction | Quantity |
|---|---|---|
| Yellow onions | Peel and dice finely | 2 medium |
| Garlic cloves | Peel and mince | 4 cloves |
| Bell peppers | Core, seed, and dice | 2 (mixed colors) |
| Jalapeños | Remove seeds for less heat; mince | 2 |
- We dice onions to about ¼-inch cubes for a balance of texture and melting into the chili base.
- Mince garlic finely to release aromatic oils.
- Bell peppers add subtle sweetness and a pop of color; uniform dice helps them blend evenly.
- Jalapeños contribute vibrant heat. Removing seeds controls spiciness but keeps the flavor intact.
Measuring Spices
The secret to authentic El Cid Chili’s signature warmth lies in a precise spice blend:
| Spice | Amount | Purpose |
|---|---|---|
| Ground cumin | 2 tsp | Earthy smoky undertone |
| Smoked paprika | 2 tsp | Adds deep smoke flavor |
| Chili powder | 3 tbsp | Primary heat and chili essence |
| Oregano (dried) | 1 tsp | Herbal complexity |
| Cayenne pepper | ¼ tsp (optional) | Adds extra kick if desired |
- Use measuring spoons for accuracy; too much chili powder or cayenne can overpower the dish.
- Combine spices in a small bowl before adding to your pot for even distribution.
- Toast ground cumin and chili powder briefly in dry heat if desired to deepen spice aroma.
With meat browned, vegetables chopped precisely, and spices measured exactly, our El Cid Chili is primed to reach its full savory potential.
Directions
Follow these steps closely to transform our ingredients into the robust and flavorful El Cid Chili. Each stage builds layers of flavor that define this classic Southwestern dish.
Browning the Meat
- Heat a large Dutch oven over medium-high heat.
- Add 1 pound ground beef and 1 pound ground pork to the pot, breaking the meat apart with a wooden spoon.
- Cook the meat until thoroughly browned, about 7-8 minutes, stirring occasionally to ensure even cooking.
- Drain excess fat to prevent greasiness but leave enough to carry flavor.
- Transfer the browned meat to a bowl and set aside.
Sautéing Vegetables
- In the same Dutch oven, add 2 tablespoons of olive oil.
- Add 1 large chopped onion, 3 minced garlic cloves, 1 chopped green bell pepper, and 1 finely diced jalapeño (seeds included for heat).
- Sauté over medium heat for 5-6 minutes until vegetables soften and onions turn translucent.
- Stir frequently to prevent burning and to release their natural sweetness.
Adding Spices and Liquids
- Return the browned meat to the pot with sautéed vegetables.
- Stir in the following spices for signature El Cid Chili flavor:
| Spice | Amount |
|---|---|
| Ground cumin | 2 teaspoons |
| Smoked paprika | 1 tablespoon |
| Chili powder | 2 tablespoons |
| Dried oregano | 1 teaspoon |
| Cayenne pepper (optional) | 1/4 teaspoon |
- Toast the spice mixture for 1-2 minutes, stirring constantly to release deep aromas.
- Add 1 can (14.5 oz) diced tomatoes, 2 cups beef broth, 1 tablespoon Worcestershire sauce, and 1 can (15 oz) cooked pinto beans, including liquid.
- Stir well to combine all ingredients thoroughly.
Simmering the Chili
- Bring the mixture to a gentle boil.
- Reduce heat to low and cover the Dutch oven with a tight-fitting lid.
- Let the chili simmer for at least 1 hour, stirring occasionally.
- Adjust seasoning with salt and pepper to taste during the last 10 minutes.
- For thicker chili, remove the lid in the final 15 minutes to allow excess liquid to evaporate.
- Optionally, use an immersion blender to slightly puree part of the chili for a creamier texture without losing robust chunks.
Pro Tip: Slow simmering is the key to unlocking the deep, smoky richness that makes the El Cid Chili so unforgettable. Patience here ensures every bite bursts with warmth and bold Southwestern character.
Serving Suggestions
Serving El Cid Chili perfectly enhances its smoky depth and bold Southwestern flavors. Let’s explore delicious ways to elevate your chili experience with thoughtful toppings and complementary sides.
Toppings and Garnishes
Adding fresh toppings balances the rich, hearty nature of El Cid Chili while amplifying its vibrant character. Consider these must-have garnishes:
- Shredded sharp cheddar or Monterey Jack cheese for creamy richness
- Sour cream or Greek yogurt to add a cooling contrast to the chili’s heat
- Chopped fresh cilantro for a bright herbal note
- Diced red onions or scallions to provide a crisp, mild bite
- Sliced avocado to introduce buttery texture and mellow spice
- Jalapeño slices for an extra kick of heat
- Crunchy tortilla strips or crushed corn chips for textural contrast
- Fresh lime wedges to squeeze over for a subtle citrus burst
These toppings let us customize heat and texture, turning each bowl of El Cid Chili into a personal masterpiece.
Side Dishes to Pair
Complement your El Cid Chili with sides that enhance its flavor profile and complete the meal. Here are our top recommended pairings:
| Side Dish | Description | Why It Works |
|---|---|---|
| Cornbread | Moist, slightly sweet bread with a crumbly crust | Balances the smoky heat and soaks up chili juices |
| Mexican Rice | Fluffy rice cooked with tomato and mild spices | Adds subtle flavor and texture contrast |
| Grilled Vegetables | Zucchini, bell peppers, and onions charred on the grill | Offers smoky notes that complement the chili |
| Refried Beans | Smooth & creamy pinto or black beans | Enhances the chili’s heartiness and protein |
| Fresh Garden Salad | Crisp greens with a light vinaigrette | Provides a refreshing, crunchy balance |
By pairing with these sides, we create a harmonious dining experience that highlights the depth of El Cid Chili without overpowering it.
Make-Ahead and Storage Tips
Mastering the El Cid Chili recipe means unlocking its rich flavors over time. Here’s how we can make ahead and store this hearty chili to enjoy its bold Southwestern character anytime.
Make-Ahead Tips
- Prepare the chili up to the simmering stage as instructed.
- Cool it slightly, then transfer to an airtight container.
- Refrigerate for up to 3 days to allow flavors to meld and deepen.
- For a flavor boost, reheat gently on the stovetop, stirring occasionally.
- Alternatively, make the chili 1-2 days ahead to maximize the savory notes that develop during chilling.
Freezing Instructions
- Let the chili cool completely before freezing.
- Portion into freezer-safe containers or heavy-duty freezer bags for convenient defrosting.
- Seal tightly to prevent freezer burn.
- Label with the date to keep track of freshness.
| Storage Method | Duration | Tips |
|---|---|---|
| Refrigerator | Up to 3 days | Store in airtight containers |
| Freezer | 3 to 4 months | Portion and seal well, thaw overnight |
Reheating Best Practices
- Thaw frozen chili in the refrigerator overnight.
- Reheat on low to medium heat, stirring frequently to prevent sticking.
- Add a splash of beef broth or water if chili thickens too much.
- Heating slowly retains the chili’s original texture and smoky depth.
Additional Storage Notes
- Avoid storing chili with dairy toppings; add those fresh when serving.
- Use glass or BPA-free plastic containers for storing to preserve taste.
- For a quick meal, freeze chili in individual portions for easy grab-and-go lunches or dinners.
“Proper storage not only keeps our El Cid Chili safe but enhances its rich, smoky flavor the next time we serve it.”
Following these Make-Ahead and Storage Tips ensures that every bite of our signature chili remains just as vibrant and satisfying as when freshly made.
Conclusion
El Cid Chili offers a bold and satisfying taste that brings Southwestern flavors right to our table. With its perfect balance of smoky spices and hearty ingredients, it’s a dish that invites us to savor every spoonful. Whether we’re cooking for a cozy night in or a festive gathering, this chili delivers warmth and depth that never disappoint.
By following the recipe and tips, we can confidently create a meal that’s both comforting and exciting. The versatility in toppings and sides lets us customize each bowl to our liking, making El Cid Chili a go-to favorite for any occasion. Let’s embrace the rich tradition this dish represents and enjoy the delicious results together.
Frequently Asked Questions
What is El Cid Chili?
El Cid Chili is a flavorful Southwestern chili made with ground beef and pork, pinto beans, fresh vegetables, and a blend of bold spices. It is known for its smoky depth and balanced heat, making it a comforting and hearty dish.
What ingredients are needed to make El Cid Chili?
Key ingredients include ground beef and pork, pinto beans, onions, garlic, bell peppers, jalapeños, diced tomatoes, beef broth, Worcestershire sauce, cumin, smoked paprika, chili powder, oregano, and optional cayenne pepper.
What equipment is essential for cooking El Cid Chili?
A large Dutch oven, wooden spoon, chef’s knife, and measuring cups are essential. Optional tools include an immersion blender for creamy texture and a slow cooker for hands-off simmering.
How should the meat be prepared for El Cid Chili?
Use a blend of 1 pound each of ground beef and pork. Brown the meat properly in your cooking pot to develop a rich base and enhance the chili’s flavor.
How long should El Cid Chili simmer?
The chili should simmer for at least one hour to develop deep, smoky richness and allow the flavors to fully meld.
What toppings go well with El Cid Chili?
Popular toppings include shredded cheese, sour cream, fresh cilantro, diced onions, avocado, jalapeño slices, tortilla strips, and lime wedges to customize flavor and texture.
What side dishes complement El Cid Chili?
Serve El Cid Chili with sides like cornbread, Mexican rice, grilled vegetables, refried beans, or a fresh garden salad for a balanced meal.
Can El Cid Chili be made ahead of time?
Yes, you can prepare the chili to the simmering stage, then cool and refrigerate it for up to three days or freeze in portions for longer storage.
How should I store leftover El Cid Chili?
Store cooled chili in airtight containers in the refrigerator (up to 3 days) or freeze it in sealed portions. Reheat gently, avoiding dairy toppings until serving.
How can I adjust the heat level in El Cid Chili?
Adjust heat by varying the amount of jalapeños and cayenne pepper in the spice mix. Add toppings like sour cream or avocado to tone down spiciness if needed.