
Who doesn’t love a light, fluffy cake that melts in your mouth? Dream Whip cake mix recipes bring that perfect balance of homemade charm and convenience. With its creamy texture and versatile flavor, Dream Whip takes ordinary desserts to the next level, making every bite feel like a celebration.
Dream Whip Cake Mix Recipes
When it comes to whipping up a luscious, soft, and celebratory dessert, Dream Whip Cake Mix Recipes bring convenience and flavor together seamlessly. These recipes create cloud-like layers of cake, combining the pre-mixed ease of boxed cake batter with the fluffy, creamy addition of Dream Whip. Let’s dive into the step-by-step process of crafting a perfect dessert using these recipes.
Classic Dream Whip Cake Recipe
This straightforward recipe uses simple ingredients to deliver a cake with a light texture and rich flavor. Here’s what you’ll need and how to create it.
Ingredients
- 1 package of Dream Whip (1.3 ounces)
- 1 package of white or yellow cake mix (15.25 ounces)
- 4 large eggs, at room temperature
- 1/2 cup vegetable oil
- 1 cup water
- 1 teaspoon vanilla extract
Steps
- Prepare the Oven and Pan: Preheat the oven to 350°F. Grease and lightly flour a 9×13-inch baking dish or two 8-inch round pans.
- Mix the Dry Ingredients: In a large mixing bowl, combine the cake mix and Dream Whip powder. Whisk together until evenly distributed.
- Add Wet Ingredients: Stir in the eggs, vegetable oil, water, and vanilla extract. Beat on low speed for 1 minute to combine.
- Whip the Batter: Increase to medium speed and beat for 4-5 minutes until the batter is smooth and fluffy. This step is key for incorporating air into the mix, ensuring the cake stays light and airy.
- Pour and Bake: Pour the batter evenly into prepared pans. Bake on the center rack for 30-35 minutes or until a toothpick inserted in the center comes out clean.
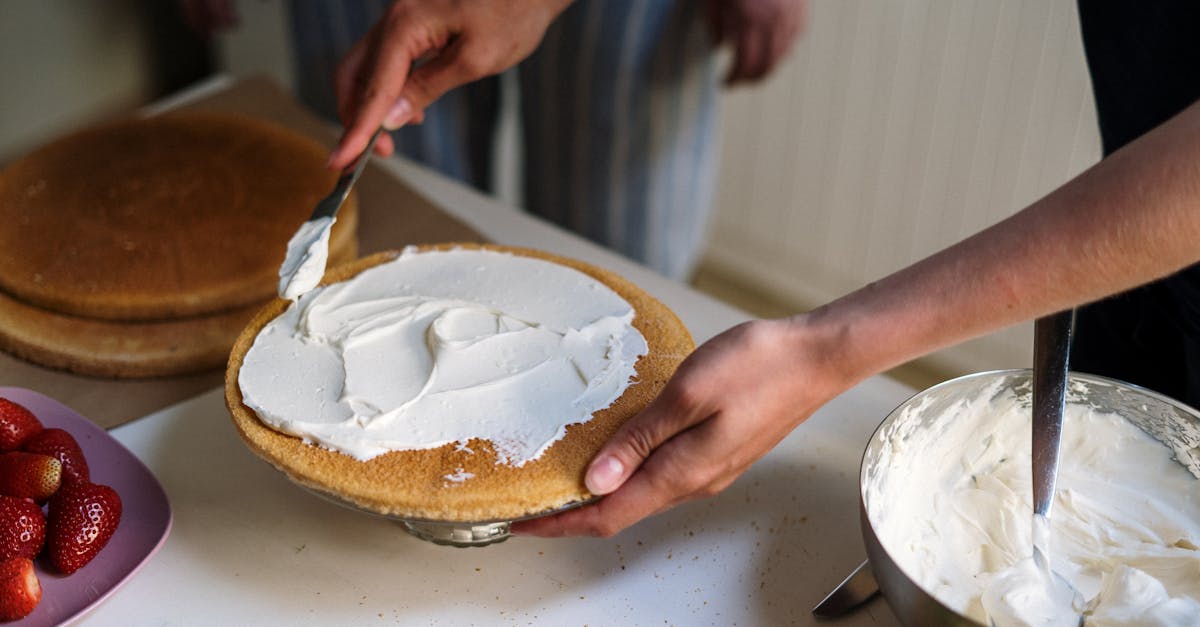
- Cool and Frost: Allow the cake to cool in the pan for 10 minutes before transferring to a wire rack to cool completely. Frost with your favorite icing or whipped topping for the finishing touch!
Chocolate Dream Whip Cake Variation
Add a chocolatey twist by substituting the white or yellow cake mix for a rich chocolate mix. Include Dream Whip as directed and pair with a glossy chocolate frosting or whipped ganache.
Pro Tips for Perfect Dream Whip Cakes
| Tip | Details |
|---|---|
| Don’t Overmix | Overmixing can break down the fluffiness provided by Dream Whip powder. |
| Use Room Temperature Eggs | Room temperature creates a smoother batter and helps ingredients blend evenly. |
| Customize Flavors | Add almond, lemon, or coconut extract to enhance flavor profiles. |
Creating bakery-style results has never been easier with Dream Whip Cake Mix Recipes. These desserts provide the perfect opportunity to showcase delicious flavor, impeccable texture, and homemade artistry effortlessly.
Ingredients
To create these light, fluffy desserts and elevate them into something extraordinary, we’ll need specific high-quality ingredients. Below are the components for both the cake and an optional dreamy frosting that will complement it perfectly.
Cake Ingredients
- 1 package (15.25 oz) of vanilla or yellow cake mix
- 1 envelope (2.6 oz) of Dream Whip Whipped Topping Mix
- 4 large eggs (room temperature)
- 1 cup (240 ml) of cold water
- 1/2 cup (120 ml) of vegetable oil
Frosting Ingredients (Optional)
- 1 envelope (2.6 oz) of Dream Whip Whipped Topping Mix
- 1/2 cup (120 ml) of cold milk
- 1 teaspoon of pure vanilla extract
- 2 cups (225 g) of powdered sugar (sifted for a smooth texture)
These thoughtfully chosen ingredients are essential for making an indulgent and perfectly textured Dream Whip cake. Use fresh and high-quality products for the best results. If you’re opting for frosting, its creamy yet light texture will beautifully complement the cake layers.
Tools And Equipment
To create the perfect Dream Whip cake, we need to have the correct tools and equipment ready. Using the right items helps ensure our cake is baked evenly, mixed properly, and presented beautifully. Below is a complete checklist of what we’ll need:
Essential Baking Tools
- Mixing Bowls: One large and one medium bowl for combining dry and wet ingredients separately.
- Electric Mixer or Stand Mixer: Helps whip the Dream Whip topping mix into a perfectly fluffy texture and blend cake batter evenly.
- Measuring Cups and Spoons: Precision is key for getting the ideal consistency. Use these for accurate measurements of cake mix, oil, water, and more.
- Rubber Spatula: For scraping down the sides of the mixing bowl and ensuring no ingredient is left behind.
- Whisk: Ideal for quickly blending dry ingredients or ensuring eggs are well-beaten when needed.
Baking Equipment
- Cake Pans: Two 9-inch round cake pans or a 9×13-inch rectangular cake pan, depending on the desired cake style. Grease them properly for easy release.
- Cooling Rack: Essential for allowing the cake to cool evenly and avoid soggy bases.
- Oven Thermometer: Ensures the oven is at the correct temperature, as precision is critical for consistent results with Dream Whip recipes.
- Pastry Brush: Useful for greasing pans or for adding syrup or frosting touches if making layered cakes.
Optional Tools for Frosting and Decoration
- Offset Spatula: For the smooth, professional application of frosting.
- Piping Bags and Tips: Great for adding decorative frosting details and borders.
- Cake Turntable: Helps us rotate the cake smoothly while frosting or decorating for precision.
Quick Reference Table
| Tool/Equipment | Purpose |
|---|---|
| Mixing Bowls | Combine wet and dry ingredients separately. |
| Electric/Stand Mixer | Whip Dream Whip and mix the cake batter. |
| Measuring Cups/Spoons | Ensure accurate ingredient measurements. |
| Rubber Spatula | Scrape bowl sides, avoid waste. |
| Cake Pans | Bake cakes uniformly and neatly. |
| Oven Thermometer | Maintain consistent oven temperature. |
| Cooling Rack | Cool cake evenly and prevent sogginess. |
By preparing these tools and equipment beforehand, we set the stage for a hassle-free baking experience that delivers a light, fluffy, and indulgent Dream Whip cake every time.
Directions
Follow these simple step-by-step instructions to create a perfectly light and fluffy Dream Whip cake. From preparing the batter to assembling and decorating, we’ll guide you through the process with ease and confidence.
Prep
- Preheat the oven to 350°F (175°C). Use an oven thermometer for accuracy.
- Grease and lightly flour two 9-inch round cake pans or line them with parchment paper to prevent sticking.
- Ensure all ingredients, such as the Dream Whip Whipped Topping Mix and eggs, are at room temperature. This helps with even mixing and creates a smoother batter.
- Set out your tools: mixing bowls, an electric mixer, measuring cups, and a rubber spatula.
Make The Cake Batter
- In a large mixing bowl, combine:
- 1 box of vanilla or yellow cake mix (about 15.25 oz.).
- 1 envelope of Dream Whip Whipped Topping Mix (approx. 1.3 oz.).
- 3 large eggs.
- 1 cup of cold water.
- 1/3 cup of vegetable oil.
- Use an electric mixer set to medium speed to beat the mixture for 2 minutes until smooth and homogenous. Make sure not to overmix as it can affect the cake’s rise and texture.
Bake The Cake
- Divide the batter evenly between the prepared pans. Spread it out with a rubber spatula for an even surface.
- Place the pans in the oven on the center rack and bake for 25-30 minutes, or until a toothpick inserted into the center comes out clean.
- Once baked, let the cakes cool in the pans for 10 minutes, then carefully remove them to a cooling rack. Allow the layers to cool completely before frosting or decorating.
Make The Frosting (Optional)
For a dreamy frosting to pair with your cake, follow these steps:
- In a mixing bowl, combine the following ingredients:
- 1/2 cup milk.
- 1 teaspoon pure vanilla extract.
- 1 envelope of Dream Whip Whipped Topping Mix.
- Beat the mixture using an electric mixer on high speed until it forms stiff peaks. Gradually add in 1 cup powdered sugar, continuing to beat until fully incorporated and smooth. Adjust the sweetness to your liking.
Assemble And Decorate
- Place one cooled cake layer on a serving plate. Spread a generous amount of frosting evenly over the top using an offset spatula.
- Place the second cake layer on top and frost the entire cake, including the sides.
- For a more decorative touch, fill a piping bag with frosting and create swirls, rosettes, or borders.
- Optional: Garnish the cake with sprinkles, chocolate shavings, fresh fruit, or edible flowers to elevate its presentation.
Here’s a quick summary of baking and decorating times in table form for your convenience:
| Step | Time Required |
|---|---|
| Prepping Ingredients | 10 minutes |
| Mixing Batter | 5-7 minutes |
| Baking | 25-30 minutes |
| Cooling & Frosting | 1 hour (cooling) + 10-15 minutes (frosting) |
Enjoy the homemade charm and dreamy texture of this exceptional Dream Whip cake! Perfect for any celebration or special occasion.
Tips For Best Results
When baking a Dream Whip cake, we want to achieve that perfect fluffy texture and balanced sweetness every time. Follow these carefully curated tips to transform your baking process and elevate your desserts to bakery-quality indulgence.
1. Use Room Temperature Ingredients
To ensure the batter mixes evenly, always use room temperature eggs, milk, and water. This helps blend the fats and liquids more efficiently, leading to a smooth, airy cake batter.
2. Avoid Overmixing
Overmixing can make the cake dense instead of light and fluffy. Mix the batter just until all ingredients are incorporated. An electric mixer set to low or medium speed works well. Remember, a few small lumps are okay.
3. Preheat Your Oven
Always preheat the oven before placing the cake inside. Maintaining the right temperature is critical for an evenly baked, risen cake. Use an oven thermometer to verify the internal temperature aligns with the recipe’s instructions.
4. Grease and Line Your Pans Properly
For effortless release and clean edges, grease the cake pans thoroughly or use parchment paper. This step ensures the cake layers slide out perfectly without sticking.
5. Measure Ingredients Accurately
Use proper measuring tools for precision. For dry ingredients, opt for measuring cups and level them with a knife to avoid accidentally adding too much. For liquids, use a clear measuring cup at eye level. Precision equals consistency.
6. Bake on the Middle Rack
Position your pans on the middle oven rack, ensuring no pans touch each other or the sides of the oven. This placement guarantees better heat distribution, preventing uneven cooking.
7. Allow the Cake to Cool Completely
Cooling the cake before frosting is crucial. Place the pans on a wire cooling rack and allow them to cool for 10 minutes before removing the cake. Afterward let the layers cool entirely at room temperature to avoid melting the frosting.
8. Enhance Flavor with Extracts and Add-Ins
While the recipe already includes vanilla, consider enhancing the flavor with almond extract, coconut extract, or citrus zest. These subtle additions can make your cake stand out.
9. Whip Dream Whip to Perfection
Follow the package directions to prepare Dream Whip Whipped Topping Mix precisely. Whipping it too little or too much can affect the light texture. Aim for soft peaks if incorporating directly into the batter or for firmer peaks when creating decorative frosting.
Table of Oven Temperature and Bake Times
To achieve consistent baking results, refer to this handy table for common cake pan sizes:
| Pan Size | Oven Temperature | Bake Time |
|---|---|---|
| 8-inch Round Pan | 350°F | 30-35 minutes |
| 9-inch Round Pan | 350°F | 28-32 minutes |
| Bundt Pan | 350°F | 40-45 minutes |
| Cupcake Tray | 350°F | 18-22 minutes |
10. Store Leftovers Properly
Store uneaten cake in an airtight container at room temperature for up to 2 days or refrigerate for extended freshness. If the cake is frosted with Dream Whip topping, always refrigerate to maintain its whipped consistency.
Variations And Add-Ons
Elevate your Dream Whip cake mix recipes with creative variations and irresistible add-ons that cater to every occasion! Whether you’re looking to experiment with new flavors or add decorative elements, we’ve got you covered with customizable ideas to make your cake truly unique.
1. Flavor Boosters
Layer in bold flavors with these simple tweaks to the base recipe:
- Citrus Zest: Add 1 tablespoon of orange, lemon, or lime zest to the batter for a refreshing twist.
- Extracts: Incorporate 2 teaspoons of almond, coconut, or even butter vanilla extract to infuse deeper flavors.
- Coffee Lovers: Replace 1/4 cup of the water with brewed espresso for a mocha-inspired cake.
2. Mix-Ins For Texture
Enhance the texture by folding in these delightful ingredients before baking:
- Chocolate Chips or White Chocolate Chips (1 cup) for gooey pockets of sweetness.
- Chopped Nuts (1/2 cup) like pecans, walnuts, or almonds for crunch.
- Fresh or Dried Fruit: Gently fold 1 cup of fresh blueberries, raspberries, or chopped dried apricots into the batter. Keep fruits lightly dusted with flour to prevent sinking.
3. Frosting And Decoration Add-Ons
- Whipped Cream Layers: Use Dream Whip itself as a light and airy alternative to buttercream frosting. Add a touch of powdered sugar and vanilla to taste.
- Sprinkles & Edible Glitter: Top frosted cakes with colorful sprinkles or edible glitter for a festive finish.
- Drizzles: Drizzle melted chocolate or caramel over the frosted cake for a decadent effect.
Optional Decorative Elements:
| Add-On | Quantity | Usage Idea |
|---|---|---|
| Crushed Oreos | 1 cup | Add to frosting or as a cake topping. |
| Shredded Coconut | 1/2 cup | Sprinkle around the sides of the cake. |
| Fresh Berries | 1–2 cups | Arrange on top for an elegant finish. |
| Mini Marshmallows | 1 cup | Scatter on top for a playful touch. |
4. Themed Variations
- Holiday Spice Cake: Add 2 teaspoons of cinnamon, 1 teaspoon of nutmeg, and 1/2 teaspoon of ground cloves to the dry mix. Pair with cream cheese frosting.
- Birthday Funfetti Cake: Stir in 1/4 cup of rainbow jimmies directly into the batter for a confetti-filled surprise.
- Chocolate Overload: Use a chocolate cake mix instead of vanilla and fold in 1/2 cup of cocoa powder for an ultra-chocolaty masterpiece.
5. Layering Ideas
Take your cake to the next level with eye-catching layers or fillings:
- Fruit Jam Layers: Spread strawberry or raspberry preserves between cake layers for a fruity complement.
- Mocha-Cream Layers: Add a layer of coffee-flavored whipped Dream Whip for a café-style dessert.
- Ganache Glaze: Pour warm chocolate ganache over stacked layers instead of frosting them completely.
Make-Ahead And Storage Instructions
Planning ahead and properly storing a Dream Whip cake guarantees that its light texture and dreamy flavors remain intact. Whether preparing the cake in advance for a special event or saving leftovers for later, following these instructions will ensure your cake stays as fresh and delicious as when it was first made.
Making the Cake Ahead of Time
- Prepare in Advance: Bake the cake as usual, ensuring it cools completely on a cooling rack to prevent condensation, which may affect texture.
- Frost Later: If you’re not planning to serve it immediately, avoid frosting the cake until the day of the event. This prevents the frosting from becoming sticky or overly soft during storage.
- Wrap it Up: Once cool, wrap each cake layer individually in plastic wrap to lock in moisture, then place them in a resealable plastic bag or airtight container.
We recommend storing the unfrosted cake layers in the refrigerator for up to 3 days, or freeze them for up to 3 months to maintain freshness.
Storing Leftover Frosted Cake
For cakes that have already been frosted with our dreamy vanilla frosting:
- Refrigeration: Cover the cake loosely with plastic wrap or a cake dome and store in the fridge for up to 5 days.
- Freezing: To freeze frosted slices, place them on a parchment-lined tray to firm up, then wrap tightly in plastic wrap followed by aluminum foil. Store in a freezer-safe container for up to 2 months.
Storage Tips for Best Results
Here’s a quick table to keep our storage recommendations clear and easy:
| Cake Type | Storage Method | Duration |
|---|---|---|
| Unfrosted Cake | Wrapped, Refrigerated | Up to 3 days |
| Unfrosted Cake | Wrapped, Frozen | Up to 3 months |
| Frosted Cake | Covered, Refrigerated | Up to 5 days |
| Frosted Cake | Wrapped, Frozen | Up to 2 months |
Reheating and Serving
When removing frozen cake layers or slices:
- Thaw Gradually: Place them in the refrigerator for several hours or overnight to thaw, ensuring even temperature changes.
- Room Temperature: Bring the cake to room temperature for 30-60 minutes before serving to recapture its soft, airy texture.
Conclusion
Dream Whip cake mix recipes open up a world of possibilities for creating desserts that are as indulgent as they are effortless. By combining high-quality ingredients with simple techniques, we can achieve bakery-style results right in our own kitchens. Whether it’s a classic cake or a creative variation, the light and fluffy texture paired with dreamy frosting makes every bite unforgettable.
With the right tools, tips, and a touch of creativity, these recipes are perfect for any occasion. From everyday treats to show-stopping celebration cakes, Dream Whip ensures each creation feels special. Let’s keep experimenting, customizing, and enjoying the magic of Dream Whip cakes!
Frequently Asked Questions
What is Dream Whip and why is it used in cake recipes?
Dream Whip is a powdered whipped topping mix that adds lightness and fluffiness to cakes. When mixed into a cake batter, it enhances the texture and flavor, giving the cake a bakery-style quality while maintaining the charm of homemade desserts.
What ingredients do I need for a basic Dream Whip cake?
For a basic Dream Whip cake, you’ll need a cake mix (vanilla or yellow), Dream Whip Whipped Topping Mix, eggs, cold water, and vegetable oil. For optional frosting, you’ll need milk, vanilla extract, and powdered sugar.
What equipment is essential to bake a Dream Whip cake?
Key tools include mixing bowls, an electric mixer, measuring cups and spoons, a whisk, rubber spatula, cake pans, a cooling rack, and an oven thermometer. Optional frosting tools, like an offset spatula and piping bags, can enhance your decorating experience.
How do I ensure my Dream Whip cake bakes perfectly?
To ensure perfect results, use room temperature ingredients, avoid overmixing the batter, preheat the oven, and bake on the middle rack. Properly grease and line the pans, and let the cake cool completely before frosting or serving.
Can I customize a Dream Whip cake for special occasions?
Yes! You can add flavor boosters like citrus zest or coffee, mix-ins such as chocolate chips or nuts, and decorate with whipped cream, sprinkles, or themed designs. Layering with fruit jams or ganache also elevates the cake for celebrations.
How do I store leftover Dream Whip cake?
Store unfrosted cake layers wrapped tightly in plastic wrap in the fridge for up to 3 days or freeze for up to 3 months. Frosted cakes should be covered loosely and refrigerated, or frozen in slices for longer storage.
Can I make a Dream Whip cake ahead of time?
Yes, you can bake the cake in advance. Allow it to cool completely, wrap the layers tightly, and store in the fridge or freezer. Frost the day of serving for the freshest presentation and flavor.
How do I reheat or serve a stored Dream Whip cake?
Thaw frozen cake layers gradually in the fridge, then bring to room temperature before serving. For frosted slices, allow them to sit at room temperature to restore their light and fluffy texture. Avoid overheating to maintain quality.