
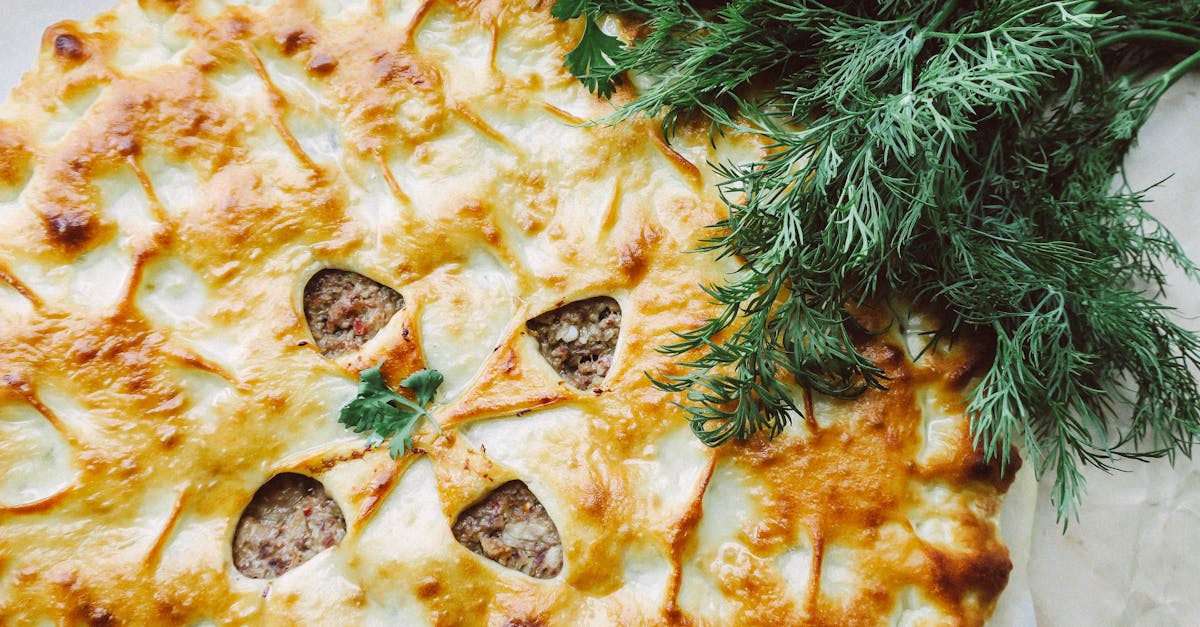
Who doesn’t love the aroma of freshly baked bread filling the kitchen? Our dill dough recipe takes that comforting experience to the next level with a burst of herby, tangy flavor. Dill, with its unique and vibrant taste, adds a refreshing twist to this soft and fluffy dough, making it perfect for rolls, loaves, or even a savory base for your favorite toppings.
Dill Dough Recipe
This Dill Dough Recipe will guide us through creating soft, herby dough infused with the fresh, aromatic flavor of dill. Whether we’re baking dinner rolls or a crusty loaf, this recipe guarantees a perfect balance of flavors and textures. Here’s how we can craft this versatile dough step by step.
Ingredients
- 2 ¼ teaspoons active dry yeast
- 1 cup warm water (about 110°F)
- 1 tablespoon granulated sugar
- 2 tablespoons olive oil (plus extra for greasing)
- 2 teaspoons salt
- 3 cups all-purpose flour (sifted for accuracy)
- 3 tablespoons fresh dill (minced) or 1 ½ tablespoons dried dill
- 1 teaspoon garlic powder (optional, for added flavor)
Steps to Prepare Dill Dough
- Activate the Yeast
In a large mixing bowl, combine the warm water, yeast, and sugar. Stir gently and let it sit for 5-7 minutes until the mixture becomes frothy. This step ensures the yeast is active and ready to give our dough an airy structure.
- Combine Wet Ingredients
Add olive oil and salt to the activated yeast mixture. Stir to blend the ingredients evenly.
- Incorporate Dry Ingredients Gradually
Gradually add the sifted all-purpose flour, one cup at a time. Start mixing with a spatula or wooden spoon. After the second cup, combine the minced dill and garlic powder directly into the dough. Mix until the dough begins to form a cohesive, slightly sticky structure.
- Knead the Dough
Transfer the dough to a floured surface. Knead for 8-10 minutes until smooth and elastic (the dough should spring back slightly when pressed with a finger).
- First Rise
Lightly grease a large bowl with olive oil. Place the kneaded dough in the bowl, turning once so it’s coated with oil. Cover with a clean kitchen towel and let it rise in a warm, draft-free area for 1 hour or until it doubles in size.
Pro-tip: If the room is cool, preheat the oven for a few minutes, then turn it off. Place the dough bowl inside for a cozy, controlled rising environment.
- Shape the Dough
Punch down the risen dough gently to release air pockets. Turn it onto a lightly floured surface and shape it as needed (rolls, loaves, or bases for flatbreads/toppings).
- Second Rise
Arrange the shaped dough on a greased baking tray or in a loaf tin. Cover again with a towel and let it rise for 30-45 minutes, ensuring it puffs up beautifully.
Baking Instructions
| Bakeware | Temperature | Time |
|---|---|---|
| Rolls | 375°F | 15-20 minutes |
| Loaf (8-inch pan) | 375°F | 30-35 minutes |
- Preheat the oven to 375°F.
- Bake based on the timing in the table. The bread should have a golden crust and sound hollow when tapped.
- Remove and cool on a wire rack for at least 15 minutes before slicing or serving.
Ingredients
Creating the perfect dill dough begins with assembling the right components. Below, we’ve grouped the ingredients into two key parts for clarity: For The Dough and For The Dill Mixture. Ensure all ingredients are prepped and measured for smooth preparation.
For The Dough
- 3 ¾ cups (450g) all-purpose flour – sifted for better texture
- 1 packet (2 ¼ tsp) active dry yeast – activated for optimal rise
- 1 ¼ cups (300ml) warm water (105–110°F) – aids in yeast activation
- ¼ cup (60ml) olive oil – adds moisture and flavor
- 2 tbsp (25g) granulated sugar – balances the herby notes
- 1 tsp (5g) salt – enhances all the flavors
For The Dill Mixture
- 3 tbsp fresh dill, finely chopped – use fresh for the best flavor; if unavailable, substitute with 1 tbsp dried dill
- ¼ cup (50g) sour cream – adds tang and creaminess to the dough
- 2 cloves garlic, minced – optional but recommended for extra depth
- Zest of ½ lemon – for a light, citrusy kick
- 1 tbsp melted unsalted butter – brushed over the dough post-baking for an aromatic touch
Having these ingredients on hand ensures a fragrant, well-balanced dough with the signature herbaceous flavor of dill.
Tools And Equipment
To prepare this aromatic dill dough recipe, we will need a set of essential tools and equipment that ensures the process is smooth and efficient. Below is a detailed list of items required, tailored to achieve the perfect, fluffy dough infused with fresh dill flavor. Each tool plays a specific role in creating a seamless baking experience.
Essential Tools
- Mixing Bowls: Use two large mixing bowls—one for combining the dry ingredients and another for the wet ingredients. A deep bowl can also help during the rising process.
- Measuring Cups and Spoons: Accurate measurements are crucial for a perfectly balanced dough. Ensure you have both liquid and dry measuring tools.
- Whisk: A sturdy whisk is ideal for incorporating dry ingredients evenly.
- Wooden Spoon or Spatula: A wooden spoon or silicone spatula works well for folding and mixing the dough before kneading.
- Kitchen Scale (optional): To weigh ingredients for consistent results, especially for flour.
- Dough Hook Attachment or Stand Mixer: If kneading by hand is not preferred, a stand mixer with a dough hook will save time and effort.
- Rolling Pin (if shaping): Perfect for evenly rolling the dough when shaping into rolls or specific forms.
- Bench Scraper: This makes handling and dividing the dough into portions easier.
Rising & Baking Essentials
- Clean Towel or Plastic Wrap: Use to cover the bowl during the rising stage. It retains warmth and moisture, essential for activating the yeast.
- Baking Sheet or Loaf Pan: Depending on your choice of baked good, a high-quality baking sheet for rolls or a loaf pan for bread is required.
- Parchment Paper: This prevents sticking during the baking process and simplifies cleanup.
- Basting Brush: To coat the dough with melted butter or an egg wash for a golden crust.
- Cooling Rack: Proper airflow after baking is crucial for preserving the texture and crust.
Temperature and Time Tools
- Thermometer: A food thermometer ensures the water for activating yeast is at the perfect temperature, around 105°F – 110°F.
- Kitchen Timer: Accurate timing ensures each stage (proofing, baking) is executed correctly.
Quick Reference Table
| Tool Name | Purpose |
|---|---|
| Mixing Bowls | Combining ingredients and allowing dough to rise. |
| Measuring Cups/Spoons | Ensuring accurate ingredient proportions. |
| Whisk | Evenly distributing dry ingredients. |
| Dough Hook/Stand Mixer | Effortlessly kneading the dough. |
| Baking Sheet/Loaf Pan | Shaping and holding the dough during baking. |
| Thermometer | Verifying proper yeast activation temperature. |
| Cooling Rack | Allowing baked goods to cool evenly. |
Directions
Follow these step-by-step instructions to craft a soft, herby dill dough that bursts with aromatic flavor. Each step ensures precision and highlights key techniques for flawless baking.
Prep
- Prepare the ingredients:
- Measure out all-purpose flour, active dry yeast, warm water, olive oil, granulated sugar, and salt for the dough.
- Finely chop fresh dill and combine it with minced garlic, lemon zest, sour cream, and melted unsalted butter for the dill mixture.
- Activate the yeast:
- Heat water to 110°F (use a thermometer for accuracy).
- Combine the warm water with 1 tablespoon of granulated sugar and 2 1/4 teaspoons of active dry yeast. Stir gently and let it sit for 5–10 minutes until a frothy layer forms, indicating the yeast is activated.
- Prepare tools:
- Set out a stand mixer with a dough hook attachment or prepare to knead by hand.
- Line baking sheets or loaf pans with parchment paper.
- Have a clean towel or plastic wrap ready to cover the dough for rising.
Making The Dough
- Combine dry ingredients:
- In a large mixing bowl, whisk together 3 cups of all-purpose flour and 1 teaspoon of salt. This ensures even distribution of salt in the dough.
- Add wet ingredients:
- Pour the activated yeast mixture into the bowl. Add 1/4 cup of olive oil and mix with a wooden spoon or spatula until a shaggy dough forms.
- Knead the dough:
- If using a stand mixer: Fit the dough hook and knead on medium speed for 8–10 minutes, until the dough is smooth and elastic.
- If kneading by hand: Turn the dough onto a floured surface and knead for 10 minutes using the heel of your hand. The dough should be soft and slightly tacky.
- First rise:
- Place the kneaded dough in a lightly oiled bowl, turning it once to coat the surface.
- Cover the bowl with a damp towel or plastic wrap. Let the dough rise in a warm place (75–80°F) for 1–1.5 hours until it doubles in size.
Incorporating The Dill
- Prepare the dill mixture:
- In a small bowl, thoroughly mix the fresh dill, minced garlic, lemon zest, sour cream, and melted unsalted butter. Set this aside.
- Deflate and fold in the dill mixture:
- Gently punch down the risen dough to deflate it. Turn it out onto a floured surface.
- Flatten the dough into a rectangle and evenly spread the dill mixture over the surface using a spatula.
- Shape the dough:
- Roll the dough inward like a log for loaf pans, or fold it multiple times for rolls or rustic loaves.
- Place the shaped dough onto prepared baking sheets or into loaf pans.
- Second rise:
- Cover the shaped dough with a towel or plastic wrap and let it rest for 30–40 minutes until puffed up.
- Bake:
- Preheat your oven to 375°F. Bake the dough for 25–30 minutes for rolls, or 35–40 minutes for loaves, until the crust is golden brown and the bread sounds hollow when tapped on the bottom.
- Cool:
- Transfer the baked dill bread onto a cooling rack and allow it to cool for at least 15 minutes before slicing or serving.
Baking Instructions
1. Preheat the Oven
We start by preheating the oven to 375°F (190°C). This ensures a consistent temperature, crucial for even baking. If you’re using a convection oven, set it to 350°F (175°C) for best results.
2. Prepare the Baking Equipment
Line your baking sheets or loaf pans with parchment paper or lightly grease them. This step is essential to prevent sticking and ensure easy removal of the baked dill dough.
3. Shape the Dough
Take the risen dough and gently punch it down to release any air bubbles. Shape it according to your preference:
- For rolls: Divide the dough into equal portions (approximately 2-inch balls) and place them on the prepared baking sheet, leaving enough space for expansion.
- For bread loaves: Shape the dough into a log form and place it in a greased loaf pan.
- For flatbreads: Roll the dough into a flattened circle or rectangle and transfer it onto a baking sheet.
4. Conduct the Second Rise
Cover the shaped dough lightly with a clean kitchen towel or plastic wrap. Let it rise again in a warm area for about 20–30 minutes, or until it puffs up slightly. This second rise is the key to achieving a fluffy texture.
5. Apply the Dill Topping
Brush the dough generously with the prepared dill mixture (sour cream, fresh dill, garlic, lemon zest, and melted butter) using a pastry brush. This step infuses the dough with aromatic and tangy flavors, creating a golden, savory crust.
6. Bake the Dough
Place the baking pans or sheets in the preheated oven. Bake according to the shape of the dough:
| Dough Shape | Baking Time | Visual Indicator |
|---|---|---|
| Rolls | 12–15 minutes | Golden brown tops |
| Loaf Bread | 25–30 minutes | Hollow sound when tapped on the crust |
| Flatbreads | 10–12 minutes | Firm edges with a light golden color |
Check the dough midway through, rotating the pans if needed to ensure even baking. Insert a kitchen thermometer into the center of the bread—it should read 190°F (88°C) when fully baked.
7. Cool the Baked Dough
Once baked, transfer the dill dough onto a cooling rack immediately. Allow it to cool for at least 15–20 minutes. Cooling ensures the interior sets properly, enhancing the texture and making it easier to slice or serve.
Tips For The Perfect Dill Dough
Creating the ultimate dill dough requires attention to detail at every stage of the process. By following these tips, we can ensure a soft, flavorful, and aromatic result every time.
1. Use Fresh Ingredients
Always opt for fresh dill, high-quality flour, and active yeast. Stale or expired ingredients can negatively affect the dough’s flavor and rising process. Fresh dill brings out the herbaceous and tangy notes, making a noticeable difference.
2. Temperature Matters
Monitor the temperature of your liquids. For activating yeast, water should be between 105°F and 115°F—warm enough to awaken the yeast but not so hot as to kill it. We recommend using a kitchen thermometer to maintain precision.
Quick Temperature Reference Table:
| Ingredient/Step | Temperature Range | Importance |
|---|---|---|
| Yeast activation | 105°F – 115°F | Ensures proper fermentation for dough rising |
| Room temperature dough resting | 70°F – 80°F | Ideal for consistent and even rising |
3. Knead Well
Proper kneading develops the gluten, which gives the dough its structure. Whether using a stand mixer with a dough hook or kneading by hand, aim for 8–10 minutes until the dough feels smooth and elastic. Overkneading, however, can make the dough tough, so keep a close eye.
4. Allow Ample Rising Time
Patience is key for perfect rising. After the first rise, the dough should at least double in size before shaping. Cover the dough with a clean towel or plastic wrap to prevent it from drying out. The second rise after shaping is equally important for achieving the desired fluffiness in the final product.
5. Enhance Flavor with Dill Mixture
Incorporate the dill mixture evenly into the dough for a balanced distribution of flavors. We recommend folding it in after the first rise to avoid diluting or breaking the dough. For an extra burst of aroma, reserve some dill mixture to apply as a topping before baking.
6. Shape with Care
When shaping rolls, loaves, or flatbreads, ensure even thickness throughout for consistent baking. For loaves, coat the pans with a thin layer of butter or parchment paper. Rolled shapes should be pinched at the seams to maintain their form during baking.
7. Watch Doneness Indicators
Bake until the crust is golden brown and the internal temperature reaches 190°F – 200°F for loaves. For rolls or smaller shapes, pressing the tops should feel firm but not hard. A hollow sound when tapping the bottom is also a reliable indicator of doneness.
By following these expert baking tips, we ensure our dill dough boasts the perfect texture, flavor, and aroma with every batch. Use these insights to elevate your baking game and create an herby masterpiece.
Serving Suggestions
When it comes to savoring our dill dough, the versatility in serving makes it a crowd-pleaser. The herby aroma and soft texture pair well with a variety of dishes or can shine as a standalone treat. Here are some thoughtful ways to serve this delicious creation:
1. Warm Rolls with Butter
Serve freshly baked dill rolls warm with a slather of softened herbed butter or plain unsalted butter. The tangy dill flavor complements the creamy richness of butter for a simple yet indulgent snack.
2. Loaf Served with Soups or Stews
Slice a dill loaf and serve alongside hearty soups or stews. The herby notes from the dill add depth to creamy tomato soup or savory beef stew. Try toasting slices for an extra crunch.
3. Savory Sandwiches
Transform your dill loaf into the perfect base for a savory sandwich. Pair with deli meats like roasted turkey or smoked ham, and add toppings like lettuce, tomatoes, and a dab of herb mayo to enhance the flavors.
4. Flatbread for Dips and Spreads
Use the dill dough to create dill flatbreads, ideal for scooping dips like tzatziki, hummus, or spinach-artichoke spread. The hints of dill elevate the flavors in the dips, making it a perfect party platter option.
5. Accompaniment to Cheese Boards
Cut the dill loaf or rolls into small slices and add them to your cheese board for a rustic touch. The herby tang pairs excellently with soft cheeses like brie, camembert, or tangy goat cheese. Add some olives and nuts for a well-rounded board.
6. Toast with Poached Eggs
Lightly toast slices of the dill loaf and top them with poached eggs for a gourmet breakfast. Sprinkle some cracked black pepper and a drizzle of olive oil for a quick yet fancy dish.
Quick Reference Table for Serving Suggestions
| Dill Dough Form | Suggested Use | Complementing Ingredients |
|---|---|---|
| Rolls | Served warm with butter | Herbed or unsalted butter |
| Loaf | Side for soups or stews, or sandwiches | Tomato soup, beef stew, deli meats, herb mayo |
| Flatbread | Scooping dips and spreads | Tzatziki, hummus, spinach-artichoke spread |
| Slices for Boards | Paired with cheese and garnishes | Brie, goat cheese, olives |
| Toast | Breakfast base with poached eggs | Eggs, olive oil, black pepper |
Pro Tip:
For an extra aromatic touch, sprinkle fresh dill leaves or a pinch of sea salt over the loaf or rolls before serving. This enhances the herbaceous notes and adds visual appeal.
Make-Ahead And Storage Instructions
Preparing dill dough in advance can save time and ensure you always have fresh, herby dough ready for baking. Let’s dive into the best practices for making it ahead and storing it properly to maintain its signature flavors and fluffy texture.
Make-Ahead Preparation
Making the dill dough ahead of time is straightforward and ensures convenience without compromising quality. Follow these steps:
- After the First Rise: Once the dough has doubled in size, punch it down gently and shape it into a ball.
- Refrigerate the Dough: Place the shaped dough in an airtight container or tightly wrap it in plastic wrap. Refrigerate for up to 24 hours. The cool temperature will slow down fermentation while preserving its aromatic dill flavor.
- Bringing Dough Back to Room Temperature: Before shaping and baking, remove the dough from the refrigerator and let it rest on the counter for about 30 to 60 minutes. This allows it to come to room temperature and rise slightly, preparing it for the next steps.
Freezing Dill Dough
For longer storage, freezing is an excellent option. This method keeps the dough fresh for weeks. Follow these simple instructions:
- Shape Before Freezing: After the first rise, shape the dough into your desired form—whether rolls, a loaf, or a flatbread.
- Pre-Freeze (Optional): Place the shaped dough on a parchment-lined baking sheet and freeze until firm (1-2 hours). This step helps the dough maintain its shape during storage.
- Wrap and Freeze: Wrap the shaped dough tightly in plastic wrap and then in aluminum foil to prevent freezer burn. Label and date it for easy tracking.
- Freeze Duration: For best quality, use the frozen dill dough within 2 months. Beyond this, the flavor and texture may diminish.
Thawing and Baking Frozen Dough
Thawing the dough correctly is crucial for achieving the intended fluffy texture and herby aroma.
- Overnight Thawing: Transfer the frozen dough to the refrigerator and let it thaw slowly overnight.
- Room Temperature Resting: After thawing, allow the dough to sit at room temperature for about 1-2 hours to complete the rise before baking.
- Baking: Proceed with the usual baking instructions, adding dill topping as directed.
Storing Baked Dill Dough
Properly storing baked dill rolls or loaves ensures they remain fresh and flavorful longer:
- Room Temperature: Store baked goods in an airtight container or tightly wrapped in plastic for up to 3 days. Add a small slice of bread to the container to retain moisture.
- Refrigeration: For longer storage, refrigerate baked items in an airtight container for up to 1 week. Reheat in the oven or microwave for a fresh-out-of-the-oven experience.
- Freezing Baked Goods: Wrap cooled rolls or slices tightly in plastic wrap and aluminum foil. Freeze for up to 3 months. Thaw in the refrigerator or at room temperature, then warm in the oven before serving.
Quick Reference for Storage Methods
| Storage Method | Duration | Additional Notes |
|---|---|---|
| Refrigerate Raw Dough | Up to 24 hours | Let dough return to room temp before baking. |
| Freeze Raw Shaped Dough | Up to 2 months | Thaw overnight in the refrigerator before baking. |
| Store Baked Goods (Room Temp) | Up to 3 days | Use airtight containers to retain freshness. |
| Refrigerate Baked Goods | Up to 1 week | Reheat before serving for best results. |
| Freeze Baked Goods | Up to 3 months | Thaw and warm before consuming for optimal flavor. |
By following these make-ahead and storage instructions, we can enjoy the fresh, flavorful dill dough at our convenience without missing out on its delightful tang and herby aroma. Remember, proper storage is key to preserving its fluffy texture and rich taste.
Conclusion
Dill dough brings a delightful twist to traditional baking, combining soft textures with vibrant, herby flavors. Its versatility makes it a go-to choice for rolls, loaves, flatbreads, and more, all while adding a touch of sophistication to any meal.
With the right tools, fresh ingredients, and a little patience, we can create fragrant, golden-baked goods that impress every time. Whether served fresh, stored for later, or paired with creative toppings, dill dough is a recipe worth mastering.
Frequently Asked Questions
What is dill dough?
Dill dough is a herby, tangy bread dough infused with fresh dill, garlic, lemon zest, and sour cream. It offers a refreshing twist to traditional bread, making it perfect for rolls, loaves, flatbreads, or as a savory base for various toppings.
What ingredients are needed to make dill dough?
Essential ingredients include all-purpose flour, active dry yeast, warm water, olive oil, granulated sugar, salt, fresh dill, sour cream, minced garlic, lemon zest, and melted unsalted butter.
Can I make dill dough ahead of time?
Yes, dill dough can be prepared in advance. After the first rise, refrigerate it for up to 24 hours or freeze it for longer storage. Thaw and bake as instructed to retain flavor and texture.
How do I knead dill dough without a stand mixer?
If you don’t have a stand mixer, knead the dough by hand on a clean, floured surface for 8-10 minutes until smooth and elastic. Ensure the dough isn’t too sticky during the process.
How do I incorporate the dill mixture into the dough?
Prepare the dill mixture separately, then fold it evenly into the risen dough before shaping it into rolls, loaves, or flatbreads to distribute the flavor.
What temperature should I bake dill dough at?
Preheat the oven to 375°F (190°C) and bake the dill dough according to its shape—e.g., 20-25 minutes for rolls or 30-35 minutes for loaves. Look for a golden crust as a doneness indicator.
How should I store baked dill dough?
Store baked dill goods in an airtight container at room temperature for 2-3 days. Refrigerate for up to a week or freeze for longer storage to maintain freshness.
Can I use dried dill instead of fresh?
Fresh dill is recommended for maximum flavor, but you can substitute dried dill if necessary. Use approximately 1/3 of the amount specified for fresh dill.
What dishes pair well with dill bread?
Dill bread complements soups, sandwiches, dips, and cheese boards. It also works well as a toasted base for breakfast dishes like poached eggs or avocado.
How do I prevent the dough from sticking to my hands or surface?
Lightly flour your hands, the surface, and tools to prevent sticking during kneading and shaping. Using parchment paper during baking also helps prevent sticking.
How do I know if the yeast is activated properly?
Activated yeast will form a bubbly, frothy layer on the surface of the warm water and sugar mixture within 5-10 minutes. If this doesn’t happen, the yeast may be inactive.
Can I freeze unused dill dough?
Yes, freeze unused dough after the first rise in a well-sealed container. Thaw it overnight in the refrigerator before shaping, rising, and baking as instructed.
How do I achieve a golden crust on dill bread?
Before baking, brush the dough with melted butter or an egg wash mixture. This helps create a beautifully golden, glossy crust.
Why is my dough not rising properly?
If your dough isn’t rising, the yeast might be expired, or the temperature may be too cold. Ensure water is warm but not hot (around 100-110°F) for yeast activation.