
There’s something truly special about a classic pecan pie, and Dear Abby’s recipe has stood the test of time for a reason. This beloved dessert is a staple at holiday gatherings, bringing a perfect balance of sweetness and crunch to the table. It’s one of those recipes that feels like a warm hug, reminding us of cherished family traditions and the joy of sharing good food.
What makes Dear Abby’s pecan pie so memorable is its simplicity and rich flavor. With just a handful of pantry staples, we can whip up a pie that’s both elegant and comforting. Whether you’re a seasoned baker or trying your hand at pecan pie for the first time, this recipe is foolproof and sure to impress. Let’s dive into this timeless treat that has graced countless tables and continues to win hearts with every bite.
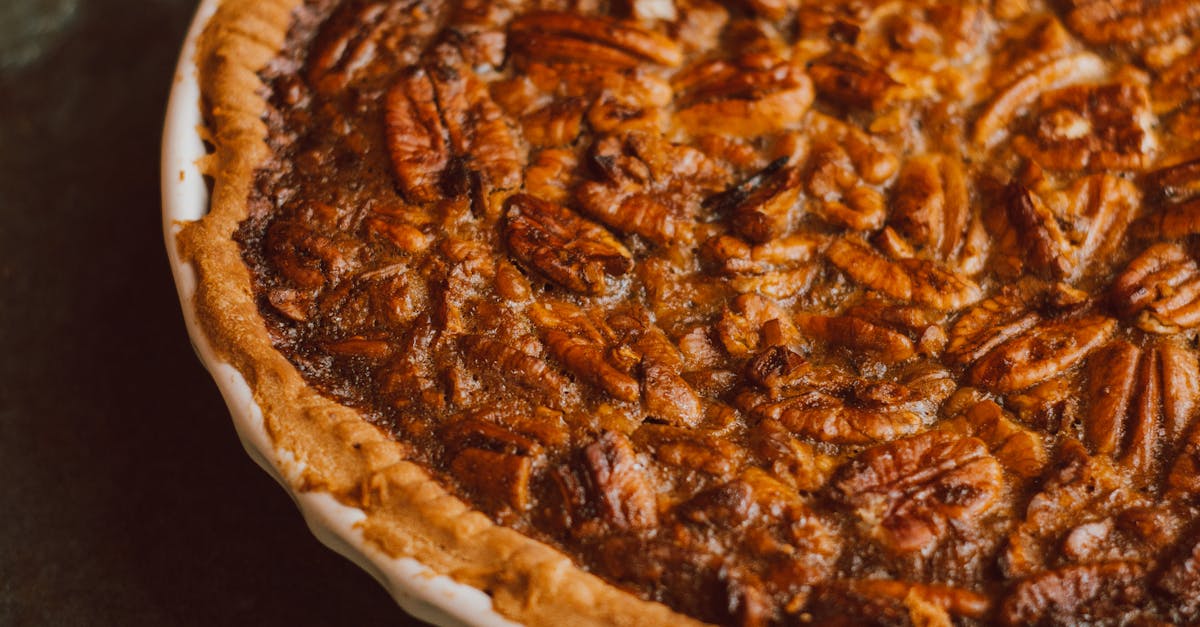
Dear Abby’s Pecan Pie Recipe
Dear Abby’s pecan pie recipe stands out as a time-honored treasure, blending a perfect harmony of sweet, nutty, and buttery flavors—all wrapped up in a golden crust. Let’s dive into the steps to create this iconic dessert. This recipe is perfect for both seasoned bakers and beginners. Gather your ingredients and follow these steps to recreate this classic at home.
Ingredients
Here’s what you’ll need to prepare Dear Abby’s pecan pie:
- 1 cup light corn syrup
- 1 cup granulated sugar
- 3 large eggs, lightly beaten
- 2 tablespoons unsalted butter, melted
- 1 teaspoon vanilla extract
- 1 1/2 cups pecan halves
- 1 store-bought or homemade 9-inch pie crust, unbaked
Tip: Toasting the pecans briefly in the oven enhances their natural flavor.
Instructions
- Preheat the oven. Set your oven to 350°F (175°C) and let it fully heat while you prepare your filling.
- Prepare the filling. In a large mixing bowl, whisk together the light corn syrup, granulated sugar, beaten eggs, melted butter, and vanilla extract until smooth and fully combined. The mixture should appear thick and slightly glossy.
- Arrange the pecans. Place the pecan halves evenly across the bottom of the unbaked pie shell. This step ensures a uniform and decorative layer of nuts on the top once baked.
- Pour the filling. Carefully pour the prepared mixture over the pecans, ensuring the nuts are well-coated and begin to float to the top.
- Bake the pie. Place the pie on the center rack of the oven and bake for 50 to 60 minutes, or until the filling is set and jiggles slightly in the center. Over-baking may cause the filling to crack, so keep an eye on it during the last 10 minutes.
- Cool the pie. Remove the pie from the oven and let it cool on a wire rack for at least 2 hours. Cooling ensures the filling fully sets.
Baking Notes
| Step | Details |
|---|---|
| Oven Temperature | Bake at 350°F (175°C) |
| Baking Duration | 50 to 60 minutes, until the filling is set |
| Cooling Time | At least 2 hours at room temperature |
Pro Tip: Use a pie shield or foil to cover the edges of the crust halfway through baking if it starts to brown too quickly.
Serving Suggestions
Serve Dear Abby’s pecan pie slightly warm or at room temperature. A dollop of whipped cream or a scoop of vanilla ice cream adds the perfect finishing touch to this already indulgent dessert. This pie is a guaranteed crowd-pleaser for holidays or any special occasion.
Ingredients
To craft Dear Abby’s irresistible pecan pie, we’ll need a curated set of simple yet impactful ingredients. Each plays a vital role in creating that perfect harmony of sweetness and crunch. Gather the following items before we begin:
- 1 cup light corn syrup
- 1 cup granulated sugar
- 3 large eggs, beaten
- 2 tablespoons unsalted butter, melted and slightly cooled
- 1 teaspoon vanilla extract
- 1 1/2 cups pecan halves
- 1 unbaked 9-inch pie crust (store-bought or homemade, your choice)
Ingredient Prep Notes:
- Ensure the unsalted butter is melted but cooled slightly to avoid cooking the eggs.
- When selecting pecans, look for fresh, high-quality halves for the best texture and flavor. Lightly toasting them can elevate the pie’s nuttiness.
- Use a high-quality vanilla extract to infuse a rich aroma and depth into the filling.
Tools And Equipment
To successfully bake Dear Abby’s Pecan Pie and achieve that perfect golden crust with a rich, nutty filling, we’ll need the right tools and equipment. Setting up our workspace beforehand ensures a smoother baking experience. Below is a detailed list of the essential tools you’ll want to have on hand:
Essential Tools
- Mixing bowl: A large bowl for combining the filling ingredients effortlessly.
- Whisk or fork: For beating the eggs and smoothly blending all the wet ingredients.
- Measuring cups and spoons: Accurate measurement is essential for the perfect balance of sweetness in the pie.
- Rubber or silicone spatula: Helps scrape every last bit of filling to avoid waste.
- Pie dish: A 9-inch pie dish works best for evenly baking and presenting this classic dessert.
- Baking sheet: Placed under the pie dish to catch any spills and make cleanup easier.
- Cooling rack: Allows the pie to cool evenly, preventing a soggy crust.
- Pastry brush (optional): Useful if we want to brush the crust edges with an egg wash for added shine.
Additional Tools for Convenience
- Small saucepan: Handy for melting the butter evenly without burning.
- Nutcracker (if using whole pecans): For those of us opting to crack our fresh pecans rather than using pre-shelled ones.
- Sharp knife: To neatly slice the pie for serving.
- Toaster or baking sheet: To toast the pecans lightly before adding them to the filling, which helps enhance their flavor.
Quick Reference Table
| Tool | Purpose | Notes |
|---|---|---|
| Mixing bowl | Combine filling ingredients | A medium-to-large-sized bowl is ideal. |
| Whisk | Beat eggs and mix smoothly | Alternatively, use a fork if unavailable. |
| Measuring cups & spoons | Ensure precise ingredient proportions | Important for consistent results. |
| 9-inch pie dish | Bake the pecan pie evenly | Glass or ceramic dishes work well. |
| Baking sheet | Catch spills, ease handling | Use one large enough for the pie dish. |
| Cooling rack | Cool pie evenly, avoid soggy crust | Essential for post-baking. |
| Silicone spatula | Scrape filling without waste | Flexible spatula ensures no leftovers. |
| Small saucepan | Melt butter evenly | Ensure it is clean and dry before use. |
Directions
Let’s dive into crafting Dear Abby’s Pecan Pie. Follow these clear, step-by-step instructions to guarantee a delightful, golden-brown dessert that’s both indulgent and crowd-pleasing.
Prep
- Preheat the oven to 350°F (177°C). Adjust the oven rack to the middle position for even baking.
- Place a baking sheet on the rack. Baking the pie on this sheet catches any drips while also helping to distribute heat evenly.
- Prepare your 9-inch pie crust: If using a pre-made crust, ensure it’s thawed. For homemade, roll it out evenly and transfer it into the pie dish, crimping the edges as desired. Chill the crust in the refrigerator to maintain its shape during baking.
Make The Filling
- In a large mixing bowl, whisk together:
- 3 large eggs (room temperature).
- 1 cup light corn syrup.
- 1 cup granulated sugar.
- Pour in 2 tablespoons melted, slightly cooled butter, followed by 1 teaspoon vanilla extract. Mix until the ingredients are fully combined.
- Gently fold in *1 1/4 cups pecan halves, ensuring they are evenly coated in the mixture. For added flavor, opt for pecans that have been lightly toasted.
Assemble The Pie
- Carefully pour the prepared pecan filling into the chilled pie crust. Spread the pecan halves evenly, arranging them in a decorative layer on top if you wish.
- For added shine, use a pastry brush to lightly glaze the crust edges with a beaten egg yolk or milk. This will create a beautifully golden finish.
Bake The Pie
- Place the pie on top of the preheated baking sheet. Bake in the oven at 350°F (177°C) for 50-60 minutes. Keep an eye on the edges of the crust. If they brown too quickly, cover them with foil or use a pie crust shield.
| Time | Task/Checkpoint |
|---|---|
| 35 minutes | Check if the edges are over-browning. Shield if needed. |
| 50 minutes | Gently shake the pie. The center should have a slight jiggle but no liquid movement. Baked to perfection. |
- Remove the pie from the oven and place it on a cooling rack. Allow it to cool for at least 2 hours. This time is essential for the filling to set properly and make slicing easier.
Make-Ahead Instructions
Preparing Dear Abby’s Pecan Pie in advance is a smart way to save time during busy holidays or special occasions. Follow these simple steps to ensure your pie stays fresh and maintains its delightful texture and flavor:
Preparing the Pie Ahead
- Bake the pie as instructed in the recipe. Allow it to cool completely on a cooling rack.
- Once cooled, cover the pie tightly with plastic wrap or aluminum foil to prevent air exposure.
- For short-term storage, the pie can be kept at room temperature for up to 2 days. Make sure it is stored in a cool, dry place.
Refrigeration Option
- For longer storage, transfer the wrapped pie to the refrigerator. Properly stored, the pecan pie will remain fresh for up to 4 days. Place it on a flat surface to avoid disturbing the filling.
Freezing Instructions
If you need to prepare well in advance, freezing is an excellent option:
- After the pie cools completely, cover it tightly with a layer of plastic wrap, followed by a layer of aluminum foil to lock in freshness.
- Label the package with the date for easy tracking.
- Store the pie flat in the freezer for up to 3 months.
Thawing and Reheating the Pie
- To thaw, transfer the frozen pie to the refrigerator and let it sit overnight.
- If you prefer serving the pie warm, preheat the oven to 300°F (150°C). Remove the covering, place the pie on a baking sheet, and warm it in the oven for 10-15 minutes. This helps restore its freshly baked aroma and slightly melts the filling for that perfect texture.
Storage and Make-Ahead Quick Reference Table
| Storage Type | Duration | Notes |
|---|---|---|
| Room Temperature | Up to 2 days | Cover tightly and store in a cool, dry place to maintain freshness. |
| Refrigerated | Up to 4 days | Ensure the pie is covered to prevent it from absorbing odors. |
| Frozen | Up to 3 months | Wrap securely and label with the date for long-term storage. |
Tips For The Perfect Pecan Pie
Crafting the perfect pecan pie requires more than just following the recipe; it’s about understanding the details that ensure this nutty, sweet treat turns out flawlessly every time. Here are our top expert tips to elevate Dear Abby’s classic pecan pie to greatness:
1. Choose High-Quality Pecans
Opt for fresh, whole pecan halves for the best texture and flavor. Lightly toast them before incorporating them into the filling. Toasting brings out their natural oils, enhancing the nuttiness and giving the pie a deeper flavor. To toast:
- Spread the pecans in a single layer on a baking sheet.
- Bake at 350°F for 5-7 minutes, checking frequently to avoid burning.
2. Prepare the Pie Crust Properly
A buttery, flaky crust is the foundation of a great pecan pie. Use chilled dough and handle it minimally to prevent overworking. Blind-bake the crust if you prefer a crispier base, particularly if your filling is particularly wet.
If you’re using a homemade crust:
- Roll the dough evenly to avoid an uneven bake.
- Press the edges carefully into the pie dish for decorative crimping.
For ready-made crusts, ensure it fits snugly into the pie dish without stretching to avoid shrinkage during baking.
3. Mix Ingredients Thoroughly But Gently
When preparing the filling, make sure ingredients like eggs, sugar, and light corn syrup are fully combined for a smooth, uniform texture. Avoid overmixing; excessive air can create bubbles or cracks in the baked filling. Use a rubber spatula or whisk to blend until just combined.
4. Prevent Over-Browning
The edges of your crust can burn before the filling sets. Protect it by covering with aluminum foil or a pie crust shield after about 20 minutes of baking.
If the filling appears to brown too quickly, you can lightly cover the top with foil midway through baking to maintain the golden, caramelized appearance.
5. Test for Doneness
It’s essential to know when your pie is baked to perfection. The filling should be set yet slightly jiggly in the center upon removal from the oven. Insert a butter knife about 1 inch from the edge—if it comes out clean, it’s ready.
6. Allow the Pie to Cool
Let your pecan pie cool completely before slicing to ensure a clean, smooth cut. The cooling process allows the filling to fully set, preventing a runny texture. Cool the pie on a wire rack for at least 2 hours.
7. Store Correctly for Maximum Freshness
Proper storage preserves the flavor and texture of your pie. Refer to the table below for optimal storage methods:
| Storage Method | Time Frame | Instructions |
|---|---|---|
| Room Temperature | Up to 2 days | Cover loosely with foil or plastic wrap to keep fresh. |
| Refrigeration | Up to 4 days | Store in an airtight container or wrap securely. Serve cold or reheat. |
| Freezing | Up to 3 months | Wrap the cooled pie in plastic and foil. Thaw overnight in the refrigerator. |
8. Enhance with Garnishes
Take your pie to the next level by adding a garnish. Top with whipped cream, vanilla ice cream, or even a drizzle of chocolate syrup for a decadent twist. Chopped pecans or powdered sugar also make excellent finishing touches.
These tips ensure that Dear Abby’s pecan pie turns out beautifully every time, showcasing its irresistible sweet, nutty, and buttery flavor.
Conclusion
Dear Abby’s pecan pie recipe is more than just a dessert; it’s a celebration of tradition and flavor that brings people together. With its straightforward steps and rich, nutty filling, this recipe transforms simple ingredients into something truly special.
Whether you’re preparing it for a holiday gathering or a casual family dinner, this pie never fails to impress. It’s a timeless classic that invites us to slow down, savor each bite, and create lasting memories with loved ones.
Frequently Asked Questions
What makes Dear Abby’s pecan pie recipe special?
Dear Abby’s pecan pie recipe is beloved for its perfect balance of sweetness and crunch, simplicity, and nostalgic appeal. It’s easy to make, even for beginners, and consistently produces a rich, flavorful dessert.
What ingredients do I need to make the pie?
You will need light corn syrup, granulated sugar, eggs, unsalted butter, vanilla extract, pecans, and a pie crust. Using fresh, high-quality pecans and premium vanilla extract is recommended for the best flavor.
How do I ensure the pie doesn’t over-brown?
To prevent over-browning, loosely cover the pie with aluminum foil during the last 10-15 minutes of baking. This protects the crust while the filling finishes setting.
Can I make this pecan pie in advance?
Yes, the pie can be made ahead! You can store it at room temperature for up to 2 days, refrigerate for up to 4 days, or freeze for up to 3 months. Thaw and reheat it before serving for a fresh taste.
Should I toast the pecans before adding them?
Lightly toasting the pecans enhances their nuttiness and flavor. Be careful not to over-toast them, as they might become bitter. Cool them completely before adding to the filling.
How do I check the pie’s doneness?
The pie is done when the filling has set but still jiggles slightly in the center. A knife inserted near the center should come out clean or with minimal filling.
What tools do I need to bake this pie?
Essential tools include a mixing bowl, whisk, rubber spatula, measuring cups/spoons, 9-inch pie dish, baking sheet, and cooling rack. Optional items include a pastry brush and nutcracker.
Can I freeze the pecan pie?
Yes, pecan pie freezes well! Wrap it tightly in plastic wrap and aluminum foil before freezing for up to 3 months. Thaw overnight in the fridge and warm it in the oven before serving.
How should I serve the pecan pie?
Serve the pie slightly warm or at room temperature. For an elevated experience, garnish with whipped cream, vanilla ice cream, or a drizzle of caramel sauce.
What is the best way to store leftovers?
Store leftover pie in an airtight container. Keep it at room temperature for up to 2 days or refrigerated for up to 4 days. For longer storage, freeze it properly.
Is this recipe suitable for beginners?
Yes! The clear, step-by-step instructions make it approachable for both novice and experienced bakers. It’s a straightforward recipe with rewarding results.